Operating Guide
Page 20
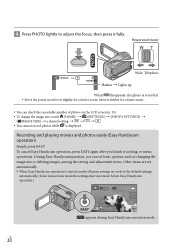
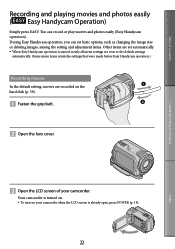
... deleting images, among the setting and adjustment items. Other items are set automatically. When Easy Handycam operation is started, nearly all menu settings are reset to the default settings automatically. (Some menu items retain the settings that were made before Easy Handycam operation.) appears during Easy Handycam operation mode.
... deleting images, among the setting and adjustment items. Other items are set automatically. When Easy Handycam operation is started, nearly all menu settings are reset to the default settings automatically. (Some menu items retain the settings that were made before Easy Handycam operation.) appears during Easy Handycam operation mode.
Operating Guide
Page 46
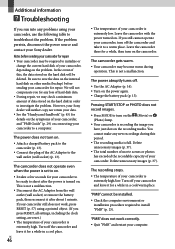
... settings, including the clock setting, are reset.) The temperature of your camcorder is extremely high. Notes before sending your camcorder for your camcorder, turn on . In the event of data stored on the problem. If your camcorder still does not work correctly. Quit "PMB" and restart your Sony dealer. US 46 The temperature...
... settings, including the clock setting, are reset.) The temperature of your camcorder is extremely high. Notes before sending your camcorder for your camcorder, turn on . In the event of data stored on the problem. If your camcorder still does not work correctly. Quit "PMB" and restart your Sony dealer. US 46 The temperature...
Operating Guide
Page 57
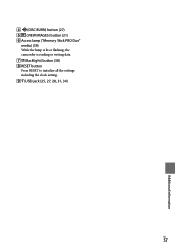
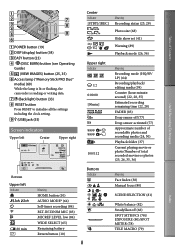
(DISC BURN) button (27) (VIEW IMAGES) button (21) Access lamp ("Memory Stick PRO Duo" media) (39) While the lamp is lit or flashing, the camcorder is reading or writing data. (Backlight) button (38) RESET button Press RESET to initialize all the settings including the clock setting. (USB) jack (25, 27, 28, 31, 34) US 57 Additional information
(DISC BURN) button (27) (VIEW IMAGES) button (21) Access lamp ("Memory Stick PRO Duo" media) (39) While the lamp is lit or flashing, the camcorder is reading or writing data. (Backlight) button (38) RESET button Press RESET to initialize all the settings including the clock setting. (USB) jack (25, 27, 28, 31, 34) US 57 Additional information
Operating Guide
Page 58
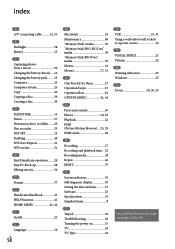
... 19, 22 Playback 21 PMB (Picture Motion Browser)....25, 29 PMB Guide 29 R Recording 17 Recording and playback time....52 Recording media 38 Repair 46 RESET 57 S Screen indicators 55 Self-diagnosis display 47 Setting the date and time...........15 Software 25 Specifications 51 Supplied items 8 T Tripod 38 Troubleshooting 46 Turning...
... 19, 22 Playback 21 PMB (Picture Motion Browser)....25, 29 PMB Guide 29 R Recording 17 Recording and playback time....52 Recording media 38 Repair 46 RESET 57 S Screen indicators 55 Self-diagnosis display 47 Setting the date and time...........15 Software 25 Specifications 51 Supplied items 8 T Tripod 38 Troubleshooting 46 Turning...
Handycam® Handbook
Page 8
..., 35) Access lamp ("Memory Stick PRO Duo" media) (60) While the lamp is lit or flashing, the camcorder is reading or writing data. (Back light) button (33) RESET button Press RESET to initialize all the settings including the clock setting. (USB) jack (55) Screen indicators Upper left...
..., 35) Access lamp ("Memory Stick PRO Duo" media) (60) While the lamp is lit or flashing, the camcorder is reading or writing data. (Back light) button (33) RESET button Press RESET to initialize all the settings including the clock setting. (USB) jack (55) Screen indicators Upper left...
Handycam® Handbook
Page 22
...the setting and adjustment items. Other items are set automatically. When Easy Handycam operation is started, nearly all menu settings are reset to the default settings automatically. (Some menu items retain the settings that were made before Easy Handycam operation.) Recording movies In the ...default setting, movies are recorded on your camcorder. Table of your camcorder when the LCD screen is already open, press POWER (p. 19). 22 Index During Easy Handycam operation, you can record or...
...the setting and adjustment items. Other items are set automatically. When Easy Handycam operation is started, nearly all menu settings are reset to the default settings automatically. (Some menu items retain the settings that were made before Easy Handycam operation.) Recording movies In the ...default setting, movies are recorded on your camcorder. Table of your camcorder when the LCD screen is already open, press POWER (p. 19). 22 Index During Easy Handycam operation, you can record or...

Handycam® Handbook
Page 68
... (SETTINGS) [PHOTO SETTINGS] [FILE NO.] a desired setting SERIES RESET Assigns file numbers of still images to be recorded (640 × 360). Allows the maximum number of photos to be recorded (640 × 480).... 68 Steps (HOME) (SETTINGS) [PHOTO SETTINGS] [ setting IMAGE SIZE] a desired DCR-SR47/SR48/SR67 VGA(0.3M) ( ) 0.2M ( ) Records photos clearly (640 × 480). Records photos clearly in sequence, following the largest file ...
... (SETTINGS) [PHOTO SETTINGS] [FILE NO.] a desired setting SERIES RESET Assigns file numbers of still images to be recorded (640 × 360). Allows the maximum number of photos to be recorded (640 × 480).... 68 Steps (HOME) (SETTINGS) [PHOTO SETTINGS] [ setting IMAGE SIZE] a desired DCR-SR47/SR48/SR67 VGA(0.3M) ( ) 0.2M ( ) Records photos clearly (640 × 480). Records photos clearly in sequence, following the largest file ...
Handycam® Handbook
Page 84
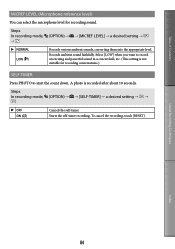
... PHOTO to record an exciting and powerful sound in a concert hall, etc. (This setting is recorded after about 10 seconds. To cancel the recording, touch [RESET]. Steps In recording mode, (OPTION) [MICREF LEVEL] a desired setting NORMAL LOW ( ) Records various ambient sounds, converting them into the...
... PHOTO to record an exciting and powerful sound in a concert hall, etc. (This setting is recorded after about 10 seconds. To cancel the recording, touch [RESET]. Steps In recording mode, (OPTION) [MICREF LEVEL] a desired setting NORMAL LOW ( ) Records various ambient sounds, converting them into the...
Handycam® Handbook
Page 85
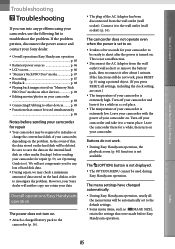
...Overall operations/Easy Handycam operation The power does not turn on your camcorder. If the functions still do not work , press RESET (p. 8) using your camcorder, use the following list to troubleshoot the problem. Leave the camcorder there for repair (p. 53, see Operating Guide too). We will ...p. 89 Notes before Easy Handycam operation. However, your Sony dealer will be deleted. Leave your camcorder with the power of your camcorder to be ready to shoot after about 1 minute. Index 85 Turn off your camcorder and take it after the power is extremely high. ...
...Overall operations/Easy Handycam operation The power does not turn on your camcorder. If the functions still do not work , press RESET (p. 8) using your camcorder, use the following list to troubleshoot the problem. Leave the camcorder there for repair (p. 53, see Operating Guide too). We will ...p. 89 Notes before Easy Handycam operation. However, your Sony dealer will be deleted. Leave your camcorder with the power of your camcorder to be ready to shoot after about 1 minute. Index 85 Turn off your camcorder and take it after the power is extremely high. ...
Handycam® Handbook
Page 106
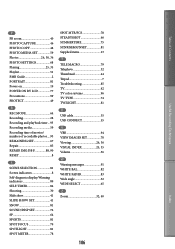
... playback time....93 Recording media 59 Recording time of movies/ number of recordable photos....93 REMAINING SET 67 Repair 85 REPAIR IMG.DB F 88, 90 RESET 8 S SCENE SELECTION 81 Screen indicators 8 Self-diagnosis display/Warning indicators 89 SELF-TIMER 84 Shooting 30 Slide show 41 SLIDE SHOW SET 41 SNOW 81...
... playback time....93 Recording media 59 Recording time of movies/ number of recordable photos....93 REMAINING SET 67 Repair 85 REPAIR IMG.DB F 88, 90 RESET 8 S SCENE SELECTION 81 Screen indicators 8 Self-diagnosis display/Warning indicators 89 SELF-TIMER 84 Shooting 30 Slide show 41 SLIDE SHOW SET 41 SNOW 81...


