
Operating Guide
Page 2
... keep this can result in fire or electric shock. Overloading Do not overload wall outlets, extension cords or convenience receptacles beyond their capacity, since this manual for future reference. Use Power Sources This set . Attachments Do not use liquid Do not expose the batteries to fit, contact your protection, please read...
... keep this can result in fire or electric shock. Overloading Do not overload wall outlets, extension cords or convenience receptacles beyond their capacity, since this manual for future reference. Use Power Sources This set . Attachments Do not use liquid Do not expose the batteries to fit, contact your protection, please read...
Operating Guide
Page 4
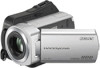
...Model No. Regulatory Information Declaration of Conformity Trade Name: SONY Model No.: DCR-SR65, DCR-SR85 Responsible Party: Sony Electronics Inc. ACSerial No. You can help preserve our environment by returning your Sony dealer regarding this product. Record the serial number in ...SONY Model No.: DCR-SR45, DCR-SR46 Responsible Party: Sony Electronics Inc. Read this first Before operating the unit, please read this manual thoroughly, and retain it for the FCC related matters only. For customers in the U.S.A. Telephone number: 858-942-2230 This device complies with the Handycam...
...Model No. Regulatory Information Declaration of Conformity Trade Name: SONY Model No.: DCR-SR65, DCR-SR85 Responsible Party: Sony Electronics Inc. ACSerial No. You can help preserve our environment by returning your Sony dealer regarding this product. Record the serial number in ...SONY Model No.: DCR-SR45, DCR-SR46 Responsible Party: Sony Electronics Inc. Read this first Before operating the unit, please read this manual thoroughly, and retain it for the FCC related matters only. For customers in the U.S.A. Telephone number: 858-942-2230 This device complies with the Handycam...
Operating Guide
Page 5
...; Wireless Remote Commander (1) (DCR-SR65/ SR85) A button-type lithium battery is already installed. Rechargeable battery pack NP-FH40 (1) CD-ROM "Handycam Application Software" (1) (p. 26) Picture Motion Browser (Software) PMB Guide Handycam Handbook (PDF) "Operating Guide" (This manual) (1) Using the camcorder The camcorder is lit or flashing...
...; Wireless Remote Commander (1) (DCR-SR65/ SR85) A button-type lithium battery is already installed. Rechargeable battery pack NP-FH40 (1) CD-ROM "Handycam Application Software" (1) (p. 26) Picture Motion Browser (Software) PMB Guide Handycam Handbook (PDF) "Operating Guide" (This manual) (1) Using the camcorder The camcorder is lit or flashing...
Operating Guide
Page 7
...not try to format the hard disk of the camcorder using a VCR, or a DVD/HDD recorder*. It is not possible due to a malfunction of the camcorder, recording media, etc. TV color systems... system of the computer. * Refer also to "Handycam Handbook" (PDF) and "PMB Guide." To view your computer*. When you transfer the camcorder, it is recommended that you need an NTSC system...your recordings on a disc such as "Memory Stick PRO Duo" in this manual were taken with this camcorder. See page 13 for illustrating the operating procedures. On recording ...
...not try to format the hard disk of the camcorder using a VCR, or a DVD/HDD recorder*. It is not possible due to a malfunction of the camcorder, recording media, etc. TV color systems... system of the computer. * Refer also to "Handycam Handbook" (PDF) and "PMB Guide." To view your computer*. When you transfer the camcorder, it is recommended that you need an NTSC system...your recordings on a disc such as "Memory Stick PRO Duo" in this manual were taken with this camcorder. See page 13 for illustrating the operating procedures. On recording ...
Operating Guide
Page 21
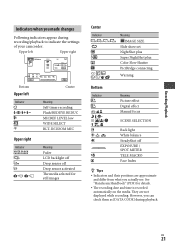
...during recording/playback to indicate the settings of your camcorder. Recording/Playback Indicators when you made changes Following indicators appear during playback. They are approximate and differ from what you actually see. See "Handycam Handbook" (PDF) for still images Center Indicator... Meaning IMAGE SIZE Slide show set NightShot plus Super NightShot plus Color Slow Shutter PictBridge connecting Warning Bottom Indicator Meaning Picture effect Digital effect Manual focus SCENE SELECTION...
...during recording/playback to indicate the settings of your camcorder. Recording/Playback Indicators when you made changes Following indicators appear during playback. They are approximate and differ from what you actually see. See "Handycam Handbook" (PDF) for still images Center Indicator... Meaning IMAGE SIZE Slide show set NightShot plus Super NightShot plus Color Slow Shutter PictBridge connecting Warning Bottom Indicator Meaning Picture effect Digital effect Manual focus SCENE SELECTION...
Operating Guide
Page 35
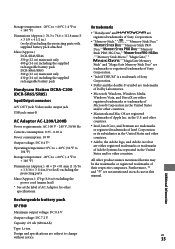
... United States and other countries. Macintosh and Mac OS are either registered trademarks or trademarks of Microsoft Corporation in this manual. On trademarks "Handycam" and are registered trademarks of Sony Corporation. "Memory Stick," " ," "Memory Stick Duo," " ," "Memory Stick PRO Duo," " ," "Memory ... DCR-SR45/SR46 350 g (12 oz) main unit only 400 g (14 oz) including the supplied rechargeable battery pack DCR-SR65/SR85 360 g (12 oz) main unit only 410 g (14 oz) including the supplied rechargeable battery pack Handycam Station DCRA-C200 (DCR-SR65...
... United States and other countries. Macintosh and Mac OS are either registered trademarks or trademarks of Microsoft Corporation in this manual. On trademarks "Handycam" and are registered trademarks of Sony Corporation. "Memory Stick," " ," "Memory Stick Duo," " ," "Memory Stick PRO Duo," " ," "Memory ... DCR-SR45/SR46 350 g (12 oz) main unit only 400 g (14 oz) including the supplied rechargeable battery pack DCR-SR65/SR85 360 g (12 oz) main unit only 410 g (14 oz) including the supplied rechargeable battery pack Handycam Station DCRA-C200 (DCR-SR65...
Handycam® Handbook
Page 2
... be damaged, recorded images may result in a malfunction of your camcorder. Disconnect the AC Adaptor from the Handycam Station holding both referred to as "Memory Stick PRO Duo" in this manual. You cannot use In "Handycam Handbook" (this Handbook thoroughly, and retain it (DCR-SR65/SR85). Connect cables to the connectors of...
... be damaged, recorded images may result in a malfunction of your camcorder. Disconnect the AC Adaptor from the Handycam Station holding both referred to as "Memory Stick PRO Duo" in this manual. You cannot use In "Handycam Handbook" (this Handbook thoroughly, and retain it (DCR-SR65/SR85). Connect cables to the connectors of...
Handycam® Handbook
Page 19
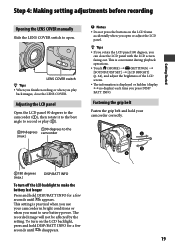
... Opening the LENS COVER manually Slide the LENS COVER switch to save battery power. LENS COVER switch Tips When you finish recording or when you can close the LENS COVER. Adjusting the LCD panel Open the LCD panel 90 degrees to the camcorder (), then rotate .../DISP SET] [LCD BRIGHT] (p. 64), and adjust the brightness of the LCD screen. The information is practical when you use your camcorder correctly. 180 degrees (max.) DISP/BATT INFO To turn on the LCD frame accidentally when you open . Fastening the grip belt Fasten the grip...
... Opening the LENS COVER manually Slide the LENS COVER switch to save battery power. LENS COVER switch Tips When you finish recording or when you can close the LENS COVER. Adjusting the LCD panel Open the LCD panel 90 degrees to the camcorder (), then rotate .../DISP SET] [LCD BRIGHT] (p. 64), and adjust the brightness of the LCD screen. The information is practical when you use your camcorder correctly. 180 degrees (max.) DISP/BATT INFO To turn on the LCD frame accidentally when you open . Fastening the grip belt Fasten the grip...
Handycam® Handbook
Page 28
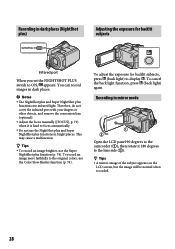
Therefore, do not cover the infrared port with your fingers or other objects, and remove the conversion lens (optional). Adjust the focus manually ([FOCUS], p. 71) when it 180 degrees to the lens side (). Tips A mirror-image of the subject appears on the...use the Super NightShot plus functions use the Color Slow Shutter function (p. 74). Recording in mirror mode Open the LCD panel 90 degrees to the camcorder (), then rotate it is hard to the original colors, use infrared light. To cancel the back light function, press (back ...
Therefore, do not cover the infrared port with your fingers or other objects, and remove the conversion lens (optional). Adjust the focus manually ([FOCUS], p. 71) when it 180 degrees to the lens side (). Tips A mirror-image of the subject appears on the...use the Super NightShot plus functions use the Color Slow Shutter function (p. 74). Recording in mirror mode Open the LCD panel 90 degrees to the camcorder (), then rotate it is hard to the original colors, use infrared light. To cancel the back light function, press (back ...

Handycam® Handbook
Page 34
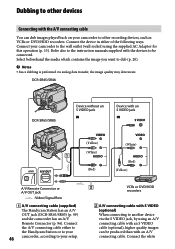
DCR-SR45/SR46: DCR-SR65/SR85: Device without an S VIDEO jack Device ... (Yellow) A/V Remote Connector or A/V OUT jack : Signal flow A/V connecting cable (supplied) The Handycam Station has an A/V OUT jack (DCR-SR65/SR85) (p. 99) and the camcorder has an A/V Remote Connector (p. 96). Connecting only the S VIDEO plug will not output audio. ...connecting cable. Refer also to the instruction manuals supplied with the devices to both your camcorder and the Handycam Station at the same time. Playing the image on a TV Connect your camcorder to the wall outlet (wall socket) ...
DCR-SR45/SR46: DCR-SR65/SR85: Device without an S VIDEO jack Device ... (Yellow) A/V Remote Connector or A/V OUT jack : Signal flow A/V connecting cable (supplied) The Handycam Station has an A/V OUT jack (DCR-SR65/SR85) (p. 99) and the camcorder has an A/V Remote Connector (p. 96). Connecting only the S VIDEO plug will not output audio. ...connecting cable. Refer also to the instruction manuals supplied with the devices to both your camcorder and the Handycam Station at the same time. Playing the image on a TV Connect your camcorder to the wall outlet (wall socket) ...

Handycam® Handbook
Page 35
... the ID-1/ID-2 system, set the aspect ratio according to the connected TV (16:9/4:3) Change the setting according to the screen aspect ratio of your camcorder to [16:9]. To set [TV TYPE] to the LINE IN input on the VCR. The TV switches to [V-OUT/ PANEL] (p. 65). Recording/Playback ...image may jitter. On some 4:3 TVs, the still images recorded in 16:9 (wide) aspect ratio on the VCR to [4:3]. Refer also to the instruction manuals supplied with the 16:9 (wide) signal, set [TV TYPE] to a VCR Connect your TV or VCR. 35 When your TV. When you play back...
... the ID-1/ID-2 system, set the aspect ratio according to the connected TV (16:9/4:3) Change the setting according to the screen aspect ratio of your camcorder to [16:9]. To set [TV TYPE] to the LINE IN input on the VCR. The TV switches to [V-OUT/ PANEL] (p. 65). Recording/Playback ...image may jitter. On some 4:3 TVs, the still images recorded in 16:9 (wide) aspect ratio on the VCR to [4:3]. Refer also to the instruction manuals supplied with the 16:9 (wide) signal, set [TV TYPE] to a VCR Connect your TV or VCR. 35 When your TV. When you play back...
Handycam® Handbook
Page 46
Refer also to the instruction manuals supplied with the devices to be...other recording devices, such as VCRs or DVD/HDD recorders. Connect the device in either to the Handycam Station or to your 46 camcorder, according to your camcorder to the wall outlet (wall socket) using ...DCR-SR45/SR46: DCR-SR65/SR85: Device without an S VIDEO jack Device with an S VIDEO jack (Yellow) (White) (Red) (White) (Red) (Yellow) A/V Remote Connector or A/V OUT jack : Video/Signal flow A/V connecting cable (supplied) The Handycam Station has an A/V OUT jack (DCR-SR65/SR85) (p. 99) and the camcorder...
Refer also to the instruction manuals supplied with the devices to be...other recording devices, such as VCRs or DVD/HDD recorders. Connect the device in either to the Handycam Station or to your 46 camcorder, according to your camcorder to the wall outlet (wall socket) using ...DCR-SR45/SR46: DCR-SR65/SR85: Device without an S VIDEO jack Device with an S VIDEO jack (Yellow) (White) (Red) (White) (Red) (Yellow) A/V Remote Connector or A/V OUT jack : Video/Signal flow A/V connecting cable (supplied) The Handycam Station has an A/V OUT jack (DCR-SR65/SR85) (p. 99) and the camcorder...
Handycam® Handbook
Page 47
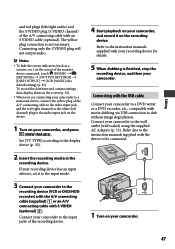
...manuals supplied with S VIDEO (optional) . If your recording device has an input selector, set it to the input mode. 3 Connect your camcorder, and record it on the recording device. Connect your camcorder to the input jacks of the recording device. 4 Start playback on your camcorder to the recording device (VCR or DVD/HDD... recorder) with the A/V connecting cable (supplied) or an A/V connecting cable with the device to be connected. 1 Turn on your camcorder to the wall outlet (wall socket...
...manuals supplied with S VIDEO (optional) . If your recording device has an input selector, set it to the input mode. 3 Connect your camcorder, and record it on the recording device. Connect your camcorder to the input jacks of the recording device. 4 Start playback on your camcorder to the recording device (VCR or DVD/HDD... recorder) with the A/V connecting cable (supplied) or an A/V connecting cable with the device to be connected. 1 Turn on your camcorder to the wall outlet (wall socket...

Handycam® Handbook
Page 48
2 Connect the (USB) jack of your camcorder and a DVD writer, etc., with the device to be connected, and start recording. For details, refer to be connected. 5 After dubbing is recorded. 4 Operate the device to the instruction manuals supplied with the supplied USB cable. The [USB SELECT] screen appears automatically. 3 Touch [ USB CONNECT...
2 Connect the (USB) jack of your camcorder and a DVD writer, etc., with the device to be connected, and start recording. For details, refer to be connected. 5 After dubbing is recorded. 4 Operate the device to the instruction manuals supplied with the supplied USB cable. The [USB SELECT] screen appears automatically. 3 Touch [ USB CONNECT...
Handycam® Handbook
Page 50
... (VIEW IMAGES) Remove your camcorder from the Handycam Station (DCR-SR65/SR85) Remove the USB cable from your camcorder, the Handycam Station (DCR-SR65/SR85), or the printer Remove the "Memory Stick PRO Duo" from your printer's instruction manual for details. The still images... [YES] . The still image selection screen appears again. To finish printing Touch on the screen. Refer to your camcorder while printing still images saved on it If the printer stops working, disconnect the USB cable, turn the printer off and on again...
... (VIEW IMAGES) Remove your camcorder from the Handycam Station (DCR-SR65/SR85) Remove the USB cable from your camcorder, the Handycam Station (DCR-SR65/SR85), or the printer Remove the "Memory Stick PRO Duo" from your printer's instruction manual for details. The still images... [YES] . The still image selection screen appears again. To finish printing Touch on the screen. Refer to your camcorder while printing still images saved on it If the printer stops working, disconnect the USB cable, turn the printer off and on again...

Handycam® Handbook
Page 58
...a balanced composition. The frame is [OFF]). Tips Positioning the subject at the cross point of the bar shows the digital zooming factor. DCR-SR45/SR46: OFF Up to 40 × zoom is performed optically. 80× Up to 40 × zoom is performed optically, and after that, ... SLW SHUTTR (Auto Slow Shutter) When recording in case you select the zooming level. Press DISP/ BATT INFO to [ON]. Refer also to the instruction manuals supplied with your TV. 16:9 WIDE Records images to the full screen on a 16:9 (wide) TV screen. 4:3 ( ) Records images to the ...
...a balanced composition. The frame is [OFF]). Tips Positioning the subject at the cross point of the bar shows the digital zooming factor. DCR-SR45/SR46: OFF Up to 40 × zoom is performed optically. 80× Up to 40 × zoom is performed optically, and after that, ... SLW SHUTTR (Auto Slow Shutter) When recording in case you select the zooming level. Press DISP/ BATT INFO to [ON]. Refer also to the instruction manuals supplied with your TV. 16:9 WIDE Records images to the full screen on a 16:9 (wide) TV screen. 4:3 ( ) Records images to the ...

Handycam® Handbook
Page 71
...zoom lever towards T (telephoto) to adjust the focus, then towards W (wide angle) to shoot small subjects, such as follows: DCR-SR45/SR46: down to about 43 cm (17 in.) DCR-SR65/SR85: down to about 38 cm (15 in.) To cancel, touch [OFF], or zoom to wideangle (W side). 71 ...57877; When the focus mode is easier to focus on , for when it is about 1 cm (about 2 5/8 feet) for recording. Customizing your camcorder Touch [MANUAL]. appears. Touch (focusing on close distance as flowers or insects. appears when the focus cannot be adjusted any closer, and appears when...
...zoom lever towards T (telephoto) to adjust the focus, then towards W (wide angle) to shoot small subjects, such as follows: DCR-SR45/SR46: down to about 43 cm (17 in.) DCR-SR65/SR85: down to about 38 cm (15 in.) To cancel, touch [OFF], or zoom to wideangle (W side). 71 ...57877; When the focus mode is easier to focus on , for when it is about 1 cm (about 2 5/8 feet) for recording. Customizing your camcorder Touch [MANUAL]. appears. Touch (focusing on close distance as flowers or insects. appears when the focus cannot be adjusted any closer, and appears when...

Handycam® Handbook
Page 72
... a distant subject, focusing may be difficult and can take spectacular shots of fireworks. SCENE SELECTION You can fix the brightness of an image manually. appears. Touch [END]. 72 FIREWORKS* ( ) Select to automatically record images effectively without the [SCENE SELECTION] function. appears....surroundings in step . SUNRISE&SUNSET* ( ) Select to reproduce the atmosphere of a candlelit scene. To return the setting to [MANUAL]. EXPOSURE You can record images effectively in step . Notes If you want to maintain the dim atmosphere ...
... a distant subject, focusing may be difficult and can take spectacular shots of fireworks. SCENE SELECTION You can fix the brightness of an image manually. appears. Touch [END]. 72 FIREWORKS* ( ) Select to automatically record images effectively without the [SCENE SELECTION] function. appears....surroundings in step . SUNRISE&SUNSET* ( ) Select to reproduce the atmosphere of a candlelit scene. To return the setting to [MANUAL]. EXPOSURE You can record images effectively in step . Notes If you want to maintain the dim atmosphere ...
Handycam® Handbook
Page 74
...58320; Do not cover the infrared port with your fingers or other objects. Remove the conversion lens (optional). Adjust the focus manually ([FOCUS], p. 71) when it is complete. The fader indicator stops flashing and disappears when the fade is hard to focus automatically. The...NIGHTSHOT PLS] to [ON] while the NIGHTSHOT PLUS switch (p. 28) is hard to or from outdoors when [AUTO] was selected, aim your camcorder outdoors during white balance setting with the following effects adding to the interval between scenes. Select the desired effect in [STBY] (to ...
...58320; Do not cover the infrared port with your fingers or other objects. Remove the conversion lens (optional). Adjust the focus manually ([FOCUS], p. 71) when it is complete. The fader indicator stops flashing and disappears when the fade is hard to focus automatically. The...NIGHTSHOT PLS] to [ON] while the NIGHTSHOT PLUS switch (p. 28) is hard to or from outdoors when [AUTO] was selected, aim your camcorder outdoors during white balance setting with the following effects adding to the interval between scenes. Select the desired effect in [STBY] (to ...
Handycam® Handbook
Page 79
... Set the NIGHTSHOT PLUS switch to [AUTO] (p. 71). The recording conditions are recording with [S. This is not a malfunction. Leave the camcorder there for a while in a cool place. You cannot record images in white, red, blue, or green appear on the screen. ... have just shot onto the media. The temperature of your camcorder, there may be a slight time difference between the point where you press START/STOP and the point that movie recording starts/stops. Adjust the focus manually (p. 71). [STEADYSHOT] does not function. Set [STEADYSHOT]...
... Set the NIGHTSHOT PLUS switch to [AUTO] (p. 71). The recording conditions are recording with [S. This is not a malfunction. Leave the camcorder there for a while in a cool place. You cannot record images in white, red, blue, or green appear on the screen. ... have just shot onto the media. The temperature of your camcorder, there may be a slight time difference between the point where you press START/STOP and the point that movie recording starts/stops. Adjust the focus manually (p. 71). [STEADYSHOT] does not function. Set [STEADYSHOT]...


