Handycam® Handbook
Page 4
...hard disk drive of the camcorder becomes extremely high or extremely low, you may not be possible. • Especially, during recording/playback, do so, your camcorder may also be saved or recorded. Note on operating temperatures • When the temperature of your camcorder. When you save your image data using a VCR, or a DVD/HDD... POWER switch. If you repeat recording/deleting images for a long time, fragmentation of the camcorder. Notes on using the Hard Disk Drive Handycam Save all your recorded images on external media. Note on disposal/transfer • If you...
...hard disk drive of the camcorder becomes extremely high or extremely low, you may not be possible. • Especially, during recording/playback, do so, your camcorder may also be saved or recorded. Note on operating temperatures • When the temperature of your camcorder. When you save your image data using a VCR, or a DVD/HDD... POWER switch. If you repeat recording/deleting images for a long time, fragmentation of the camcorder. Notes on using the Hard Disk Drive Handycam Save all your recorded images on external media. Note on disposal/transfer • If you...
Handycam® Handbook
Page 5
...ratio (16:9 or 4:3) of the recording image ...... 28 Recording the fast action in slow-motion (SMTH SLW REC) (DCR-SR190E/SR200E/SR290E/ SR300E 29 Playback 31 Using PB zoom 33 Searching for desired images by date (Date Index 33 Playing ...recording media (MANAGE HDD/MEMORY) category 49 Formatting the hard disk or the "Memory Stick Duo 49 Checking the hard disk information 50 Preventing data on the hard disk of Contents Read this before operating your camcorder 2 Notes on using the Hard Disk Drive Handycam 4 Subject examples and solutions ..... 7 Enjoying your camcorder Operation flow 8 ...
...ratio (16:9 or 4:3) of the recording image ...... 28 Recording the fast action in slow-motion (SMTH SLW REC) (DCR-SR190E/SR200E/SR290E/ SR300E 29 Playback 31 Using PB zoom 33 Searching for desired images by date (Date Index 33 Playing ...recording media (MANAGE HDD/MEMORY) category 49 Formatting the hard disk or the "Memory Stick Duo 49 Checking the hard disk information 50 Preventing data on the hard disk of Contents Read this before operating your camcorder 2 Notes on using the Hard Disk Drive Handycam 4 Subject examples and solutions ..... 7 Enjoying your camcorder Operation flow 8 ...

Handycam® Handbook
Page 8
...images. x Saving images on a DVD using your camcorder. x Deleting the selected images (p. 38) x Deleting all the images ([ FORMAT], p. 49) 8 Movies are recorded on the hard disk, and still images are recorded on either the hard disk or a "Memory Stick Duo." Delete the image data... that has been saved on your camcorder (p. 23). x Viewing on the LCD screen of your camcorder (p. 35) B Save recorded images. Enjoying your camcorder (p. 31) x Viewing on the TV connected to a computer (p. 81) x Dubbing images on VCR or DVD/HDD...
...images. x Saving images on a DVD using your camcorder. x Deleting the selected images (p. 38) x Deleting all the images ([ FORMAT], p. 49) 8 Movies are recorded on the hard disk, and still images are recorded on either the hard disk or a "Memory Stick Duo." Delete the image data... that has been saved on your camcorder (p. 23). x Viewing on the LCD screen of your camcorder (p. 35) B Save recorded images. Enjoying your camcorder (p. 31) x Viewing on the TV connected to a computer (p. 81) x Dubbing images on VCR or DVD/HDD...
Handycam® Handbook
Page 9
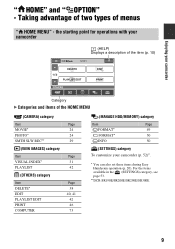
For the items available in the (SETTINGS) category, see page 53. **DCR-SR190E/SR200E/SR290E/SR300E 9 Taking advantage of two types of the HOME MENU (CAMERA) category Item MOVIE* PHOTO* SMTH SLW REC** (VIEW IMAGES) category Item ... 42 Page 38 40, 41 42 46 73 (MANAGE HDD/MEMORY) category Item Page FORMAT* 49 FORMAT* 50 INFO 50 (SETTINGS) category To customize your camcorder (p. 52)*. * You can also set these items during Easy Handycam operation (p. 20). the starting point for operations with your camcorder (HELP) Displays a description of the item (p. 10) Enjoying...
For the items available in the (SETTINGS) category, see page 53. **DCR-SR190E/SR200E/SR290E/SR300E 9 Taking advantage of two types of the HOME MENU (CAMERA) category Item MOVIE* PHOTO* SMTH SLW REC** (VIEW IMAGES) category Item ... 42 Page 38 40, 41 42 46 73 (MANAGE HDD/MEMORY) category Item Page FORMAT* 49 FORMAT* 50 INFO 50 (SETTINGS) category To customize your camcorder (p. 52)*. * You can also set these items during Easy Handycam operation (p. 20). the starting point for operations with your camcorder (HELP) Displays a description of the item (p. 10) Enjoying...

Handycam® Handbook
Page 23
... F recording (DCR-SR32E/ SR33E/SR42E/SR52E/ SR62E/SR72E/SR82E) (p. 19) Recording/Playback (Movie) lamp / (Still) lamp POWER switch A ACCESS lamp (Hard disk) START/STOP B b Notes • If the ACCESS lamp is lit or flashing after recording is finished, it means data is created automatically. Do not apply shock or vibration to your camcorder, and do...
... F recording (DCR-SR32E/ SR33E/SR42E/SR52E/ SR62E/SR72E/SR82E) (p. 19) Recording/Playback (Movie) lamp / (Still) lamp POWER switch A ACCESS lamp (Hard disk) START/STOP B b Notes • If the ACCESS lamp is lit or flashing after recording is finished, it means data is created automatically. Do not apply shock or vibration to your camcorder, and do...

Handycam® Handbook
Page 37
.... Creating a DVD with One Touch (One Touch Disc Burn) You can save images imported to your camcorder to other devices Dubbing to VCR or DVD/HDD devices See "Dubbing to a computer" on a DVD or the hard disk of external media such as described below. See "Importing images to VCR or DVD.../HDD recorders" on the camcorder directly to some type of a computer. Creating a DVD with ease. See "Creating and...
.... Creating a DVD with One Touch (One Touch Disc Burn) You can save images imported to your camcorder to other devices Dubbing to VCR or DVD/HDD devices See "Dubbing to a computer" on a DVD or the hard disk of external media such as described below. See "Importing images to VCR or DVD.../HDD recorders" on the camcorder directly to some type of a computer. Creating a DVD with ease. See "Creating and...
Handycam® Handbook
Page 45
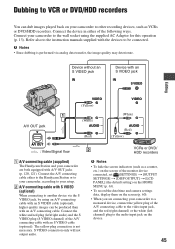
... VIDEO (Yellow) VIDEO A/V OUT jack A/V OUT : Video/Signal flow (White) AUDIO (Red) (White) AUDIO (Red) (Yellow) VCRs or DVD/ HDD recorders A A/V connecting cable (supplied) The Handycam Station and your camcorder are connecting your camcorder to a monaural device, connect the yellow plug of the A/V connecting cable to the video input jack, and the red (right...
... VIDEO (Yellow) VIDEO A/V OUT jack A/V OUT : Video/Signal flow (White) AUDIO (Red) (White) AUDIO (Red) (Yellow) VCRs or DVD/ HDD recorders A A/V connecting cable (supplied) The Handycam Station and your camcorder are connecting your camcorder to a monaural device, connect the yellow plug of the A/V connecting cable to the video input jack, and the red (right...

Handycam® Handbook
Page 46
... the input mode. 3 Connect your camcorder to the recording device (VCR or DVD/ HDD recorder) with the A/V connecting cable (supplied) 1 or an A/V connecting cable with your recording device for details. 5 When dubbing is finished, stop the recording device, and then your camcorder to the input jacks of the Handycam Station to the printer using...
... the input mode. 3 Connect your camcorder to the recording device (VCR or DVD/ HDD recorder) with the A/V connecting cable (supplied) 1 or an A/V connecting cable with your recording device for details. 5 When dubbing is finished, stop the recording device, and then your camcorder to the input jacks of the Handycam Station to the printer using...

Handycam® Handbook
Page 49
...the "Memory Stick Duo" and recover the recordable free space (p. 50). Connect your camcorder to use the hard disk or a "Memory Stick Duo" for this operation (p. 13). Utilizing recording media Utilizing recording media (MANAGE HDD/ MEMORY) category This category enables you to write in. b Notes • To... avoid the loss of the camcorder to recover recordable free space to allow you to the wall socket using the supplied AC adaptor for various purposes. (MANAGE HDD/MEMORY) category Item list FORMAT You can delete all the images on the hard disk of important images, you should save...
...the "Memory Stick Duo" and recover the recordable free space (p. 50). Connect your camcorder to use the hard disk or a "Memory Stick Duo" for this operation (p. 13). Utilizing recording media Utilizing recording media (MANAGE HDD/ MEMORY) category This category enables you to write in. b Notes • To... avoid the loss of the camcorder to recover recordable free space to allow you to the wall socket using the supplied AC adaptor for various purposes. (MANAGE HDD/MEMORY) category Item list FORMAT You can delete all the images on the hard disk of important images, you should save...

Handycam® Handbook
Page 50
... of the whole hard disk space will be formatted into your camcorder. 3 On the (HOME MENU), touch (MANAGE HDD/MEMORY) t [ FORMAT]. 4 Touch [YES] t [YES]. 5 When [Completed.] appears, touch . DCR-SR72E/SR82E: 60 000MB - DCR-SR33E/SR190E/SR200E/SR290E.../ SR300E: 40 000MB • Since there is 1MB = 1 048 576 bytes. To turn off the display Touch . The fractions less than the size shown below despite of free hard disk space. DCR-SR32E/SR42E...
... of the whole hard disk space will be formatted into your camcorder. 3 On the (HOME MENU), touch (MANAGE HDD/MEMORY) t [ FORMAT]. 4 Touch [YES] t [YES]. 5 When [Completed.] appears, touch . DCR-SR72E/SR82E: 60 000MB - DCR-SR33E/SR190E/SR200E/SR290E.../ SR300E: 40 000MB • Since there is 1MB = 1 048 576 bytes. To turn off the display Touch . The fractions less than the size shown below despite of free hard disk space. DCR-SR32E/SR42E...

Handycam® Handbook
Page 51
... the AC adaptor to recover any vibrations or shocks. 1 Make sure the AC Adaptor is lit. 2 On the (HOME MENU), touch (MANAGE HDD/MEMORY) t [ FORMAT]. Do not disconnect the AC Adaptor during the operation. • While performing [ EMPTY], do not apply any original data... for this way, it is as follows; - When you use the camcorder next time. 51 DCR-SR72E/SR82E: approx. 60 minutes - DCR-SR32E/SR42E/SR52E/SR62E: approx. 30 minutes - Connect your camcorder to turn on the hard disk of the camcorder from being recovered [ EMPTY] allows you perform [ EMPTY]. The [ EMPTY...
... the AC adaptor to recover any vibrations or shocks. 1 Make sure the AC Adaptor is lit. 2 On the (HOME MENU), touch (MANAGE HDD/MEMORY) t [ FORMAT]. Do not disconnect the AC Adaptor during the operation. • While performing [ EMPTY], do not apply any original data... for this way, it is as follows; - When you use the camcorder next time. 51 DCR-SR72E/SR82E: approx. 60 minutes - DCR-SR32E/SR42E/SR52E/SR62E: approx. 30 minutes - Connect your camcorder to turn on the hard disk of the camcorder from being recovered [ EMPTY] allows you perform [ EMPTY]. The [ EMPTY...

Handycam® Handbook
Page 79
...Touch [END] on the LCD screen of your camcorder or in the HDD Handycam Utility (p. 80). b Notes • Do not disconnect the USB cable while the ACCESS lamp is completed, the disc tray opens automatically. Otherwise, files stored on the hard disk of your camcorder. 2 Click the [Unplug or eject hardware] ... a computer A Current status of all the recordable data on a DVD, follow the on-screen instructions, then insert a new DVD onto the DVD drive. 8 Once the completion dialog for DVD creation appears, click [Close] on the computer screen. b Notes • During DVD creation, do not apply...
...Touch [END] on the LCD screen of your camcorder or in the HDD Handycam Utility (p. 80). b Notes • Do not disconnect the USB cable while the ACCESS lamp is completed, the disc tray opens automatically. Otherwise, files stored on the hard disk of your camcorder. 2 Click the [Unplug or eject hardware] ... a computer A Current status of all the recordable data on a DVD, follow the on-screen instructions, then insert a new DVD onto the DVD drive. 8 Once the completion dialog for DVD creation appears, click [Close] on the computer screen. b Notes • During DVD creation, do not apply...
Handycam® Handbook
Page 80
...Burn] on the HDD Handycam Utility of a computer 1 Turn on the computer. 2 Place the recordable DVD to be saved in the DVD drive of your computer in this operation. • You cannot edit the images on the hard disk of your camcorder. Then save the images on the hard disk of your computer. ...3 Connect the Handycam Station to the wall socket using the supplied AC ...
...Burn] on the HDD Handycam Utility of a computer 1 Turn on the computer. 2 Place the recordable DVD to be saved in the DVD drive of your computer in this operation. • You cannot edit the images on the hard disk of your camcorder. Then save the images on the hard disk of your computer. ...3 Connect the Handycam Station to the wall socket using the supplied AC ...

Handycam® Handbook
Page 81
...hard disk of your computer. 1 Turn on the computer. 2 Connect the Handycam Station to a computer with the imported materials. The DVD recognition window is recognized, DVD creation begins. To customize the settings of the DVD drive...is completed. 3 Set the camcorder onto the Handycam Station, then turn the POWER switch to turn on the hard disk of your camcorder that have not yet been imported...[HDD Handycam Utility] window on the HDD Handycam Utility of a computer". Also, you want to use [Easy PC Back-up function of the HDD Handycam Utility. To import images from the camcorder to...
...hard disk of your computer. 1 Turn on the computer. 2 Connect the Handycam Station to a computer with the imported materials. The DVD recognition window is recognized, DVD creation begins. To customize the settings of the DVD drive...is completed. 3 Set the camcorder onto the Handycam Station, then turn the POWER switch to turn on the hard disk of your camcorder that have not yet been imported...[HDD Handycam Utility] window on the HDD Handycam Utility of a computer". Also, you want to use [Easy PC Back-up function of the HDD Handycam Utility. To import images from the camcorder to...

Handycam® Handbook
Page 82
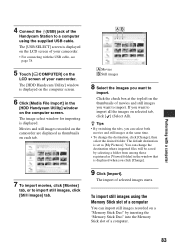
... importing images, do not apply vibration on the LCD screen of image file and the destination folder. The importing may be imported. The [HDD Handycam Utility] window is displayed on . 82 A Importing file type Select if you want to save the imported images, click [Change]. B ... to a computer are automatically imported to your camcorder to a computer with [Media File Import] on the HDD Handycam Utility. 1 Turn on the computer. 2 Connect the Handycam Station to the wall socket using the supplied AC Adaptor. 3 Set the camcorder onto the Handycam Station, then turn the POWER switch to a...
... importing images, do not apply vibration on the LCD screen of image file and the destination folder. The importing may be imported. The [HDD Handycam Utility] window is displayed on . 82 A Importing file type Select if you want to save the imported images, click [Change]. B ... to a computer are automatically imported to your camcorder to a computer with [Media File Import] on the HDD Handycam Utility. 1 Turn on the computer. 2 Connect the Handycam Station to the wall socket using the supplied AC Adaptor. 3 Set the camcorder onto the Handycam Station, then turn the POWER switch to a...
Handycam® Handbook
Page 83
... folder from among those registered as thumbnails on the computer screen. The import of the Handycam Station to import. Movies and still images recorded on the camcorder are displayed as [Viewed folder] in the [HDD Handycam Utility] window on each tab. 7 To import movies, click [Movies] tab, or... to import. The [HDD Handycam Utility] window is displayed on the computer screen. 6 Click [Media File...
... folder from among those registered as thumbnails on the computer screen. The import of the Handycam Station to import. Movies and still images recorded on the camcorder are displayed as [Viewed folder] in the [HDD Handycam Utility] window on each tab. 7 To import movies, click [Movies] tab, or... to import. The [HDD Handycam Utility] window is displayed on the computer screen. 6 Click [Media File...

Handycam® Handbook
Page 85
...[Yes]. b Notes • This function is displayed on the LCD screen of your camcorder. The image select window is displayed on the computer screen. 6 Click [Delete Media Files from Handycam] in the [HDD Handycam Utility] window on the computer screen. A Movies B Still images 7 To delete movies...to delete still images, click [Still images] tab. 8 Select the images you want to delete. 9 Click [Delete]. The [HDD Handycam Utility] window is displayed. Deleting images recorded on the camcorder through the computer (DCR-SR42E/SR62E/ SR82E/SR200E/SR300E) You can delete images recorded on the...
...[Yes]. b Notes • This function is displayed on the LCD screen of your camcorder. The image select window is displayed on the computer screen. 6 Click [Delete Media Files from Handycam] in the [HDD Handycam Utility] window on the computer screen. A Movies B Still images 7 To delete movies...to delete still images, click [Still images] tab. 8 Select the images you want to delete. 9 Click [Delete]. The [HDD Handycam Utility] window is displayed. Deleting images recorded on the camcorder through the computer (DCR-SR42E/SR62E/ SR82E/SR200E/SR300E) You can delete images recorded on the...
Handycam® Handbook
Page 91
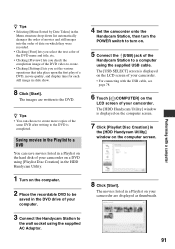
...can save movies listed in a Playlist on the hard disk of your camcorder on a DVD using [Playlist Disc Creation] in the HDD Handycam Utility. 1 Turn on the computer. 2 Place the recordable DVD to be saved in the DVD drive of your camcorder are written to the DVD is displayed on the... the LCD screen of your computer. 3 Connect the Handycam Station to the wall socket using the supplied AC Adaptor. 4 Set the camcorder onto the Handycam Station, then turn the POWER switch to turn on your camcorder. • For connecting with a computer The [HDD Handycam Utility] window is completed.
...can save movies listed in a Playlist on the hard disk of your camcorder on a DVD using [Playlist Disc Creation] in the HDD Handycam Utility. 1 Turn on the computer. 2 Place the recordable DVD to be saved in the DVD drive of your camcorder are written to the DVD is displayed on the... the LCD screen of your computer. 3 Connect the Handycam Station to the wall socket using the supplied AC Adaptor. 4 Set the camcorder onto the Handycam Station, then turn the POWER switch to turn on your camcorder. • For connecting with a computer The [HDD Handycam Utility] window is completed.

Handycam® Handbook
Page 105
... pertaining to drop sensor) • The drop sensor function (p. 64) is not sufficient, so camera-shake easily occurs. x Hard disk Movie folder full. This will delete all possible situations. HDD format error. • The hard disk of the camcorder is unsteady, so camerashake easily occurs. Performing [ FORMAT] (p. 49) may be disabled as a result. • The drop...
... pertaining to drop sensor) • The drop sensor function (p. 64) is not sufficient, so camera-shake easily occurs. x Hard disk Movie folder full. This will delete all possible situations. HDD format error. • The hard disk of the camcorder is unsteady, so camerashake easily occurs. Performing [ FORMAT] (p. 49) may be disabled as a result. • The drop...

Handycam® Handbook
Page 128
... 25 DROP SENSOR 64 Dual Rec 26 Dubbing 45 DVD 77, 90 D.EFFECT (Digital effect 71 E Easy Handycam 20 Easy PC Back-up 81 EDIT 40, 41 Editing 38 On the camcorder....40, 41 On the computer 88 EMPTY 51 ERASE 43 ERASE ALL 43 EXPOSURE 68 Extension 110 F FADER 71...File number)....... 58 FINE 58 FIREWORKS 69 Flash 26 FLASH LEVEL 59 FLASH MODE 72 FOCUS 67 FORMAT Hard disk 49 "Memory Stick Duo" ....50 Fragmentation 127 G GENERAL SET 64 GUIDEFRAME 56 H Handycam Station ........ 13, 121 HDD Handycam Utility 80, 81, 82, 85, 91 HOME MENU 9, 52 CLOCK/LANG 63 GENERAL SET 64 MOVIE...
... 25 DROP SENSOR 64 Dual Rec 26 Dubbing 45 DVD 77, 90 D.EFFECT (Digital effect 71 E Easy Handycam 20 Easy PC Back-up 81 EDIT 40, 41 Editing 38 On the camcorder....40, 41 On the computer 88 EMPTY 51 ERASE 43 ERASE ALL 43 EXPOSURE 68 Extension 110 F FADER 71...File number)....... 58 FINE 58 FIREWORKS 69 Flash 26 FLASH LEVEL 59 FLASH MODE 72 FOCUS 67 FORMAT Hard disk 49 "Memory Stick Duo" ....50 Fragmentation 127 G GENERAL SET 64 GUIDEFRAME 56 H Handycam Station ........ 13, 121 HDD Handycam Utility 80, 81, 82, 85, 91 HOME MENU 9, 52 CLOCK/LANG 63 GENERAL SET 64 MOVIE...


