
Operating Guide
Page 1
Printed on how to use the camcorder. © 2006 Sony Corporation 2-887-134-11(1) Operating Guide DCR-SR40/SR60/SR80 US Additional information on this product and answers to frequently asked questions can find more detailed information on 100% recycled paper using VOC (Volatile Organic Compound)-free vegetable oil based ink. Printed in Japan Also refer to "Handycam Handbook" (PDF) By referring to "Handycam Handbook" (PDF) contained in the supplied CD-ROM, you can be found at our Customer Support Website.
Printed on how to use the camcorder. © 2006 Sony Corporation 2-887-134-11(1) Operating Guide DCR-SR40/SR60/SR80 US Additional information on this product and answers to frequently asked questions can find more detailed information on 100% recycled paper using VOC (Volatile Organic Compound)-free vegetable oil based ink. Printed in Japan Also refer to "Handycam Handbook" (PDF) By referring to "Handycam Handbook" (PDF) contained in the supplied CD-ROM, you can be found at our Customer Support Website.
Operating Guide
Page 6
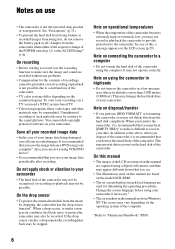
... be contrary to "Handycam Handbook" (PDF). 6 It may prevent data recovery on the hard disk of the camcorder. When you transfer the camcorder, it using your ...DCR-SR80. • The on-screen displays in this , a message appears on the LCD screen (p.29). Note on connecting the camcorder to a computer • Do not format the hard disk of the camcorder using the camcorder in highlands • Do not turn on the camcorder... delete data from the shock by dropping, the camcorder has the drop sensor function*. The scenes may damage the hard disk drive of your recordings on a TV, you need ...
... be contrary to "Handycam Handbook" (PDF). 6 It may prevent data recovery on the hard disk of the camcorder. When you transfer the camcorder, it using your ...DCR-SR80. • The on-screen displays in this , a message appears on the LCD screen (p.29). Note on connecting the camcorder to a computer • Do not format the hard disk of the camcorder using the camcorder in highlands • Do not turn on the camcorder... delete data from the shock by dropping, the camcorder has the drop sensor function*. The scenes may damage the hard disk drive of your recordings on a TV, you need ...
Operating Guide
Page 7
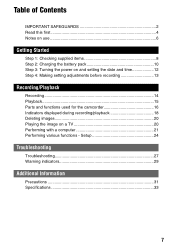
... setting the date and time 12 Step 4: Making setting adjustments before recording 13 Recording/Playback Recording 14 Playback 15 Parts and functions used for the camcorder 16 Indicators displayed during recording/playback 18 Deleting images 20 Playing the image on a TV 20 Performing with a computer 21 Performing various functions -
... setting the date and time 12 Step 4: Making setting adjustments before recording 13 Recording/Playback Recording 14 Playback 15 Parts and functions used for the camcorder 16 Indicators displayed during recording/playback 18 Deleting images 20 Playing the image on a TV 20 Performing with a computer 21 Performing various functions -
Operating Guide
Page 8
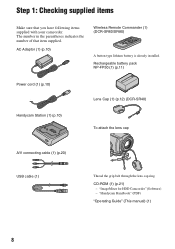
...-ROM (1) (p.21) - "ImageMixer for HDD Camcorder" (Software) - Step 1: Checking supplied items Make sure that item supplied. AC Adaptor (1) (p.10) Wireless Remote Commander (1) (DCR-SR60/SR80) A button-type lithium battery is already installed. "Handycam Handbook" (PDF) "Operating Guide" (This manual...parentheses indicates the number of that you have following items supplied with your camcorder. Rechargeable battery pack NP-FP50 (1) (p.11) Power cord (1) (p.10) Handycam Station (1) (p.10) Lens Cap (1) (p.12) (DCR-SR40) To attach the lens cap A/V connecting cable (1) (p.20) USB ...
...-ROM (1) (p.21) - "ImageMixer for HDD Camcorder" (Software) - Step 1: Checking supplied items Make sure that item supplied. AC Adaptor (1) (p.10) Wireless Remote Commander (1) (DCR-SR60/SR80) A button-type lithium battery is already installed. "Handycam Handbook" (PDF) "Operating Guide" (This manual...parentheses indicates the number of that you have following items supplied with your camcorder. Rechargeable battery pack NP-FP50 (1) (p.11) Power cord (1) (p.10) Handycam Station (1) (p.10) Lens Cap (1) (p.12) (DCR-SR40) To attach the lens cap A/V connecting cable (1) (p.20) USB ...
Operating Guide
Page 10
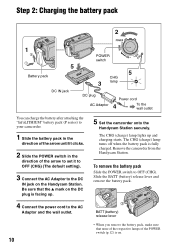
...DC plug AC Adaptor Power cord 4 To the wall outlet You can charge the battery after attaching the "InfoLITHIUM" battery pack (P series) to your camcorder. 1 Slide the battery pack in the direction of the arrow until it clicks. 2 Slide the POWER switch in the direction of the POWER switch ...(p.12) is fully charged. The CHG (charge) lamp lights up . 5 Set the camcorder onto the Handycam Station securely. Remove the camcorder from the Handycam Station. The CHG (charge) lamp turns off when the battery pack is on. To remove the battery pack Slide the POWER...
...DC plug AC Adaptor Power cord 4 To the wall outlet You can charge the battery after attaching the "InfoLITHIUM" battery pack (P series) to your camcorder. 1 Slide the battery pack in the direction of the arrow until it clicks. 2 Slide the POWER switch in the direction of the POWER switch ...(p.12) is fully charged. The CHG (charge) lamp lights up . 5 Set the camcorder onto the Handycam Station securely. Remove the camcorder from the Handycam Station. The CHG (charge) lamp turns off when the battery pack is on. To remove the battery pack Slide the POWER...
Operating Guide
Page 11
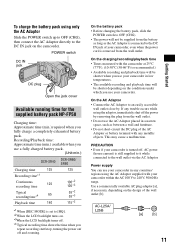
... the conditions under which you fully charge a completely exhausted battery pack. If any metallic objects. Power supply You can use your camcorder in low temperatures. • The available recording and playback time will not be shorter depending on . *3When the LCD backlight ...the supplied battery pack NP-FP50 Charging time: Approximate time (min.) required when you use a fully charged battery pack. (Unit:min.) DCR-SR40 DCR-SR60/ SR80 Charging time 125 Recording time*1 Continuous 125 recording time Typical recording time*4 65 Playback time 140 125 100*2 105*3 55...
... the conditions under which you fully charge a completely exhausted battery pack. If any metallic objects. Power supply You can use your camcorder in low temperatures. • The available recording and playback time will not be shorter depending on . *3When the LCD backlight ...the supplied battery pack NP-FP50 Charging time: Approximate time (min.) required when you use a fully charged battery pack. (Unit:min.) DCR-SR40 DCR-SR60/ SR80 Charging time 125 Recording time*1 Continuous 125 recording time Typical recording time*4 65 Playback time 140 125 100*2 105*3 55...
Operating Guide
Page 12
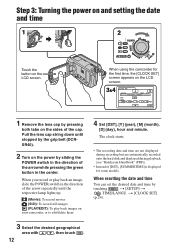
... the desired geographical area with / , then touch . 12 Pull the lens cap string down until stopped by the grip belt (DCRSR40). 2 Turn on your camcorder, or to edit/delete them 4 Set [DST], [Y] (year), [M] (month), [D] (day), hour and minute. When you record or play back images on...center. When using the camcorder for the first time, the [CLOCK SET] screen appears on the LCD screen. The clock starts. • The recording date and time are not displayed during recording but are automatically recorded onto the hard disk and displayed during playback (see "Handycam Handbook" (PDF)). &#...
... the desired geographical area with / , then touch . 12 Pull the lens cap string down until stopped by the grip belt (DCRSR40). 2 Turn on your camcorder, or to edit/delete them 4 Set [DST], [Y] (year), [M] (month), [D] (day), hour and minute. When you record or play back images on...center. When using the camcorder for the first time, the [CLOCK SET] screen appears on the LCD screen. The clock starts. • The recording date and time are not displayed during recording but are automatically recorded onto the hard disk and displayed during playback (see "Handycam Handbook" (PDF)). &#...
Operating Guide
Page 13
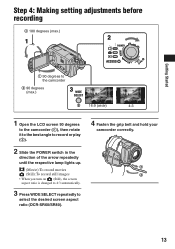
Step 4: Making setting adjustments before recording 2 180 degrees (max.) 1 2 Getting Started 1 90 degrees to the camcorder 2 90 degrees (max.) 3 16:9 (wide) 4:3 1 Open the LCD screen 90 degrees to the camcorder (1), then rotate it to the best angle to record or play (2). 2 Slide the POWER switch in the direction of the arrow repeatedly until... • When you turn on (Still), the screen aspect ratio is changed to 4:3 automatically. 3 Press WIDE SELECT repeatedly to select the desired screen aspect ratio (DCR-SR60/SR80). 4 Fasten the grip belt and hold your camcorder correctly. 13
Step 4: Making setting adjustments before recording 2 180 degrees (max.) 1 2 Getting Started 1 90 degrees to the camcorder 2 90 degrees (max.) 3 16:9 (wide) 4:3 1 Open the LCD screen 90 degrees to the camcorder (1), then rotate it to the best angle to record or play (2). 2 Slide the POWER switch in the direction of the arrow repeatedly until... • When you turn on (Still), the screen aspect ratio is changed to 4:3 automatically. 3 Press WIDE SELECT repeatedly to select the desired screen aspect ratio (DCR-SR60/SR80). 4 Fasten the grip belt and hold your camcorder correctly. 13
Operating Guide
Page 14
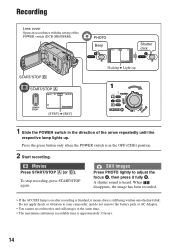
... of the arrow repeatedly until the respective lamp lights up 1 1 Slide the POWER switch in accordance with the setting of the POWER switch (DCR-SR60/SR80). Do not apply shock or vibration to adjust the focus A, then press it means data is approximately 13 hours. 14 Still Images... Press PHOTO lightly to your camcorder, and do not remove the battery pack or AC Adaptor. • You cannot record movies and still images at the same time. • The maximum continuous recordable time is still being written onto the hard disk. Press the green button only when the...
... of the arrow repeatedly until the respective lamp lights up 1 1 Slide the POWER switch in accordance with the setting of the POWER switch (DCR-SR60/SR80). Do not apply shock or vibration to adjust the focus A, then press it means data is approximately 13 hours. 14 Still Images... Press PHOTO lightly to your camcorder, and do not remove the battery pack or AC Adaptor. • You cannot record movies and still images at the same time. • The maximum continuous recordable time is still being written onto the hard disk. Press the green button only when the...
Operating Guide
Page 15
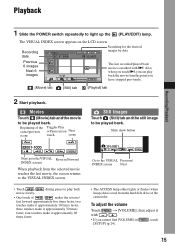
...Movie) tab (Still) tab (Playlist) tab 2 Start playback. Also, when you touch i, you can play back • One touch of the camcorder. Slide show button 101-0001 P-MENU Go to be played back. Movies Touch (Movie) tab and the movie to the VISUAL Previous/ INDEX screen Next...be played back. Still Images Touch (Still) tab and the still image to the VISUAL Reverse/Forward INDEX screen) When playback from the hard disk drive of / makes the reverse/ fast forward approximately five times faster, two touches make it approximately 10 times faster, three touches make it ...
...Movie) tab (Still) tab (Playlist) tab 2 Start playback. Also, when you touch i, you can play back • One touch of the camcorder. Slide show button 101-0001 P-MENU Go to be played back. Movies Touch (Movie) tab and the movie to the VISUAL Previous/ INDEX screen Next...be played back. Still Images Touch (Still) tab and the still image to the VISUAL Reverse/Forward INDEX screen) When playback from the hard disk drive of / makes the reverse/ fast forward approximately five times faster, two touches make it approximately 10 times faster, three touches make it ...
Operating Guide
Page 16
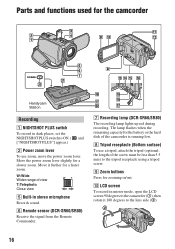
... side (2). 16 q; Parts and functions used for the camcorder Handycam Station Recording 1 NIGHTSHOT PLUS switch To record in dark ...hard disk of view T:Telephoto Close view 5 Built-in mirror mode, open the LCD screen 90 degrees to the camcorder (1), then rotate it further for a slower zoom. W:Wide Wider range of the camcorder... is running low. 8 Tripod receptacle (Bottom surface) To use zoom, move the power zoom lever. LCD screen To record in stereo microphone Records sound. 6 Remote sensor (DCR-SR60/SR80) Receive the signal from the Remote Commander. 7 Recording lamp (DCR...
... side (2). 16 q; Parts and functions used for the camcorder Handycam Station Recording 1 NIGHTSHOT PLUS switch To record in dark ...hard disk of view T:Telephoto Close view 5 Built-in mirror mode, open the LCD screen 90 degrees to the camcorder (1), then rotate it further for a slower zoom. W:Wide Wider range of the camcorder... is running low. 8 Tripod receptacle (Bottom surface) To use zoom, move the power zoom lever. LCD screen To record in stereo microphone Records sound. 6 Remote sensor (DCR-SR60/SR80) Receive the signal from the Remote Commander. 7 Recording lamp (DCR...

Operating Guide
Page 17
...Shoe. 4 Active Interface Shoe (DCR-SR60/SR80) The Active Interface Shoe supplies power to optional accessories such as you want to display in "Recording". qk A/V (audio/video) jack Connect with the camcorder and the Handycam Station. ql REMOTE jack (DCR-SR60/SR80) Connect other devices qj... qk ql ....... DVD BURN button Create a DVD by connecting the camcorder to display .. wa Interface connector Connect with the A/V connecting cable....
...Shoe. 4 Active Interface Shoe (DCR-SR60/SR80) The Active Interface Shoe supplies power to optional accessories such as you want to display in "Recording". qk A/V (audio/video) jack Connect with the camcorder and the Handycam Station. ql REMOTE jack (DCR-SR60/SR80) Connect other devices qj... qk ql ....... DVD BURN button Create a DVD by connecting the camcorder to display .. wa Interface connector Connect with the A/V connecting cable....
Operating Guide
Page 20
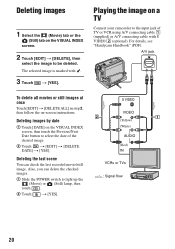
Playing the image on a TV Connect your camcorder to select the date of TV or VCR using A/V connecting cable 1 (supplied) or A/V connecting cable with . 3 Touch t [YES]. Deleting the last scene You can delete the checked images. 1 Slide the POWER switch to be deleted. For details, see "Handycam Handbook" (PDF). Deleting images by date...
Playing the image on a TV Connect your camcorder to select the date of TV or VCR using A/V connecting cable 1 (supplied) or A/V connecting cable with . 3 Touch t [YES]. Deleting the last scene You can delete the checked images. 1 Slide the POWER switch to be deleted. For details, see "Handycam Handbook" (PDF). Deleting images by date...
Operating Guide
Page 21
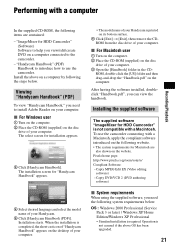
... then remove the CDROM from the disc drive of your Handycam. 5 Click [Handycam Handbook (PDF)]. Operation is not compatible with a Macintosh, apply the compliant software introduced on the following website. • The system requirements for HDD Camcorder" (Software) Software to the camcorder. - x For Windows user 1 Turn...www.pixela.co.jp/oem/sony/e/ Compliant Software: - Install the above OS has been upgraded. 21 The installation screen for installation appears. 3 Click [Handycam Handbook]. When the installation is completed, the short-cut icon of "Handycam Handbook" appears on the ...
... then remove the CDROM from the disc drive of your Handycam. 5 Click [Handycam Handbook (PDF)]. Operation is not compatible with a Macintosh, apply the compliant software introduced on the following website. • The system requirements for HDD Camcorder" (Software) Software to the camcorder. - x For Windows user 1 Turn...www.pixela.co.jp/oem/sony/e/ Compliant Software: - Install the above OS has been upgraded. 21 The installation screen for installation appears. 3 Click [Handycam Handbook]. When the installation is completed, the short-cut icon of "Handycam Handbook" appears on the ...
Operating Guide
Page 22
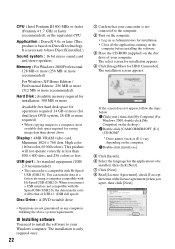
... hard disk space for operations required: 14 GB or more (for dual layer DVD system, 28 GB or more available disk space required for installation. • Close all the applications running on the computer before installing the software. 3 Place the CD-ROM (supplied) on the disc drive ...For Windows 2000, double-click [My Computer] on the computer. 3Double-click [install.exe]. 5 Click [Install]. 6 Select the language for HDD Camcorder]. You can transfer data at less than shown above system requirements. When you connect a USB interface not compatible with Hi-Speed USB (USB2.0). Disc...
... hard disk space for operations required: 14 GB or more (for dual layer DVD system, 28 GB or more available disk space required for installation. • Close all the applications running on the computer before installing the software. 3 Place the CD-ROM (supplied) on the disc drive ...For Windows 2000, double-click [My Computer] on the computer. 3Double-click [install.exe]. 5 Click [Install]. 6 Select the language for HDD Camcorder]. You can transfer data at less than shown above system requirements. When you connect a USB interface not compatible with Hi-Speed USB (USB2.0). Disc...

Operating Guide
Page 23
The installation for "ImageMixer for HDD Camcorder] and [ImageMixer destination folder] appear on the [Ready to install DirectX 9.0c. qs If the [Installing Microsoft ® DirectX ®] screen is checked, then click [Finish]. qf Remove the CD-ROM from the disc drive of your computer. 23 If not, skip to save the software...
The installation for "ImageMixer for HDD Camcorder] and [ImageMixer destination folder] appear on the [Ready to install DirectX 9.0c. qs If the [Installing Microsoft ® DirectX ®] screen is checked, then click [Finish]. qf Remove the CD-ROM from the disc drive of your computer. 23 If not, skip to save the software...
Operating Guide
Page 25
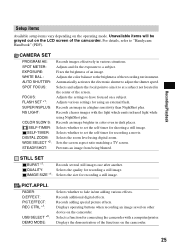
...image. Adjusts the settings to fade in/out adding various effects. Prevents an image from being blurred. Selects the size for connecting the camcorder with the light which emits infrared light while using NightShot plus . FADER: D.EFFECT: PICT.EFFECT: REC CTRL *1: USB SELECT *3:... Adjusts and fix the exposure to "Handycam Handbook" (PDF). Sets the screen aspect ratio matching a TV screen. Recording/Playback Setup items Available setup items vary depending on the camcorder. Unavailable items will be grayed out on the camcorder. 25 Selects and adjusts the focal point...
...image. Adjusts the settings to fade in/out adding various effects. Prevents an image from being blurred. Selects the size for connecting the camcorder with the light which emits infrared light while using NightShot plus . FADER: D.EFFECT: PICT.EFFECT: REC CTRL *1: USB SELECT *3:... Adjusts and fix the exposure to "Handycam Handbook" (PDF). Sets the screen aspect ratio matching a TV screen. Recording/Playback Setup items Available setup items vary depending on the camcorder. Unavailable items will be grayed out on the camcorder. 25 Selects and adjusts the focal point...
Operating Guide
Page 26
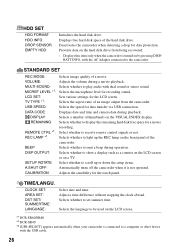
... HDD: Initializes the hard disk drive. USB SPEED: Selects the speed for recording sound. REC LAMP *1: Selects whether to the camcorder. CLOCK SET: AREA SET: DST SET/ SUMMERTIME: LANGUAGE: Select date and time. Displays free hard disk space of thumbnails on the hard disk drive from the camcorder. MICREF LEVEL *1: ...Adjust a time difference without stopping the clock abroad. Selects whether to be used on the LCD screen. *1 DCR-SR60/SR80 *2 DCR-SR40 *3 [USB SELECT] appears automatically when your camcorder is turned on a TV. Selects the language to set summer time.
... HDD: Initializes the hard disk drive. USB SPEED: Selects the speed for recording sound. REC LAMP *1: Selects whether to the camcorder. CLOCK SET: AREA SET: DST SET/ SUMMERTIME: LANGUAGE: Select date and time. Displays free hard disk space of thumbnails on the hard disk drive from the camcorder. MICREF LEVEL *1: ...Adjust a time difference without stopping the clock abroad. Selects whether to be used on the LCD screen. *1 DCR-SR60/SR80 *2 DCR-SR40 *3 [USB SELECT] appears automatically when your camcorder is turned on a TV. Selects the language to set summer time.
Operating Guide
Page 27
... them. However, your Sony dealer will be required to initialize or change the current hard disk of this, the data stored on the hard disk will neither copy nor save (backup) the data on the hard disk (see "Handycam Handbook" (PDF)) on Easy Handycam operation, refer to the wall outlet (p.10). • Set the camcorder onto the Handycam Station securely (p.10...
... them. However, your Sony dealer will be required to initialize or change the current hard disk of this, the data stored on the hard disk will neither copy nor save (backup) the data on the hard disk (see "Handycam Handbook" (PDF)) on Easy Handycam operation, refer to the wall outlet (p.10). • Set the camcorder onto the Handycam Station securely (p.10...
Operating Guide
Page 28
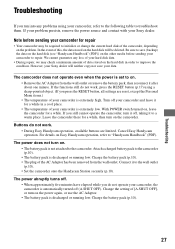
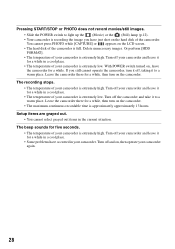
.... • You cannot select grayed out items in your camcorder. Turn off your camcorder and leave it for a while, then turn on the LCD screen. • The hard disk of the camcorder. Leave the camcorder there for a while in a cool place. • The temperature of your camcorder is extremely high. If you have occurred in the current...
.... • You cannot select grayed out items in your camcorder. Turn off your camcorder and leave it for a while, then turn on the LCD screen. • The hard disk of the camcorder. Leave the camcorder there for a while in a cool place. • The temperature of your camcorder is extremely high. If you have occurred in the current...


