Operating Guide
Page 6
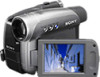
... the camcorder • Do not hold the camcorder by the following measures: - See "Maintenance and precautions" (p. 68). • Before connecting your Sony dealer regarding this product. Connect the equipment... between the equipment and receiver. - Consult the dealer or an experienced radio/TV technician for a digital device pursuant to these numbers whenever you can use in... call your camcorder to another device with . Viewfinder Battery pack LCD panel • The camcorder is connected. - Record the serial number in your camcorder. DCR-HC28 Serial No. Your camcorder is not...
... the camcorder • Do not hold the camcorder by the following measures: - See "Maintenance and precautions" (p. 68). • Before connecting your Sony dealer regarding this product. Connect the equipment... between the equipment and receiver. - Consult the dealer or an experienced radio/TV technician for a digital device pursuant to these numbers whenever you can use in... call your camcorder to another device with . Viewfinder Battery pack LCD panel • The camcorder is connected. - Record the serial number in your camcorder. DCR-HC28 Serial No. Your camcorder is not...
Operating Guide
Page 9
Dubbing/Editing Dubbing to VCR/DVD device, etc 48 Recording pictures from a TV or VCR/DVD device, etc 50 Dubbing sound to a recorded tape 51 Jacks to connect external devices 53 Troubleshooting Troubleshooting 54 Warning indicators and messages 61 Continued , 9 PROGRAM AE/P EFFECT, etc. OTHERS menu 47 - VCR SET menu 45 - LCD B.L./LCD...
Dubbing/Editing Dubbing to VCR/DVD device, etc 48 Recording pictures from a TV or VCR/DVD device, etc 50 Dubbing sound to a recorded tape 51 Jacks to connect external devices 53 Troubleshooting Troubleshooting 54 Warning indicators and messages 61 Continued , 9 PROGRAM AE/P EFFECT, etc. OTHERS menu 47 - VCR SET menu 45 - LCD B.L./LCD...
Operating Guide
Page 32
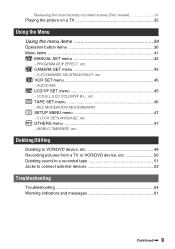
... can display the time code on the TV screen by using the A/V connecting cable with an S VIDEO cable, pictures can connect your camcorder to [V-OUT/LCD] (p. 47). In this operation (p. 12). When connecting your camcorder to a TV through a VCR Connect your camcorder to the input jack of an A/V connecting cable. Playing the picture on a TV You can be reproduced more faithfully...
... can display the time code on the TV screen by using the A/V connecting cable with an S VIDEO cable, pictures can connect your camcorder to [V-OUT/LCD] (p. 47). In this operation (p. 12). When connecting your camcorder to a TV through a VCR Connect your camcorder to the input jack of an A/V connecting cable. Playing the picture on a TV You can be reproduced more faithfully...
Operating Guide
Page 44
... image color deeper this way. * Picture appears in full screen mode when the wide-screen TV switches to full mode. ** Played in full mode when you connect to your ID-1/ID-2 compatible TV. N.S.LIGHT (NightShot Light) When using the NightShot plus (p. 26) function to record, you...picture in full screen mode. • When you record a picture to be played back on a 16:9 wide TV connected to your camcorder, select [16:9 WIDE]. B 4:3 Standard setting (to record pictures to be played back on a 4:3 TV). 16:9 WIDE ( ) Records pictures to [OFF] ( ) when using [N.S.LIGHT] is attached. • ...
... image color deeper this way. * Picture appears in full screen mode when the wide-screen TV switches to full mode. ** Played in full mode when you connect to your ID-1/ID-2 compatible TV. N.S.LIGHT (NightShot Light) When using the NightShot plus (p. 26) function to record, you...picture in full screen mode. • When you record a picture to be played back on a 16:9 wide TV connected to your camcorder, select [16:9 WIDE]. B 4:3 Standard setting (to record pictures to be played back on a 4:3 TV). 16:9 WIDE ( ) Records pictures to [OFF] ( ) when using [N.S.LIGHT] is attached. • ...
Operating Guide
Page 47
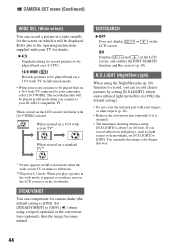
... page 19. See page 34 for when you to [NEVER]. DEMO MODE The default setting is not automatically turned off. • When you connect your camcorder abroad, you set the time difference to 0, the clock returns to the originally set to a wall outlet, [A.SHUT OFF] is automatically turned ... operate the touch panel. LANGUAGE You can select the language to be used on the LCD screen. • Your camcorder offers [ENG[SIMP]] (simplified English) for details on the TV screen, LCD screen, and in accordance with B. When the POWER switch is inserted. - WORLD TIME/BEEP, etc...
... page 19. See page 34 for when you to [NEVER]. DEMO MODE The default setting is not automatically turned off. • When you connect your camcorder abroad, you set the time difference to 0, the clock returns to the originally set to a wall outlet, [A.SHUT OFF] is automatically turned ... operate the touch panel. LANGUAGE You can select the language to be used on the LCD screen. • Your camcorder offers [ENG[SIMP]] (simplified English) for details on the TV screen, LCD screen, and in accordance with B. When the POWER switch is inserted. - WORLD TIME/BEEP, etc...

Operating Guide
Page 48
... (2), or the i.LINK cable (3). You can copy the picture played back on the VCR/TV. • When you are transmitted digitally, producing high quality pictures and sound. In this operation (p. 12). The video and audio signals are connecting your camcorder to other recording devices (VCR/ DVD device, etc.). Refer also to the instruction...
... (2), or the i.LINK cable (3). You can copy the picture played back on the VCR/TV. • When you are transmitted digitally, producing high quality pictures and sound. In this operation (p. 12). The video and audio signals are connecting your camcorder to other recording devices (VCR/ DVD device, etc.). Refer also to the instruction...

Operating Guide
Page 50
.../DVD device. The picture played on the connected device appears on your camcorder. To i.LINK jack DV To DV Interface (i.LINK) TVs or VCR/ DVD devices : Signal flow i.LINK cable (optional) 1 Connect your TV or VCR/DVD device to your camcorder to recording pause mode. Be sure to be connected. • You cannot record pictures on the...
.../DVD device. The picture played on the connected device appears on your camcorder. To i.LINK jack DV To DV Interface (i.LINK) TVs or VCR/ DVD devices : Signal flow i.LINK cable (optional) 1 Connect your TV or VCR/DVD device to your camcorder to recording pause mode. Be sure to be connected. • You cannot record pictures on the...
Operating Guide
Page 51
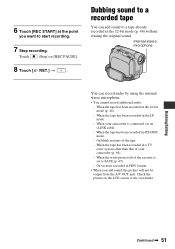
...the tape has been recorded in the LP mode. - Touch (Stop) or [REC PAUSE]. 8 Touch [ RET.] t . When your camcorder (p. 64). - When the write-protect tab of the cassette is connected via an i.LINK cable. - Check the picture on the LCD screen or the viewfinder. When the tape has been recorded... in a TV color system other than that of the tape. - Internal stereo microphone You can add sound to a ...
...the tape has been recorded in the LP mode. - Touch (Stop) or [REC PAUSE]. 8 Touch [ RET.] t . When your camcorder (p. 64). - When the write-protect tab of the cassette is connected via an i.LINK cable. - Check the picture on the LCD screen or the viewfinder. When the tape has been recorded... in a TV color system other than that of the tape. - Internal stereo microphone You can add sound to a ...
Operating Guide
Page 58
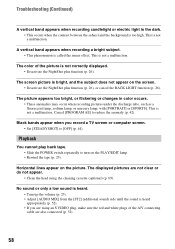
...[AUDIO MIX] from the [ST2] (additional sound) side until the sound is too high. This is not a malfunction. The color of the A/V connecting cable are not clear or do not appear. • Clean the head using the cleaning cassette (optional) (p. 69). Playback You cannot play back tape... dark. • This occurs when the contrast between the subject and the background is heard appropriately (p. 52). • If you record a TV screen or computer screen. • Set [STEADYSHOT] to reduce the anomaly (p. 42). Troubleshooting (Continued) A vertical band appears when recording candlelight ...
...[AUDIO MIX] from the [ST2] (additional sound) side until the sound is too high. This is not a malfunction. The color of the A/V connecting cable are not clear or do not appear. • Clean the head using the cleaning cassette (optional) (p. 69). Playback You cannot play back tape... dark. • This occurs when the contrast between the subject and the background is heard appropriately (p. 52). • If you record a TV screen or computer screen. • Set [STEADYSHOT] to reduce the anomaly (p. 42). Troubleshooting (Continued) A vertical band appears when recording candlelight ...

Operating Guide
Page 74
...57 AUDIO MIX 52 AUDIO MODE 46 AUTO SHTR (Auto shutter 43 A.SHUT OFF (Auto shut off 47 A/V connecting cable .....32, 48 A/V OUT jack 32, 48 B BACK LIGHT 26, 57 BATT (battery) release lever...battery 12 Battery pack 12 Pre-installed rechargeable battery 71 Charging time 13 CHG (charge) lamp 12 CLOCK SET 19 Connect TV 32, 50 VCR 32, 48, 50 D D ZOOM (Digital zoom) ..... 43 DATA CODE 28, 39 DATE...27 Double speed Playback........ 40 Dubbing 48, 51 DV Interface 48, 50, 53 E EASY button 22 Easy Handycam 22, 35 EDITSEARCH 30, 44 END SCH (END SEARCH 30, 57 EXPOSURE 38, 59 F FADER 37 ...
...57 AUDIO MIX 52 AUDIO MODE 46 AUTO SHTR (Auto shutter 43 A.SHUT OFF (Auto shut off 47 A/V connecting cable .....32, 48 A/V OUT jack 32, 48 B BACK LIGHT 26, 57 BATT (battery) release lever...battery 12 Battery pack 12 Pre-installed rechargeable battery 71 Charging time 13 CHG (charge) lamp 12 CLOCK SET 19 Connect TV 32, 50 VCR 32, 48, 50 D D ZOOM (Digital zoom) ..... 43 DATA CODE 28, 39 DATE...27 Double speed Playback........ 40 Dubbing 48, 51 DV Interface 48, 50, 53 E EASY button 22 Easy Handycam 22, 35 EDITSEARCH 30, 44 END SCH (END SEARCH 30, 57 EXPOSURE 38, 59 F FADER 37 ...


