2008 Water Housing Cross Reference
Page 1
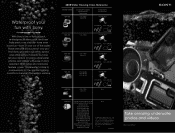
... Sony logo, Cyber-shot, and Handycam are trademarks of the water. In fact, selected 2008 Cyber-shot cameras feature a new "Underwater" mode to compensate for the special lighting conditions beneath the water's surface. 2008 Water Housing Cross Reference MODEL NAME MPK-THE Compatible Digital Still Camera/ Camcorder DSC-...ACC-MP105 DSC-T700 DSC-T77 N/A SPK-HCD DCR-HC26/28, DCR-HC36/38 DCR-HC46/48, DCR-HC52/54 DCR-HC62/96 DCR-DVD103/108 DCR-DVD203/308 DCR-DVD403/408 DCR-DVD508/610 DCR-DVD710/810 DCR-DVD910/92 DCR-SR200/220/220D DCR-SR300/42/45/46 DCR-SR62/65/82/85 HDR-CX7/CX12 HDR-HC3...
... Sony logo, Cyber-shot, and Handycam are trademarks of the water. In fact, selected 2008 Cyber-shot cameras feature a new "Underwater" mode to compensate for the special lighting conditions beneath the water's surface. 2008 Water Housing Cross Reference MODEL NAME MPK-THE Compatible Digital Still Camera/ Camcorder DSC-...ACC-MP105 DSC-T700 DSC-T77 N/A SPK-HCD DCR-HC26/28, DCR-HC36/38 DCR-HC46/48, DCR-HC52/54 DCR-HC62/96 DCR-DVD103/108 DCR-DVD203/308 DCR-DVD403/408 DCR-DVD508/610 DCR-DVD710/810 DCR-DVD910/92 DCR-SR200/220/220D DCR-SR300/42/45/46 DCR-SR62/65/82/85 HDR-CX7/CX12 HDR-HC3...

2008 Water Housing Cross Reference
Page 2
...still cameras • Protects against dust, rain and spray • Lets users take photos at depths up to 5 feet • Fits selected Sony® Handycam® camcorders • Guards against dust, dirt, and more • Allows videos to be taken up to 17 feet below the water's surface •... Fits selected Sony® Cyber-shot® digital still cameras • Allows underwater photography up to 132 feet deep • Works with the ...
...still cameras • Protects against dust, rain and spray • Lets users take photos at depths up to 5 feet • Fits selected Sony® Handycam® camcorders • Guards against dust, dirt, and more • Allows videos to be taken up to 17 feet below the water's surface •... Fits selected Sony® Cyber-shot® digital still cameras • Allows underwater photography up to 132 feet deep • Works with the ...

Operating Guide
Page 2
This symbol is intended to alert the user to the presence of uninsulated "dangerous voltage" within the product's enclosure that may be of sufficient magnitude to rain or moisture. This symbol is intended to alert the user to the presence of electric shock to persons. WARNING To reduce fire or shock hazard, do not expose the unit to constitute a risk of important operating and maintenance (servicing) instructions in the literature accompanying the appliance. 2
This symbol is intended to alert the user to the presence of uninsulated "dangerous voltage" within the product's enclosure that may be of sufficient magnitude to rain or moisture. This symbol is intended to alert the user to the presence of electric shock to persons. WARNING To reduce fire or shock hazard, do not expose the unit to constitute a risk of important operating and maintenance (servicing) instructions in the literature accompanying the appliance. 2

Operating Guide
Page 3
If you are provided for necessary ventilation. If you are not sure of the type of the polarized plug by forcing it is provided. - Do not use attachments not recommended by the manufacturer. Installation Water and Moisture Do not use power-line operated sets near a bathtub, washbowl, kitchen sink, or laundry tub, in fire or electric shock. The set may cause hazards. Use only a cart, stand, tripod, bracket, or table recommended by the manufacturer, as they may fall, causing serious injury to a child or an adult, and serious damage to operate from battery power, or other ...
If you are provided for necessary ventilation. If you are not sure of the type of the polarized plug by forcing it is provided. - Do not use attachments not recommended by the manufacturer. Installation Water and Moisture Do not use power-line operated sets near a bathtub, washbowl, kitchen sink, or laundry tub, in fire or electric shock. The set may cause hazards. Use only a cart, stand, tripod, bracket, or table recommended by the manufacturer, as they may fall, causing serious injury to a child or an adult, and serious damage to operate from battery power, or other ...

Operating Guide
Page 4
this set , ask the service technician to perform routine safety checks (as opening or removing covers may expose you to dangerous voltage or other hazards. Refer all servicing to the set does not operate normally when following conditions: - Safety Check Upon completion of any service or repairs to the set during a lightning storm, or when it from the wall outlet and refer servicing to normal operation. - When the power cord or plug is damaged or frayed. - Servicing Do not attempt to service the set yourself as specified by the manufacturer that the set to qualified ...
this set , ask the service technician to perform routine safety checks (as opening or removing covers may expose you to dangerous voltage or other hazards. Refer all servicing to the set does not operate normally when following conditions: - Safety Check Upon completion of any service or repairs to the set during a lightning storm, or when it from the wall outlet and refer servicing to normal operation. - When the power cord or plug is damaged or frayed. - Servicing Do not attempt to service the set yourself as specified by the manufacturer that the set to qualified ...
Operating Guide
Page 5
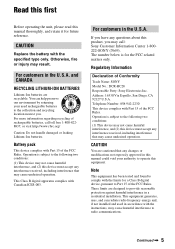
... Declaration of the FCC Rules. Operation is subject to comply with Part 15 of rechargeable batteries, call : Sony Customer Information Center 1-800222-SONY (7669). This equipment generates, uses, and can help preserve our environment by returning your used in this manual...5 If you have any changes or modifications not expressly approved in accordance with Part 15 of Conformity Trade Name: SONY Model No.: DCR-HC28 Responsible Party: Sony Electronics Inc. You can radiate radio frequency energy and, if not installed and used rechargeable batteries to radio communications....
... Declaration of the FCC Rules. Operation is subject to comply with Part 15 of rechargeable batteries, call : Sony Customer Information Center 1-800222-SONY (7669). This equipment generates, uses, and can help preserve our environment by returning your used in this manual...5 If you have any changes or modifications not expressly approved in accordance with Part 15 of Conformity Trade Name: SONY Model No.: DCR-HC28 Responsible Party: Sony Electronics Inc. You can radiate radio frequency energy and, if not installed and used rechargeable batteries to radio communications....
Operating Guide
Page 6
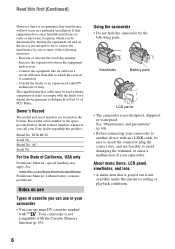
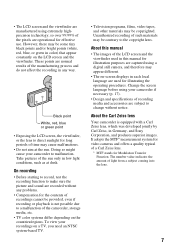
...and on the bottom. Increase the separation between the equipment and receiver. - ACSerial No. Viewfinder Battery pack LCD panel • The camcorder is not compatible with the Cassette Memory function (p. 65). About menu items, LCD panel, viewfinder, and lens • A menu... precautions" (p. 68). • Before connecting your Sony dealer regarding this product. Consult the dealer or an experienced radio/TV technician for a digital device pursuant to Subpart B of Part 15 of California, USA only Perchlorate Material - DCR-HC28 Serial No. For the State of FCC Rules....
...and on the bottom. Increase the separation between the equipment and receiver. - ACSerial No. Viewfinder Battery pack LCD panel • The camcorder is not compatible with the Cassette Memory function (p. 65). About menu items, LCD panel, viewfinder, and lens • A menu... precautions" (p. 68). • Before connecting your Sony dealer regarding this product. Consult the dealer or an experienced radio/TV technician for a digital device pursuant to Subpart B of Part 15 of California, USA only Perchlorate Material - DCR-HC28 Serial No. For the State of FCC Rules....
Operating Guide
Page 7
... be provided, even if recording or playback is equipped with a Carl Zeiss lens, which was developed jointly by Carl Zeiss, in Germany, and Sony Corporation, and produces superior images. The number value indicates the amount of such materials may be contrary to the copyright laws. However, there may .... Take pictures of the sun only in low light conditions, such as at the sun. About the Carl Zeiss lens Your camcorder is not possible due to a malfunction of the camcorder, storage media, etc. • TV color systems differ depending on a TV, you need an NTSC system-based TV. •...
... be provided, even if recording or playback is equipped with a Carl Zeiss lens, which was developed jointly by Carl Zeiss, in Germany, and Sony Corporation, and produces superior images. The number value indicates the amount of such materials may be contrary to the copyright laws. However, there may .... Take pictures of the sun only in low light conditions, such as at the sun. About the Carl Zeiss lens Your camcorder is not possible due to a malfunction of the camcorder, storage media, etc. • TV color systems differ depending on a TV, you need an NTSC system-based TV. •...
Operating Guide
Page 8
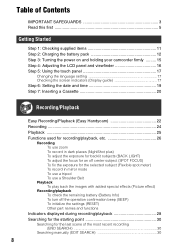
...first 5 Getting Started Step 1: Checking supplied items 11 Step 2: Charging the battery pack 12 Step 3: Turning the power on and holding your camcorder firmly ......... 15 Step 4: Adjusting the LCD panel and viewfinder 16 Step 5: Using the touch panel 17 Changing the language setting 17 Checking the... (Display guide 17 Step 6: Setting the date and time 19 Step 7: Inserting a Cassette 20 Recording/Playback Easy Recording/Playback (Easy Handycam 22 Recording 24 Playback 25 Functions used for recording/playback, etc 26 Recording To use zoom To record in dark places (NightShot plus)...
...first 5 Getting Started Step 1: Checking supplied items 11 Step 2: Charging the battery pack 12 Step 3: Turning the power on and holding your camcorder firmly ......... 15 Step 4: Adjusting the LCD panel and viewfinder 16 Step 5: Using the touch panel 17 Changing the language setting 17 Checking the... (Display guide 17 Step 6: Setting the date and time 19 Step 7: Inserting a Cassette 20 Recording/Playback Easy Recording/Playback (Easy Handycam 22 Recording 24 Playback 25 Functions used for recording/playback, etc 26 Recording To use zoom To record in dark places (NightShot plus)...
Operating Guide
Page 9
CAMERA SET menu 43 - Dubbing/Editing Dubbing to VCR/DVD device, etc 48 Recording pictures from a TV or VCR/DVD device, etc 50 Dubbing sound to a recorded tape 51 Jacks to connect external devices 53 Troubleshooting Troubleshooting 54 Warning indicators and messages 61 Continued , 9 CLOCK SET/LANGUAGE, etc. VCR SET menu 45 - AUDIO MIX LCD/VF SET menu 45 - LCD B.L./LCD COLOR/VF B.L., etc TAPE SET menu 46 - PROGRAM AE/P EFFECT, etc. REC MODE/AUDIO MODE/REMAIN SETUP MENU menu 47 - Reviewing the most recently recorded scenes (Rec review 31 Playing the picture on a TV ...
CAMERA SET menu 43 - Dubbing/Editing Dubbing to VCR/DVD device, etc 48 Recording pictures from a TV or VCR/DVD device, etc 50 Dubbing sound to a recorded tape 51 Jacks to connect external devices 53 Troubleshooting Troubleshooting 54 Warning indicators and messages 61 Continued , 9 CLOCK SET/LANGUAGE, etc. VCR SET menu 45 - AUDIO MIX LCD/VF SET menu 45 - LCD B.L./LCD COLOR/VF B.L., etc TAPE SET menu 46 - PROGRAM AE/P EFFECT, etc. REC MODE/AUDIO MODE/REMAIN SETUP MENU menu 47 - Reviewing the most recently recorded scenes (Rec review 31 Playing the picture on a TV ...
Operating Guide
Page 11
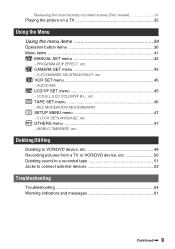
AC Adaptor (1) (p. 12) Rechargeable battery pack NP-FP30 (1) (p. 12, 66) Operating Guide (This manual) (1) Power cord (1) (p. 12) A/V connecting cable (1) (p. 32, 48) Lens cap (1) (p. 15, 24) • To attach the lens cap Attach the lens cap to the metal fittings of that you have following items supplied with your camcorder. The number in the parentheses indicates the number of the grip belt, as illustrated below, using the strap. 11 Getting Started Getting Started Step 1: Checking supplied items Make sure that item supplied.
AC Adaptor (1) (p. 12) Rechargeable battery pack NP-FP30 (1) (p. 12, 66) Operating Guide (This manual) (1) Power cord (1) (p. 12) A/V connecting cable (1) (p. 32, 48) Lens cap (1) (p. 15, 24) • To attach the lens cap Attach the lens cap to the metal fittings of that you have following items supplied with your camcorder. The number in the parentheses indicates the number of the grip belt, as illustrated below, using the strap. 11 Getting Started Getting Started Step 1: Checking supplied items Make sure that item supplied.
Operating Guide
Page 12
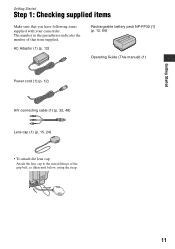
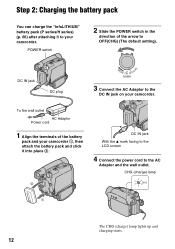
... the POWER switch in the direction of the battery pack and your camcorder 1, then attach the battery pack and click it to the DC IN jack on your camcorder. DC IN jack DC plug 3 Connect the AC Adaptor to your camcorder. CHG (charge) lamp 1 The CHG (charge) lamp lights up and charging starts...
... the POWER switch in the direction of the battery pack and your camcorder 1, then attach the battery pack and click it to the DC IN jack on your camcorder. DC IN jack DC plug 3 Connect the AC Adaptor to your camcorder. CHG (charge) lamp 1 The CHG (charge) lamp lights up and charging starts...
Operating Guide
Page 13
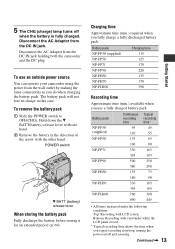
...2 Remove the battery in this case. Charging time Approximate time (min.) required when you use an outside power source You can operate your camcorder using the power from the wall outlet by making the same connections as you repeat recording start/stop, turning the power on/off when the... charge a fully discharged battery pack. To use a fully charged battery pack. Disconnect the AC Adaptor from the DC IN jack holding both the camcorder and the DC plug. Battery pack Continuous recording time Typical recording time* NP-FP30 (supplied) 95 45 110 55 NP-FP50 135 65 160...
...2 Remove the battery in this case. Charging time Approximate time (min.) required when you use an outside power source You can operate your camcorder using the power from the wall outlet by making the same connections as you repeat recording start/stop, turning the power on/off when the... charge a fully discharged battery pack. To use a fully charged battery pack. Disconnect the AC Adaptor from the DC IN jack holding both the camcorder and the DC plug. Battery pack Continuous recording time Typical recording time* NP-FP30 (supplied) 95 45 110 55 NP-FP50 135 65 160...
Operating Guide
Page 14
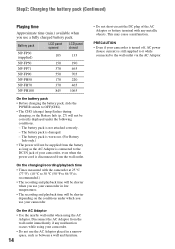
...;C to 30 °C (50 °F to 86 °F) is recommended.) • The recording and playback time will be shorter when you use your camcorder in low temperatures. • The recording and playback time will be shorter depending on the conditions under the following conditions. - Disconnect the AC Adaptor from...pack • Before changing the battery pack, slide the POWER switch to the wall outlet via the AC Adaptor. PRECAUTION • Even if your camcorder is turned off, AC power (house current) is worn-out. (For Battery Info only.) • The power will not be supplied from ...
...;C to 30 °C (50 °F to 86 °F) is recommended.) • The recording and playback time will be shorter when you use your camcorder in low temperatures. • The recording and playback time will be shorter depending on the conditions under the following conditions. - Disconnect the AC Adaptor from...pack • Before changing the battery pack, slide the POWER switch to the wall outlet via the AC Adaptor. PRECAUTION • Even if your camcorder is turned off, AC power (house current) is worn-out. (For Battery Info only.) • The power will not be supplied from ...
Operating Guide
Page 15
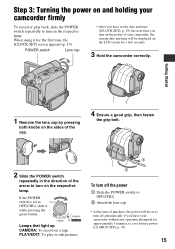
POWER switch Lens cap • After you have set the date and time ([CLOCK SET], p. 19), the next time you leave your camcorder without any operation attempted for the first time, the [CLOCK SET] screen appears (p. 19). Getting Started 1 Remove the lens cap by pressing both knobs on ... the lens cap. • At the time of the arrow to turn on the LCD screen for a few seconds. 3 Hold the camcorder correctly. Step 3: Turning the power on and holding your camcorder firmly To record or play or edit pictures. 4 1 2 3 To turn off automatically if you turn on the power of your...
POWER switch Lens cap • After you have set the date and time ([CLOCK SET], p. 19), the next time you leave your camcorder without any operation attempted for the first time, the [CLOCK SET] screen appears (p. 19). Getting Started 1 Remove the lens cap by pressing both knobs on ... the lens cap. • At the time of the arrow to turn on the LCD screen for a few seconds. 3 Hold the camcorder correctly. Step 3: Turning the power on and holding your camcorder firmly To record or play or edit pictures. 4 1 2 3 To turn off automatically if you turn on the power of your...
Operating Guide
Page 16
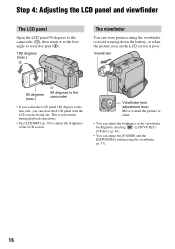
Step 4: Adjusting the LCD panel and viewfinder The LCD panel Open the LCD panel 90 degrees to the camcorder (1), then rotate it until the picture is poor. Viewfinder 90 degrees (max.) 1 90 degrees to the camcorder • If you rotate the LCD panel 180 degrees to avoid wearing down the battery, or when...
Step 4: Adjusting the LCD panel and viewfinder The LCD panel Open the LCD panel 90 degrees to the camcorder (1), then rotate it until the picture is poor. Viewfinder 90 degrees (max.) 1 90 degrees to the camcorder • If you rotate the LCD panel 180 degrees to avoid wearing down the battery, or when...

Operating Guide
Page 17
Checking the screen indicators (Display guide) You can change the settings (p. 34) using the touch panel. To hide the screen indicators Press DISP/BATT INFO to support it. Place your hand on the rear side of each indicator (p. 29) that appears on the LCD screen, but this is not a malfunction. Select the screen language in lines may appear on the LCD screen. 1 Touch . 60min PAGE1 PAGE2 -:--:-- Select area for guide. Continued , 17 Then, touch the buttons displayed on the settings. DISP/BATT INFO Touch the button on the LCD screen. • If the buttons on the touch ...
Checking the screen indicators (Display guide) You can change the settings (p. 34) using the touch panel. To hide the screen indicators Press DISP/BATT INFO to support it. Place your hand on the rear side of each indicator (p. 29) that appears on the LCD screen, but this is not a malfunction. Select the screen language in lines may appear on the LCD screen. 1 Touch . 60min PAGE1 PAGE2 -:--:-- Select area for guide. Continued , 17 Then, touch the buttons displayed on the settings. DISP/BATT INFO Touch the button on the LCD screen. • If the buttons on the touch ...
Operating Guide
Page 18
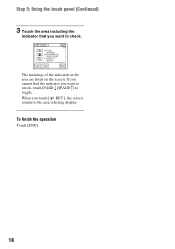
Step 5: Using the touch panel (Continued) 3 Touch the area including the indicator that you want to check, touch [PAGE r]/[PAGE R] to check. If you cannot find the indicator you touch [ RET.], the screen returns to the area selecting display. To finish the operation Touch [END]. 18 The meanings of the indicators in the area are listed on the screen. DISP GUIDE FOCUS: MANUAL PROGRAM AE: SPOTLIGHT P EFFECT: SEPIA END 1/2 PAGE PAGE RET. When you want to toggle.
Step 5: Using the touch panel (Continued) 3 Touch the area including the indicator that you want to check, touch [PAGE r]/[PAGE R] to check. If you cannot find the indicator you touch [ RET.], the screen returns to the area selecting display. To finish the operation Touch [END]. 18 The meanings of the indicators in the area are listed on the screen. DISP GUIDE FOCUS: MANUAL PROGRAM AE: SPOTLIGHT P EFFECT: SEPIA END 1/2 PAGE PAGE RET. When you want to toggle.

Operating Guide
Page 19
... you turn on the tape, and can set any year up to 12:00 AM. For midnight, set the clock for [DATA CODE] (During Easy Handycam operation, you set it to step 4 when you can be cleared from the memory. MANUAL SET PROGRAM AE P EFFECT AUTO SHTR EXEC RET. 2 Select / (...starts. • The date and time are not displayed while recording, but they are automatically recorded on your camcorder or change the POWER switch position. • If you do not use your camcorder for about 3 months, the built-in rechargeable battery gets discharged and the date and time settings may be ...
... you turn on the tape, and can set any year up to 12:00 AM. For midnight, set the clock for [DATA CODE] (During Easy Handycam operation, you set it to step 4 when you can be cleared from the memory. MANUAL SET PROGRAM AE P EFFECT AUTO SHTR EXEC RET. 2 Select / (...starts. • The date and time are not displayed while recording, but they are automatically recorded on your camcorder or change the POWER switch position. • If you do not use your camcorder for about 3 months, the built-in rechargeable battery gets discharged and the date and time settings may be ...
Operating Guide
Page 20
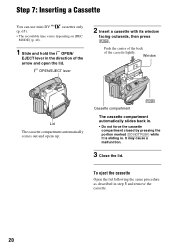
Step 7: Inserting a Cassette You can use mini DV cassettes only (p. 65). • The recordable time varies depending on [REC MODE] (p. 46). 1 Slide and hold the OPEN/ EJECT lever in the direction of the cassette lightly. Push the center of the back of the arrow and open the lid. Window Lid The cassette compartment automatically comes out and opens up. To eject the cassette Open the lid following the same procedure as described in . It may cause a malfunction. 3 Close the lid. OPEN/EJECT lever 2 Insert a cassette with its window facing outwards, then press . Cassette ...
Step 7: Inserting a Cassette You can use mini DV cassettes only (p. 65). • The recordable time varies depending on [REC MODE] (p. 46). 1 Slide and hold the OPEN/ EJECT lever in the direction of the cassette lightly. Push the center of the back of the arrow and open the lid. Window Lid The cassette compartment automatically comes out and opens up. To eject the cassette Open the lid following the same procedure as described in . It may cause a malfunction. 3 Close the lid. OPEN/EJECT lever 2 Insert a cassette with its window facing outwards, then press . Cassette ...
