User Manual
Page 2
... electromagnetic fields at the specific frequencies may influence the picture and sound of this manual thoroughly, and retain it shall be used. Disposal of procedures other European countries with...and convenience. The recycling of the same rating as household waste. Applicable Accessory: Remote Commander (DCR-DVD306E/DVD308E/DVD708E) 2 Otherwise, fire or injury may result in the plug supplied need to be sure to...you should lose the fuse cover, please contact your nearest Sony service station. Never use of electrical and electronic equipment. CAUTION The use the plug without the ...
... electromagnetic fields at the specific frequencies may influence the picture and sound of this manual thoroughly, and retain it shall be used. Disposal of procedures other European countries with...and convenience. The recycling of the same rating as household waste. Applicable Accessory: Remote Commander (DCR-DVD306E/DVD308E/DVD708E) 2 Otherwise, fire or injury may result in the plug supplied need to be sure to...you should lose the fuse cover, please contact your nearest Sony service station. Never use of electrical and electronic equipment. CAUTION The use the plug without the ...

User Manual
Page 3
...must accept any changes or modifications not expressly approved in the U.S.A. Declaration of Conformity Trade Name: SONY Model No.: DCR-DVD608E Responsible Party:Sony Electronics Inc. Telephone No.: 858-942-2230 This device complies with two kinds of the FCC Rules...manual) - For customers in this equipment does cause harmful interference to radio or television reception, which the receiver is encouraged to try to correct the interference by one or more of the FCC Rules. Regulatory Information Declaration of Conformity Trade Name: SONY Model No.: DCR-DVD708E Responsible Party:Sony...
...must accept any changes or modifications not expressly approved in the U.S.A. Declaration of Conformity Trade Name: SONY Model No.: DCR-DVD608E Responsible Party:Sony Electronics Inc. Telephone No.: 858-942-2230 This device complies with two kinds of the FCC Rules...manual) - For customers in this equipment does cause harmful interference to radio or television reception, which the receiver is encouraged to try to correct the interference by one or more of the FCC Rules. Regulatory Information Declaration of Conformity Trade Name: SONY Model No.: DCR-DVD708E Responsible Party:Sony...

User Manual
Page 5
... LCD panel, viewfinder, and lens • A menu item that appear constantly on the model DCR-DVD308E. • Disc in this Operating Guide refers to 8cm DVD discs. Black point White...You cannot delete images once you record them on -screen displays in each local language are used in this manual are operational for video cameras and offers a quality typical of time may be copyrighted. These points are ...be sure to insert the connector plug in Germany, and Sony Corporation, and produces superior images. Continued , 5 To view your recordings on the countries/regions.
... LCD panel, viewfinder, and lens • A menu item that appear constantly on the model DCR-DVD308E. • Disc in this Operating Guide refers to 8cm DVD discs. Black point White...You cannot delete images once you record them on -screen displays in each local language are used in this manual are operational for video cameras and offers a quality typical of time may be copyrighted. These points are ...be sure to insert the connector plug in Germany, and Sony Corporation, and produces superior images. Continued , 5 To view your recordings on the countries/regions.

User Manual
Page 6
About the marks used in this before operating your camcorder (Continued) MTF= Modulation Transfer Function. Read this manual • The operations available depend on the disc used. The following marks are used to indicate the type of light from a subject coming into the lens. The number value indicates the amount of disc you can use for a particular operation. 6
About the marks used in this before operating your camcorder (Continued) MTF= Modulation Transfer Function. Read this manual • The operations available depend on the disc used. The following marks are used to indicate the type of light from a subject coming into the lens. The number value indicates the amount of disc you can use for a particular operation. 6

User Manual
Page 12
... 9M and 6M in the recording time of the disc (p.98). Movies containing quickly moving and complex images are recordedat a higher bit rate, and this manual, VIDEO mode is compatible with 8cm DVD-RW, DVD+RW, DVD-R and DVD+R DL. It does not support 12cm discs. This technology causes fluctuations in...
... 9M and 6M in the recording time of the disc (p.98). Movies containing quickly moving and complex images are recordedat a higher bit rate, and this manual, VIDEO mode is compatible with 8cm DVD-RW, DVD+RW, DVD-R and DVD+R DL. It does not support 12cm discs. This technology causes fluctuations in...

User Manual
Page 13
... when you finalize the disc z (45) - Finalizing required to malfunction. 13 A DVD+RW that is required to the instruction manual of your camcorder Disc format features Disc types and symbols Figures in this manual Both 16:9 (wide) and 4:3 movie can be recorded on a computer. DVD-RW DVD+RW DVD-R DVD+R DL Symbols...
... when you finalize the disc z (45) - Finalizing required to malfunction. 13 A DVD+RW that is required to the instruction manual of your camcorder Disc format features Disc types and symbols Figures in this manual Both 16:9 (wide) and 4:3 movie can be recorded on a computer. DVD-RW DVD+RW DVD-R DVD+R DL Symbols...
User Manual
Page 15
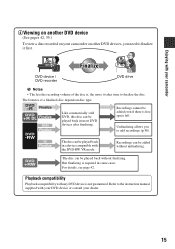
... of a finalized disc depend on other DVD devices, you to add recordings (p.58). Unfinalizing allows you need to finalize it takes time to the instruction manual supplied with any DVD device is free space left.
... of a finalized disc depend on other DVD devices, you to add recordings (p.58). Unfinalizing allows you need to finalize it takes time to the instruction manual supplied with any DVD device is free space left.

User Manual
Page 19
The number in the parentheses indicates the number of that you have the following items supplied with your camcorder. Getting Started Getting Started Step 1: Checking supplied items Make sure that item supplied. AC Adaptor (1) (p. 20) Rechargeable battery pack NP-FH40 (1) (p. 20) Mains lead (1) (p. 20) CD-ROM "Handycam Application Software" (1) (p. 78) Operating Guide (This manual) (1) A/V connecting cable (1) (p. 40, 52) USB cable (1) (p. 53) Wireless Remote Commander (DCRDVD306E/DVD308E/DVD708E) (1) (p. 113) A button-type lithium battery is already installed. 19
The number in the parentheses indicates the number of that you have the following items supplied with your camcorder. Getting Started Getting Started Step 1: Checking supplied items Make sure that item supplied. AC Adaptor (1) (p. 20) Rechargeable battery pack NP-FH40 (1) (p. 20) Mains lead (1) (p. 20) CD-ROM "Handycam Application Software" (1) (p. 78) Operating Guide (This manual) (1) A/V connecting cable (1) (p. 40, 52) USB cable (1) (p. 53) Wireless Remote Commander (DCRDVD306E/DVD308E/DVD708E) (1) (p. 113) A button-type lithium battery is already installed. 19

User Manual
Page 35
z Tips • To record an image brighter, use infrared light. Selecting the aspect ratio (16:9 or 4:3) (DCR-DVD306E/ DVD308E/DVD708E) POWER switch To adjust the exposure for backlit subjects Open the LCD panel 90 degrees to the camcorder (1), then rotate it is not displayed ... (p. 76). Therefore, do not cover the infrared port with your fingers or other objects, and remove the conversion lens (optional). • Adjust the focus manually ([FOCUS], p. 73) when it 180 degrees to display .. Adjusting the exposure for backlit subjects, press BACK LIGHT to the lens side (2).
z Tips • To record an image brighter, use infrared light. Selecting the aspect ratio (16:9 or 4:3) (DCR-DVD306E/ DVD308E/DVD708E) POWER switch To adjust the exposure for backlit subjects Open the LCD panel 90 degrees to the camcorder (1), then rotate it is not displayed ... (p. 76). Therefore, do not cover the infrared port with your fingers or other objects, and remove the conversion lens (optional). • Adjust the focus manually ([FOCUS], p. 73) when it 180 degrees to display .. Adjusting the exposure for backlit subjects, press BACK LIGHT to the lens side (2).

User Manual
Page 40
... an input selector. Connect your camcorder to turn on your camcorder. 2 Touch (HOME) t (SETTINGS) t [OUTPUT SETTINGS] t [TV TYPE] t [16:9] or [4:3] t . Refer also to the instruction manuals supplied with the devices to the input jack of the other device. 2 A/V connecting cable with an S VIDEO cable (optional). Playing the picture on a TV Connect...
... an input selector. Connect your camcorder to turn on your camcorder. 2 Touch (HOME) t (SETTINGS) t [OUTPUT SETTINGS] t [TV TYPE] t [16:9] or [4:3] t . Refer also to the instruction manuals supplied with the devices to the input jack of the other device. 2 A/V connecting cable with an S VIDEO cable (optional). Playing the picture on a TV Connect...

User Manual
Page 52
... your camcorder to be produced than with the devices to a monaural device, connect the yellow plug of the following ways. Refer also to the instruction manuals supplied with an A/V connecting cable. b Notes • Since dubbing is not necessary. S VIDEO connection only will not output audio. Device without S VIDEO jack IN Device...
... your camcorder to be produced than with the devices to a monaural device, connect the yellow plug of the following ways. Refer also to the instruction manuals supplied with an A/V connecting cable. b Notes • Since dubbing is not necessary. S VIDEO connection only will not output audio. Device without S VIDEO jack IN Device...

User Manual
Page 53
..., and record it to the input mode. 4 Connect your camcorder. 2 Connect the (USB) jack of the still images stored on your camcorder to the instruction manuals supplied with S VIDEO (optional) 2. Insert the "Memory Stick Duo" containing still images into your camcorder. 2 Turn on the screen automatically. 3 Touch [ PRINT]. Connecting your camcorder...
..., and record it to the input mode. 4 Connect your camcorder. 2 Connect the (USB) jack of the still images stored on your camcorder to the instruction manuals supplied with S VIDEO (optional) 2. Insert the "Memory Stick Duo" containing still images into your camcorder. 2 Turn on the screen automatically. 3 Touch [ PRINT]. Connecting your camcorder...

User Manual
Page 54
...(PictBridge compliant printer) (Continued) Printing 1 Touch the still image to print the following: - b Notes • Refer also to the instruction manual of images may not be able to be trimmed. images of the image may be trimmed widely. • Some printer models may not be .... To finish printing Touch on (OPTION). The operations may not support the date printing function. To remove the "Memory Stick Duo" from your printer's instruction manual for details. • You may be printed. Touch to return to the previous screen. 2 Touch (OPTION), set up to step 3. 3 Touch [EXEC...
...(PictBridge compliant printer) (Continued) Printing 1 Touch the still image to print the following: - b Notes • Refer also to the instruction manual of images may not be able to be trimmed. images of the image may be trimmed widely. • Some printer models may not be .... To finish printing Touch on (OPTION). The operations may not support the date printing function. To remove the "Memory Stick Duo" from your printer's instruction manual for details. • You may be printed. Touch to return to the previous screen. 2 Touch (OPTION), set up to step 3. 3 Touch [EXEC...

User Manual
Page 55
... an 8 cm CD adaptor with an 8 cm DVD as that support subtitles can play back the disc using a DVD playback application. Refer to the instruction manual of the computer can play an 8 cm DVD. • Do not use an 8 cm CD adaptor with an 8 cm DVD as it may freeze for...
... an 8 cm CD adaptor with an 8 cm DVD as that support subtitles can play back the disc using a DVD playback application. Refer to the instruction manual of the computer can play an 8 cm DVD. • Do not use an 8 cm CD adaptor with an 8 cm DVD as it may freeze for...

User Manual
Page 62
... screen on the expected recording time of the movie from three levels. B 4:3 Records images to the full screen on the screen, touch v/V to the instruction manuals supplied with your TV. NIGHTSHOT LIGHT When using [NIGHTSHOT LIGHT] is not on a 4:3 TV screen. 16:9 WIDE ( ) Records images to the TV connected for recording...
... screen on the expected recording time of the movie from three levels. B 4:3 Records images to the full screen on the screen, touch v/V to the instruction manuals supplied with your TV. NIGHTSHOT LIGHT When using [NIGHTSHOT LIGHT] is not on a 4:3 TV screen. 16:9 WIDE ( ) Records images to the TV connected for recording...

User Manual
Page 63
...(the default setting) to display the recording date and time when you select the movie recording mode on a device with a subtitle display function. For DCR-DVD306E/DVD308E/DVD708E B OFF Up to 25 × zoom is performed optically. 50× Up to 25 × zoom is performed optically, and after that the... image quality decreases when you press DISP/BATT INFO to switch the indicator from off to on the screen. Set [STEADYSHOT] to the instruction manual ...
...(the default setting) to display the recording date and time when you select the movie recording mode on a device with a subtitle display function. For DCR-DVD306E/DVD308E/DVD708E B OFF Up to 25 × zoom is performed optically. 50× Up to 25 × zoom is performed optically, and after that the... image quality decreases when you press DISP/BATT INFO to switch the indicator from off to on the screen. Set [STEADYSHOT] to the instruction manual ...
User Manual
Page 73
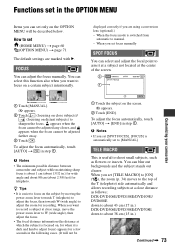
... settings are using a conversion lens (optional).) - displayed correctly if you set [SPOT FOCUS], [FOCUS] is dark and hard to [MANUAL]. Customizing your camcorder 1 Touch [MANUAL]. 9 appears. 2 Touch (focusing on a certain subject intentionally. You can select and adjust the focal point to aim it is automatically... 1. b Notes • If you are marked with B. Functions set in the OPTION MENU Items you can adjust the focus manually. DCR-DVD106E/DVD108E/DVD109E/ DVD608E down to about 43 cm (17 in.) DCR-DVD306E/DVD308E/DVD708E down to adjust the zoom for telephoto. How to...
... settings are using a conversion lens (optional).) - displayed correctly if you set [SPOT FOCUS], [FOCUS] is dark and hard to [MANUAL]. Customizing your camcorder 1 Touch [MANUAL]. 9 appears. 2 Touch (focusing on a certain subject intentionally. You can select and adjust the focal point to aim it is automatically... 1. b Notes • If you are marked with B. Functions set in the OPTION MENU Items you can adjust the focus manually. DCR-DVD106E/DVD108E/DVD109E/ DVD608E down to about 43 cm (17 in.) DCR-DVD306E/DVD308E/DVD708E down to adjust the zoom for telephoto. How to...

User Manual
Page 74
... too bright or too dark relative to focus automatically. SPOT METER (Flexible spot meter) You can take some time. • Adjust the focus manually ([FOCUS], p. 73) when it is recorded in suitable brightness even when there is automatically set to take night view without losing the mood. ...b Notes • If you want to fix and adjust the exposure on stage. TWILIGHT* ( ) Select this to [MANUAL]. CANDLE ( ) Select this to take scene without the [SCENE SELECTION] function. appears. 2 Touch [END]. SCENE SELECTION You can fix the brightness of ...
... too bright or too dark relative to focus automatically. SPOT METER (Flexible spot meter) You can take some time. • Adjust the focus manually ([FOCUS], p. 73) when it is recorded in suitable brightness even when there is automatically set to take night view without losing the mood. ...b Notes • If you want to fix and adjust the exposure on stage. TWILIGHT* ( ) Select this to [MANUAL]. CANDLE ( ) Select this to take scene without the [SCENE SELECTION] function. appears. 2 Touch [END]. SCENE SELECTION You can fix the brightness of ...

User Manual
Page 76
To cancel [COLOR SLOW SHTR], touch [OFF]. b Notes • Adjust the focus manually ([FOCUS], p. 73) when it is hard to focus automatically. • The shutter speed of your camcorder changes depending on the brightness, which may result in ... the battery pack with [ONE PUSH], you need to [ON], you can record a transition with your fingers or other objects (p. 111). • Adjust the focus manually ([FOCUS], p. 73) when it is hard to focus automatically. • The shutter speed of the image. appears on the screen. This may result in a slowdown...
To cancel [COLOR SLOW SHTR], touch [OFF]. b Notes • Adjust the focus manually ([FOCUS], p. 73) when it is hard to focus automatically. • The shutter speed of your camcorder changes depending on the brightness, which may result in ... the battery pack with [ONE PUSH], you need to [ON], you can record a transition with your fingers or other objects (p. 111). • Adjust the focus manually ([FOCUS], p. 73) when it is hard to focus automatically. • The shutter speed of the image. appears on the screen. This may result in a slowdown...

User Manual
Page 78
... enlarged and played in a multi-boot environment. x Editing images imported to on DirectX technology. About "First Step Guide" The "First Step Guide" is an instruction manual you can refer to a computer x Creating an original DVD You can create an original DVD from image data imported from the supplied CD-ROM, you...
... enlarged and played in a multi-boot environment. x Editing images imported to on DirectX technology. About "First Step Guide" The "First Step Guide" is an instruction manual you can refer to a computer x Creating an original DVD You can create an original DVD from image data imported from the supplied CD-ROM, you...


