User Manual
Page 1
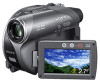
Operating Guide DCR-DVD105E/DVD205E/DVD304E/ DVD305E/DVD605E/DVD705E/ DVD755E 2-661-360-11(1) Enjoying with your DVD Handycam 12 Getting Started 18 Easy Handycam 32 Recording /Playback 40 Playback on DVD devices 54 Using the Recorded disc 61 Using the Setup items 64 Editing on DVD Handycam 85 Dubbing, Printing 94 Using a Computer 101 Troubleshooting 107 Additional Information 130 Glossary, Index 144 © 2006 Sony Corporation
Operating Guide DCR-DVD105E/DVD205E/DVD304E/ DVD305E/DVD605E/DVD705E/ DVD755E 2-661-360-11(1) Enjoying with your DVD Handycam 12 Getting Started 18 Easy Handycam 32 Recording /Playback 40 Playback on DVD devices 54 Using the Recorded disc 61 Using the Setup items 64 Editing on DVD Handycam 85 Dubbing, Printing 94 Using a Computer 101 Troubleshooting 107 Additional Information 130 Glossary, Index 144 © 2006 Sony Corporation
User Manual
Page 8
... (16:9 or 4:3) of Contents Enjoying with your DVD Handycam What you can do with your DVD Handycam 12 Choosing a disc 14 Using your DVD Handycam 16 Getting Started Step 1: Checking supplied items 18 Step ...19 Step 3: Turning the power on, and holding your camcorder with automatic settings Using Easy Handycam operation 32 Recording with ease 34 Playing back with ease 36 Preparation for playing back on ...Recording To use zoom To record sound with more presence (5.1ch surround recording) (For DCR-DVD304E/DVD305E/DVD755E) To record in dark places (NightShot plus) To adjust the exposure for...
... (16:9 or 4:3) of Contents Enjoying with your DVD Handycam What you can do with your DVD Handycam 12 Choosing a disc 14 Using your DVD Handycam 16 Getting Started Step 1: Checking supplied items 18 Step ...19 Step 3: Turning the power on, and holding your camcorder with automatic settings Using Easy Handycam operation 32 Recording with ease 34 Playing back with ease 36 Preparation for playing back on ...Recording To use zoom To record sound with more presence (5.1ch surround recording) (For DCR-DVD304E/DVD305E/DVD755E) To record in dark places (NightShot plus) To adjust the exposure for...
User Manual
Page 10
... PICT.APPLI 75 Special effects on pictures or additional functions on recording/playback (PICT.EFFECT/D.EFFECT, etc.) DISC SET (DCR-DVD105E/DVD205E/DVD605E/DVD705E) / MEDIA SET (DCR-DVD304E/DVD305E/DVD755E 77 Settings for discs and "Memory Stick Duo" (FORMAT/FINALIZE/UNFINALIZE, etc.) STANDARD SET 78 Settings... SET/AREA SET/LANGUAGE, etc.) Customizing Personal Menu 83 Editing on DVD Handycam Copying the still images (DCR-DVD304E/DVD305E/DVD755E 85 Deleting still images from the "Memory Stick Duo" (DCR-DVD304E/DVD305E/DVD755E 87 Editing the original data 88 Creating the Playlist 89 ...
... PICT.APPLI 75 Special effects on pictures or additional functions on recording/playback (PICT.EFFECT/D.EFFECT, etc.) DISC SET (DCR-DVD105E/DVD205E/DVD605E/DVD705E) / MEDIA SET (DCR-DVD304E/DVD305E/DVD755E 77 Settings for discs and "Memory Stick Duo" (FORMAT/FINALIZE/UNFINALIZE, etc.) STANDARD SET 78 Settings... SET/AREA SET/LANGUAGE, etc.) Customizing Personal Menu 83 Editing on DVD Handycam Copying the still images (DCR-DVD304E/DVD305E/DVD755E 85 Deleting still images from the "Memory Stick Duo" (DCR-DVD304E/DVD305E/DVD755E 87 Editing the original data 88 Creating the Playlist 89 ...
User Manual
Page 12
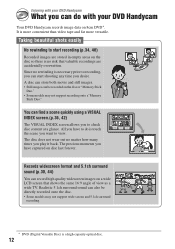
... disc. 12 Realistic 5.1ch surround sound can also be recorded on disc last forever. The precious moments you have to do with your DVD Handycam Your DVD Handycam records image data on a wide LCD screen that valuable recordings are stored in empty areas on the disc so there is no risk that... shows the same 16:9 angle of view as a wide TV. Enjoying with your DVD Handycam What you can do is necessary prior to start shooting any time you desire. Records widescreen format and 5.1ch surround sound (p.30, 44) You can...
... disc. 12 Realistic 5.1ch surround sound can also be recorded on disc last forever. The precious moments you have to do with your DVD Handycam Your DVD Handycam records image data on a wide LCD screen that valuable recordings are stored in empty areas on the disc so there is no risk that... shows the same 16:9 angle of view as a wide TV. Enjoying with your DVD Handycam What you can do is necessary prior to start shooting any time you desire. Records widescreen format and 5.1ch surround sound (p.30, 44) You can...
User Manual
Page 13
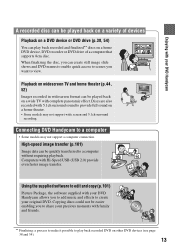
...8226; Some models may not support wide screen and 5.1ch surround recording. Playback on other DVD devices (see page 38 and 54). 13 Connecting DVD Handycam to provide full sound on a variety of a computer that supports 8cm disc. When finalizing the disc, you can be played back on a home ...theater. • Some models may not support a computer connection. Using the supplied software to create your DVD Handycam A recorded disc can be played back on a DVD device or DVD drive (p.38, 54) You can be easier enabling you want to a computer ...
...8226; Some models may not support wide screen and 5.1ch surround recording. Playback on other DVD devices (see page 38 and 54). 13 Connecting DVD Handycam to provide full sound on a variety of a computer that supports 8cm disc. When finalizing the disc, you can be played back on a home ...theater. • Some models may not support a computer connection. Using the supplied software to create your DVD Handycam A recorded disc can be played back on a DVD device or DVD drive (p.38, 54) You can be easier enabling you want to a computer ...
User Manual
Page 14
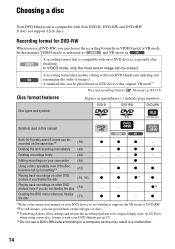
...1Refer to its original empty state. (p.62) Even when using a new disc, format it supports the VR mode of images). Editing recordings on your DVD Handycam (deleting and rearranging the order of DVD-RW. *2For still images, you finalize the disc (57) z z - Playing back recordings on the same ... Playing back recordings on the all types of discs. *3 Formatting deletes all recordings and returns the recording medium to the instruction manual of your DVD Handycam (p.27). *4 Do not use a DVD-RW, you finalize the disc (38, 54) z - A finalized disc can record them on other...
...1Refer to its original empty state. (p.62) Even when using a new disc, format it supports the VR mode of images). Editing recordings on your DVD Handycam (deleting and rearranging the order of DVD-RW. *2For still images, you finalize the disc (57) z z - Playing back recordings on the same ... Playing back recordings on the all types of discs. *3 Formatting deletes all recordings and returns the recording medium to the instruction manual of your DVD Handycam (p.27). *4 Do not use a DVD-RW, you finalize the disc (38, 54) z - A finalized disc can record them on other...
User Manual
Page 15
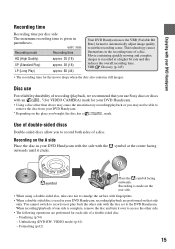
...quickly moving and complex images is recorded at the center facing symbol Place the symbol facing outwards. Disc use Sony discs or discs with an *(for VIDEO CAMERA) mark for your DVD Handycam. • Using a disc other side. • The following operations are performed on the A side ... Recording time HQ (High Quality) approx. 20 (18) SP (Standard Play) approx. 30 (18) LP (Long Play) approx. 60 (44) Your DVD Handycam uses the VBR (Variable Bit Rate) format to automatically adjust image quality to smudge the surface with fingerprints. • When a double-sided disc is made...
...quickly moving and complex images is recorded at the center facing symbol Place the symbol facing outwards. Disc use Sony discs or discs with an *(for VIDEO CAMERA) mark for your DVD Handycam. • Using a disc other side. • The following operations are performed on the A side ... Recording time HQ (High Quality) approx. 20 (18) SP (Standard Play) approx. 30 (18) LP (Long Play) approx. 60 (44) Your DVD Handycam uses the VBR (Variable Bit Rate) format to automatically adjust image quality to smudge the surface with fingerprints. • When a double-sided disc is made...
User Manual
Page 16
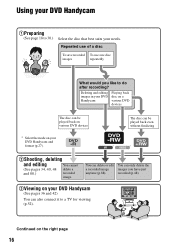
... save recorded To use one disc images repeatedly What would you have just anytime (p.88). Deleting and editing images in your DVD Handycam Playing back disc on your DVD Handycam (See pages 36 and 42) You can only delete the a recorded image images you like to 30.) Select the disc that best...). 3Viewing on the right page 16 You can delete or edit You can also connect it to a TV for viewing (p.52). Continued on your DVD Handycam and format (p.27). Using your DVD Handycam 1Preparing (See page 18 to do after recording?
... save recorded To use one disc images repeatedly What would you have just anytime (p.88). Deleting and editing images in your DVD Handycam Playing back disc on your DVD Handycam (See pages 36 and 42) You can only delete the a recorded image images you like to 30.) Select the disc that best...). 3Viewing on the right page 16 You can delete or edit You can also connect it to a TV for viewing (p.52). Continued on your DVD Handycam and format (p.27). Using your DVD Handycam 1Preparing (See page 18 to do after recording?
User Manual
Page 17
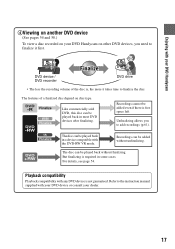
... a finalized disc depend on disc type. But finalizing is not guaranteed. Refer to the instruction manual supplied with your DVD device or consult your DVD Handycam on other DVD devices, you to finalize the disc. The features of the disc is free space left. Recordings cannot be added even if there... played back in some cases. Finalize The disc can be played back in a device compatible with the DVD-RW VR mode. Enjoying with your DVD Handycam 4Viewing on another DVD device (See pages 54 and 58.) To view a disc recorded on your dealer. 17
... a finalized disc depend on disc type. But finalizing is not guaranteed. Refer to the instruction manual supplied with your DVD device or consult your DVD Handycam on other DVD devices, you to finalize the disc. The features of the disc is free space left. Recordings cannot be added even if there... played back in some cases. Finalize The disc can be played back in a device compatible with the DVD-RW VR mode. Enjoying with your DVD Handycam 4Viewing on another DVD device (See pages 54 and 58.) To view a disc recorded on your dealer. 17
User Manual
Page 28
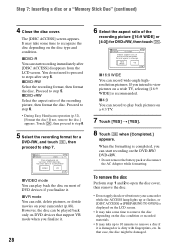
It may take some time to view pictures on various DVD devices. Proceed to step 6. • During Easy Handycam operation (p.32), [Format the disc? xVR mode You can edit, delete pictures, or divide movies on the disc type and condition. If not, remove the ...
It may take some time to view pictures on various DVD devices. Proceed to step 6. • During Easy Handycam operation (p.32), [Format the disc? xVR mode You can edit, delete pictures, or divide movies on the disc type and condition. If not, remove the ...
User Manual
Page 32
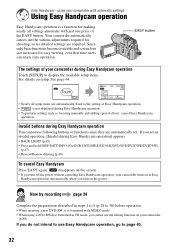
... the EASY button. Invalid buttons during Easy Handycam operation] appears. • BACK LIGHT (p.45) • Press and hold DISP BATT/INFO (For DCR-DVD205E/DVD304E/DVD305E/DVD705E/DVD755E) (p.47) • Review/Review deleting (p.48) To cancel Easy Handycam Press EASY again. disappears on the screen... intend to use following buttons or functions since they are automatically set an invalid operation, [Invalid during Easy Handycam operation You cannot use Easy Handycam operation, go to page 40. 32 Now try recording page 34 Complete the preparations described in steps 1 to...
... the EASY button. Invalid buttons during Easy Handycam operation] appears. • BACK LIGHT (p.45) • Press and hold DISP BATT/INFO (For DCR-DVD205E/DVD304E/DVD305E/DVD705E/DVD755E) (p.47) • Review/Review deleting (p.48) To cancel Easy Handycam Press EASY again. disappears on the screen... intend to use following buttons or functions since they are automatically set an invalid operation, [Invalid during Easy Handycam operation You cannot use Easy Handycam operation, go to page 40. 32 Now try recording page 34 Complete the preparations described in steps 1 to...

User Manual
Page 33
Easy Handycam - using your camcorder with automatic settings 33
Easy Handycam - using your camcorder with automatic settings 33

User Manual
Page 35
... heard. When disappears, the image has been recorded. 35 Flashing bLights up the lamp. (Still) 2 Select the recording destination for still images (For DCR-DVD304E/DVD305E/ DVD755E). 1 Touch [SETUP] t [STILL MEDIA]. 2 Select the media for recording still images, then touch . using your camcorder and... press EASY to set to light up A shutter sound is [FINE] (p.74). Easy Handycam - Before Easy Handycam operation Turn on your camcorder with the selected recording media displayed at the top right. 1 2 The number of the arrow to Easy...
... heard. When disappears, the image has been recorded. 35 Flashing bLights up the lamp. (Still) 2 Select the recording destination for still images (For DCR-DVD304E/DVD305E/ DVD755E). 1 Touch [SETUP] t [STILL MEDIA]. 2 Select the media for recording still images, then touch . using your camcorder and... press EASY to set to light up A shutter sound is [FINE] (p.74). Easy Handycam - Before Easy Handycam operation Turn on your camcorder with the selected recording media displayed at the top right. 1 2 The number of the arrow to Easy...
User Manual
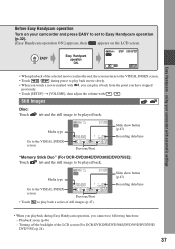
Page 37
...end, the screen returns to the VISUAL INDEX screen. • Touch / during Easy Handycam operation, you cannot use following functions: - Still Images Disc: Touch tab and the still...Touch to be played back. Before Easy Handycam operation Turn on the LCD screen. Slide show button (p.47) Recording date/time "Memory Stick Duo" (For DCR-DVD304E/DVD305E/DVD755E): Touch tab and ...Recording date/time • When you playback during pause to Easy Handycam operation (p.32). [Easy Handycam operation ON.] appears, then appears on your camcorder with automatic settings • When ...
...end, the screen returns to the VISUAL INDEX screen. • Touch / during Easy Handycam operation, you cannot use following functions: - Still Images Disc: Touch tab and the still...Touch to be played back. Before Easy Handycam operation Turn on the LCD screen. Slide show button (p.47) Recording date/time "Memory Stick Duo" (For DCR-DVD304E/DVD305E/DVD755E): Touch tab and ...Recording date/time • When you playback during pause to Easy Handycam operation (p.32). [Easy Handycam operation ON.] appears, then appears on your camcorder with automatic settings • When ...
User Manual
Page 38
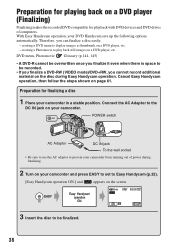
...images as thumbnails on a DVD player, etc. - creating a DVD menu to play back still images on a DVD player, etc. With Easy Handycam operation, your camcorder from running out of computers. Therefore, you cannot record additional material on the disc during finalizing. 2 Turn on your camcorder and ...press EASY to set to Easy Handycam (p.32). [Easy Handycam operation ON.] and appears on the screen. 3 Insert the disc to be recorded. • If you finalize a DVD-RW (VIDEO...
...images as thumbnails on a DVD player, etc. - creating a DVD menu to play back still images on a DVD player, etc. With Easy Handycam operation, your camcorder from running out of computers. Therefore, you cannot record additional material on the disc during finalizing. 2 Turn on your camcorder and ...press EASY to set to Easy Handycam (p.32). [Easy Handycam operation ON.] and appears on the screen. 3 Insert the disc to be recorded. • If you finalize a DVD-RW (VIDEO...
User Manual
Page 39
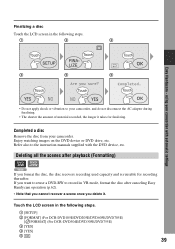
...it takes for recording thereafter. Touch the LCD screen in the following steps. 1 [SETUP] 2 [FORMAT] (For DCR-DVD105E/DVD205E/DVD605E/DVD705E) [ FORMAT] (For DCR-DVD304E/DVD305E/DVD755E) 3 [YES] 4 [YES] 5 39 using your camcorder with automatic settings 4 5 6 &#...8226; Do not apply shock or vibration to the instruction manuals supplied with the DVD device, etc. Finalizing a disc Touch the LCD screen in the following steps. 1 2 3 Easy Handycam...
...it takes for recording thereafter. Touch the LCD screen in the following steps. 1 [SETUP] 2 [FORMAT] (For DCR-DVD105E/DVD205E/DVD605E/DVD705E) [ FORMAT] (For DCR-DVD304E/DVD305E/DVD755E) 3 [YES] 4 [YES] 5 39 using your camcorder with automatic settings 4 5 6 &#...8226; Do not apply shock or vibration to the instruction manuals supplied with the DVD device, etc. Finalizing a disc Touch the LCD screen in the following steps. 1 2 3 Easy Handycam...
User Manual
Page 63
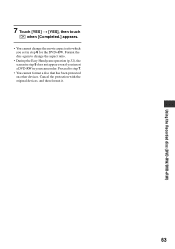
Proceed to change the movie aspect ratio which you insert a DVD-RW in step 6 for the DVD+RW. Format the disc again to step 7. • You cannot format a disc that has been protected on other devices. Using the Recorded disc (DVD-RW/DVD+RW) 7 Touch [YES] t [YES], then touch when [Completed.] appears. • You cannot change the aspect ratio. • During the Easy Handycam operation (p.32), the screen in step 5 does not appear even if you set in your camcorder. Cancel the protection with the original devices, and then format it. 63
Proceed to change the movie aspect ratio which you insert a DVD-RW in step 6 for the DVD+RW. Format the disc again to step 7. • You cannot format a disc that has been protected on other devices. Using the Recorded disc (DVD-RW/DVD+RW) 7 Touch [YES] t [YES], then touch when [Completed.] appears. • You cannot change the aspect ratio. • During the Easy Handycam operation (p.32), the screen in step 5 does not appear even if you set in your camcorder. Cancel the protection with the original devices, and then format it. 63

User Manual
Page 65
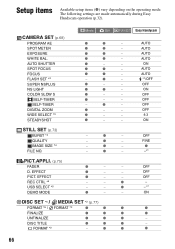
After finishing the settings, touch t (close) to the previous screen. Touch not to change the item without changing the setting. • Cancel the Easy Handycam operation (p.32) to select it. 4 Customize the item. x To change the setup items for the standard operation. If you decide not to change the setting, ... the same as that in step 2.) 3 Select the desired item. • You can also touch the item directly to change the setup items during Easy Handycam operation does not appear during Easy Handycam operation (p.32). 1 Touch [SETUP].
After finishing the settings, touch t (close) to the previous screen. Touch not to change the item without changing the setting. • Cancel the Easy Handycam operation (p.32) to select it. 4 Customize the item. x To change the setup items for the standard operation. If you decide not to change the setting, ... the same as that in step 2.) 3 Select the desired item. • You can also touch the item directly to change the setup items during Easy Handycam operation does not appear during Easy Handycam operation (p.32). 1 Touch [SETUP].
User Manual
Page 66
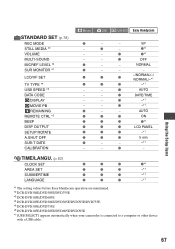
... SET (p.68) PROGRAM AE SPOT METER EXPOSURE WHITE BAL. EFFECT REC CTRL *5 USB SELECT *5 DEMO MODE z - z 66 PLAY/EDIT Easy Handycam - OFF - 4:3 - FINE - z - *7 - z z The following settings are made automatically during Easy Handycam operation (p.32). AUTO SHUTTER SPOT FOCUS FOCUS FLASH SET *2 SUPER NSPLUS NS LIGHT COLOR SLOW S SELF-TIMER SELF-TIMER DIGITAL...
... SET (p.68) PROGRAM AE SPOT METER EXPOSURE WHITE BAL. EFFECT REC CTRL *5 USB SELECT *5 DEMO MODE z - z 66 PLAY/EDIT Easy Handycam - OFF - 4:3 - FINE - z - *7 - z z The following settings are made automatically during Easy Handycam operation (p.32). AUTO SHUTTER SPOT FOCUS FOCUS FLASH SET *2 SUPER NSPLUS NS LIGHT COLOR SLOW S SELF-TIMER SELF-TIMER DIGITAL...
User Manual
Page 67
z z*1 - - z OFF z - - z -*1 z - - z*1 - - z - TIME/LANGU. (p.82) CLOCK SET z z z z*1 AREA SET z z z -*1 SUMMERTIME z z z -*1 LANGUAGE z z z -*1 *1 The setting values before Easy Handycam operation are maintained. *2 DCR-DVD304E/DVD305E/DVD755E *3 DCR-DVD105E/DVD605E *4 DCR-DVD205E/DVD304E/DVD305E/DVD705E/DVD755E *5 DCR-DVD305E/DVD755E *6 DCR-DVD105E/DVD205E/DVD605E/DVD705E *7 [USB SELECT] appears automatically when your camcorder is connected to a computer or other device with a USB cable. 67 AUTO...
z z*1 - - z OFF z - - z -*1 z - - z*1 - - z - TIME/LANGU. (p.82) CLOCK SET z z z z*1 AREA SET z z z -*1 SUMMERTIME z z z -*1 LANGUAGE z z z -*1 *1 The setting values before Easy Handycam operation are maintained. *2 DCR-DVD304E/DVD305E/DVD755E *3 DCR-DVD105E/DVD605E *4 DCR-DVD205E/DVD304E/DVD305E/DVD705E/DVD755E *5 DCR-DVD305E/DVD755E *6 DCR-DVD105E/DVD205E/DVD605E/DVD705E *7 [USB SELECT] appears automatically when your camcorder is connected to a computer or other device with a USB cable. 67 AUTO...


