Operating Instructions
Page 10
...Shooting movies 29 Shooting still images 34 Shooting techniques to prepare and use your camcorder ...... 55 Choosing and viewing a recording - PROGRAM AE 47 Adjusting the exposure manually 48 Focusing manually 49 Shooting with your DVD Handycam 4 What is the difference between DVD-R and DVD-RW 6 How to ...battery pack 16 Showing the remaining battery time - BACK LIGHT 41 Shooting in the dark - Wide mode 45 10 Optimizing the camera automatically - Review 53 Deleting the last scene (DVD-RWs only 53 Changing the disc title 54 Viewing the recordings Playing a disc on a used disc -...
...Shooting movies 29 Shooting still images 34 Shooting techniques to prepare and use your camcorder ...... 55 Choosing and viewing a recording - PROGRAM AE 47 Adjusting the exposure manually 48 Focusing manually 49 Shooting with your DVD Handycam 4 What is the difference between DVD-R and DVD-RW 6 How to ...battery pack 16 Showing the remaining battery time - BACK LIGHT 41 Shooting in the dark - Wide mode 45 10 Optimizing the camera automatically - Review 53 Deleting the last scene (DVD-RWs only 53 Changing the disc title 54 Viewing the recordings Playing a disc on a used disc -...

Operating Instructions
Page 19
You can turn the LCD screen over and move it into the camcorder body. •When the LCD screen is moved back to the camcorder while recording or while in various angles, and reviewing recorded images. 2 180º OPEN button 90º 1 90º 1 Open the LCD screen while pressing OPEN. 2 Adjust the ...back to the [BRT NORMAL]. 19 Notes •When closing the LCD screen, set it vertically until it clicks, then swing it back to the camcorder body with the LCD screen facing out as changing settings, shooting images in standby to record, the screen backlight is fixed to the...
You can turn the LCD screen over and move it into the camcorder body. •When the LCD screen is moved back to the camcorder while recording or while in various angles, and reviewing recorded images. 2 180º OPEN button 90º 1 90º 1 Open the LCD screen while pressing OPEN. 2 Adjust the ...back to the [BRT NORMAL]. 19 Notes •When closing the LCD screen, set it vertically until it clicks, then swing it back to the camcorder body with the LCD screen facing out as changing settings, shooting images in standby to record, the screen backlight is fixed to the...
Operating Instructions
Page 53
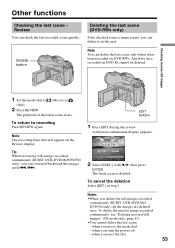
...last scene - Any data once recorded on DVD-RWs. EXEC. [ REVIEW ] : END RET. 2 Select [EXEC.] with ./>. Notes •When you eject the disc. 53 when you delete the still images recorded continuously (BURST, DCR-DVD200/ DVD300 only), all the images are deleted once. Note You ...confirmation display appears. when you can delete the last scene only when it on the Review display. Tip When reviewing still images recorded continuously (BURST, DCR-DVD200/DVD300 only), you move the mode dial. - REVIEW button Deleting the last scene (DVD-RWs only) If the checked scene is deleted...
...last scene - Any data once recorded on DVD-RWs. EXEC. [ REVIEW ] : END RET. 2 Select [EXEC.] with ./>. Notes •When you eject the disc. 53 when you delete the still images recorded continuously (BURST, DCR-DVD200/ DVD300 only), all the images are deleted once. Note You ...confirmation display appears. when you can delete the last scene only when it on the Review display. Tip When reviewing still images recorded continuously (BURST, DCR-DVD200/DVD300 only), you move the mode dial. - REVIEW button Deleting the last scene (DVD-RWs only) If the checked scene is deleted...
Operating Instructions
Page 60
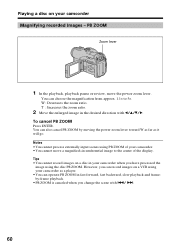
...ZOOM by moving the power zoom lever toward W as far as it will go. Notes •You cannot process externally input scenes using your camcorder when you change the scene with b/v/V/B. However, you can record images on a VCR using PB ZOOM of the display. You can choose ... - Playing a disc on your camcorder. •You cannot move the power zoom lever. Tips •You cannot record images on a disc in the desired direction with ./ >. 60 To cancel PB ZOOM Press ENTER. PB ZOOM Zoom lever 1 In the playback, playback pause or review, move a magnified circumferential image to...
...ZOOM by moving the power zoom lever toward W as far as it will go. Notes •You cannot process externally input scenes using your camcorder when you change the scene with b/v/V/B. However, you can record images on a VCR using PB ZOOM of the display. You can choose ... - Playing a disc on your camcorder. •You cannot move the power zoom lever. Tips •You cannot record images on a disc in the desired direction with ./ >. 60 To cancel PB ZOOM Press ENTER. PB ZOOM Zoom lever 1 In the playback, playback pause or review, move a magnified circumferential image to...
Operating Instructions
Page 141
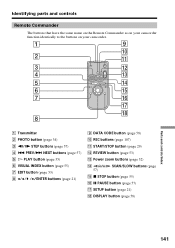
...page 53) 8 B/V/v /b/ENTER buttons (page 21) 9 DATA CODE button (page 58) q; REC buttons (page 107) qa START/STOP button (page 29) qs REVIEW button (page 53) qd Power zoom buttons (page 32) qf / 57) SCAN/SLOW buttons (page qg x STOP button (page 55) qh X PAUSE button (...Parts and controls/Index 141 Identifying parts and controls Remote Commander The buttons that have the same name on the Remote Commander as on your camcorder function identically to the buttons on your camcorder. 1 9 q; 2 qa 3 qs 4 qd 5 qf 6 qg 7 qh qj qk 8 1 Transmitter 2 PHOTO button (page 34)...
...page 53) 8 B/V/v /b/ENTER buttons (page 21) 9 DATA CODE button (page 58) q; REC buttons (page 107) qa START/STOP button (page 29) qs REVIEW button (page 53) qd Power zoom buttons (page 32) qf / 57) SCAN/SLOW buttons (page qg x STOP button (page 55) qh X PAUSE button (...Parts and controls/Index 141 Identifying parts and controls Remote Commander The buttons that have the same name on the Remote Commander as on your camcorder function identically to the buttons on your camcorder. 1 9 q; 2 qa 3 qs 4 qd 5 qf 6 qg 7 qh qj qk 8 1 Transmitter 2 PHOTO button (page 34)...
Operating Instructions
Page 144
... R Recording format 7 Recording mode 33 Recording time 17 Remaining battery time indicator 31 Remaining time 115 Remote Commander 141 REMOTE jack 137 RESET 112, 140 Review 53 S Self-diagnosis display .......... 123 Self-timer recording 43, 110 SEPIA 51 SETUP display 108 Shoulder strap 136, 139 Slide show 61 Slow playback 57...
... R Recording format 7 Recording mode 33 Recording time 17 Remaining battery time indicator 31 Remaining time 115 Remote Commander 141 REMOTE jack 137 RESET 112, 140 Review 53 S Self-diagnosis display .......... 123 Self-timer recording 43, 110 SEPIA 51 SETUP display 108 Shoulder strap 136, 139 Slide show 61 Slow playback 57...

