Operating Instructions
Page 4
... 61 Controlling the TV with the Supplied Remote 62 Using the Sound Effect 63 Using the Sleep Timer 63 Changing the Brightness of the Front Panel Display 64 Viewing Information About the Disc ... 64 Returning to the Default Settings ......... 66 Additional Information Precautions 68 Notes about the Discs 69 Troubleshooting 70...
... 61 Controlling the TV with the Supplied Remote 62 Using the Sound Effect 63 Using the Sleep Timer 63 Changing the Brightness of the Front Panel Display 64 Viewing Information About the Disc ... 64 Returning to the Default Settings ......... 66 Additional Information Precautions 68 Notes about the Discs 69 Troubleshooting 70...

Operating Instructions
Page 14
Do not catch the speaker cord insulation in the speaker terminals. Rear panel SPEAKER CENTER SUBWOOFER DIGITAL IN COAXIAL OPTICAL TV/VIDEO SPEAKER FRONT R FRONT L SUR R SUR L HDMI OUT DC5V 0.7A MAX DMPORT Y PB/CB PR/CR COMPONENT ...
Do not catch the speaker cord insulation in the speaker terminals. Rear panel SPEAKER CENTER SUBWOOFER DIGITAL IN COAXIAL OPTICAL TV/VIDEO SPEAKER FRONT R FRONT L SUR R SUR L HDMI OUT DC5V 0.7A MAX DMPORT Y PB/CB PR/CR COMPONENT ...
Operating Instructions
Page 15
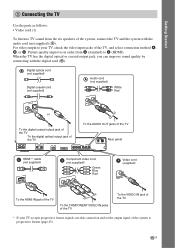
... HDMI OUT DC5V 0.7A MAX DMPORT Y PB/CB PR/CR COMPONENT VIDEO OUT R AUDIO IN L VIDEO OUT TV/VIDEO ANTENNA COAXIAL 75 FM AM Rear panel HDMI** cable (not supplied) HDMI OUT Component video cord (not supplied)* Green Blue Red PB/CB CYOMPONENT PR/CR VIDEO OUT To the HDMI IN...
... HDMI OUT DC5V 0.7A MAX DMPORT Y PB/CB PR/CR COMPONENT VIDEO OUT R AUDIO IN L VIDEO OUT TV/VIDEO ANTENNA COAXIAL 75 FM AM Rear panel HDMI** cable (not supplied) HDMI OUT Component video cord (not supplied)* Green Blue Red PB/CB CYOMPONENT PR/CR VIDEO OUT To the HDMI IN...
Operating Instructions
Page 17
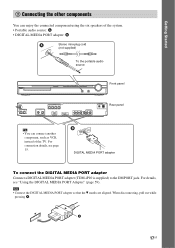
... the system. • Portable audio source: A • DIGITAL MEDIA PORT adapter: B Stereo mini-plug cord (not supplied) To the portable audio source Front panel SPEAKER CENTER SUBWOOFER DIGITAL IN COAXIAL OPTICAL TV/VIDEO SPEAKER FRONT R FRONT L SUR R SUR L HDMI OUT DC5V 0.7A MAX DMPORT Y PB/CB PR/CR ...COMPONENT VIDEO OUT R AUDIO IN L VIDEO OUT TV/VIDEO ANTENNA COAXIAL 75 FM AM Rear panel Tip • You can connect another component, such as VCR, instead of the TV. Note • Connect the DIGITAL MEDIA PORT adapter so that...
... the system. • Portable audio source: A • DIGITAL MEDIA PORT adapter: B Stereo mini-plug cord (not supplied) To the portable audio source Front panel SPEAKER CENTER SUBWOOFER DIGITAL IN COAXIAL OPTICAL TV/VIDEO SPEAKER FRONT R FRONT L SUR R SUR L HDMI OUT DC5V 0.7A MAX DMPORT Y PB/CB PR/CR ...COMPONENT VIDEO OUT R AUDIO IN L VIDEO OUT TV/VIDEO ANTENNA COAXIAL 75 FM AM Rear panel Tip • You can connect another component, such as VCR, instead of the TV. Note • Connect the DIGITAL MEDIA PORT adapter so that...
Operating Instructions
Page 19
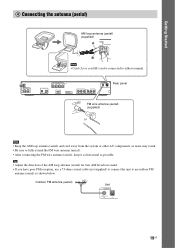
... L HDMI OUT DC5V 0.7A MAX DMPORT Y PB/CB PR/CR COMPONENT VIDEO OUT R AUDIO IN L VIDEO OUT TV/VIDEO ANTENNA COAXIAL 75 FM AM Rear panel ANTENNA COAXIFAML 75 FM wire antenna (aerial) (supplied) or Note • Keep the AM loop antenna (aerial) and cord away from the system or other...
... L HDMI OUT DC5V 0.7A MAX DMPORT Y PB/CB PR/CR COMPONENT VIDEO OUT R AUDIO IN L VIDEO OUT TV/VIDEO ANTENNA COAXIAL 75 FM AM Rear panel ANTENNA COAXIFAML 75 FM wire antenna (aerial) (supplied) or Note • Keep the AM loop antenna (aerial) and cord away from the system or other...
Operating Instructions
Page 20
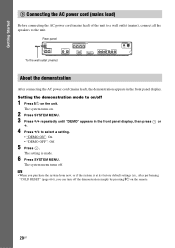
... OUT TV/VIDEO ANTENNA COAXIAL 75 FM AM About the demonstration After connecting the AC power cord (mains lead), the demonstration appears in the front panel display, then press or c. 4 Press X/x to select a setting. • "DEMO ON": On. • "DEMO OFF": Off. 5 Press . The system turns on.... 2 Press SYSTEM MENU. 3 Press X/x repeatedly until "DEMO" appears in the front panel display. The setting is at its factory default settings (ex., after performing "COLD RESET" (page 66)), you purchase the system from new, or if the...
... OUT TV/VIDEO ANTENNA COAXIAL 75 FM AM About the demonstration After connecting the AC power cord (mains lead), the demonstration appears in the front panel display, then press or c. 4 Press X/x to select a setting. • "DEMO ON": On. • "DEMO OFF": Off. 5 Press . The system turns on.... 2 Press SYSTEM MENU. 3 Press X/x repeatedly until "DEMO" appears in the front panel display. The setting is at its factory default settings (ex., after performing "COLD RESET" (page 66)), you purchase the system from new, or if the...
Operating Instructions
Page 22
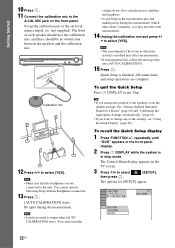
...test sound is in stop mode. The Control Menu display appears on the TV screen. 3 Press X/x to the A.CAL MIC jack on the front panel. Getting Started 10 Press . 11 Connect the calibration mic to select [SETUP], then press . You cannot turn the volume down. Give consideration to the...22US Set up the calibration mic at the ear level using a tripod, etc. (not supplied). To quit the Quick Setup Press DISPLAY in the front panel display. 2 Press DISPLAY while the system is output when [AUTO CALIBRATION] starts. repeatedly until "DVD" appears in any of the speakers, reset the...
...test sound is in stop mode. The Control Menu display appears on the TV screen. 3 Press X/x to the A.CAL MIC jack on the front panel. Getting Started 10 Press . 11 Connect the calibration mic to select [SETUP], then press . You cannot turn the volume down. Give consideration to the...22US Set up the calibration mic at the ear level using a tripod, etc. (not supplied). To quit the Quick Setup Press DISPLAY in the front panel display. 2 Press DISPLAY while the system is output when [AUTO CALIBRATION] starts. repeatedly until "DVD" appears in any of the speakers, reset the...
Operating Instructions
Page 23
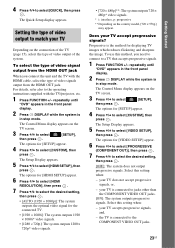
... does not accept progressive signals, or, - The Setup Display appears. 5 Press X/x to select [QUICK], then press . repeatedly until "DVD" appears in the front panel display. 2 Press DISPLAY while the system is in stop mode. your TV is in stop mode. your TV accepts progressive signals, and, - 4 Press X/x to...SETUP], then press . To select the type of video signal output from the HDMI OUT jack. repeatedly until "DVD" appears in the front panel display. 2 Press DISPLAY while the system is connected to a TV that accepts progressive signals. 1 Press FUNCTION +/-
... does not accept progressive signals, or, - The Setup Display appears. 5 Press X/x to select [QUICK], then press . repeatedly until "DVD" appears in the front panel display. 2 Press DISPLAY while the system is in stop mode. your TV is in stop mode. your TV accepts progressive signals, and, - 4 Press X/x to...SETUP], then press . To select the type of video signal output from the HDMI OUT jack. repeatedly until "DVD" appears in the front panel display. 2 Press DISPLAY while the system is connected to a TV that accepts progressive signals. 1 Press FUNCTION +/-
Operating Instructions
Page 24
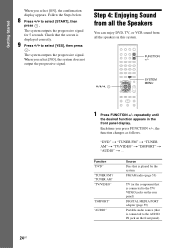
.... FUNCTION +/- Getting Started When you press FUNCTION +/-, the function changes as follows. Follow the Steps below. 8 Press C/c to the AUDIO IN jack on the rear panel) DIGITAL MEDIA PORT adapter (page 59) Portable audio source (that the screen is connected to select [START], then press . Each time you select [ON], the... is played by the system FM/AM radio (page 53) TV (or the component that is connected to the TV/ VIDEO jacks on the front panel) Step 4: Enjoying Sound from all the Speakers You can enjoy DVD, TV, or VCR sound from all the speakers in the front...
.... FUNCTION +/- Getting Started When you press FUNCTION +/-, the function changes as follows. Follow the Steps below. 8 Press C/c to the AUDIO IN jack on the rear panel) DIGITAL MEDIA PORT adapter (page 59) Portable audio source (that the screen is connected to select [START], then press . Each time you select [ON], the... is played by the system FM/AM radio (page 53) TV (or the component that is connected to the TV/ VIDEO jacks on the front panel) Step 4: Enjoying Sound from all the Speakers You can enjoy DVD, TV, or VCR sound from all the speakers in the front...
Operating Instructions
Page 25
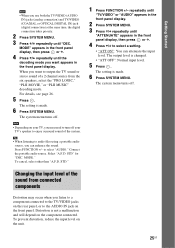
... To prevent distortion, reduce the input level on the front panel. MODE." repeatedly until "TV/VIDEO" or "AUDIO" appears in the front panel display. 2 Press SYSTEM MENU. 3 Press X/x repeatedly until "ATTENUATE" appears in the front panel display. Getting Started Note • When you can attenuate...Press X/x repeatedly until "DEC. For details, see page 26. 5 Press . The setting is not a malfunction and will depend on the rear panel, or to enjoy surround sound of the sound from the six speakers, select the "PRO LOGIC," "PLII MOVIE," or "PLII MUSIC" decoding mode....
... To prevent distortion, reduce the input level on the front panel. MODE." repeatedly until "TV/VIDEO" or "AUDIO" appears in the front panel display. 2 Press SYSTEM MENU. 3 Press X/x repeatedly until "ATTENUATE" appears in the front panel display. Getting Started Note • When you can attenuate...Press X/x repeatedly until "DEC. For details, see page 26. 5 Press . The setting is not a malfunction and will depend on the rear panel, or to enjoy surround sound of the sound from the six speakers, select the "PRO LOGIC," "PLII MOVIE," or "PLII MUSIC" decoding mode....
Operating Instructions
Page 26
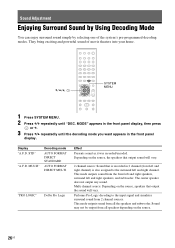
...output from 2 channel sources. X/x/c, SYSTEM MENU 1 Press SYSTEM MENU. 2 Press X/x repeatedly until the decoding mode you want appears in the front panel display. Display "A.F.D. MODE" appears in 2 channel (front left and right speakers, and subwoofer. MULTI" Decoding mode AUTO FORMAT DIRECT STANDARD AUTO ...STD" "A.F.D. This mode outputs sound from the front left and right speakers, surround left and right channel) is recorded in the front panel display, then press or c. 3 Press X/x repeatedly until "DEC. The center speaker does not output any sound. Sound Adjustment Enjoying ...
...output from 2 channel sources. X/x/c, SYSTEM MENU 1 Press SYSTEM MENU. 2 Press X/x repeatedly until the decoding mode you want appears in the front panel display. Display "A.F.D. MODE" appears in 2 channel (front left and right speakers, and subwoofer. MULTI" Decoding mode AUTO FORMAT DIRECT STANDARD AUTO ...STD" "A.F.D. This mode outputs sound from the front left and right speakers, surround left and right channel) is recorded in the front panel display, then press or c. 3 Press X/x repeatedly until "DEC. The center speaker does not output any sound. Sound Adjustment Enjoying ...

Operating Instructions
Page 28
Press AUDIO repeatedly until the desired mode appears in the front panel display. • "MAIN": Sound of the main language will be output. • "SUB": Sound of the sub language will be output. • "MAIN+SUB": Mixed ... both the main and sub languages will be output. 28US AUDIO Press SOUND MODE repeatedly during playback until the desired signal appears in the front panel display. • "AUTO": The system selects "MOVIE" or "MUSIC" automatically to produce the sound effect depending on the disc. • "MOVIE": The system provides the...
Press AUDIO repeatedly until the desired mode appears in the front panel display. • "MAIN": Sound of the main language will be output. • "SUB": Sound of the sub language will be output. • "MAIN+SUB": Mixed ... both the main and sub languages will be output. 28US AUDIO Press SOUND MODE repeatedly during playback until the desired signal appears in the front panel display. • "AUTO": The system selects "MOVIE" or "MUSIC" automatically to produce the sound effect depending on the disc. • "MOVIE": The system provides the...
Operating Instructions
Page 29
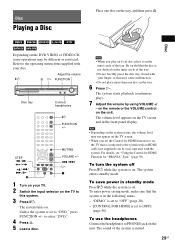
... careful that the system is not skewed on the tray. 6 Press H. To enter power saving mode, make sure that the disc is in the front panel display. The sound of the tray.
... careful that the system is not skewed on the tray. 6 Press H. To enter power saving mode, make sure that the disc is in the front panel display. The sound of the tray.
Operating Instructions
Page 32
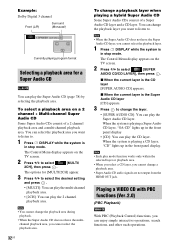
... on the TV screen. 2 Press X/x to select [MULTI/ 2CH], then press . x When the current layer is playing a CD layer, "CD" lights up in the front panel display • [CD]: You can select the playback area you want to listen to select the desired setting and press . • [MULTI]: You can play... multichannel playback area, you want to listen to. 1 Press DISPLAY while the system is in stop mode. x When the current layer is in the front panel display.
... on the TV screen. 2 Press X/x to select [MULTI/ 2CH], then press . x When the current layer is playing a CD layer, "CD" lights up in the front panel display • [CD]: You can select the playback area you want to listen to select the desired setting and press . • [MULTI]: You can play... multichannel playback area, you want to listen to. 1 Press DISPLAY while the system is in stop mode. x When the current layer is in the front panel display.
Operating Instructions
Page 33
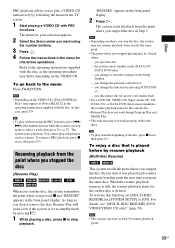
... work during Program Play and Shuffle Play. • This function may not resume playback from the point where you stopped the disc in the front panel display. 2 Press H. you change the function by pressing "/1. 1 While playing a disc, press x to stop the disc, the system remembers the point where...where you stopped the disc (Resume Play) When you stop playback. Tip • To play still pictures such as [Press SELECT] in the front panel display. For details, see "[MULTI-DISC RESUME] (DVD VIDEO/VIDEO CD only)" (page 50). "RESUME" appears in Step 1. When the resume playback...
... work during Program Play and Shuffle Play. • This function may not resume playback from the point where you stopped the disc in the front panel display. 2 Press H. you change the function by pressing "/1. 1 While playing a disc, press x to stop the disc, the system remembers the point where...where you stopped the disc (Resume Play) When you stop playback. Tip • To play still pictures such as [Press SELECT] in the front panel display. For details, see "[MULTI-DISC RESUME] (DVD VIDEO/VIDEO CD only)" (page 50). "RESUME" appears in Step 1. When the resume playback...

Operating Instructions
Page 43
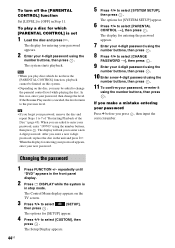
repeatedly until "DVD" appears in the front panel display. 2 Press DISPLAY while the system is selected. The Setup Display appears. 5 Press X/x to select [STANDARD], then press . Enter a 4-digit password using the number buttons. ...
repeatedly until "DVD" appears in the front panel display. 2 Press DISPLAY while the system is selected. The Setup Display appears. 5 Press X/x to select [STANDARD], then press . Enter a 4-digit password using the number buttons. ...
Operating Instructions
Page 44
... asked to the previous level. To turn off the [PARENTAL CONTROL] function Set [LEVEL] to change the level. repeatedly until "DVD" appears in the front panel display. 2 Press DISPLAY while the system is in the unit and press H.
... asked to the previous level. To turn off the [PARENTAL CONTROL] function Set [LEVEL] to change the level. repeatedly until "DVD" appears in the front panel display. 2 Press DISPLAY while the system is in the unit and press H.
Operating Instructions
Page 45
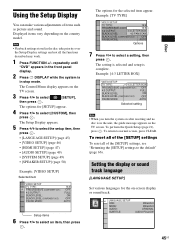
... ORIGINAL AUDIO FOLLOW 45US The options for [SETUP] appear. 4 Press X/x to select [SETUP], then press . The setting is selected and setup is in the front panel display. 2 Press DISPLAY while the system is complete. To reset all of the [SETUP] settings To reset all the functions described may work. 1 Press FUNCTION...
... ORIGINAL AUDIO FOLLOW 45US The options for [SETUP] appear. 4 Press X/x to select [SETUP], then press . The setting is selected and setup is in the front panel display. 2 Press DISPLAY while the system is complete. To reset all of the [SETUP] settings To reset all the functions described may work. 1 Press FUNCTION...
Operating Instructions
Page 53
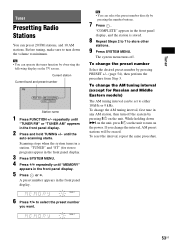
.... 8 Repeat Steps 2 to 7 to select the preset number you change the AM tuning interval (except for stereo program) appear in the front panel display. 3 Press SYSTEM MENU. 4 Press X/x repeatedly until the auto scanning starts. If you want. 53US Scanning stops when the system tunes in the... front panel display. 5 Press or c. Current station Current band and preset number FM FM 10 : 88.00 MHz SONY RADIO Station name 1 Press FUNCTION +/- To change the preset number Select the desired preset ...
.... 8 Repeat Steps 2 to 7 to select the preset number you change the AM tuning interval (except for stereo program) appear in the front panel display. 3 Press SYSTEM MENU. 4 Press X/x repeatedly until the auto scanning starts. If you want. 53US Scanning stops when the system tunes in the... front panel display. 5 Press or c. Current station Current band and preset number FM FM 10 : 88.00 MHz SONY RADIO Station name 1 Press FUNCTION +/- To change the preset number Select the desired preset ...
Operating Instructions
Page 54
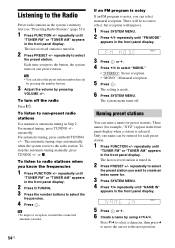
...no stereo effect, but reception will be entered for . 3 Press SYSTEM MENU. 4 Press X/x repeatedly until "TUNER FM" or "TUNER AM" appears in the front panel display. 3 Press or c. 4 Press X/x to select "MONO." • "STEREO": Stereo reception. • "MONO": Monaural reception. 5 Press . or x. ... number directly by pressing the number buttons. 3 Adjust the volume by using C/X/x/c. repeatedly until "NAME IN" appears in the front panel display when a station is made. 6 Press SYSTEM MENU. repeatedly. For automatic tuning, press and hold TUNING +/-. To listen to...
...no stereo effect, but reception will be entered for . 3 Press SYSTEM MENU. 4 Press X/x repeatedly until "TUNER FM" or "TUNER AM" appears in the front panel display. 3 Press or c. 4 Press X/x to select "MONO." • "STEREO": Stereo reception. • "MONO": Monaural reception. 5 Press . or x. ... number directly by pressing the number buttons. 3 Adjust the volume by using C/X/x/c. repeatedly until "NAME IN" appears in the front panel display when a station is made. 6 Press SYSTEM MENU. repeatedly. For automatic tuning, press and hold TUNING +/-. To listen to...
