
Operating Instructions
Page 6
... Changing the Sound 47 Selecting a Sound Field 49 Adjusting the level parameters 51 Enjoying Movies 52 Changing the Angles 52 Displaying the Subtitles 53 Checking the Play Information (ADVANCED 54 Using ... other Unit 61 Listening to the Radio 62 Naming Preset Stations 63 Settings and Adjustments 64 Using the Setup Display 64 Setting the Display or Sound Track Language (LANGUAGE SETUP 65 Settings for the Display (SCREEN SETUP 66 Custom Settings (CUSTOM SETUP 67 Settings for the Speakers (SPEAKER SETUP 68 Additional...
... Changing the Sound 47 Selecting a Sound Field 49 Adjusting the level parameters 51 Enjoying Movies 52 Changing the Angles 52 Displaying the Subtitles 53 Checking the Play Information (ADVANCED 54 Using ... other Unit 61 Listening to the Radio 62 Naming Preset Stations 63 Settings and Adjustments 64 Using the Setup Display 64 Setting the Display or Sound Track Language (LANGUAGE SETUP 65 Settings for the Display (SCREEN SETUP 66 Custom Settings (CUSTOM SETUP 67 Settings for the Speakers (SPEAKER SETUP 68 Additional...
Operating Instructions
Page 11
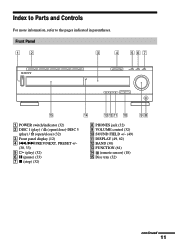
Index to Parts and Controls For more information, refer to the pages indicated in parentheses. SOUND FIELD +/- (49) qa DISPLAY (49, 62) qs BAND (30) qd FUNCTION (61) qf (remote sensor) (18) qg Disc tray (32) continued 11 Front Panel 1 POWER switch/indicator (32) 2 DISC 1 (play) / A (open/close)-DISC 5 (play) / A (open/close) (32) 3 Front panel display (12) 4 ./> PREV/NEXT, PRESET +/- (30, 33) 5 H (play) (32) 6 X (pause) (33) 7 x (stop) (32) 8 PHONES jack (32) 9 VOLUME control (32) q;
Index to Parts and Controls For more information, refer to the pages indicated in parentheses. SOUND FIELD +/- (49) qa DISPLAY (49, 62) qs BAND (30) qd FUNCTION (61) qf (remote sensor) (18) qg Disc tray (32) continued 11 Front Panel 1 POWER switch/indicator (32) 2 DISC 1 (play) / A (open/close)-DISC 5 (play) / A (open/close) (32) 3 Front panel display (12) 4 ./> PREV/NEXT, PRESET +/- (30, 33) 5 H (play) (32) 6 X (pause) (33) 7 x (stop) (32) 8 PHONES jack (32) 9 VOLUME control (32) q;

Operating Instructions
Page 12
Front Panel Display When playing back a DVD Disc mode Playing Current title status number Current chapter number Current sound ALL1DISC S AUTO TITLE PRO LOGIC DIGITAL FM AM NTSCPBC ANGLE TRACK CHAPTER INDEX H TUNED M MONO ST S dB REPEAT 1 k H z PROGRAM M H z SHUFFLE Current..., CD, or VIDEO CD Disc mode Current index number Current track (The index indicator does not number appear during SACD playback.) Current play mode Current sound ALL1DISC S AUTO TITLE PRO LOGIC DIGITAL FM AM NTSCPBC ANGLE TRACK CHAPTER INDEX H TUNED M MONO ST S dB REPEAT 1 k H z PROGRAM M H z SHUFFLE ...
Front Panel Display When playing back a DVD Disc mode Playing Current title status number Current chapter number Current sound ALL1DISC S AUTO TITLE PRO LOGIC DIGITAL FM AM NTSCPBC ANGLE TRACK CHAPTER INDEX H TUNED M MONO ST S dB REPEAT 1 k H z PROGRAM M H z SHUFFLE Current..., CD, or VIDEO CD Disc mode Current index number Current track (The index indicator does not number appear during SACD playback.) Current play mode Current sound ALL1DISC S AUTO TITLE PRO LOGIC DIGITAL FM AM NTSCPBC ANGLE TRACK CHAPTER INDEX H TUNED M MONO ST S dB REPEAT 1 k H z PROGRAM M H z SHUFFLE ...

Operating Instructions
Page 14
... (26) 14 TV/VIDEO (60) wa REPEAT (40) ws MUTING (33) wd TIME (45) wf FUNCTION (61) wg BAND (30) wh Number buttons (35) wj SOUND FIELD (49) wk DISPLAY (49, 62) wl ENTER (60) e; Remote 1 23 4 56 7 89 >10 10/0 Note This remote control glows in the dark. However, before...
... (26) 14 TV/VIDEO (60) wa REPEAT (40) ws MUTING (33) wd TIME (45) wf FUNCTION (61) wg BAND (30) wh Number buttons (35) wj SOUND FIELD (49) wk DISPLAY (49, 62) wl ENTER (60) e; Remote 1 23 4 56 7 89 >10 10/0 Note This remote control glows in the dark. However, before...

Operating Instructions
Page 16
... adjustments to items such as follows: , Control Menu display m ADVANCED display (Appears if you press DVD DISPLAY, the Control Menu display changes as picture and sound.
... adjustments to items such as follows: , Control Menu display m ADVANCED display (Appears if you press DVD DISPLAY, the Control Menu display changes as picture and sound.

Operating Instructions
Page 18
... you do not use a new battery with this system. Grey (+) (+) (-) Color tube (-) Black 18 Step 1: Speaker System Hookup Connect the supplied speaker system using the remote, point it at the remote sensor on the system. To obtain the best possible surround sound, specify the speaker parameters (distance, level, etc...an extended period of the terminals to be connected. Do not connect any foreign object into the Remote You can control the system using the supplied remote. Inserting Batteries into the remote casing, particularly when replacing the batteries. • Do not expose the...
... you do not use a new battery with this system. Grey (+) (+) (-) Color tube (-) Black 18 Step 1: Speaker System Hookup Connect the supplied speaker system using the remote, point it at the remote sensor on the system. To obtain the best possible surround sound, specify the speaker parameters (distance, level, etc...an extended period of the terminals to be connected. Do not connect any foreign object into the Remote You can control the system using the supplied remote. Inserting Batteries into the remote casing, particularly when replacing the batteries. • Do not expose the...
Operating Instructions
Page 20
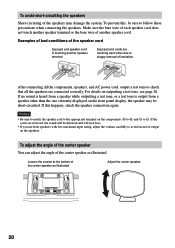
... of the center speaker as illustrated. Adjust the center speaker. 20 Exposed end cords are connected correctly. If the cords are reversed, the sound will lack bass. • If you use front speakers with low maximum input rating, adjust the volume carefully to sloppy removal of insulation..... Notes • Be sure to match the speaker cord to the appropriate terminal on the front panel display, the speaker may damage the system. Examples of bad conditions of the speaker cord Exposed end speaker cord is output from a speaker other due to avoid excessive output on outputting...
... of the center speaker as illustrated. Adjust the center speaker. 20 Exposed end cords are connected correctly. If the cords are reversed, the sound will lack bass. • If you use front speakers with low maximum input rating, adjust the volume carefully to sloppy removal of insulation..... Notes • Be sure to match the speaker cord to the appropriate terminal on the front panel display, the speaker may damage the system. Examples of bad conditions of the speaker cord Exposed end speaker cord is output from a speaker other due to avoid excessive output on outputting...

Operating Instructions
Page 25
...room, etc. You can be the same distance from the listening position (A). Specifying the speaker parameters To obtain the best possible surround sound, first specify the distance of your listening position, then set the balance and level. Use the test tone to adjust the speaker volumes... to 50 feet) (A) from the listening position. You may adjust the speaker parameters using SPEAKER SETUP in any position. However, if necessary, this system allows you B A A 45° B A A 45° C C 90° C C 90° 20° 20° Note Do not place the center...
...room, etc. You can be the same distance from the listening position (A). Specifying the speaker parameters To obtain the best possible surround sound, first specify the distance of your listening position, then set the balance and level. Use the test tone to adjust the speaker volumes... to 50 feet) (A) from the listening position. You may adjust the speaker parameters using SPEAKER SETUP in any position. However, if necessary, this system allows you B A A 45° B A A 45° C C 90° C C 90° 20° 20° Note Do not place the center...

Operating Instructions
Page 28
... C. To specify the balance and level of the test tone from center, 6 steps left or right). 28 Balance of each speaker sounds the same using X/x. • Items adjusted in the system. 6 Using X/x to select T.TONE and use C/c to set to adjust other parameters in your listening position and select the item to...
... C. To specify the balance and level of the test tone from center, 6 steps left or right). 28 Balance of each speaker sounds the same using X/x. • Items adjusted in the system. 6 Using X/x to select T.TONE and use C/c to set to adjust other parameters in your listening position and select the item to...

Operating Instructions
Page 29
... be cleared, and speaker parameters will be defaulted. 29 LEVEL (0 dB) (center speaker level) Adjust the level of other speakers, the subwoofer may output excessive sound. W. LEV. (0 dB) (subwoofer level) Adjust the level of the subwoofer (-6 dB to previous menu. • Y (Yes): If you select an item, the...
... be cleared, and speaker parameters will be defaulted. 29 LEVEL (0 dB) (center speaker level) Adjust the level of other speakers, the subwoofer may output excessive sound. W. LEV. (0 dB) (subwoofer level) Adjust the level of the subwoofer (-6 dB to previous menu. • Y (Yes): If you select an item, the...

Operating Instructions
Page 33
... back to DVD and playback starts (Auto-Function). Change a disc while playing another disc Press DISC SKIP. While playing a disc, do not turn off the system, first press x to stop playback and then press 1 on , you can play mode Press >. The function changes to the Press .. z On the disc tray ... standby mode and the power indicator lights up the volume. However, if Program Play is not chosen. the disc Mute the sound Press MUTING. To turn off : there is being playbacked. - Doing so may cancel the menu settings. When you can only start playback by pressing the H....
... back to DVD and playback starts (Auto-Function). Change a disc while playing another disc Press DISC SKIP. While playing a disc, do not turn off the system, first press x to stop playback and then press 1 on , you can play mode Press >. The function changes to the Press .. z On the disc tray ... standby mode and the power indicator lights up the volume. However, if Program Play is not chosen. the disc Mute the sound Press MUTING. To turn off : there is being playbacked. - Doing so may cancel the menu settings. When you can only start playback by pressing the H....

Operating Instructions
Page 35
... vary from disc to disc. 2 Press C/X/x/c or the number buttons to select the title you want to select the item you play . 3 Press ENTER. The system starts playing the selected title. 1 Press DVD MENU. The DVD menu appears on the TV screen. Using the DVD menu Some DVDs allow you to... you play these DVDs, you can select the title you can select items such as the language for the subtitles and the language for the sound using a menu. The contents of the menu vary from disc to disc. 2 Press C/X/x/c or the number buttons to play a DVD which contains several titles, you...
... vary from disc to disc. 2 Press C/X/x/c or the number buttons to select the title you want to select the item you play . 3 Press ENTER. The system starts playing the selected title. 1 Press DVD MENU. The DVD menu appears on the TV screen. Using the DVD menu Some DVDs allow you to... you play these DVDs, you can select the title you can select items such as the language for the subtitles and the language for the sound using a menu. The contents of the menu vary from disc to disc. 2 Press C/X/x/c or the number buttons to play a DVD which contains several titles, you...

Operating Instructions
Page 47
... same language is displayed two or more times, the DVD is recorded in SACD playback. With stereo CDs or VIDEO CDs, you can select the sound from both the right and left channel, you press the button, the item changes. The options for AUDIO appear. 1 2 ( 2 7 ) 1 8 ( 3 4 ) ...T 1:32:55 1: ENGLISH 1: ENGLISH 2: ENGLISH 3: FRENCH PLAY DVD PROGRAM FORMAT DOLBY DIGITAL 3/2.1 L CR LFE LS RS 3 Press X/x to the sound of the selected channel through both speakers. Each time you can select AUDIO directly by pressing AUDIO. z You can select the left channel and hear...
... same language is displayed two or more times, the DVD is recorded in SACD playback. With stereo CDs or VIDEO CDs, you can select the sound from both the right and left channel, you press the button, the item changes. The options for AUDIO appear. 1 2 ( 2 7 ) 1 8 ( 3 4 ) ...T 1:32:55 1: ENGLISH 1: ENGLISH 2: ENGLISH 3: FRENCH PLAY DVD PROGRAM FORMAT DOLBY DIGITAL 3/2.1 L CR LFE LS RS 3 Press X/x to the sound of the selected channel through both speakers. Each time you can select AUDIO directly by pressing AUDIO. z You can select the left channel and hear...

Operating Instructions
Page 48
...," the channels being output. PROGRAM FORMAT DOLBY DIGITAL 3/2.1 L CR LFE LS RS • DTS "LFE" is enclosed in the program format display mean the following sound component: L: Front (left) R : Front (right) C : Center LS : Rear (left) RS : Rear (right) S : Rear (monaural): The rear component of recorded channels may differ. LFE : LFE (Low... Digital 5.1ch When an LFE signal component is output, "LFE" is always enclosed in a solid line regardless of the disc When you play MPEG AUDIO sound tracks, the system outputs PCM (stereo) signals.
...," the channels being output. PROGRAM FORMAT DOLBY DIGITAL 3/2.1 L CR LFE LS RS • DTS "LFE" is enclosed in the program format display mean the following sound component: L: Front (left) R : Front (right) C : Center LS : Rear (left) RS : Rear (right) S : Rear (monaural): The rear component of recorded channels may differ. LFE : LFE (Low... Digital 5.1ch When an LFE signal component is output, "LFE" is always enclosed in a solid line regardless of the disc When you play MPEG AUDIO sound tracks, the system outputs PCM (stereo) signals.

Operating Instructions
Page 49
... front panel display switches as follows: remaining or playing time t sound field t remaining or playing time z The system memorizes the last sound field selected for all preset stations. CINEMA STUDIO EX A* Reproduces the sound characteristics of the Sony Pictures Entertainment's classic editing studio using the 3D sound imaging of V. This mode is automatically applied again. To...
... front panel display switches as follows: remaining or playing time t sound field t remaining or playing time z The system memorizes the last sound field selected for all preset stations. CINEMA STUDIO EX A* Reproduces the sound characteristics of the Sony Pictures Entertainment's classic editing studio using the 3D sound imaging of V. This mode is automatically applied again. To...

Operating Instructions
Page 50
... of the front speakers without adding any source using only the front left and right speakers and subwoofer. Great for soft acoustic sounds. This mode presents the sound as a reference. SEMI-M. AUTO FORMAT DECODE Automatically detects the type of a jazz club. You can use this mode as ...it was recorded/encoded, without using game software with Dolby Pro Logic to play any effects. MULTI DIMENSION* (Virtual Multi Dimension) Uses 3D sound imaging to the way it was recorded. Ideal for rock or pop music. Software with 2 channel audio signals, is played according to ...
... of the front speakers without adding any source using only the front left and right speakers and subwoofer. Great for soft acoustic sounds. This mode presents the sound as a reference. SEMI-M. AUTO FORMAT DECODE Automatically detects the type of a jazz club. You can use this mode as ...it was recorded/encoded, without using game software with Dolby Pro Logic to play any effects. MULTI DIMENSION* (Virtual Multi Dimension) Uses 3D sound imaging to the way it was recorded. Ideal for rock or pop music. Software with 2 channel audio signals, is played according to ...

Operating Instructions
Page 51
... with virtual speakers. If you do not operate the remote for each speaker (page 28). 1 Start playing a program source encoded with multichannel surround sound. 2 Press AMP MENU repeatedly on the remote. 9 LEVEL appears on the front panel display. The adjusted value will not be able to be ... that employ the virtual speakers, you will appear on the front panel display. 3 Sit in your headphone to the PHONES jack of the system, the HEADPHONE THEATER mode allows you to the HEADPHONE THEATER mode. Notes • The effects provided by the virtual speakers may cause increased ...
... with virtual speakers. If you do not operate the remote for each speaker (page 28). 1 Start playing a program source encoded with multichannel surround sound. 2 Press AMP MENU repeatedly on the remote. 9 LEVEL appears on the front panel display. The adjusted value will not be able to be ... that employ the virtual speakers, you will appear on the front panel display. 3 Sit in your headphone to the PHONES jack of the system, the HEADPHONE THEATER mode allows you to the HEADPHONE THEATER mode. Notes • The effects provided by the virtual speakers may cause increased ...

Operating Instructions
Page 54
... such as kbps (kilo bit per second). To turn off . BIT RATE BIT RATE 384kbps Audio Mbps 0 5 10 Video When playing MPEG audio sound tracks BIT RATE 0 0 5 kbps 1000 Mbps 10 Audio Video Bit rate refers to the amount of each item By pressing DVD DISPLAY repeatedly, you... bit per second in Step 3. However, this does not always mean that is being read ("Layer 0" or "Layer 1"). If it is a dual-layer DVD, the system indicates which layer is a large amount of data. The options for ADVANCED appear. 1 2 ( 2 7 ) 1 8 ( 3 4 ) T 1:32:55 PLAY DVD BIT RATE OFF BIT RATE ...
... such as kbps (kilo bit per second). To turn off . BIT RATE BIT RATE 384kbps Audio Mbps 0 5 10 Video When playing MPEG audio sound tracks BIT RATE 0 0 5 kbps 1000 Mbps 10 Audio Video Bit rate refers to the amount of each item By pressing DVD DISPLAY repeatedly, you... bit per second in Step 3. However, this does not always mean that is being read ("Layer 0" or "Layer 1"). If it is a dual-layer DVD, the system indicates which layer is a large amount of data. The options for ADVANCED appear. 1 2 ( 2 7 ) 1 8 ( 3 4 ) T 1:32:55 PLAY DVD BIT RATE OFF BIT RATE ...

Operating Instructions
Page 62
... Press the button again to select the preset station you want. z To improve reception Reorient the supplied antennas. Each time you press the button, the system tunes in . ALL1DISC S AUTO TITLE PRO LOGIC DIGITAL FM AM NTSCPBC ANGLE TRACK CHAPTER INDEX H TUNED M MONO ST S dB REPEAT 1 k H z... DISPLAY VOL +/- For automatic tuning, press and hold m or M (TUNING + or -) on the remote repeatedly. To check the frequency or sound field Press DISPLAY repeatedly. TUNING +/- 1 Press FUNCTION repeatedly until TUNER appears on page 30). There will be no stereo effect, but the reception ...
... Press the button again to select the preset station you want. z To improve reception Reorient the supplied antennas. Each time you press the button, the system tunes in . ALL1DISC S AUTO TITLE PRO LOGIC DIGITAL FM AM NTSCPBC ANGLE TRACK CHAPTER INDEX H TUNED M MONO ST S dB REPEAT 1 k H z... DISPLAY VOL +/- For automatic tuning, press and hold m or M (TUNING + or -) on the remote repeatedly. To check the frequency or sound field Press DISPLAY repeatedly. TUNING +/- 1 Press FUNCTION repeatedly until TUNER appears on page 30). There will be no stereo effect, but the reception ...

Operating Instructions
Page 64
.... Settings and Adjustments Using the Setup Display By using the Setup Display, you can go to Step 3 directly. 2 Press X/x to items such as picture and sound. Then press ENTER. You can also set a language for SETUP appear. ( 47 ) : : STOP DVD CUSTOM RESET 64 The Setup Display appears. The options for the...
.... Settings and Adjustments Using the Setup Display By using the Setup Display, you can go to Step 3 directly. 2 Press X/x to items such as picture and sound. Then press ENTER. You can also set a language for SETUP appear. ( 47 ) : : STOP DVD CUSTOM RESET 64 The Setup Display appears. The options for the...


