Operating Instructions
Page 9
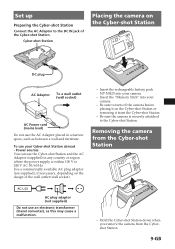
... region where the power supply is securely attatched to turn off the camera before placing it on the Cyber-shot Station or removing it from the Cyber-shot Station. - Insert the rechargeable battery pack NP-NH25 into your camera. - Removing the camera from the Cybershot Station. 9-GB Be sure the camera is within 100 V to the DC IN jack of the wall...
... region where the power supply is securely attatched to turn off the camera before placing it on the Cyber-shot Station or removing it from the Cyber-shot Station. - Insert the rechargeable battery pack NP-NH25 into your camera. - Removing the camera from the Cybershot Station. 9-GB Be sure the camera is within 100 V to the DC IN jack of the wall...
Operating Instructions
Page 10
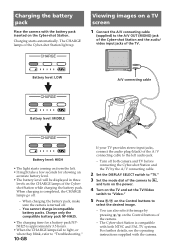
.... • The battery level will be displayed in three levels on the CHARGE lamps of the Cybershot Station while charging the battery pack. Charging the battery pack Place the camera with the battery pack inserted on the Control buttons to select the desired image. - Charging starts automatically... the image by the A/V connecting cable. 2 Set the DISPLAY SELECT switch to the A/V OUT (MONO) jack of the Cyber-shot Station and the audio/ video input jacks of the camera. - Battery level: LOW A/V connecting cable Battery level: MIDDLE Battery level: HIGH • The light starts coming on from...
.... • The battery level will be displayed in three levels on the CHARGE lamps of the Cybershot Station while charging the battery pack. Charging the battery pack Place the camera with the battery pack inserted on the Control buttons to select the desired image. - Charging starts automatically... the image by the A/V connecting cable. 2 Set the DISPLAY SELECT switch to the A/V OUT (MONO) jack of the Cyber-shot Station and the audio/ video input jacks of the camera. - Battery level: LOW A/V connecting cable Battery level: MIDDLE Battery level: HIGH • The light starts coming on from...