
Limited Warranty (US Only)
Page 1
..., Sony will supply, at its original packaging or packaging affording an equal degree of the Product, including the antenna. 4-557-172-02 General Stereo/Hifi Components/Tape Decks ® CD Players/Mini Disc Players/Audio Systems Hifi Audio LIMITED WARRANTY Sony Electronics Inc. ("Sony") warrants this Product is determined to be presented to any authorized Sony service facility. ACCESSORIES: Parts and labor for all labor charges. 2. REPAIR OR REPLACEMENT AS...
..., Sony will supply, at its original packaging or packaging affording an equal degree of the Product, including the antenna. 4-557-172-02 General Stereo/Hifi Components/Tape Decks ® CD Players/Mini Disc Players/Audio Systems Hifi Audio LIMITED WARRANTY Sony Electronics Inc. ("Sony") warrants this Product is determined to be presented to any authorized Sony service facility. ACCESSORIES: Parts and labor for all labor charges. 2. REPAIR OR REPLACEMENT AS...
Operating Instructions (primary manual)
Page 2
... which can radiate radio frequency energy and, if not installed and used for a Class B digital device, pursuant to Part 15 of the FCC Rules. If this manual are designed to persons. Model No Serial No About This Manual The instructions in this equipment does cause harmful interference to correct the interference by turning the equipment off and on, the user is encouraged to...
... which can radiate radio frequency energy and, if not installed and used for a Class B digital device, pursuant to Part 15 of the FCC Rules. If this manual are designed to persons. Model No Serial No About This Manual The instructions in this equipment does cause harmful interference to correct the interference by turning the equipment off and on, the user is encouraged to...
Operating Instructions (primary manual)
Page 3
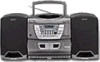
... Basic Operations 4 Playing a CD 6 Listening to the radio 8 Playing a tape 10 Recording on a tape The CD Player 12 Using the display 13 Locating a specific track 14 Playing tracks repeatedly (Repeat Play) 15 Creating your own program (Program Play) The Timer 16 Setting the clock 17 Waking up to music 19 Falling asleep to music Setting Up 20 Hooking up the system 23 Adjusting the audio emphasis (MEGA BASS/4 BAND GRAPHIC EQUALIZER/ SURROUND) Additional Information 25 Precautions 27 Troubleshooting 29 Maintenance 30 Specifications 31 Index CFD...
... Basic Operations 4 Playing a CD 6 Listening to the radio 8 Playing a tape 10 Recording on a tape The CD Player 12 Using the display 13 Locating a specific track 14 Playing tracks repeatedly (Repeat Play) 15 Creating your own program (Program Play) The Timer 16 Setting the clock 17 Waking up to music 19 Falling asleep to music Setting Up 20 Hooking up the system 23 Adjusting the audio emphasis (MEGA BASS/4 BAND GRAPHIC EQUALIZER/ SURROUND) Additional Information 25 Precautions 27 Troubleshooting 29 Maintenance 30 Specifications 31 Index CFD...
Operating Instructions (primary manual)
Page 4
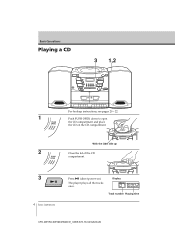
Display Track number Playing time CFD-ZW150/.ZW160/ZW200.E_3-859-373-1X.U2/CA2/AU6 The player plays all the tracks once. Basic Operations Playing a CD 3 1,2 For hookup instructions, see pages 20 - 22. 1 Push PUSH OPEN down to open the CD compartment and place the CD on ). With the label side up 2 Close the lid of the CD compartment. 3 4 Basic Operations Press ^ (direct power-on the CD compartment.
Display Track number Playing time CFD-ZW150/.ZW160/ZW200.E_3-859-373-1X.U2/CA2/AU6 The player plays all the tracks once. Basic Operations Playing a CD 3 1,2 For hookup instructions, see pages 20 - 22. 1 Push PUSH OPEN down to open the CD compartment and place the CD on ). With the label side up 2 Close the lid of the CD compartment. 3 4 Basic Operations Press ^ (direct power-on the CD compartment.
Operating Instructions (primary manual)
Page 6
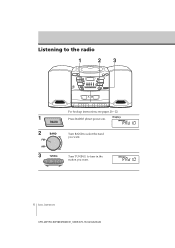
Listening to tune in the station you want . 3 Turn TUNING to the radio 1 23 For hookup instructions, see pages 20 - 22. 1 Press RADIO (direct power-on). Display 2 Turn BAND to select the band you want . 6 Basic Operations CFD-ZW150/.ZW160/ZW200.E_3-859-373-1X.U2/CA2/AU6
Listening to tune in the station you want . 3 Turn TUNING to the radio 1 23 For hookup instructions, see pages 20 - 22. 1 Press RADIO (direct power-on). Display 2 Turn BAND to select the band you want . 6 Basic Operations CFD-ZW150/.ZW160/ZW200.E_3-859-373-1X.U2/CA2/AU6
Operating Instructions (primary manual)
Page 7
... player turns on /off the radio Press VOLUME +/- Reorient the player itself for AM Basic Operations 7 CFD-ZW150/.ZW160/ZW200.E_3-859-373-1X.U2/CA2/AU6 To Adjust the volume Turn on automatically and starts playing the previous station. Radio will play in monaural. • Next time you want to listen to "MONO". Use these buttons for FM. POWER To improve broadcast reception Reorient the antenna for additional operations POWER VOLUME...
... player turns on /off the radio Press VOLUME +/- Reorient the player itself for AM Basic Operations 7 CFD-ZW150/.ZW160/ZW200.E_3-859-373-1X.U2/CA2/AU6 To Adjust the volume Turn on automatically and starts playing the previous station. Radio will play in monaural. • Next time you want to listen to "MONO". Use these buttons for FM. POWER To improve broadcast reception Reorient the antenna for additional operations POWER VOLUME...
Operating Instructions (primary manual)
Page 9
Tip For the best results, use TYPE I (normal) tape. DIR in the display indicates the tape direction of that side. p6 POWER To select the direction of the tape (CFD-ZW200 deck A only) To play Both sides of the tape repeatedly Both sides of the tape from the front side to reverse side only* Switch DIRECTION MODE to resume play begins from the reverse side, the tape stops at the end...
Tip For the best results, use TYPE I (normal) tape. DIR in the display indicates the tape direction of that side. p6 POWER To select the direction of the tape (CFD-ZW200 deck A only) To play Both sides of the tape repeatedly Both sides of the tape from the front side to reverse side only* Switch DIRECTION MODE to resume play begins from the reverse side, the tape stops at the end...
Operating Instructions (primary manual)
Page 10
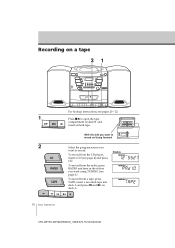
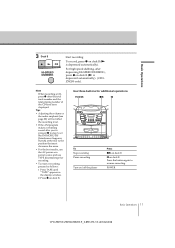
... Basic Operations CFD-ZW150/.ZW160/ZW200.E_3-859-373-1X.U2/CA2/AU6 To record from the radio, press RADIO and tune in the station you want to open the tape compartment on deck B and insert a blank tape. With the side you want using TUNING (see page 6.) To record from the CD player, insert a CD (see pages 20 - 22. 1 Press p6 to record. Recording on a tape 31 For hookup instructions...
... Basic Operations CFD-ZW150/.ZW160/ZW200.E_3-859-373-1X.U2/CA2/AU6 To record from the radio, press RADIO and tune in the station you want to open the tape compartment on deck B and insert a blank tape. With the side you want using TUNING (see page 6.) To record from the CD player, insert a CD (see pages 20 - 22. 1 Press p6 to record. Recording on a tape 31 For hookup instructions...
Operating Instructions (primary manual)
Page 11
... Operations 3 Deck B Start recording. Tips • Adjusting the volume or the audio emphasis (see page 23) will not affect the recording level. • If the AM program makes a whistling sound after you've pressed r in the display window. 2 Press r on deck B. To record, press r on deck B (( is depressed automatically). For high speed dubbing, after the total track number and the total playing number of the CD...
... Operations 3 Deck B Start recording. Tips • Adjusting the volume or the audio emphasis (see page 23) will not affect the recording level. • If the AM program makes a whistling sound after you've pressed r in the display window. 2 Press r on deck B. To record, press r on deck B (( is depressed automatically). For high speed dubbing, after the total track number and the total playing number of the CD...
Operating Instructions (primary manual)
Page 13
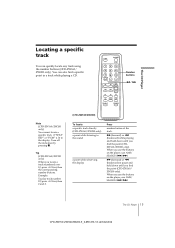
... a specific track directly (CFD-ZW160/ZW200 only) a point while listening to the sound a point while observing the display Press number button of the track. ) (forward) or 0 (backward) while playing and hold down until you find a specific point in a track while playing a CD. Turn off the indication by pressing p. Locating a specific track You can also find the point (CFDZW160/ZW200 only). You can quickly locate any track using the number buttons (CFD-ZW160...
... a specific track directly (CFD-ZW160/ZW200 only) a point while listening to the sound a point while observing the display Press number button of the track. ) (forward) or 0 (backward) while playing and hold down until you find a specific point in a track while playing a CD. Turn off the indication by pressing p. Locating a specific track You can also find the point (CFDZW160/ZW200 only). You can quickly locate any track using the number buttons (CFD-ZW160...
Operating Instructions (primary manual)
Page 15
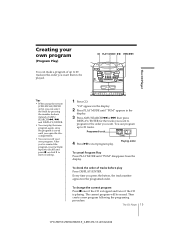
... programed order. You can make a program of tracks before play . The current program will be played. After you open the disc compartment. • You can record your own program (Program Play) You can program up to 20 tracks. Programed track 4 Press ^ to start program play Press DISPLAY/ENTER. Playing order To cancel Program Play Press PLAY MODE until you 've created the program, insert a blank tape into deck B and press r on deck B to start recording. 1 Press CD. The CD Player 15 CFD...
... programed order. You can make a program of tracks before play . The current program will be played. After you open the disc compartment. • You can record your own program (Program Play) You can program up to 20 tracks. Programed track 4 Press ^ to start program play Press DISPLAY/ENTER. Playing order To cancel Program Play Press PLAY MODE until you 've created the program, insert a blank tape into deck B and press r on deck B to start recording. 1 Press CD. The CD Player 15 CFD...
Operating Instructions (primary manual)
Page 16
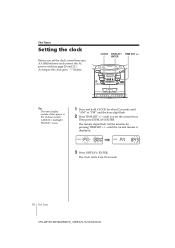
... The time display system of this player is displayed. 3 Press DISPLAY/ENTER. The minute digits flash. The clock starts from 00 seconds. 16 The Timer CFD-ZW150/.ZW160/ZW200.E_3-859-373-1X.U2/CA2/AU6 CLOCK DISPLAY/ TIME SET +/- Then press DISPLAY/ENTER. until the current minute is the 12-hour system: AM12:00 = midnight PM12:00 = noon 1 Press and hold CLOCK for about...
... The time display system of this player is displayed. 3 Press DISPLAY/ENTER. The minute digits flash. The clock starts from 00 seconds. 16 The Timer CFD-ZW150/.ZW160/ZW200.E_3-859-373-1X.U2/CA2/AU6 CLOCK DISPLAY/ TIME SET +/- Then press DISPLAY/ENTER. until the current minute is the 12-hour system: AM12:00 = midnight PM12:00 = noon 1 Press and hold CLOCK for about...
Operating Instructions (primary manual)
Page 18
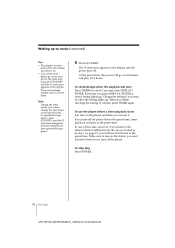
... at the preset time. At the preset time, the power will go on page 17, you will start Press TIMER for 2 hours. If you turn off the player. Make sure to tune in the station you want to listen to the tape function. To use it. To check/change the tape player to before you turn off . In case of volume, press TIMER again. Each time you press DISPLAY/ENTER, a stored setting lights up...
... at the preset time. At the preset time, the power will go on page 17, you will start Press TIMER for 2 hours. If you turn off the player. Make sure to tune in the station you want to listen to the tape function. To use it. To check/change the tape player to before you turn off . In case of volume, press TIMER again. Each time you press DISPLAY/ENTER, a stored setting lights up...
Operating Instructions (primary manual)
Page 21
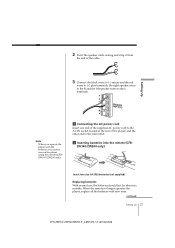
... supplied) Replacing batteries With normal use, the batteries should last for about six months. continued Setting Up 21 CFD-ZW150/.ZW160/ZW200.E_3-859-373-1X.U2/CA2/AU6 When the remote no longer operates the player, replace all the batteries with the batteries, you operate the player with new ones. Setting Up Note When you cannot turn on the player using the remote (CFDZW160/ZW200 only). 3 Connecting the AC power cord...
... supplied) Replacing batteries With normal use, the batteries should last for about six months. continued Setting Up 21 CFD-ZW150/.ZW160/ZW200.E_3-859-373-1X.U2/CA2/AU6 When the remote no longer operates the player, replace all the batteries with the batteries, you operate the player with new ones. Setting Up Note When you cannot turn on the player using the remote (CFDZW160/ZW200 only). 3 Connecting the AC power cord...
Operating Instructions (primary manual)
Page 25
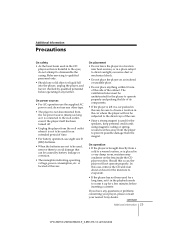
... period of time. • For battery operation, use the supplied AC power cord; On power sources • For AC operation use eight size D (R20) batteries. • When the batteries are not to be used, remove them to avoid damage that can be caused by qualified personnel before inserting a cassette. do not attempt to qualified personnel only. • Should any questions or problems concerning your player, please...
... period of time. • For battery operation, use the supplied AC power cord; On power sources • For AC operation use eight size D (R20) batteries. • When the batteries are not to be used, remove them to avoid damage that can be caused by qualified personnel before inserting a cassette. do not attempt to qualified personnel only. • Should any questions or problems concerning your player, please...
Operating Instructions (primary manual)
Page 27
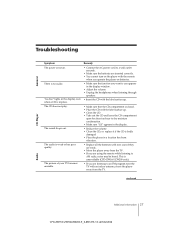
... AC power cord to a wall outlet securely. • Make sure the batteries are inserted correctly. • You cannot turn on the player with the remote when you operate the player on . There is no disc" lights in the display even when a CD is badly damaged • Place the player in the display window. • Adjust the volume. • Unplug the headphones when listening through speakers. • Insert the CD with...
... AC power cord to a wall outlet securely. • Make sure the batteries are inserted correctly. • You cannot turn on the player with the remote when you operate the player on . There is no disc" lights in the display even when a CD is badly damaged • Place the player in the display window. • Adjust the volume. • Unplug the headphones when listening through speakers. • Insert the CD with...
Operating Instructions (primary manual)
Page 28
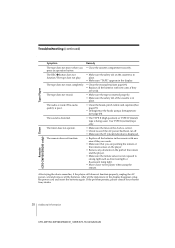
...). • Demagnetize the heads using the remote. Use TYPE I (normal) tape only. • Make sure the time on the clock is displayed. The remote does not function. • Replace all the batteries with new ones if they are pointing the remote at the remote sensor on the cassette is being used. If the problem persists, please consult your nearest Sony dealer. 28 Additional Information CFD-ZW150/.ZW160/ZW200.E_3-859...
...). • Demagnetize the heads using the remote. Use TYPE I (normal) tape only. • Make sure the time on the clock is displayed. The remote does not function. • Replace all the batteries with new ones if they are pointing the remote at the remote sensor on the cassette is being used. If the problem persists, please consult your nearest Sony dealer. 28 Additional Information CFD-ZW150/.ZW160/ZW200.E_3-859...

Operating Instructions (primary manual)
Page 30
... - 1,602 kHz (Australian model) 530 - 1,710 kHz (Other models) Aerials FM: Telescopic aerial AM: Built-in ferrite bar aerial Cassette-corder section Recording system 4-track 2 channel stereo Fast winding time Approx. 110 s (sec.) with no more than 44.6 µW (This output is the value measured at a distance of about 200 mm from 250 - 6,300 Hz; Other Specifications CD player section System Compact disc digital audio system Laser diode properties Material: GaAlAs...
... - 1,602 kHz (Australian model) 530 - 1,710 kHz (Other models) Aerials FM: Telescopic aerial AM: Built-in ferrite bar aerial Cassette-corder section Recording system 4-track 2 channel stereo Fast winding time Approx. 110 s (sec.) with no more than 44.6 µW (This output is the value measured at a distance of about 200 mm from 250 - 6,300 Hz; Other Specifications CD player section System Compact disc digital audio system Laser diode properties Material: GaAlAs...
Operating Instructions (primary manual)
Page 31
... accessories Sony MDR headphone series Additional Information 31 CFD-ZW150/.ZW160/ZW200.E_3-859-373-1X.U2/CA2/AU6 batteries) Supplied accessory AC power cord (1) Remote controller (1) (CFD-ZW160/ZW200 only) Design and specifications are subject to change without notice. projecting parts) Mass Approx. 8.7 kg (19 lb. 3 oz) (incl. Battery life For CD radio cassette-corder: CFD-ZW150/ZW160 FM recording Sony R20P: approx. 6.5 h Sony alkaline LR20: approx. 12 h Tape playback Sony R20P: approx. 3 h Sony alkaline LR20: approx. 6 h CD playback Sony...
... accessories Sony MDR headphone series Additional Information 31 CFD-ZW150/.ZW160/ZW200.E_3-859-373-1X.U2/CA2/AU6 batteries) Supplied accessory AC power cord (1) Remote controller (1) (CFD-ZW160/ZW200 only) Design and specifications are subject to change without notice. projecting parts) Mass Approx. 8.7 kg (19 lb. 3 oz) (incl. Battery life For CD radio cassette-corder: CFD-ZW150/ZW160 FM recording Sony R20P: approx. 6.5 h Sony alkaline LR20: approx. 12 h Tape playback Sony R20P: approx. 3 h Sony alkaline LR20: approx. 6 h CD playback Sony...
Operating Instructions (primary manual)
Page 32
... AC power cord 21 Creating your own program 15 D, E, F, G, H Demagnetizing the tape heads 29 Display 12 GRAPHIC EQUALIZER 23 I, J, K Improving broadcast reception 7 L Listening to the radio 6 Locating a specific track 13 M, N, O MEGA BASS 23 P, Q Playing a CD 4 a tape 8 tracks repeatedly 14 Program Play 15 R Recording on a tape 10 Repeat Play 14 S Selecting audio emphasis 23 tracks 13 Setting the clock 16 Setting up 20 SURROUND 24 T Timer Falling asleep to music 19 Waking up to music 17 Troubleshooting 27 U, V, W, X, Y, Z Using the display 12 Sony Corporation...
... AC power cord 21 Creating your own program 15 D, E, F, G, H Demagnetizing the tape heads 29 Display 12 GRAPHIC EQUALIZER 23 I, J, K Improving broadcast reception 7 L Listening to the radio 6 Locating a specific track 13 M, N, O MEGA BASS 23 P, Q Playing a CD 4 a tape 8 tracks repeatedly 14 Program Play 15 R Recording on a tape 10 Repeat Play 14 S Selecting audio emphasis 23 tracks 13 Setting the clock 16 Setting up 20 SURROUND 24 T Timer Falling asleep to music 19 Waking up to music 17 Troubleshooting 27 U, V, W, X, Y, Z Using the display 12 Sony Corporation...


