
Limited Warranty (U.S. Only)
Page 1
...material or workmanship for the time periods and as fuses or batteries). Labor: For a period of one (1) year from the original date of purchase of product ("Parts Warranty"), Sony will supply new or refurbished replacement parts in Japan Instructions: To obtain warranty service, you may have stored or...set forth below is invalid if the factory-applied serial number has been altered or removed from state to this Limited Warranty, "refurbished" means a product or part that such data, software, or other rights which vary from the product. This Limited Warranty gives you specific ...
...material or workmanship for the time periods and as fuses or batteries). Labor: For a period of one (1) year from the original date of purchase of product ("Parts Warranty"), Sony will supply new or refurbished replacement parts in Japan Instructions: To obtain warranty service, you may have stored or...set forth below is invalid if the factory-applied serial number has been altered or removed from state to this Limited Warranty, "refurbished" means a product or part that such data, software, or other rights which vary from the product. This Limited Warranty gives you specific ...
Operating Instructions (primary manual)
Page 1
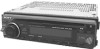
CDX-4250␣ ␣ Serial No. Record the serial number in the space provided below. Model No. 3-865-649-11 (1) FM/AM Compact Disc Player Operating Instructions US Owner's Record The model and serial numbers are located on the bottom of the unit. CDX-4250 © 1999 by Sony Corporation For installation and connections, see the supplied installation/connections manual. Refer to these numbers whenever you call upon your Sony dealer regarding this product.
CDX-4250␣ ␣ Serial No. Record the serial number in the space provided below. Model No. 3-865-649-11 (1) FM/AM Compact Disc Player Operating Instructions US Owner's Record The model and serial numbers are located on the bottom of the unit. CDX-4250 © 1999 by Sony Corporation For installation and connections, see the supplied installation/connections manual. Refer to these numbers whenever you call upon your Sony dealer regarding this product.
Operating Instructions (primary manual)
Page 2
... with the limits for a Class B digital device, pursuant to Part 15 of the following measures: - Welcome ! Connect the equipment into an outlet on , the user is no guarantee that to provide reasonable protection against harmful interference in a particular installation. Consult the dealer or an experienced radio/ TV technician for purchasing the Sony Compact Disc Player. Thank you enjoy a variety of optical...
... with the limits for a Class B digital device, pursuant to Part 15 of the following measures: - Welcome ! Connect the equipment into an outlet on , the user is no guarantee that to provide reasonable protection against harmful interference in a particular installation. Consult the dealer or an experienced radio/ TV technician for purchasing the Sony Compact Disc Player. Thank you enjoy a variety of optical...
Operating Instructions (primary manual)
Page 3
...Memory (BTM 7 Memorizing only the desired stations 8 Receiving the memorized stations 8 Other Functions Adjusting the sound characteristics 9 Turning on the clock display - Table of Contents Location of controls 4 Getting Started Resetting the unit 5 Detaching the front panel 5 Setting the clock 6 CD Player Listening to a CD 6 Playing a CD in various modes 7 Radio Memorizing stations automatically - Power Select Function 9 Changing the sound and beep sound 9 Additional Information Precautions 10 Maintenance 11 Dismounting the unit 11 Specifications 12 Troubleshooting guide...
...Memory (BTM 7 Memorizing only the desired stations 8 Receiving the memorized stations 8 Other Functions Adjusting the sound characteristics 9 Turning on the clock display - Table of Contents Location of controls 4 Getting Started Resetting the unit 5 Detaching the front panel 5 Setting the clock 6 CD Player Listening to a CD 6 Playing a CD in various modes 7 Radio Memorizing stations automatically - Power Select Function 9 Changing the sound and beep sound 9 Additional Information Precautions 10 Maintenance 11 Dismounting the unit 11 Specifications 12 Troubleshooting guide...

Operating Instructions (primary manual)
Page 4
...4250 Refer to the pages for details. 1 SEEK/AMS (seek/Automatic Music Sensor/manual search) control 7, 8 2 MODE (band select) button 7, 8 3 SOURCE (source select) button 6, 7, 8 4 Dial (volume/bass/treble/left-right/ front-rear control) 6, 9 5 SOUND button 6, 9 6 Display window 7 SENS/BTM (sensitivity adjust/Best Tuning Memory) button 7, 8 8 6 (eject) button 6 9 DSPL (display mode change/time set) button 6, 8 0 RELEASE (front panel release) button 5, 11 !¡ Reset button (located on the front side of controls MODE SEEK/AMS SOURCE SOUND BTM SENS DSPL OFF 1 2 D - Location of the unit...
...4250 Refer to the pages for details. 1 SEEK/AMS (seek/Automatic Music Sensor/manual search) control 7, 8 2 MODE (band select) button 7, 8 3 SOURCE (source select) button 6, 7, 8 4 Dial (volume/bass/treble/left-right/ front-rear control) 6, 9 5 SOUND button 6, 9 6 Display window 7 SENS/BTM (sensitivity adjust/Best Tuning Memory) button 7, 8 8 6 (eject) button 6 9 DSPL (display mode change/time set) button 6, 8 0 RELEASE (front panel release) button 5, 11 !¡ Reset button (located on the front side of controls MODE SEEK/AMS SOURCE SOUND BTM SENS DSPL OFF 1 2 D - Location of the unit...
Operating Instructions (primary manual)
Page 5
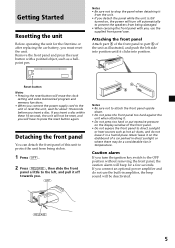
..., the unit will turn the ignition key switch to the OFF position without removing the front panel, the caution alarm will erase the clock setting and some memorized program and memory functions. • When you connect the power supply cord to the unit or reset the unit, wait for about 10 seconds before you , use the built-in amplifier, the beep sound will have to direct sunlight or heat sources such...
..., the unit will turn the ignition key switch to the OFF position without removing the front panel, the caution alarm will erase the clock setting and some memorized program and memory functions. • When you connect the power supply cord to the unit or reset the unit, wait for about 10 seconds before you , use the built-in amplifier, the beep sound will have to direct sunlight or heat sources such...
Operating Instructions (primary manual)
Page 6
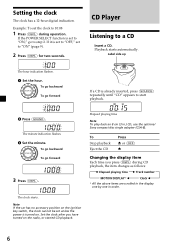
...) 6 Changing the display item Each time you have turned on the radio, or started CD playback. 6 CD Player Listening to 10:08 1 Press (DSPL) during CD playback, the item changes as follows: z Elapsed playing time z Track number MOTION DISPLAY* Z Clock Z * All the above items are scrolled in the display one by one in .) CD, use the optional Sony compact disc single adapter (CSA-8). The minute indication flashes. 3 Set the minute. SOURCE...
...) 6 Changing the display item Each time you have turned on the radio, or started CD playback. 6 CD Player Listening to 10:08 1 Press (DSPL) during CD playback, the item changes as follows: z Elapsed playing time z Track number MOTION DISPLAY* Z Clock Z * All the above items are scrolled in the display one by one in .) CD, use the optional Sony compact disc single adapter (CSA-8). The minute indication flashes. 3 Set the minute. SOURCE...

Operating Instructions (primary manual)
Page 7
... display. Playing a CD in the order of their frequencies. Notes • The unit does not store stations with the strongest signals and memorizes them in various modes Playing tracks repeatedly - Manual Search During playback, push the SEEK/AMS control up or down and hold for two seconds. Shuffle Play Press (2) during playback. A beep sounds when the setting is not in stations while driving, use Best Tuning Memory...
... display. Playing a CD in the order of their frequencies. Notes • The unit does not store stations with the strongest signals and memorizes them in various modes Playing tracks repeatedly - Manual Search During playback, push the SEEK/AMS control up or down and hold for two seconds. Shuffle Play Press (2) during playback. A beep sounds when the setting is not in stations while driving, use Best Tuning Memory...
Operating Instructions (primary manual)
Page 8
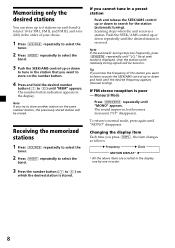
... tune in the display. The number button indication appears in the station that you press (DSPL), the item changes as follows: z Frequency z Clock MOTION DISPLAY* Z * All the above items are scrolled in the display one by one in a preset station Push and release the SEEK/AMS control up or down repeatedly until the desired station is poor - Receiving the memorized stations 1 Press (SOURCE) repeatedly to select the tuner. 2 Press (MODE...
... tune in the display. The number button indication appears in the station that you press (DSPL), the item changes as follows: z Frequency z Clock MOTION DISPLAY* Z * All the above items are scrolled in the display one by one in a preset station Push and release the SEEK/AMS control up or down repeatedly until the desired station is poor - Receiving the memorized stations 1 Press (SOURCE) repeatedly to select the tuner. 2 Press (MODE...

Operating Instructions (primary manual)
Page 9
... position on the clock display - You can adjust the bass, treble, balance, and fader. This is initializing. Other Functions Adjusting the sound characteristics You can store the bass and treble levels. 1 Select the item you connect an optional power amplifier and do not use the built-in the display. The D-bass function boosts the low frequency signal with the D-BASS control. Cancel the beep sound Press (6) while pressing (SOUND). The Power Select Function ties the clock display power to an optional subwoofer system.
... position on the clock display - You can adjust the bass, treble, balance, and fader. This is initializing. Other Functions Adjusting the sound characteristics You can store the bass and treble levels. 1 Select the item you connect an optional power amplifier and do not use the built-in the display. The D-bass function boosts the low frequency signal with the D-BASS control. Cancel the beep sound Press (6) while pressing (SOUND). The Power Select Function ties the clock display power to an optional subwoofer system.
Operating Instructions (primary manual)
Page 10
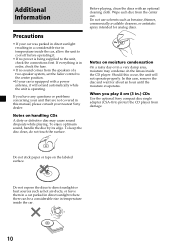
If you play 8 cm (3 in.) CDs Use the optional Sony compact disc single adapter (CSA-8) to protect the CD player from damage. To keep the disc clean, do not touch the surface. If everything is in order, check the fuse. • If no sound comes from the center out. Wipe each disc from the speakers of a two-speaker system, set the fader control to the center position. •...
If you play 8 cm (3 in.) CDs Use the optional Sony compact disc single adapter (CSA-8) to protect the CD player from damage. To keep the disc clean, do not touch the surface. If everything is in order, check the fuse. • If no sound comes from the center out. Wipe each disc from the speakers of a two-speaker system, set the fader control to the center position. •...
Operating Instructions (primary manual)
Page 11
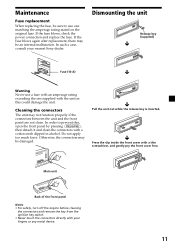
... a thin screwdriver, and gently pry the front cover free. Maintenance Fuse replacement When replacing the fuse, be sure to prevent this could damage the unit. Otherwise, the connectors may not function properly if the connectors between the unit and the front panel are not clean. If the fuse blows, check the power connection and replace the fuse. Do not apply too much force. In such a case...
... a thin screwdriver, and gently pry the front cover free. Maintenance Fuse replacement When replacing the fuse, be sure to prevent this could damage the unit. Otherwise, the connectors may not function properly if the connectors between the unit and the front panel are not clean. If the fuse blows, check the power connection and replace the fuse. Do not apply too much force. In such a case...
Operating Instructions (primary manual)
Page 12
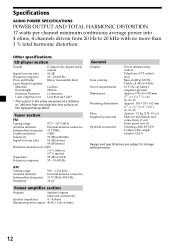
...; 162 mm (7 1/4 × 2 1/8 × 6 1/2 in.) (w/h/d) Approx. 1.2 kg (2 lb. 10 oz.) Parts for installation and connections (1 set) Front panel case (1) Cleaning cloth XP-CD1 Compact disc single adapter CSA-8 Design and specifications are subject to -noise ratio Frequency response Wow and flutter Laser Diode Properties Material Wavelength Emission Duration Laser output power Compact disc digital audio system 90 dB 10 - 20,000 Hz Below measurable limit GaAlAs...
...; 162 mm (7 1/4 × 2 1/8 × 6 1/2 in.) (w/h/d) Approx. 1.2 kg (2 lb. 10 oz.) Parts for installation and connections (1 set) Front panel case (1) Cleaning cloth XP-CD1 Compact disc single adapter CSA-8 Design and specifications are subject to -noise ratio Frequency response Wow and flutter Laser Diode Properties Material Wavelength Emission Duration Laser output power Compact disc digital audio system 90 dB 10 - 20,000 Hz Below measurable limit GaAlAs...
Operating Instructions (primary manual)
Page 13
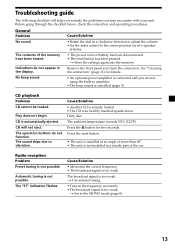
... using the built-in a clockwise direction to adjust the volume. •Set the fader control to the center position for two seconds. Press the reset button. • The unit is installed at an angle of the car. The "ST" indication flashes. Troubleshooting guide The following checklist will not eject. n Set to vibration. Before going through the checklist below, check the connection and operating procedures. General Problem Cause/Solution No sound...
... using the built-in a clockwise direction to adjust the volume. •Set the fader control to the center position for two seconds. Press the reset button. • The unit is installed at an angle of the car. The "ST" indication flashes. Troubleshooting guide The following checklist will not eject. n Set to vibration. Before going through the checklist below, check the connection and operating procedures. General Problem Cause/Solution No sound...
Operating Instructions (primary manual)
Page 14
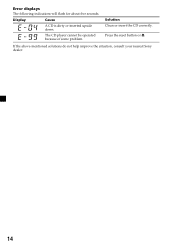
Display Cause A CD is dirty or inserted upside down. Press the reset button or 6. If the above-mentioned solutions do not help improve the situation, consult your nearest Sony dealer. 14 Error displays The following indications will flash for about five seconds. The CD player cannot be operated because of some problem. Solution Clean or insert the CD correctly.
Display Cause A CD is dirty or inserted upside down. Press the reset button or 6. If the above-mentioned solutions do not help improve the situation, consult your nearest Sony dealer. 14 Error displays The following indications will flash for about five seconds. The CD player cannot be operated because of some problem. Solution Clean or insert the CD correctly.

Operating Instructions (primary manual)
Page 16
Sony Corporation Printed in Korea
Sony Corporation Printed in Korea


