
Limited Warranty
Page 1
... to improper operation or maintenance, connection to improper voltage supply, or attempted repair by Sony to any authorized Sony service facility. Proof of purchase in either its option, at no charge, or pay for all labor charges. 2. This warranty is invalid if the factory applied serial number has been altered or removed from the date of purchase, if this Product (including any...
... to improper operation or maintenance, connection to improper voltage supply, or attempted repair by Sony to any authorized Sony service facility. Proof of purchase in either its option, at no charge, or pay for all labor charges. 2. This warranty is invalid if the factory applied serial number has been altered or removed from the date of purchase, if this Product (including any...
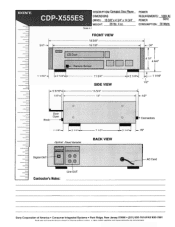
Dimensions Diagram
Page 1
• -• 3/4' CD Door TIMM 1 1/16"-1. 1/4"4-ii 5 3/16"-u1/4 .- Compact Disc Player DIMENSIONS (WHD): 18 3/8" x 4 3/4" x 14 3/4" WEIGHT: 28 lbs. 4 oz. DESCRIPTION. POWER REQUIREMENTS. 120V AC POWER 60Hz CONSUMPTION: 30 Watts FRONT VIEW 18 3/8" 16 7/8' . 1- 3/4" T rf 11 3)4' SIDE VIEW 11 '?!!!" 1 4 1/4' 4 3/4" 2 a"-W- 1/4!ta. - 1 1/16" 1/2" -I- 1/2" Door Open Knob 1 1/8"-s- 2 1/4"-al Optical Fixed Variable W.-Connectors 71/2" 21/4" 7/8" BACK VIEW Digital OUT- -1 Contractor's Notes: Line OUT AC Cord Sony Corporation of America •...
• -• 3/4' CD Door TIMM 1 1/16"-1. 1/4"4-ii 5 3/16"-u1/4 .- Compact Disc Player DIMENSIONS (WHD): 18 3/8" x 4 3/4" x 14 3/4" WEIGHT: 28 lbs. 4 oz. DESCRIPTION. POWER REQUIREMENTS. 120V AC POWER 60Hz CONSUMPTION: 30 Watts FRONT VIEW 18 3/8" 16 7/8' . 1- 3/4" T rf 11 3)4' SIDE VIEW 11 '?!!!" 1 4 1/4' 4 3/4" 2 a"-W- 1/4!ta. - 1 1/16" 1/2" -I- 1/2" Door Open Knob 1 1/8"-s- 2 1/4"-al Optical Fixed Variable W.-Connectors 71/2" 21/4" 7/8" BACK VIEW Digital OUT- -1 Contractor's Notes: Line OUT AC Cord Sony Corporation of America •...
Operating Instructions
Page 1
SONY 3-752-483-21(1) Compact Disc Player Operating Instructions El CDP-X555ES
SONY 3-752-483-21(1) Compact Disc Player Operating Instructions El CDP-X555ES
Operating Instructions
Page 2
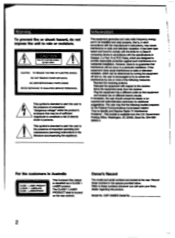
... a Class B computing device in accordance with the specifications in a residential installation. The user may cause interference to comply with the limits for additional suggestions. The CLASS1 LASER PRODUCT label is intended to alert the user to persons. Owner's Record The model and serial numbers are designed to radio or television reception, which are located at the rear. COP-X555ES Serial No. 2 However. Washington. Stock No. 004...
... a Class B computing device in accordance with the specifications in a residential installation. The user may cause interference to comply with the limits for additional suggestions. The CLASS1 LASER PRODUCT label is intended to alert the user to persons. Owner's Record The model and serial numbers are designed to radio or television reception, which are located at the rear. COP-X555ES Serial No. 2 However. Washington. Stock No. 004...

Operating Instructions
Page 3
... a particular point in time remote ()commander 7 Playing a disc - Program play (page 13) - Easy-t-osee display The selection number, the playing time. an This indicates a function operated only on a disc. - Auto space 22 Locating the loudest portion of controls Front panel 6 Remote commander 7 indalling batteries in a selection 10 Locating an index 11 To play 12 Playing only the desired selections - Delete bank Memorizing desired selection Playing the disc using the delete bank Clearing...
... a particular point in time remote ()commander 7 Playing a disc - Program play (page 13) - Easy-t-osee display The selection number, the playing time. an This indicates a function operated only on a disc. - Auto space 22 Locating the loudest portion of controls Front panel 6 Remote commander 7 indalling batteries in a selection 10 Locating an index 11 To play 12 Playing only the desired selections - Delete bank Memorizing desired selection Playing the disc using the delete bank Clearing...
Operating Instructions
Page 4
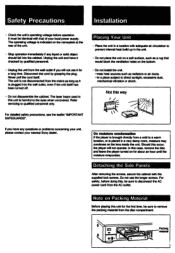
... Precautions Installation • Check the unit's operating voltage before doing this occur. It must be identical with the supplied lock screws. remove the disc and leave the player turned on Packing Material Before playing this unit is plugged into the cabinet. moisture may condense on the nameplate at the rear of your nearest Sony dealer. the player will not use the longer...
... Precautions Installation • Check the unit's operating voltage before doing this occur. It must be identical with the supplied lock screws. remove the disc and leave the player turned on Packing Material Before playing this unit is plugged into the cabinet. moisture may condense on the nameplate at the rear of your nearest Sony dealer. the player will not use the longer...
Operating Instructions
Page 5
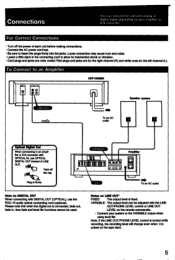
... turned while recording, the recording level wiN change even when it is preset on LINE OUT* FIXED: The output level is connected, fade out, fade in, time fade and level file functions cannot be adjusted with OPTICAL IN. For Correct Connections • Turn off the cap Plug in the connecting cord to allow for inadvertent shock or vibration. • Cord plugs and jacks are color coded: Red plugs and jacks are for the right channel...
... turned while recording, the recording level wiN change even when it is preset on LINE OUT* FIXED: The output level is connected, fade out, fade in, time fade and level file functions cannot be adjusted with OPTICAL IN. For Correct Connections • Turn off the cap Plug in the connecting cord to allow for inadvertent shock or vibration. • Cord plugs and jacks are color coded: Red plugs and jacks are for the right channel...
Operating Instructions
Page 6
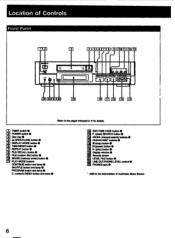
CD TIMER switch • 00 POWER switch • al Disc tray • al • OPEN/CLOSE button • GO DISPLAY MODE button • al TIME/MEMO button • On REPEAT button • • FLE RECALL button • ▪ FILE (custom file) button • cco03 ERASE (memory erase) button • PLAY MODE buttons CONTINUE button and lamp • SHUFFLE button and lamp • PROGRAM button and lamp • C. (custom) INDEX button and lamp • Old EDIT/TIME FADE button • 03 P. (peak...
CD TIMER switch • 00 POWER switch • al Disc tray • al • OPEN/CLOSE button • GO DISPLAY MODE button • al TIME/MEMO button • On REPEAT button • • FLE RECALL button • ▪ FILE (custom file) button • cco03 ERASE (memory erase) button • PLAY MODE buttons CONTINUE button and lamp • SHUFFLE button and lamp • PROGRAM button and lamp • C. (custom) INDEX button and lamp • Old EDIT/TIME FADE button • 03 P. (peak...

Operating Instructions
Page 7
... 0 15 o a OPEN/CLOSE button • ag111 FILE RECALL button • DISPLAY MODE button • al M. (music) SCAN button • On Numeric buttons • al CLEAR button 0. • O CO A. CUE (auto cue) button IL • CEI FILE (custom file) button • On MEMO INPUT button • in1B LEVEL FILE button • FADER (lade in • for details. Installing Batteries in the Remote Commander 1 2 Two size AA (R6) batteries • On battery lite...
... 0 15 o a OPEN/CLOSE button • ag111 FILE RECALL button • DISPLAY MODE button • al M. (music) SCAN button • On Numeric buttons • al CLEAR button 0. • O CO A. CUE (auto cue) button IL • CEI FILE (custom file) button • On MEMO INPUT button • in1B LEVEL FILE button • FADER (lade in • for details. Installing Batteries in the Remote Commander 1 2 Two size AA (R6) batteries • On battery lite...
Operating Instructions
Page 8
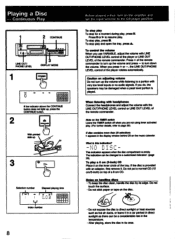
... touch the surface. • Do not stick paper or tape on the amplifier and set the input selector to the CD player position. Playing a Disc - To control the volume When you press+or -. adjust the volume with the UNE OUT/PHONE LEVEL control or UNE OUT LEVEL of the remote commander. When you use VARIABLE. the speakers may be damaged when a peak level portion is empty...
... touch the surface. • Do not stick paper or tape on the amplifier and set the input selector to the CD player position. Playing a Disc - To control the volume When you press+or -. adjust the volume with the UNE OUT/PHONE LEVEL control or UNE OUT LEVEL of the remote commander. When you use VARIABLE. the speakers may be damaged when a peak level portion is empty...

Operating Instructions
Page 11
...play fading out Press FADER when you play right from the beginning of a selection (for connections. To end the play fades out and enters the pause mode. L'AAI ' flashes in the window, and play will appear in the display window. To cancel auto ...cue Press the A. Fading in/Fading out You can have noise in the lead-in . SPACE/A. CUE again. Note on which index numbers are recorded. To Play a Selection Immediately From the Beginning - Auto Cue II Auto cue lets you want to the blank lead-in may not be operated when the DIGITAL (optical) OUT is used...
...play fading out Press FADER when you play right from the beginning of a selection (for connections. To end the play fades out and enters the pause mode. L'AAI ' flashes in the window, and play will appear in the display window. To cancel auto ...cue Press the A. Fading in/Fading out You can have noise in the lead-in . SPACE/A. CUE again. Note on which index numbers are recorded. To Play a Selection Immediately From the Beginning - Auto Cue II Auto cue lets you want to the blank lead-in may not be operated when the DIGITAL (optical) OUT is used...
Operating Instructions
Page 15
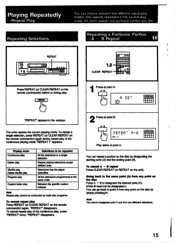
... 1.13 CLEAR REPEAT CD= PressREPEAT (or CLEAR REPEAT on the disc by simply pressing Note You cannot designate point A and B in the same order Between the specific custom indexes Note Repeat play cannot be designated.) You can repeat a portion on the remote commander) before or during repeat play of the continuous play modes. Press at point A. Playing mode Continuous play Delete play Shuffle play Delete shuffle play Program play Custom index play &Wooden* lo...
... 1.13 CLEAR REPEAT CD= PressREPEAT (or CLEAR REPEAT on the disc by simply pressing Note You cannot designate point A and B in the same order Between the specific custom indexes Note Repeat play cannot be designated.) You can repeat a portion on the remote commander) before or during repeat play of the continuous play modes. Press at point A. Playing mode Continuous play Delete play Shuffle play Delete shuffle play Program play Custom index play &Wooden* lo...
Operating Instructions
Page 17
..., if the AUTO SPACE function is also erased when you have programmed a selection number over 24 "----- To check your program. Set the tape to your program cc i Press CHECK the first selection in the program will be disPlaYed• Each time you press CLEAR, the last selection in the program will be displayed. You can make a program for side A are played, the unit will play the selections...
..., if the AUTO SPACE function is also erased when you have programmed a selection number over 24 "----- To check your program. Set the tape to your program cc i Press CHECK the first selection in the program will be disPlaYed• Each time you press CLEAR, the last selection in the program will be displayed. You can make a program for side A are played, the unit will play the selections...

Operating Instructions
Page 18
... the program will be programmed in your program. NI. replace with the144andOMbuttons, check the total time. Selections will be played. ")(DISC-2)(" is displayed. When "NEXT DISC" is displayed. To stop playing Press E. To program while checking the total time Use theIN and00Ibuttons insteadof the numeric buttons to the continuous playing mode. and then press PROGRAM while the selection number islashing. To program selections for editing tapes. order and disc number. At the same time, you...
... the program will be programmed in your program. NI. replace with the144andOMbuttons, check the total time. Selections will be played. ")(DISC-2)(" is displayed. When "NEXT DISC" is displayed. To stop playing Press E. To program while checking the total time Use theIN and00Ibuttons insteadof the numeric buttons to the continuous playing mode. and then press PROGRAM while the selection number islashing. To program selections for editing tapes. order and disc number. At the same time, you...

Operating Instructions
Page 21
... in your tape; If you have been programmed, if there is turned on both sides. After all selections on the disc. To disappear "EDIT" in the Program 1. "B" lights up to the beginning of selections on the disc. Set the tape to 24 steps. You can replace the disc by another disc, the new selection number(s) on the new disc that best fit the playing time at the...
... in your tape; If you have been programmed, if there is turned on both sides. After all selections on the disc. To disappear "EDIT" in the Program 1. "B" lights up to the beginning of selections on the disc. Set the tape to 24 steps. You can replace the disc by another disc, the new selection number(s) on the new disc that best fit the playing time at the...
Operating Instructions
Page 22
... any problem in adjusting the recording level. 22 this function. Once time fade is within some seconds before the designated time. You need not press buttons for 4 seconds. To display the time moaning until the time set time fading out. delete shuffle and program play duration, following duration. PressII to end and determine the loudest portion (peak level) of the total playing time. 3 To start playback. Note on the remote...
... any problem in adjusting the recording level. 22 this function. Once time fade is within some seconds before the designated time. You need not press buttons for 4 seconds. To display the time moaning until the time set time fading out. delete shuffle and program play duration, following duration. PressII to end and determine the loudest portion (peak level) of the total playing time. 3 To start playback. Note on the remote...

Operating Instructions
Page 23
... the player's memory. Lights when Disc Memo is empty, press POWER to turn on program bank A single disc cannot be recalled. To clear custom lifts or to reset ~tory of another disc. clear the custom file of al discs at the same time. • When more than 9 custom indexes and disc memo are memorized for a disc, so that the disc can be played always...
... the player's memory. Lights when Disc Memo is empty, press POWER to turn on program bank A single disc cannot be recalled. To clear custom lifts or to reset ~tory of another disc. clear the custom file of al discs at the same time. • When more than 9 custom indexes and disc memo are memorized for a disc, so that the disc can be played always...

Operating Instructions
Page 29
.... 3 Adjust to the desired playback level. 0 a PHONE LEVEL Press LEVEL FILE to have the unit memorize an optimum playback level for each individual disc.Each time you play a disc, the volume will be reset to the level memorized for Each Disc Level File I- 3 4 • alit: 1 cr=o6 "s' 2 1 2 Presslo.to the designated piaybacit level. TheUNE OUT/PHONELEVEL control will automatically turn to start play the disc...
.... 3 Adjust to the desired playback level. 0 a PHONE LEVEL Press LEVEL FILE to have the unit memorize an optimum playback level for each individual disc.Each time you play a disc, the volume will be reset to the level memorized for Each Disc Level File I- 3 4 • alit: 1 cr=o6 "s' 2 1 2 Presslo.to the designated piaybacit level. TheUNE OUT/PHONELEVEL control will automatically turn to start play the disc...

Operating Instructions
Page 31
... oz), net Remote commander RIA-O991 (supplied) Remote control system Infrared control Power Requirements 3 V DC with two batteries size AA (EC designation R6) Dimensions 62 x 18 x 1'75 min (w/h/d) (2 1/2 X 23/32 X 7 inches) Weight 130g (4.6 oz) Including batteries Supplied accessories Connecting cord (1) (2 phono plugs 2 phono plugs) Remote commander (1) Size AA batteries (2) Screws (8) Optional accessory Audio Optical connecting cord POC-15 Design and specifications subject to noise ratio Dynamic range Harmonic distortion Channel separation 2 Hz...
... oz), net Remote commander RIA-O991 (supplied) Remote control system Infrared control Power Requirements 3 V DC with two batteries size AA (EC designation R6) Dimensions 62 x 18 x 1'75 min (w/h/d) (2 1/2 X 23/32 X 7 inches) Weight 130g (4.6 oz) Including batteries Supplied accessories Connecting cord (1) (2 phono plugs 2 phono plugs) Remote commander (1) Size AA batteries (2) Screws (8) Optional accessory Audio Optical connecting cord POC-15 Design and specifications subject to noise ratio Dynamic range Harmonic distortion Channel separation 2 Hz...
Operating Instructions
Page 32
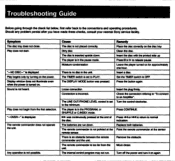
... player turned on the disc tray Clean the disc. Set the TIMER switch to an Amplifier". Any operation is no disc in the PROGRAM. Insert the disc with the printed side up PressII orli.to the connections and operating procedures. "*-NO DISC-- Display window does not illuminate even when the power is set to normal indication. Turnoff the power and turniton again. Insert a disc. The UNE OUT/PHONE LEVEL control is turned on the power. Replace...
... player turned on the disc tray Clean the disc. Set the TIMER switch to an Amplifier". Any operation is no disc in the PROGRAM. Insert the disc with the printed side up PressII orli.to the connections and operating procedures. "*-NO DISC-- Display window does not illuminate even when the power is set to normal indication. Turnoff the power and turniton again. Insert a disc. The UNE OUT/PHONE LEVEL control is turned on the power. Replace...


