Installer Manual
Page 1
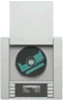
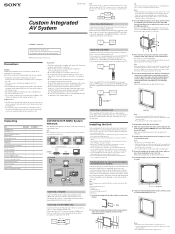
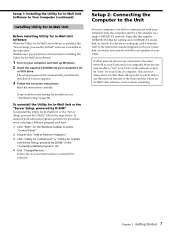
...) 1 R6 (size-AA) battery 2 User's manual 1 Installer's manual (this manual) 1 DVP-NW50 - 1 1 1 4 1 3 - 1 4 4 1 2 1 1 CDP-NW10/DVP-NW50 System Network The diagram below illustrates an...required connections for the system network. © 2005 Sony Corporation Printed in Korea Precautions Caution Unauthorized substitutions may... construction is mounted at the Unit. If you pass the player signals via the VCR, you . Connecting an AC power unit...a horizontal position only. • Keep the Unit and the discs away from an actual system network. Custom Integrated AV System Connecting ...
...) 1 R6 (size-AA) battery 2 User's manual 1 Installer's manual (this manual) 1 DVP-NW50 - 1 1 1 4 1 3 - 1 4 4 1 2 1 1 CDP-NW10/DVP-NW50 System Network The diagram below illustrates an...required connections for the system network. © 2005 Sony Corporation Printed in Korea Precautions Caution Unauthorized substitutions may... construction is mounted at the Unit. If you pass the player signals via the VCR, you . Connecting an AC power unit...a horizontal position only. • Keep the Unit and the discs away from an actual system network. Custom Integrated AV System Connecting ...
Installer Manual
Page 2
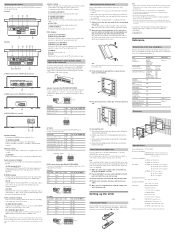
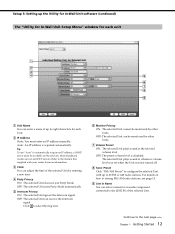
...to the SPEAKER OUT 8 a) 8 a) 8 b) 8 b) 8 c) 8 c) DC IN connector for the CDP-NW10/DVP-NW50 Use Sony's connecting cables for the required connections of a component, such as a CD Changer, so that you must also ...the DC IN connector using a S VIDEO cable. Network hookup You can tune in the User's manual indicated below , according to the input jack on your TV monitor. 5 VIDEO OUT (DVP-...battery compartment with the screw side facing up to four Units (CDP-NW10), or one video input jack, connect the player to the Unit. Note After completing all of the connections, insert...
...to the SPEAKER OUT 8 a) 8 a) 8 b) 8 b) 8 c) 8 c) DC IN connector for the CDP-NW10/DVP-NW50 Use Sony's connecting cables for the required connections of a component, such as a CD Changer, so that you must also ...the DC IN connector using a S VIDEO cable. Network hookup You can tune in the User's manual indicated below , according to the input jack on your TV monitor. 5 VIDEO OUT (DVP-...battery compartment with the screw side facing up to four Units (CDP-NW10), or one video input jack, connect the player to the Unit. Note After completing all of the connections, insert...
User Manual
Page 2
.... 2 Keep these instructions. 3 Heed all warnings. 4 Follow all servicing to provide reasonable protection against harmful interference in this manual could void your safety. Note to CATV system installer: This reminder is subject to avoid injury from the apparatus. 11Only use ... prevent fire or shock hazard, do not expose the unit to the presence of Conformity Trade name: SONY Model No.: CDP-NW10/DVP-NW50 Responsible Party: Sony Electronics Inc. Regulatory Information Declaration of important operating and maintenance (servicing) instructions in a particular installation. ...
.... 2 Keep these instructions. 3 Heed all warnings. 4 Follow all servicing to provide reasonable protection against harmful interference in this manual could void your safety. Note to CATV system installer: This reminder is subject to avoid injury from the apparatus. 11Only use ... prevent fire or shock hazard, do not expose the unit to the presence of Conformity Trade name: SONY Model No.: CDP-NW10/DVP-NW50 Responsible Party: Sony Electronics Inc. Regulatory Information Declaration of important operating and maintenance (servicing) instructions in a particular installation. ...
User Manual
Page 3
TABLE OF CONTENTS About This Manual 5 Notes About the Discs 5 Features 6 Quick Guide to Disc Type 8 Chapter 1 Getting Started Setting up the System 10 Connecting a TV (DVP-NW50 only) 10 Connecting audio Equipment 10 Selecting a method for using the ...the remote 18 Menu operation 18 Menu tree 19 Chapter 3 Playing Discs (CDP-NW10 only) Playing a CD Disc 20 Various play mode functions (Shuffle play, Repeat play) 21 Searching for a particular point on a disc (Search/Scan) 21 Chapter 4 Playing Discs (DVP-NW50 only) Playing a CD Disc 22 Various play mode functions (Shuffle play, Repeat play) 23 ...
TABLE OF CONTENTS About This Manual 5 Notes About the Discs 5 Features 6 Quick Guide to Disc Type 8 Chapter 1 Getting Started Setting up the System 10 Connecting a TV (DVP-NW50 only) 10 Connecting audio Equipment 10 Selecting a method for using the ...the remote 18 Menu operation 18 Menu tree 19 Chapter 3 Playing Discs (CDP-NW10 only) Playing a CD Disc 20 Various play mode functions (Shuffle play, Repeat play) 21 Searching for a particular point on a disc (Search/Scan) 21 Chapter 4 Playing Discs (DVP-NW50 only) Playing a CD Disc 22 Various play mode functions (Shuffle play, Repeat play) 23 ...
User Manual
Page 5
... used as the temperature may rise considerably inside the car. • After playing, store the disc in this manual is a standard format defined by its case. • Clean the disc with a cleaning cloth. Functions available for Standardization)/MPEG which compresses audio data. Notes About the... Discs To keep the disc clean, handle the disc by ISO (International Organization for music CDs or...
... used as the temperature may rise considerably inside the car. • After playing, store the disc in this manual is a standard format defined by its case. • Clean the disc with a cleaning cloth. Functions available for Standardization)/MPEG which compresses audio data. Notes About the... Discs To keep the disc clean, handle the disc by ISO (International Organization for music CDs or...
User Manual
Page 6
Up to 12 Units (CDP-NW10 or DVP-NW50) - MP3 discs (DVP-NW50 only) and LINE IN in any... a computer via a network (An exclusive application of this manual) is prohibited. The Gracenote logo and logotype, and the "Powered by GracenoteR. Features The CDP-NW10/DVP-NW50 (referred to as a CD Changer - Use of...player model and a DVD player model with a simple timer clock and 2ch audio input • The Unit can play back CDs mounted in other Units via a network • 2ch to 5.1ch sound produced from connected speakers for DVP-NW50, or 2ch sound produced from connected speakers for CDP-NW10...
Up to 12 Units (CDP-NW10 or DVP-NW50) - MP3 discs (DVP-NW50 only) and LINE IN in any... a computer via a network (An exclusive application of this manual) is prohibited. The Gracenote logo and logotype, and the "Powered by GracenoteR. Features The CDP-NW10/DVP-NW50 (referred to as a CD Changer - Use of...player model and a DVD player model with a simple timer clock and 2ch audio input • The Unit can play back CDs mounted in other Units via a network • 2ch to 5.1ch sound produced from connected speakers for DVP-NW50, or 2ch sound produced from connected speakers for CDP-NW10...
User Manual
Page 11
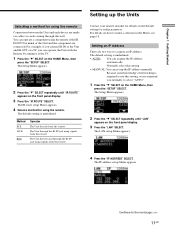
...OUT of networking is underlined. The IR route setup Menu appears. 4 Select a method for each device are two ways to use this setting. • MANUAL: You can operate the Unit with the Remote by aiming it at the TV. 1 Press the "V" SELECT on the front panel display. 3 Press the... "IR ROUTE" SELECT. Setting up the IP address manually. Because some knowledge of a TV, you normally to select "AUTO." 1 Press the "V" SELECT on the default setting for using signals from the remote. Continue...
...OUT of networking is underlined. The IR route setup Menu appears. 4 Select a method for each device are two ways to use this setting. • MANUAL: You can operate the Unit with the Remote by aiming it at the TV. 1 Press the "V" SELECT on the front panel display. 3 Press the... "IR ROUTE" SELECT. Setting up the IP address manually. Because some knowledge of a TV, you normally to select "AUTO." 1 Press the "V" SELECT on the default setting for using signals from the remote. Continue...

User Manual
Page 12
...details on the remote, then press ENTER. 10 Press BACK. Naming the Unit You can input up the Units (continued) 5 Press "AUTO" or "MANUAL" SELECT. The Setup Menu appears. 2 Press the "V" SELECT repeatedly until "NAME" appears on which the cursor is completed. The confirmation display appears. B...press the "SETUP" SELECT. E Moves the cursor to set an IP address. H Stores the name and returns to name the room as you select "MANUAL," go to the step 6. 6 Press the A SELECT to the LAN setup Menu. 11 Press the "DIAGNOSIS" SELECT. F Changes characters in reverse alphabetical...
...details on the remote, then press ENTER. 10 Press BACK. Naming the Unit You can input up the Units (continued) 5 Press "AUTO" or "MANUAL" SELECT. The Setup Menu appears. 2 Press the "V" SELECT repeatedly until "NAME" appears on which the cursor is completed. The confirmation display appears. B...press the "SETUP" SELECT. E Moves the cursor to set an IP address. H Stores the name and returns to name the room as you select "MANUAL," go to the step 6. 6 Press the A SELECT to the LAN setup Menu. 11 Press the "DIAGNOSIS" SELECT. F Changes characters in reverse alphabetical...
User Manual
Page 31
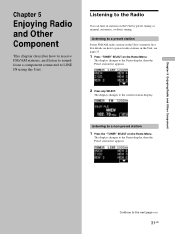
Listening to the next page l 31US Continue to the Radio You can tune in stations on the Unit by preset tuning or manual, automatic, or direct tuning. Chapter 5 Enjoying Radio and Other Component Chapter 5 Enjoying Radio and Other Component This chapter describes how to receive FM/AM stations, ...
Listening to the next page l 31US Continue to the Radio You can tune in stations on the Unit by preset tuning or manual, automatic, or direct tuning. Chapter 5 Enjoying Radio and Other Component Chapter 5 Enjoying Radio and Other Component This chapter describes how to receive FM/AM stations, ...
User Manual
Page 32
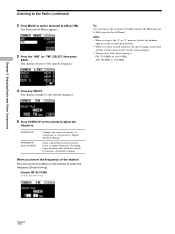
... to 1710 MHz 4 Press any SELECT. The display changes to the current frequency. 5 Press DOWN/UP on the remote to a frequency 1 step lower or higher. (Manual tuning) Scans a particular station toward a lower or higher frequency. DOWN/UP DOWN/UP (press and hold) Changes the current frequency to enter the frequency (Direct...
... to 1710 MHz 4 Press any SELECT. The display changes to the current frequency. 5 Press DOWN/UP on the remote to a frequency 1 step lower or higher. (Manual tuning) Scans a particular station toward a lower or higher frequency. DOWN/UP DOWN/UP (press and hold) Changes the current frequency to enter the frequency (Direct...
User Manual
Page 50
...or the Monitor function (page 38, 39). There is no sound. , The speaker cord is not connected securely. , Check the speaker settings (Installer's manual). , The connecting cord is not set to on the Setup Menu to "OFF" (page 46). The sound volume may be the entire 5.1 channel.... improve if you are playing a multi channel source such as Dolby Digital sound track. , Check the speaker connections and settings (Installer's manual). , Depending on the disc, the sound may come from the surround speakers. , Check the speaker connections and settings. , Make sure the rear speakers are dirty....
...or the Monitor function (page 38, 39). There is no sound. , The speaker cord is not connected securely. , Check the speaker settings (Installer's manual). , The connecting cord is not set to on the Setup Menu to "OFF" (page 46). The sound volume may be the entire 5.1 channel.... improve if you are playing a multi channel source such as Dolby Digital sound track. , Check the speaker connections and settings (Installer's manual). , Depending on the disc, the sound may come from the surround speakers. , Check the speaker connections and settings. , Make sure the rear speakers are dirty....
User Manual
Page 51
... direct tuning. , No stations have been preset or the preset stations have the extension ".MP3." , The data is available. While playing such a disc, the Unit stops playback at the remote sensor on the Unit. , The batteries in the remote are weak. , There are obstacles between the remote..., DVD or PBC menu automatically appears on the DVD does not match the Unit. , Moisture has condensed inside the Unit. See the operating manual that conforms to see if the network cable supports 100BASE-TX or not. , The network cable, network switch, or router device may contain an...
... direct tuning. , No stations have been preset or the preset stations have the extension ".MP3." , The data is available. While playing such a disc, the Unit stops playback at the remote sensor on the Unit. , The batteries in the remote are weak. , There are obstacles between the remote..., DVD or PBC menu automatically appears on the DVD does not match the Unit. , Moisture has condensed inside the Unit. See the operating manual that conforms to see if the network cable supports 100BASE-TX or not. , The network cable, network switch, or router device may contain an...
User Manual
Page 54
...(DVP-NW50 only) Composite video out: 1Vp-p 75ohms S1 video out: Y: 1Vp-p 75ohms C: 0.286 Vp-p 75ohms General DC power consumption: CDP-NW10: DC 29.5 V/1A DC 14V/1.5A DVP-NW50: DC 29.5 V/1A DC 29.5 V/1A DC 14V/1.5A Power consumption: 540 W Operating ... 32˚F to 104˚F) Dimensions: 230 ✕ 266 ✕ 104 mm (9 1/8 ✕ 10 1/2 ✕ 4 1/8 inches) (w/h/d) Mass: CDP-NW10: 2.5 kg (5 lbs 8 oz) DVP-NW50: 2.7 kg (5 lbs 15 oz) Supplied accessories : For details on this see "Installer's manual" Design and specifications are subject to change without notice. 54US
...(DVP-NW50 only) Composite video out: 1Vp-p 75ohms S1 video out: Y: 1Vp-p 75ohms C: 0.286 Vp-p 75ohms General DC power consumption: CDP-NW10: DC 29.5 V/1A DC 14V/1.5A DVP-NW50: DC 29.5 V/1A DC 29.5 V/1A DC 14V/1.5A Power consumption: 540 W Operating ... 32˚F to 104˚F) Dimensions: 230 ✕ 266 ✕ 104 mm (9 1/8 ✕ 10 1/2 ✕ 4 1/8 inches) (w/h/d) Mass: CDP-NW10: 2.5 kg (5 lbs 8 oz) DVP-NW50: 2.7 kg (5 lbs 15 oz) Supplied accessories : For details on this see "Installer's manual" Design and specifications are subject to change without notice. 54US
Utility for In-Wall Unit Software User Manual
Page 1
2-593-899-11(2) Utility for In-Wall Unit CDP-NW10/DVP-NW50 User's Manual 2005 Sony Corporation
2-593-899-11(2) Utility for In-Wall Unit CDP-NW10/DVP-NW50 User's Manual 2005 Sony Corporation
Utility for In-Wall Unit Software User Manual
Page 2
Notice for users • Copyright laws prohibit reproducing the software or the manual accompanying it in whole or in part, or renting the software without the permission of the copyright holder. • In no other responsibility. • The ... than that provided is so designated. • Please note that which is not covered by the warranty. Program © 2005 Sony Corporation Documentation © 2005 Sony Corporation 2 However, SONY bears no event will SONY be liable for any financial damage, or loss of profits, including claims made by third parties, arising out of the...
Notice for users • Copyright laws prohibit reproducing the software or the manual accompanying it in whole or in part, or renting the software without the permission of the copyright holder. • In no other responsibility. • The ... than that provided is so designated. • Please note that which is not covered by the warranty. Program © 2005 Sony Corporation Documentation © 2005 Sony Corporation 2 However, SONY bears no event will SONY be liable for any financial damage, or loss of profits, including claims made by third parties, arising out of the...

Utility for In-Wall Unit Software User Manual
Page 4
... as described. Continue to operate each installed Unit individually or all installed Units simultaneously (page 29) • Getting CD information from the pictures in this manual. Overview Important features of the the Utility for InWall Unit software include the following: • Using a computer to set up each installed Unit individually or...
... as described. Continue to operate each installed Unit individually or all installed Units simultaneously (page 29) • Getting CD information from the pictures in this manual. Overview Important features of the the Utility for InWall Unit software include the following: • Using a computer to set up each installed Unit individually or...
Utility for In-Wall Unit Software User Manual
Page 6
A PDF version of this user's manual is an upgrade of the original manufacturer-installed operating system • A multi-boot environment • A multi-monitor environment • A Macintosh environment Continue to install the ...
A PDF version of this user's manual is an upgrade of the original manufacturer-installed operating system • A multi-boot environment • A multi-monitor environment • A Macintosh environment Continue to install the ...
Utility for In-Wall Unit Software User Manual
Page 7
... 100BASE-TX Ethernet cabling and a 100BASE-TX router, hub, or switch. For details on your computer, and start up such a network, refer to the instruction manual supplied with your router, hub, or switch, and consult with your installed Units, the computer and the Units must be "seen" by DiXiM" in the...
... 100BASE-TX Ethernet cabling and a 100BASE-TX router, hub, or switch. For details on your computer, and start up such a network, refer to the instruction manual supplied with your router, hub, or switch, and consult with your installed Units, the computer and the Units must be "seen" by DiXiM" in the...
Utility for In-Wall Unit Software User Manual
Page 12
... "FM/AM Preset" to 20 FM or AM radio stations. Continue to automatically acquire an IP address, a DHCP server must enter an IP address manually. Most broadband routers can receive the Intercom signal. Click to select the ring tone. 6 Monitor Privacy ON: The selected Unit cannot be monitored by ...a new time. 4 Party Privacy ON: The selected Unit does not join Party Mode. OFF: The preset volume level is acquired automatically. Refer to the manual that supplied with up to the LINE IN of the selected Unit by other Units. OFF: The selected Unit can act as DHCP servers. Tip...
... "FM/AM Preset" to 20 FM or AM radio stations. Continue to automatically acquire an IP address, a DHCP server must enter an IP address manually. Most broadband routers can receive the Intercom signal. Click to select the ring tone. 6 Monitor Privacy ON: The selected Unit cannot be monitored by ...a new time. 4 Party Privacy ON: The selected Unit does not join Party Mode. OFF: The preset volume level is acquired automatically. Refer to the manual that supplied with up to the LINE IN of the selected Unit by other Units. OFF: The selected Unit can act as DHCP servers. Tip...
Utility for In-Wall Unit Software User Manual
Page 24
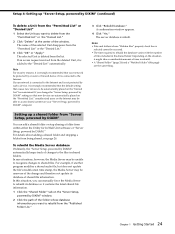
... take a considerable amount of shared file information. Depending on the Internet may be unaware of the change the "Server Setup, powered by DiXiM" You can manually force the Media Server to rebuild its database of time to the files in the shared folder.
... take a considerable amount of shared file information. Depending on the Internet may be unaware of the change the "Server Setup, powered by DiXiM" You can manually force the Media Server to rebuild its database of time to the files in the shared folder.

