
Operating Instructions
Page 2
.... Conventions • Instructions in this icon.) Indicates hints and tips for models CDP-CE335 and CDP-CE235. To avoid electrical shock, do not open the cabinet. Thank you can also use the controls on the remote if they have the same or similar names as a CLASS 1 LASER product.... THE BLADES CAN BE FULLY INSERTED TO PREVENT BLADE EXPOSURE. The laser component in this manual thoroughly and retain it for purchasing the Sony Compact Disc Player. Before operating the unit, please read this manual describe the controls on the player. • The following icons are for...
.... Conventions • Instructions in this icon.) Indicates hints and tips for models CDP-CE335 and CDP-CE235. To avoid electrical shock, do not open the cabinet. Thank you can also use the controls on the remote if they have the same or similar names as a CLASS 1 LASER product.... THE BLADES CAN BE FULLY INSERTED TO PREVENT BLADE EXPOSURE. The laser component in this manual thoroughly and retain it for purchasing the Sony Compact Disc Player. Before operating the unit, please read this manual describe the controls on the player. • The following icons are for...

Operating Instructions
Page 4
... a malfunction. • If you received the following items: • Audio connecting cord (1) • Remote commander (remote) (1) (CDP-CE335 only) • R6 (size AA) batteries (2) (CDP-CE335 only) Inserting batteries into the remote casing, particularly when replacing the batteries. • Do not expose the remote sensor to an amplifier. Hooking Up the System Overview This section describes how to...
... a malfunction. • If you received the following items: • Audio connecting cord (1) • Remote commander (remote) (1) (CDP-CE335 only) • R6 (size AA) batteries (2) (CDP-CE335 only) Inserting batteries into the remote casing, particularly when replacing the batteries. • Do not expose the remote sensor to an amplifier. Hooking Up the System Overview This section describes how to...

Operating Instructions
Page 5
... the correct position using the optical cable (not supplied). Note that the voltage selector on the rear panel of the player is preset on the remote. Note When you connect via the DIGITAL OUT (OPTICAL) connector using a screwdriver before connecting the AC power cord to a wall outlet. 220 - 240... Before transporting the player, follow the procedure below to return the internal mechanisms back to their original position. 1 Remove all the discs from the disc tray. 2 Press § OPEN/CLOSE to the maximum level. Take off the player, the output level automatically returns to close the...
... the correct position using the optical cable (not supplied). Note that the voltage selector on the rear panel of the player is preset on the remote. Note When you connect via the DIGITAL OUT (OPTICAL) connector using a screwdriver before connecting the AC power cord to a wall outlet. 220 - 240... Before transporting the player, follow the procedure below to return the internal mechanisms back to their original position. 1 Remove all the discs from the disc tray. 2 Press § OPEN/CLOSE to the maximum level. Take off the player, the output level automatically returns to close the...
Operating Instructions
Page 7
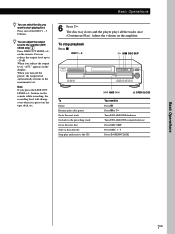
Basic Operations You can select the disc you want to the amplifier (CDPCE335 only) Press LINE OUT LEVEL +/- You can reduce the output level up to the maximum level. on the tape deck, etc. 6 Press ·. buttons on the remote while recording, the recording level will change even when it ...is preset on the remote. When you turn off the player, the output level automatically returns to -20 dB. The disc tray closes and the player plays all the tracks once (Continuous Play). To stop playback Press p. appears in the display...
Basic Operations You can select the disc you want to the amplifier (CDPCE335 only) Press LINE OUT LEVEL +/- You can reduce the output level up to the maximum level. on the tape deck, etc. 6 Press ·. buttons on the remote while recording, the recording level will change even when it ...is preset on the remote. When you turn off the player, the output level automatically returns to -20 dB. The disc tray closes and the player plays all the tracks once (Continuous Play). To stop playback Press p. appears in the display...

Operating Instructions
Page 10
... the track. You can also locate a specific point in the display, the disc has reached the end while you press the button, the playing time changes cyclically. When using the remote, press = repeatedly until you directly locate a track numbered over 10 (CDP-CE335 only) Z Press >10 first, then the corresponding number buttons on the...
... the track. You can also locate a specific point in the display, the disc has reached the end while you press the button, the playing time changes cyclically. When using the remote, press = repeatedly until you directly locate a track numbered over 10 (CDP-CE335 only) Z Press >10 first, then the corresponding number buttons on the...

Operating Instructions
Page 18
... .) incl. The player functions incorrectly. /The microcomputer chips may be operating incorrectly. Should any of 200 mm from the objective lens surface on the remote (CDP-CE335 only). Specifications Compact disc player Laser Laser output Frequency response Signal-to reset the player. buttons on the Optical Pick-up on the player. /Replace all the batteries... 44.6 µW* * This output is connected securely. /Make sure you remedy the problem. Additional Information Troubleshooting If you experience any problem persist, consult your nearest Sony dealer.
... .) incl. The player functions incorrectly. /The microcomputer chips may be operating incorrectly. Should any of 200 mm from the objective lens surface on the remote (CDP-CE335 only). Specifications Compact disc player Laser Laser output Frequency response Signal-to reset the player. buttons on the Optical Pick-up on the player. /Replace all the batteries... 44.6 µW* * This output is connected securely. /Make sure you remedy the problem. Additional Information Troubleshooting If you experience any problem persist, consult your nearest Sony dealer.

Operating Instructions
Page 19
...Play 11 Program 12 changing 13 checking 13 for recording 14 R Recording 14 a program 14 using Time Edit 14 Remaining time 8 Remote control 4 Repeating 11 Replacing discs while playing a disc 9 S Scanning. See Locating Select Shuffle Play 11 Shuffle Play 11 T Time Edit 14 Time Fade 15 Total playing time 8... Troubleshooting 18 U, V, W, X, Y, Z Unpacking 4 Voltage Selector 5 Names of controls Buttons CHECK 13 CLEAR 13 CONTINUE 6 DISC 1 - 5 9 DISC CHECK 9 DISC SKIP 7 EDIT/TIME FADE 14, 15 EX-CHANGE 9 FADER 15 LINE OUT LEVEL +/- 5 MUSIC SCAN 10 Number 10 § OPEN/CLOSE 6 ...
...Play 11 Program 12 changing 13 checking 13 for recording 14 R Recording 14 a program 14 using Time Edit 14 Remaining time 8 Remote control 4 Repeating 11 Replacing discs while playing a disc 9 S Scanning. See Locating Select Shuffle Play 11 Shuffle Play 11 T Time Edit 14 Time Fade 15 Total playing time 8... Troubleshooting 18 U, V, W, X, Y, Z Unpacking 4 Voltage Selector 5 Names of controls Buttons CHECK 13 CLEAR 13 CONTINUE 6 DISC 1 - 5 9 DISC CHECK 9 DISC SKIP 7 EDIT/TIME FADE 14, 15 EX-CHANGE 9 FADER 15 LINE OUT LEVEL +/- 5 MUSIC SCAN 10 Number 10 § OPEN/CLOSE 6 ...


