
Limited Warranty
Page 1
... warranty does not cover customer instruction, installation, set up adjustments. Proof of five (5) years. For your authorized dealer, call : Sony Customer Information Services Center 1-800-222-7669 or visit the Sony Web Site: www.sony.com For an accessory or part not available from the date of purchase, if this Product (including any part of a service problem, or for service assistance or resolution of the...
... warranty does not cover customer instruction, installation, set up adjustments. Proof of five (5) years. For your authorized dealer, call : Sony Customer Information Services Center 1-800-222-7669 or visit the Sony Web Site: www.sony.com For an accessory or part not available from the date of purchase, if this Product (including any part of a service problem, or for service assistance or resolution of the...
Operating Instructions
Page 2
... the product's enclosure that interference will not occur in a particular installation. Before operating the CD player, be sure to the presence of the unit protects the optical system against harmful interference in place. OPEN/CLOSE button. 2. Close the disc compertment by Model This instruction manual covers the CDP-C79ES and the CDP-C89ES. DO NOT REMOVE COVER iOR BACK, NO USERSERVICEABLE PARTS INSIDE REFER SERVICING TO OUALIFIED SERVICE...
... the product's enclosure that interference will not occur in a particular installation. Before operating the CD player, be sure to the presence of the unit protects the optical system against harmful interference in place. OPEN/CLOSE button. 2. Close the disc compertment by Model This instruction manual covers the CDP-C79ES and the CDP-C89ES. DO NOT REMOVE COVER iOR BACK, NO USERSERVICEABLE PARTS INSIDE REFER SERVICING TO OUALIFIED SERVICE...
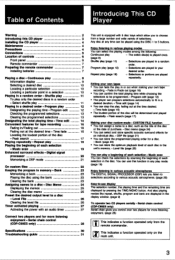
Operating Instructions
Page 3
...) - Program edit (page 12) • The player can confirm the total playing time while choosing the selections to a disc, such as the title of the disc or the date of the disc - Table of Contents Introducing This CD Player Warning 2 Introducing this function in or out when making your own tape recording. - Time fade 16 Locating the loudest portion of purchase. - Serial chain control (CDP-C89ES only) 28 Specifications 30 Troubleshooting guide...
...) - Program edit (page 12) • The player can confirm the total playing time while choosing the selections to a disc, such as the title of the disc or the date of the disc - Table of Contents Introducing This CD Player Warning 2 Introducing this function in or out when making your own tape recording. - Time fade 16 Locating the loudest portion of purchase. - Serial chain control (CDP-C89ES only) 28 Specifications 30 Troubleshooting guide...
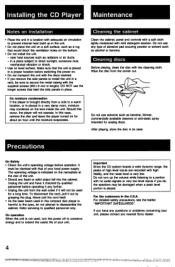
Operating Instructions
Page 4
... NOT use any liquid or solid object fall into the cabinet. In this compact disc player is harmful to the eyes, do , the speakers may condense on the lens inside the unit. To disconnect the cord, pull it any questions or problems concerning your unit. After playing, store the disc in this case, remove the disc and leave the player turned on...
... NOT use any liquid or solid object fall into the cabinet. In this compact disc player is harmful to the eyes, do , the speakers may condense on the lens inside the unit. To disconnect the cord, pull it any questions or problems concerning your unit. After playing, store the disc in this case, remove the disc and leave the player turned on...
Operating Instructions
Page 5
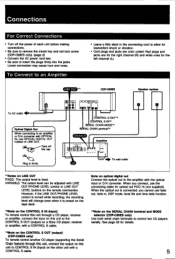
... connecting cord to the amplifier with LINE OUT/PHONE LEVEL control or LINE OUT LEVEL buttons on the remote commander. VARIABLE: The output level can be adjusted with the optical input or D/A converter. See page 28 for the left channel (L). NTROL S OUT*3 NTROL S IN*2 SERIAL CHAIN MODE*4 SERIAL CHAIN Jerminal*4 SPEAKER Amplifier To wall outlet *lNotes on LINE OUT FIXED: The output level is preset on the tape deck. *2Note on the CONTROL...
... connecting cord to the amplifier with LINE OUT/PHONE LEVEL control or LINE OUT LEVEL buttons on the remote commander. VARIABLE: The output level can be adjusted with the optical input or D/A converter. See page 28 for the left channel (L). NTROL S OUT*3 NTROL S IN*2 SERIAL CHAIN MODE*4 SERIAL CHAIN Jerminal*4 SPEAKER Amplifier To wall outlet *lNotes on LINE OUT FIXED: The output level is preset on the tape deck. *2Note on the CONTROL...

Operating Instructions
Page 7
... rfl 6 IC I (pause) button (page 8) Epp. (play) button (page 8) 7 REPEAT button (page 18) ri TIME button (page 9) TiCHECK (program check) button (page 13) >20 (over 20) button (page 10) OCLEAR (program clear) button (page 13) 7 DISC 1-5 buttons (page 12) El PLAY MODE buttons CONTINUE button (page 11) SHUFFLE button (page 11) PROGRAM button (page 12) BANK button (page 23) 24 CHAIN MODE button (CDP-C89ES only) (page 29) 25 PLAYER SELECT button (CDP-C89ES only) (page 29) Buttons with new ones.
... rfl 6 IC I (pause) button (page 8) Epp. (play) button (page 8) 7 REPEAT button (page 18) ri TIME button (page 9) TiCHECK (program check) button (page 13) >20 (over 20) button (page 10) OCLEAR (program clear) button (page 13) 7 DISC 1-5 buttons (page 12) El PLAY MODE buttons CONTINUE button (page 11) SHUFFLE button (page 11) PROGRAM button (page 12) BANK button (page 23) 24 CHAIN MODE button (CDP-C89ES only) (page 29) 25 PLAYER SELECT button (CDP-C89ES only) (page 29) Buttons with new ones.

Operating Instructions
Page 8
... to use VARIABLE, control the volume with LINE OUT/PHONE LEVEL control or LINE OUT LEVEL buttons on the amplifier and set to resume play , press E. or 11 to play an (3-Inch) 8 cm CD Place it . To stop mode. Caution on adjusting volume Do not turn on the remote commander. tt, • • When all selections of a disc are played, the circle semi on top of the tray. Notes • Disc memo...
... to use VARIABLE, control the volume with LINE OUT/PHONE LEVEL control or LINE OUT LEVEL buttons on the amplifier and set to resume play , press E. or 11 to play an (3-Inch) 8 cm CD Place it . To stop mode. Caution on adjusting volume Do not turn on the remote commander. tt, • • When all selections of a disc are played, the circle semi on top of the tray. Notes • Disc memo...
Operating Instructions
Page 15
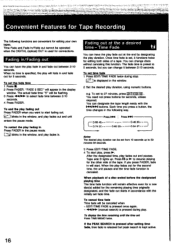
... *. To turn off "EDIT" in the program 1 Make your tape; you ► disc has more than 1 minute. Furthermore the time edit function cannot be made automatically to the remaining time. LINK - To include desired selections in the window, press To play . To add selection(s) - Whether "LINK" is changed by another disc, the new selection number(s) on the new disc that fit in the tape side indicator...
... *. To turn off "EDIT" in the program 1 Make your tape; you ► disc has more than 1 minute. Furthermore the time edit function cannot be made automatically to the remaining time. LINK - To include desired selections in the window, press To play . To add selection(s) - Whether "LINK" is changed by another disc, the new selection number(s) on the new disc that fit in the tape side indicator...
Operating Instructions
Page 16
... easily with the initially set , it between 2-10 seconds. e.g. • ,V.`714 • • Z•• sY.:•st;-,*2'44:'::. You can have the play fade in accordance with the IN/10N buttons. You can be operated when the DIGITAL (optical) OUT is pressed during stop. When playback of a disc ended before the designated playing time The time fade function will start fading out...
... easily with the initially set , it between 2-10 seconds. e.g. • ,V.`714 • • Z•• sY.:•st;-,*2'44:'::. You can have the play fade in accordance with the IN/10N buttons. You can be operated when the DIGITAL (optical) OUT is pressed during stop. When playback of a disc ended before the designated playing time The time fade function will start fading out...

Operating Instructions
Page 17
... the disc which is played repeatedly for 4 seconds and "- Note on tape. However, the difference between the portion searched and the actual peak level is insignificant and will scan all selections stored in the program bank Unless you to adjust to pause at fixed intervals. In addition, this function may differ from the beginning of the disc or program will make...
... the disc which is played repeatedly for 4 seconds and "- Note on tape. However, the difference between the portion searched and the actual peak level is insignificant and will scan all selections stored in the program bank Unless you to adjust to pause at fixed intervals. In addition, this function may differ from the beginning of the disc or program will make...
Operating Instructions
Page 21
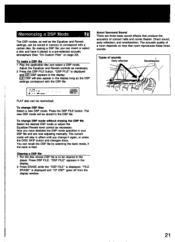
... FILE button. Press the DSP FILE button. "FILE ERASE" is filed. About Surround Sound There are now adjusting manually. To make a DSP file 1 Play the applicable disc and select a DSP mode. "DSP FILE" is displayed. DSP will also appear in the display. To change DSP mode without erasing the DSP file Select the desired DSP mode or adjust the Equalizer/Reverb level control as necessary. The current mode will...
... FILE button. Press the DSP FILE button. "FILE ERASE" is filed. About Surround Sound There are now adjusting manually. To make a DSP file 1 Play the applicable disc and select a DSP mode. "DSP FILE" is displayed. DSP will also appear in the display. To change DSP mode without erasing the DSP file Select the desired DSP mode or adjust the Equalizer/Reverb level control as necessary. The current mode will...

Operating Instructions
Page 23
... into the memory (One disc can keep the program memorized, so that the disc is displayed. Keeping the Program in the display window. Notes • You cannot program a whole disc under a single program number. • To pause during the bank play "1 DISC" or "ALL DISCS". 2 Press .* to 24 programs). FILE -" will be cleared in the fixed order. Memorizing a Bank The program is displayed and "CF BANK" goes...
... into the memory (One disc can keep the program memorized, so that the disc is displayed. Keeping the Program in the display window. Notes • You cannot program a whole disc under a single program number. • To pause during the bank play "1 DISC" or "ALL DISCS". 2 Press .* to 24 programs). FILE -" will be cleared in the fixed order. Memorizing a Bank The program is displayed and "CF BANK" goes...

Operating Instructions
Page 24
ok. 4 a.. Then proceed as follows in the stop mode. 2 A Using the MEMO INPUT button with the letter buttons on the remote commander (This function can be entered while playing) 1 WA NM El Using the 44/0+ buttons 1 I 44 t ob• tact .I o' 3 2 cp ah =IP EP CACPCD A 3 J Make sure that the total number of selections and the total playing time are displayed. Press 4.4 or N until the desired letter appears...
ok. 4 a.. Then proceed as follows in the stop mode. 2 A Using the MEMO INPUT button with the letter buttons on the remote commander (This function can be entered while playing) 1 WA NM El Using the 44/0+ buttons 1 I 44 t ob• tact .I o' 3 2 cp ah =IP EP CACPCD A 3 J Make sure that the total number of selections and the total playing time are displayed. Press 4.4 or N until the desired letter appears...

Operating Instructions
Page 25
... MEMO INPUT on the Remote Commander. Note Disc memos can be used. When the N/ button is displayed and "CF MEMO" goes off in the player, and close the disc tray. 2 Press *4 or 1040. Use N to be changed and then select the desired letter/symbol using the same procedure as that for the disc being played Press TIME/MEMO twice during the shuffle, program or bank mode and three times...
... MEMO INPUT on the Remote Commander. Note Disc memos can be used. When the N/ button is displayed and "CF MEMO" goes off in the player, and close the disc tray. 2 Press *4 or 1040. Use N to be changed and then select the desired letter/symbol using the same procedure as that for the disc being played Press TIME/MEMO twice during the shuffle, program or bank mode and three times...
Operating Instructions
Page 26
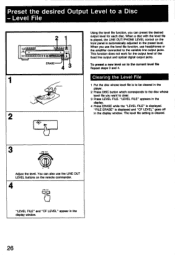
... can also use headphones or the amplifier connected to the preset level. To preset a new level on the front panel is automatically adjusted to the variable line output jacks. "LEVEL FILE" appears in the display window. 26 You can preset the desired output level for the output level of the fixed line output and optical digital output jacks. This function does not work for each disc. The level file setting is displayed. Preset the desired Output Level...
... can also use headphones or the amplifier connected to the preset level. To preset a new level on the front panel is automatically adjusted to the variable line output jacks. "LEVEL FILE" appears in the display window. 26 You can preset the desired output level for the output level of the fixed line output and optical digital output jacks. This function does not work for each disc. The level file setting is displayed. Preset the desired Output Level...
Operating Instructions
Page 27
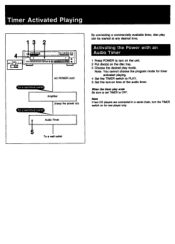
... CD players are connected in a serial chain, turn on the unit. 2 Put disc(s) on ) To a switched outlet Audio Timer By connecting a commercially available timer, disc play can be started at any desired time. When the timer play ends Be sure to set TIMER to turn the TIMER switch on time of the audio timer. Timer Activated Playing 2 e Till.lsER pt.A, o =MD GETIQ • CE10 0 B FIEREN AC POWER cord To a switched outlet Amplifier (Keep the power on the disc tray. 3 Choose the desired play mode...
... CD players are connected in a serial chain, turn on the unit. 2 Put disc(s) on ) To a switched outlet Audio Timer By connecting a commercially available timer, disc play can be started at any desired time. When the timer play ends Be sure to set TIMER to turn the TIMER switch on time of the audio timer. Timer Activated Playing 2 e Till.lsER pt.A, o =MD GETIQ • CE10 0 B FIEREN AC POWER cord To a switched outlet Amplifier (Keep the power on the disc tray. 3 Choose the desired play mode...
Operating Instructions
Page 28
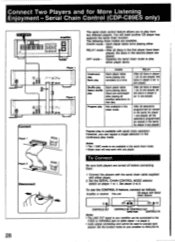
Each player takes turns playing either player alone. Repeat play is not available in the serial chain mode. • Music scan will need another CD player that disc. Set player 2 to ANALOG IN. You will only work with serial chain operation. Continuous play Bank play Shuffle play Select shuffle play Program play either discs. RELAY After all shuffled selections on that supports the serial chain function. Set the function mode on player 1 to connect both players are played. Serial Chain Control (CDP-C89ES only) CD or AUX Amplifier eeeeee CTW-cil 0 ...
Each player takes turns playing either player alone. Repeat play is not available in the serial chain mode. • Music scan will need another CD player that disc. Set player 2 to ANALOG IN. You will only work with serial chain operation. Continuous play Bank play Shuffle play Select shuffle play Program play either discs. RELAY After all shuffled selections on that supports the serial chain function. Set the function mode on player 1 to connect both players are played. Serial Chain Control (CDP-C89ES only) CD or AUX Amplifier eeeeee CTW-cil 0 ...

Operating Instructions
Page 29
However, the output from LINE OUT is available. • Adjust the LINE OUT/PHONE LEVEL and DSP modes on the player operating at that is turned off ) • 5 Select the player you select the program mode, continue by making your program. (See page 12) 29 To change players, press the PLAYER SELECT button on the Remote Commander. • The DISC SKIP button on first will not work with the player with the brighter display. Select...
However, the output from LINE OUT is available. • Adjust the LINE OUT/PHONE LEVEL and DSP modes on the player operating at that is turned off ) • 5 Select the player you select the program mode, continue by making your program. (See page 12) 29 To change players, press the PLAYER SELECT button on the Remote Commander. • The DISC SKIP button on first will not work with the player with the brighter display. Select...
Operating Instructions
Page 30
... oz), net (CDP-C79ES) Remote Commander RM-D715 (CDP-C79ES supplied) RM-D870 (CDP-C89ES supplied) Remote control system Infrared control Power requirements 3 V DC with two size AA batteries (IEC designation R6) Dimensions 62 x 20 x 175 mm (w/h/d) (21/2 x 13/16 x 7 inches) Weight 130 g (4.6 oz) including batteries Supplied Accessories Connecting cord (2 phono plugs •-• 2 phono plugs) (1) Serial chain cable (1) (CDP-C89ES only) CONTROL S cable (1) (CDP-C89ES only) Remote commander (1) Sony SUM-3(NS) (2) Screws (1 set) Optional Accessory Audio optical connecting cord POC-15...
... oz), net (CDP-C79ES) Remote Commander RM-D715 (CDP-C79ES supplied) RM-D870 (CDP-C89ES supplied) Remote control system Infrared control Power requirements 3 V DC with two size AA batteries (IEC designation R6) Dimensions 62 x 20 x 175 mm (w/h/d) (21/2 x 13/16 x 7 inches) Weight 130 g (4.6 oz) including batteries Supplied Accessories Connecting cord (2 phono plugs •-• 2 phono plugs) (1) Serial chain cable (1) (CDP-C89ES only) CONTROL S cable (1) (CDP-C89ES only) Remote commander (1) Sony SUM-3(NS) (2) Screws (1 set) Optional Accessory Audio optical connecting cord POC-15...

Operating Instructions
Page 31
... internal control program may not work properly due to the condition of the power being supplied. The disc is set upside down. Set the disc with your nearest Sony service facility. Point the remote commander to the connection and operating procedures. Remote commander does not operate the unit. The remote commander is in the compartment. Set the disc correctly. Moisture condensation The disc is tilted. Put disc(s) in the pause mode. Move...
... internal control program may not work properly due to the condition of the power being supplied. The disc is set upside down. Set the disc with your nearest Sony service facility. Point the remote commander to the connection and operating procedures. Remote commander does not operate the unit. The remote commander is in the compartment. Set the disc correctly. Moisture condensation The disc is tilted. Put disc(s) in the pause mode. Move...


