

Primary User Manual
Page 1
CCD-Fx Serial No. SONY® 3-758-676-23 (1) Video Camera Recorder 8 CCD-FX430/FX435/FX530/FX630 Operation Manual Before operating the unit, please read this product. Refer to these numbers whenever you call upon your Sony dealer regarding this manual thoroughly and retain it for future reference. AC-V Serial No Photo: CCD-FX430 Video8 Handycam ©1994 by Sony Corporation Model No. Record the serial number in the space provided below. Model No. Owner's Record The model and serial numbers are located on the bottom.
CCD-Fx Serial No. SONY® 3-758-676-23 (1) Video Camera Recorder 8 CCD-FX430/FX435/FX530/FX630 Operation Manual Before operating the unit, please read this product. Refer to these numbers whenever you call upon your Sony dealer regarding this manual thoroughly and retain it for future reference. AC-V Serial No Photo: CCD-FX430 Video8 Handycam ©1994 by Sony Corporation Model No. Record the serial number in the space provided below. Model No. Owner's Record The model and serial numbers are located on the bottom.

Primary User Manual
Page 2
... for a Class B digital device. However, there is very easy to use. Connect the equipment into an outlet on your nearest Sony Service Center or Factory Service Center for years to come. You will not occur in a particular installation if this manual could void your Handycam you call 416499-SONY (Canada only) Caution: Do not handle damaged or leaking nickekadmium batteries. CAUTION A.Sst 0; For...
... for a Class B digital device. However, there is very easy to use. Connect the equipment into an outlet on your nearest Sony Service Center or Factory Service Center for years to come. You will not occur in a particular installation if this manual could void your Handycam you call 416499-SONY (Canada only) Caution: Do not handle damaged or leaking nickekadmium batteries. CAUTION A.Sst 0; For...

Primary User Manual
Page 3
... Begin Checking Your Model Number 4 Checking Supplied Accessories 5 Getting Started Charging and Installing the Battery Pack 6 Inserting a Cassette 9 Adjusting the Viewfinder Lens 10 Basic Operations Camera Recording II Using the Zoom Feature 13 Hints for Better Shooting 14 Checking the Recorded Picture 15 Connections for Playback 16 Connecting to a TV without Audio/Video Input Jacks 16 Connecting to a TV or a VCR with Audio/Video Input Jacks 16 Playing Back a Tape 18 Advanced Operations Using Alternative Power Sources 20 Using House Current 20 Recording with the Date or Time 21 Recording...
... Begin Checking Your Model Number 4 Checking Supplied Accessories 5 Getting Started Charging and Installing the Battery Pack 6 Inserting a Cassette 9 Adjusting the Viewfinder Lens 10 Basic Operations Camera Recording II Using the Zoom Feature 13 Hints for Better Shooting 14 Checking the Recorded Picture 15 Connections for Playback 16 Connecting to a TV without Audio/Video Input Jacks 16 Connecting to a TV or a VCR with Audio/Video Input Jacks 16 Playing Back a Tape 18 Advanced Operations Using Alternative Power Sources 20 Using House Current 20 Recording with the Date or Time 21 Recording...

Primary User Manual
Page 4
...". To view your country. Please check the list on a TV, you use the RFU adaptor when you need an NTSC/PAL-M transcoder (as this manual and operating the unit, check your model number by looking at the bottom of such materials may be able to the provision of differences Model number CCD-FX430 CCD-FX435 CCD-FX530 CCD-FX630 Audio Monaural • • • Stereo • Steady Shot Manual Focus...
...". To view your country. Please check the list on a TV, you use the RFU adaptor when you need an NTSC/PAL-M transcoder (as this manual and operating the unit, check your model number by looking at the bottom of such materials may be able to the provision of differences Model number CCD-FX430 CCD-FX435 CCD-FX530 CCD-FX630 Audio Monaural • • • Stereo • Steady Shot Manual Focus...
Primary User Manual
Page 6
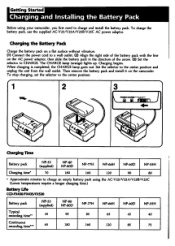
... 40 Continuous recording time*" 65 I80 160 120 85 75 Charging begins. When charging is completed, the CHARGE lamp goes out. Set the selector to charge and install the battery pack. To charge the battery pack, use the supplied AC-V25/V25A/V25B/V25C AC power adaptor. The CHARGE lamp (orange) lights up. To stop charging, set the selector to the center position. 1 2 WO. 3 4 i • Tinan J . ,,, i e-, , ' '''Q,-;P;,r.,..,•1.7 / Charging Time Battery pack...
... 40 Continuous recording time*" 65 I80 160 120 85 75 Charging begins. When charging is completed, the CHARGE lamp goes out. Set the selector to charge and install the battery pack. To charge the battery pack, use the supplied AC-V25/V25A/V25B/V25C AC power adaptor. The CHARGE lamp (orange) lights up. To stop charging, set the selector to the center position. 1 2 WO. 3 4 i • Tinan J . ,,, i e-, , ' '''Q,-;P;,r.,..,•1.7 / Charging Time Battery pack...
Primary User Manual
Page 7
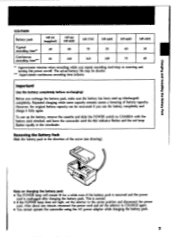
... minutes when recording while you repeat recording start/s op or zooming and turning the power on charging the battery pack • The POWER lamp will remain lit for a while even if the battery pack is removed and the power cord is normal. • If the POWER lamp does not light, set the selector to CHARGE again. • You cannot operate the camcorder using the AC power adaptor while charging the battery pack. 7
... minutes when recording while you repeat recording start/s op or zooming and turning the power on charging the battery pack • The POWER lamp will remain lit for a while even if the battery pack is removed and the power cord is normal. • If the POWER lamp does not light, set the selector to CHARGE again. • You cannot operate the camcorder using the AC power adaptor while charging the battery pack. 7
Primary User Manual
Page 11
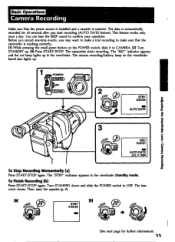
...:00 AUTO DATE Adjusting the Viewfinder Lens / Camera Recording REC 0:00:01 ==. The camcorder starts recording. The camera recording/battery lamp on the POWER switch, slide it to make sure that the power source is installed and a cassette is inserted. Turn STANDBY down and slide the POWER switch to confirm your operation. This feature works only once a day. AUTO DATE JUL 4 1994 To Stop Recording Momentarily ral Press START/STOP again. To Finish Recording Da Press START/STOP again...
...:00 AUTO DATE Adjusting the Viewfinder Lens / Camera Recording REC 0:00:01 ==. The camcorder starts recording. The camera recording/battery lamp on the POWER switch, slide it to make sure that the power source is installed and a cassette is inserted. Turn STANDBY down and slide the POWER switch to confirm your operation. This feature works only once a day. AUTO DATE JUL 4 1994 To Stop Recording Momentarily ral Press START/STOP again. To Finish Recording Da Press START/STOP again...
Primary User Manual
Page 12
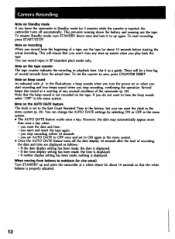
... sound is not recorded on the tape counter The tape counter indicates the recording or playback time. If you do not want to outdoors (or vice versa) Turn STANDBY up again. If the date display setting has been made, the date is displayed. - When moving from the actual time. Camera Recording Note on Standby mode If you leave the camcorder in the menu system. Use it to zero, press COUNTER RESET...
... sound is not recorded on the tape counter The tape counter indicates the recording or playback time. If you do not want to outdoors (or vice versa) Turn STANDBY up again. If the date display setting has been made, the date is displayed. - When moving from the actual time. Camera Recording Note on Standby mode If you leave the camcorder in the menu system. Use it to zero, press COUNTER RESET...
Primary User Manual
Page 15
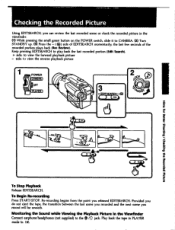
... EDITSEARCH to play back the last recorded portion (Edit Search). + side: to CAMERA. (2) Turn STANDBY up. (3) Press the - ( IR) side of the recorded portion plays back (Rec Review). side: t, view the reverse playback picture POWER •0FF 0 'PLAYIER NOS tC Hints for Better Shooting / Checking the Recorded Picture To Stop Playback Release EDITSEARCH. Re-recording begins from the point you record will be smooth. Provided you do not eject the tape, the...
... EDITSEARCH to play back the last recorded portion (Edit Search). + side: to CAMERA. (2) Turn STANDBY up. (3) Press the - ( IR) side of the recorded portion plays back (Rec Review). side: t, view the reverse playback picture POWER •0FF 0 'PLAYIER NOS tC Hints for Better Shooting / Checking the Recorded Picture To Stop Playback Release EDITSEARCH. Re-recording begins from the point you record will be smooth. Provided you do not eject the tape, the...
Primary User Manual
Page 16
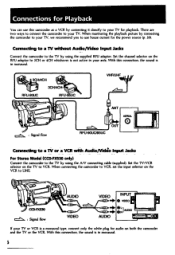
... type, connect only the white plug for audio on the TV to your area. Connections for Playback You can use house current for the power source (p. 20). When connecting the camcorder to VCR, set the input selector on the RFU adaptor to LINE. 0 AUDIO VIDEO INPUT VIDEO CCD-FX530 : Signal flow VIDEO AUDIO AUDIO If your TV for playback. There are two ways to conned the camcorder to VCR. With this camcorder as a VCR by using the A/V connecting cable (supplied). Set...
... type, connect only the white plug for audio on the TV to your area. Connections for Playback You can use house current for the power source (p. 20). When connecting the camcorder to VCR, set the input selector on the RFU adaptor to LINE. 0 AUDIO VIDEO INPUT VIDEO CCD-FX530 : Signal flow VIDEO AUDIO AUDIO If your TV for playback. There are two ways to conned the camcorder to VCR. With this camcorder as a VCR by using the A/V connecting cable (supplied). Set...
Primary User Manual
Page 18
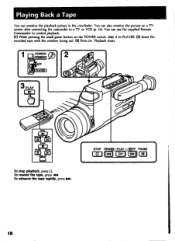
STOP REW(B-PLAY - (eFF PAUSE 0 C>. Playing Back a Tape You can use the supplied Remote Commander to control playback. (1) While pressing the small green button on a TV screen, after connecting the camcorder to PLAYER. (2) Insert the recorded tape with the window facing out. (3) Press Playback starts. • • 1 POWER c..) CAMERA OFF „..oirpk PLAYER I • PLAY (c).0 N PLAY ME= slop MEE PAUSE SLOW 11 E] 0GRAY To stop playback, press 0. You can also monitor the picture on the POWER switch. slide it...
STOP REW(B-PLAY - (eFF PAUSE 0 C>. Playing Back a Tape You can use the supplied Remote Commander to control playback. (1) While pressing the small green button on a TV screen, after connecting the camcorder to PLAYER. (2) Insert the recorded tape with the window facing out. (3) Press Playback starts. • • 1 POWER c..) CAMERA OFF „..oirpk PLAYER I • PLAY (c).0 N PLAY ME= slop MEE PAUSE SLOW 11 E] 0GRAY To stop playback, press 0. You can also monitor the picture on the POWER switch. slide it...

Primary User Manual
Page 28
... power zoom button until the zooming stops. (3) Turn the focus ring to achieve a sharp focus. (4) Set the desired shot length using the power zoom button. The Mb indicator appears in telephoto before recording, and then reset the shot length. (1) Set FOCUS to Use Manual Focus _. In the following cases you should obtain better results by adjusting the focus manually. [o] 0 • Insufficient light [a] • Subjects with the FOCUS switch (CCD-FX630 only) When to MANUAL. For models with little contrast - Focusing Manually - MANUAL...
... power zoom button until the zooming stops. (3) Turn the focus ring to achieve a sharp focus. (4) Set the desired shot length using the power zoom button. The Mb indicator appears in telephoto before recording, and then reset the shot length. (1) Set FOCUS to Use Manual Focus _. In the following cases you should obtain better results by adjusting the focus manually. [o] 0 • Insufficient light [a] • Subjects with the FOCUS switch (CCD-FX630 only) When to MANUAL. For models with little contrast - Focusing Manually - MANUAL...
Primary User Manual
Page 33
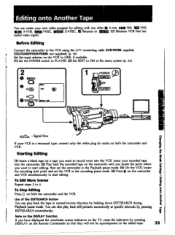
... the VCR, insert your recorded tape into the camcorder. (2) Play back the recorded tape on the camcorder until you locate the point where you have displayed the viewfinder screen indicators on the TV, erase the indicators by pressing DISPLAY on the Remote Commander so that has audio/video inputs. Before Editing Conned the camcorder to the VCR using the AN connecting cable (CCD-FX530: supplied, CCD-FX1130/FX435/FX630: not supplied). (p. 16) Set the input...
... the VCR, insert your recorded tape into the camcorder. (2) Play back the recorded tape on the camcorder until you locate the point where you have displayed the viewfinder screen indicators on the TV, erase the indicators by pressing DISPLAY on the Remote Commander so that has audio/video inputs. Before Editing Conned the camcorder to the VCR using the AN connecting cable (CCD-FX530: supplied, CCD-FX1130/FX435/FX630: not supplied). (p. 16) Set the input...
Primary User Manual
Page 36
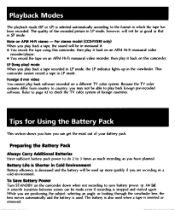
... lens, the lens moves automatically and the battery is selected automatically according to play back software recorded on this camcorder, then play it back on a different TV color system. Playback Modes The playback mode (SP or LP) is used. LP (long play) mode When you play back a tape recorded in Cold Environment Battery efficiency is inserted or removed. This camcorder cannot record a tape in a cold environment. Battery Life is Shorter in LP mode, the LP indicator lights...
... lens, the lens moves automatically and the battery is selected automatically according to play back software recorded on this camcorder, then play it back on a different TV color system. Playback Modes The playback mode (SP or LP) is used. LP (long play) mode When you play back a tape recorded in Cold Environment Battery efficiency is inserted or removed. This camcorder cannot record a tape in a cold environment. Battery Life is Shorter in LP mode, the LP indicator lights...
Primary User Manual
Page 41
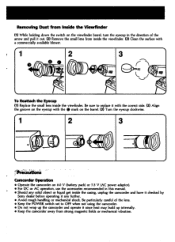
.... e 1 2 3 Camcorder Operation • Operate the camcorder on 6.0 V (battery pack) or 7.5 V (AC power adaptor). • For DC or AC operation, use the accessories recommended in the direction of the lens. • Keep the POWER switch set to replace it with the correct side. (2) Align the groove on the barrel. (3) Turn the eyecup clockwise. Be sure to OFF when not using the camcorder. • Do not wrap up internally. •...
.... e 1 2 3 Camcorder Operation • Operate the camcorder on 6.0 V (battery pack) or 7.5 V (AC power adaptor). • For DC or AC operation, use the accessories recommended in the direction of the lens. • Keep the POWER switch set to replace it with the correct side. (2) Align the groove on the barrel. (3) Turn the eyecup clockwise. Be sure to OFF when not using the camcorder. • Do not wrap up internally. •...
Primary User Manual
Page 42
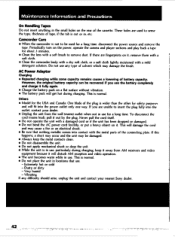
... humid - Camcorder Care • When the camcorder is in use for a long time. particularly during charging. Never pull the cord itself. • Do not operate the unit with a mild detergent solution. Dusty or dirty - disconnect the power source and remove the tape. This is out or in, etc. Others • Model for safety purposes and will disturb AM reception and video operation. •...
... humid - Camcorder Care • When the camcorder is in use for a long time. particularly during charging. Never pull the cord itself. • Do not operate the unit with a mild detergent solution. Dusty or dirty - disconnect the power source and remove the tape. This is out or in, etc. Others • Model for safety purposes and will disturb AM reception and video operation. •...
Primary User Manual
Page 44
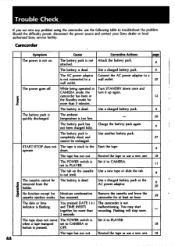
... more than recording. The ambient temperature is Use another battery pack. drum. 9 The tape has run out. Use a charged battery pack. 6 The AC power adaptor Connect the AC power adaptor to a is not connected to the Eject the tape. OFF. is out (red). 9 The cassette cannot be recharged. I removed from the holder. camcorder has been in Turn STANDBY down once and CAMERA mode, the turn it to CAMERA or 18 button is pressed...
... more than recording. The ambient temperature is Use another battery pack. drum. 9 The tape has run out. Use a charged battery pack. 6 The AC power adaptor Connect the AC power adaptor to a is not connected to the Eject the tape. OFF. is out (red). 9 The cassette cannot be recharged. I removed from the holder. camcorder has been in Turn STANDBY down once and CAMERA mode, the turn it to CAMERA or 18 button is pressed...

Primary User Manual
Page 45
... polarity. SOUND set to OFF. viewfinder screen is heard. (CCD-FX530 only) recorded with WIND selector to ON in the menu 31 system. The playback picture is EDIT is set the sound is not not adjusted. 10 clear. Clean the heads using the Sony V8-25CLH cleaning cassette. 40 The supplied Remote COMMANDER is not DISPLAY on the Press DISPLAY on the Remote displayed on the The viewfinder lens is "noisy". Remove the viewfinder...
... polarity. SOUND set to OFF. viewfinder screen is heard. (CCD-FX530 only) recorded with WIND selector to ON in the menu 31 system. The playback picture is EDIT is set the sound is not not adjusted. 10 clear. Clean the heads using the Sony V8-25CLH cleaning cassette. 40 The supplied Remote COMMANDER is not DISPLAY on the Press DISPLAY on the Remote displayed on the The viewfinder lens is "noisy". Remove the viewfinder...
Primary User Manual
Page 47
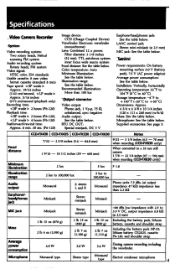
... Audio recording system: Rotary heads, FM system Video signal: NTSC color, EIA standards Usable cassette: 8 mm video format cassette (standard 8 mm) Tape speed: Approx. 19/32 inches (1.43 cm)/second, Approx. 5/16 inches (0.72 cm)/second (playback only) Recording time: 2 hours (P6-120) Playback time: 2 hours (P6-I20), < LP mode> 4 hours (P6-120) Fastforward/rewind time: Approx. 6 min. 30 sec. (P6-120) Image device: CCD (Charge Coupled Device) Viewfinder: Electronic viewfinder (monochrome) Lens: Combined 12 x power...
... Audio recording system: Rotary heads, FM system Video signal: NTSC color, EIA standards Usable cassette: 8 mm video format cassette (standard 8 mm) Tape speed: Approx. 19/32 inches (1.43 cm)/second, Approx. 5/16 inches (0.72 cm)/second (playback only) Recording time: 2 hours (P6-120) Playback time: 2 hours (P6-I20), < LP mode> 4 hours (P6-120) Fastforward/rewind time: Approx. 6 min. 30 sec. (P6-120) Image device: CCD (Charge Coupled Device) Viewfinder: Electronic viewfinder (monochrome) Lens: Combined 12 x power...

Primary User Manual
Page 56
Tripod mounting Trouble check Twilight mode D, E DATE/TIME DISPLAY EDIT Editing EDITSEARCH EJECT 21 19 33 33 15 ........ 9 IN, X, Y, WIND Zoom 15 53 5I 18 16 51 19 14 26 1 I , 1, K, L LANC 51 Lithium battery 34 M, N, 0, P Manual focus 28 Menu system 31 M. Index A AC power adaptor Adjusting viewfinder AFM Hi-Fi Sound AGE/EVENT AUTO DATE Auto focus A/V connecting cable B BACK LIGHT Battery pack BEEP C Camera recording Car battery Charging battery Cleaning video heads Clock set Connection COUNTER RESET F, G, H Q, R 6, 20 10 36 22 11 21 16...
Tripod mounting Trouble check Twilight mode D, E DATE/TIME DISPLAY EDIT Editing EDITSEARCH EJECT 21 19 33 33 15 ........ 9 IN, X, Y, WIND Zoom 15 53 5I 18 16 51 19 14 26 1 I , 1, K, L LANC 51 Lithium battery 34 M, N, 0, P Manual focus 28 Menu system 31 M. Index A AC power adaptor Adjusting viewfinder AFM Hi-Fi Sound AGE/EVENT AUTO DATE Auto focus A/V connecting cable B BACK LIGHT Battery pack BEEP C Camera recording Car battery Charging battery Cleaning video heads Clock set Connection COUNTER RESET F, G, H Q, R 6, 20 10 36 22 11 21 16...


