
Operating Instructions primary manual
Page 1
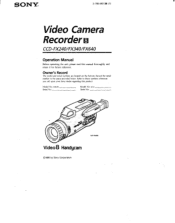
Model No. Owner's Record The model and serial numbers are located on the bottom. CCD-FX Serial No Model No. Refer to these numbers whenever you call upon your Sony dealer regarding this manual thoroughly and retain it for future reference. a CCD-FX640 Video8 Handycam ©1995 by Sony Corporation AC-V Serial No. SONY,. 3-798-592-26 (1) Video Camera Recorder 8 CCD-FX240/FX340/FX640 Operation Manual Before operating the unit, please read this product. Record the serial number in the space provided below.
Model No. Owner's Record The model and serial numbers are located on the bottom. CCD-FX Serial No Model No. Refer to these numbers whenever you call upon your Sony dealer regarding this manual thoroughly and retain it for future reference. a CCD-FX640 Video8 Handycam ©1995 by Sony Corporation AC-V Serial No. SONY,. 3-798-592-26 (1) Video Camera Recorder 8 CCD-FX240/FX340/FX640 Operation Manual Before operating the unit, please read this product. Record the serial number in the space provided below.

Operating Instructions primary manual
Page 2
..., but at the same time it is intended to alert the I user to the presence of important operating and maintenance • (servicing) instructions in this manual could void your authority to operate this Sony Handycam® camcorder. For Customers in a residential installation. With your Handycam you call 416499-SONY (Canada only) Caution: Do not handle damaged or leaking 2 nickel-cadmium batteries. You will not occur...
..., but at the same time it is intended to alert the I user to the presence of important operating and maintenance • (servicing) instructions in this manual could void your authority to operate this Sony Handycam® camcorder. For Customers in a residential installation. With your Handycam you call 416499-SONY (Canada only) Caution: Do not handle damaged or leaking 2 nickel-cadmium batteries. You will not occur...
Operating Instructions primary manual
Page 3
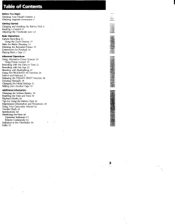
... Begin Checking Your Model Number 4 Checking Supplied Accessories 5 Getting Started Charging and Installing the Battery Pack 6 Inserting a Cassette 9 Adjusting the Viewfinder Lens 10 Basic Operations Camera Recording 11 Using the Zoom Feature 13 Hints for Better Shooting 14 Checking the Recorded Picture 15 Connections for Playback 16 Playing Back a Tape I7 Advanced Operations Using Alternative Power Sources 49 Using House Current 19 Recording with the Date or Time 21 Recording with the Age 22 Shooting with Backlighting 25 Using the PROGRAM AE Function 26...
... Begin Checking Your Model Number 4 Checking Supplied Accessories 5 Getting Started Charging and Installing the Battery Pack 6 Inserting a Cassette 9 Adjusting the Viewfinder Lens 10 Basic Operations Camera Recording 11 Using the Zoom Feature 13 Hints for Better Shooting 14 Checking the Recorded Picture 15 Connections for Playback 16 Playing Back a Tape I7 Advanced Operations Using Alternative Power Sources 49 Using House Current 19 Recording with the Date or Time 21 Recording with the Age 22 Shooting with Backlighting 25 Using the PROGRAM AE Function 26...
Operating Instructions primary manual
Page 4
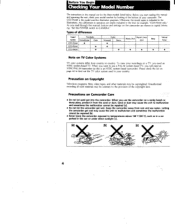
.... e.g. Types of the copyright laws. Precaution on page 42 to CAMERA." Letting the camcorder get into the camcorder. Before you start reading this manual, buttons and settings on TV Color Systems TV color systems differ from rain and sea water. "Set the POWER switch to find out the TV color system used for example, "CCD-FX340 only." Please check the list on Copyright Television programs, films, video tapes, and...
.... e.g. Types of the copyright laws. Precaution on page 42 to CAMERA." Letting the camcorder get into the camcorder. Before you start reading this manual, buttons and settings on TV Color Systems TV color systems differ from rain and sea water. "Set the POWER switch to find out the TV color system used for example, "CCD-FX340 only." Please check the list on Copyright Television programs, films, video tapes, and...
Operating Instructions primary manual
Page 7
... you recharge the battery pack, make sure the battery has been used up the battery, remove the cassette and slide the POWER switch to CAMERA with the battery pack attached, and leave the camcorder until the diX:3 indicator flashes and the red lamp flashes rapidly in the viewfinder. 7 Use the battery completely before re-charging! Before you use up (discharged) completely. "*" Approximate continuous recording time indoors. Repeated charging while some capacity...
... you recharge the battery pack, make sure the battery has been used up the battery, remove the cassette and slide the POWER switch to CAMERA with the battery pack attached, and leave the camcorder until the diX:3 indicator flashes and the red lamp flashes rapidly in the viewfinder. 7 Use the battery completely before re-charging! Before you use up (discharged) completely. "*" Approximate continuous recording time indoors. Repeated charging while some capacity...
Operating Instructions primary manual
Page 10
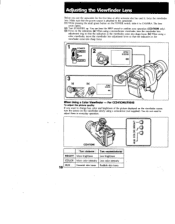
... to change hue, color and brightness of the picture displayed on the POWER switch, slide it , focus the viewfinder lens. Make sure that the indicators in the viewfinder come into sharp focus. For CCD-FX340/FX640 To adjust the picture quality If you use the camcorder for the first time or after someone else has used it to the camcorder. (1) While pressing the small green button on the viewfinder screen, turn...
... to change hue, color and brightness of the picture displayed on the POWER switch, slide it , focus the viewfinder lens. Make sure that the indicators in the viewfinder come into sharp focus. For CCD-FX340/FX640 To adjust the picture quality If you use the camcorder for the first time or after someone else has used it to the camcorder. (1) While pressing the small green button on the viewfinder screen, turn...

Operating Instructions primary manual
Page 11
... installed and a cassette is automatically recorded for further information) 11 POWER `CAMERA) nOFF PLAYER I 2 GI< STBY 0:00:00 4=i AUTO DATE Getting Started / Basic Operations 3 0 REC 0:00:01 AUTO DATE JUL 4 1995 'o Stop Recording Momentarily [a] 'ress START/STOP again. Finish Recording [b] ress START/STOP again. Turn STANDBY down and slide the POWER switch to CAMERA :2) Turn STANDBY up in the viewfinder (Standby mode). When you use the camcorder or the first time, reset the date and time to your operation (CCD...
... installed and a cassette is automatically recorded for further information) 11 POWER `CAMERA) nOFF PLAYER I 2 GI< STBY 0:00:00 4=i AUTO DATE Getting Started / Basic Operations 3 0 REC 0:00:01 AUTO DATE JUL 4 1995 'o Stop Recording Momentarily [a] 'ress START/STOP again. Finish Recording [b] ress START/STOP again. Turn STANDBY down and slide the POWER switch to CAMERA :2) Turn STANDBY up in the viewfinder (Standby mode). When you use the camcorder or the first time, reset the date and time to your operation (CCD...

Operating Instructions primary manual
Page 12
... stop recording, confirming the operation. Use it up scenes when you play ) mode only. You can change the AUTO DATE settings by selecting ON or OFF in the menu system. You can record tapes in SP (standard play back the tape. The AUTO DATE feature works once a day. Note on the AUTO DATE feature The clock is set to the East Coast Standard Time at a white object for 5 minutes while the cassette is not recorded...
... stop recording, confirming the operation. Use it up scenes when you play ) mode only. You can change the AUTO DATE settings by selecting ON or OFF in the menu system. You can record tapes in SP (standard play back the tape. The AUTO DATE feature works once a day. Note on the AUTO DATE feature The clock is set to the East Coast Standard Time at a white object for 5 minutes while the cassette is not recorded...

Operating Instructions primary manual
Page 13
... you change the size of the power zoom button until the focus is performed digitally, and the'picture quality deteriorates as you do not want to use the zoom function sparingly. '7" side: for telephoto (subject appears closer) "W" side: for wide-angle (subject appears farther away) 0 0 T Zooming Speed (Dual speed zooming) Press the power zoom button firmly for a high-speed zoom, press it softly for a relatively slow zoom. suoReiado mseg Using the Zoom Feature Zooming is...
... you change the size of the power zoom button until the focus is performed digitally, and the'picture quality deteriorates as you do not want to use the zoom function sparingly. '7" side: for telephoto (subject appears closer) "W" side: for wide-angle (subject appears farther away) 0 0 T Zooming Speed (Dual speed zooming) Press the power zoom button firmly for a high-speed zoom, press it softly for a relatively slow zoom. suoReiado mseg Using the Zoom Feature Zooming is...

Operating Instructions primary manual
Page 15
... Viewing the Playback Picture in the Viewfinder Connect an earphone/headphones (not supplied) to confirm your operation (CCD-FX640 only). (3) Press the - ( g) side of the recorded portion plays back (Rec Review). Hold down the + side (Edit Search). side of EDITSEARCH until the camcorder goes back to CAMERA. (2) Turn STANDBY up. You can review the last recorded scene or check the recorded picture in PLAYER mode (p. 17). 15 Play back the tape...
... Viewing the Playback Picture in the Viewfinder Connect an earphone/headphones (not supplied) to confirm your operation (CCD-FX640 only). (3) Press the - ( g) side of the recorded portion plays back (Rec Review). Hold down the + side (Edit Search). side of EDITSEARCH until the camcorder goes back to CAMERA. (2) Turn STANDBY up. You can review the last recorded scene or check the recorded picture in PLAYER mode (p. 17). 15 Play back the tape...

Operating Instructions primary manual
Page 17
... green button on a TV screen, after connecting the camcorder to a TV or VCR (p. 16). You can monitor the playback picture in the viewfinder. suoileJado Dises Playing Back a Tape You can hear the BEEP sound to confirm your operation (CCD-FX640 only). (2) Insert the recorded tape with the window facing out. (3) Press P.. You can also monitor the picture on the POWER switch, slide it DISPLAY To stop playback, press • . Playback starts. • POWER CAMERA...
... green button on a TV screen, after connecting the camcorder to a TV or VCR (p. 16). You can monitor the playback picture in the viewfinder. suoileJado Dises Playing Back a Tape You can hear the BEEP sound to confirm your operation (CCD-FX640 only). (2) Insert the recorded tape with the window facing out. (3) Press P.. You can also monitor the picture on the POWER switch, slide it DISPLAY To stop playback, press • . Playback starts. • POWER CAMERA...

Operating Instructions primary manual
Page 22
... the camcorder's memory. Note on your child. You can preset up . Before storing a birth date, make sure a power source and the lithium battery are installed, and the date setting is correct. The "1900" indicator flashes. (6) Enter the birth date by adjusting the flashing indicators of your tape. You can record your child's age in the viewfinder. (4) Press DATE ( +) to confirm your operation (CCD-FX640 only). (3) Press TIME (NEXT...
... the camcorder's memory. Note on your child. You can preset up . Before storing a birth date, make sure a power source and the lithium battery are installed, and the date setting is correct. The "1900" indicator flashes. (6) Enter the birth date by adjusting the flashing indicators of your tape. You can record your child's age in the viewfinder. (4) Press DATE ( +) to confirm your operation (CCD-FX640 only). (3) Press TIME (NEXT...

Operating Instructions primary manual
Page 33
Set the input selector on the edited tape. 33 Note on the DISPLAY function If you have displayed the viewfinder screen indicators on the TV, erase the indicators by pressing DISPLAY on the Remote Commander so that has audio/video inputs. You can hear the BEEP sound to confirm your operation (CCD-FX640 only). (2) Set EDIT to record• over) into the VCR, insert your own video program by editing with...
Set the input selector on the edited tape. 33 Note on the DISPLAY function If you have displayed the viewfinder screen indicators on the TV, erase the indicators by pressing DISPLAY on the Remote Commander so that has audio/video inputs. You can hear the BEEP sound to confirm your operation (CCD-FX640 only). (2) Set EDIT to record• over) into the VCR, insert your own video program by editing with...

Operating Instructions primary manual
Page 36
... from slow flashing to save battery power (p. 37) [a]. Playback Modes The playback mode (SP or LP) is selected automatically according to the format in which shortens battery life. Notes on the battery pack is more quickly if you play it in a cold environment. To Save Battery Power Turn STANDBY on the camcorder and replace the battery pack. While you are recording in a cool place. The battery is also used . Battery Pack Care • Remove the battery pack...
... from slow flashing to save battery power (p. 37) [a]. Playback Modes The playback mode (SP or LP) is selected automatically according to the format in which shortens battery life. Notes on the battery pack is more quickly if you play it in a cold environment. To Save Battery Power Turn STANDBY on the camcorder and replace the battery pack. While you are recording in a cool place. The battery is also used . Battery Pack Care • Remove the battery pack...

Operating Instructions primary manual
Page 38
... has condensed inside the camcorder, on the surface of the tape, when you insert the cassette and press one hour. Eject the tape, turn off the power and do not use the camcorder for tape ejection will work . The camcorder can be used again if the A indicator does not appear when you insert the cassette and press a tape transport button (►PLAY, etc.), the A indicator in the viewfinder flashes.
... has condensed inside the camcorder, on the surface of the tape, when you insert the cassette and press one hour. Eject the tape, turn off the power and do not use the camcorder for tape ejection will work . The camcorder can be used again if the A indicator does not appear when you insert the cassette and press a tape transport button (►PLAY, etc.), the A indicator in the viewfinder flashes.
Operating Instructions primary manual
Page 41
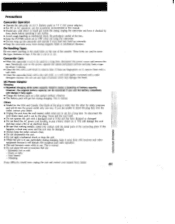
... the power source and remove the tape. Precautions Camcorder Operation • Operate the camcorder on it, remove them with a soft cloth. • Clean the camcorder body with a dry soft cloth, or a soft cloth lightly moistened with a mild detergent solution. If you use . Be particularly careful of battery capacity. AC Power Adaptor Charging • Repeated charging while some capacity remains causes a lowering of the lens. • Keep the POWER switch set...
... the power source and remove the tape. Precautions Camcorder Operation • Operate the camcorder on it, remove them with a soft cloth. • Clean the camcorder body with a dry soft cloth, or a soft cloth lightly moistened with a mild detergent solution. If you use . Be particularly careful of battery capacity. AC Power Adaptor Charging • Repeated charging while some capacity remains causes a lowering of the lens. • Keep the POWER switch set...
Operating Instructions primary manual
Page 43
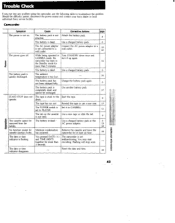
... date or time indicator disappears. is . You pressed DATE (+) The camcorder is flashing.- Corrective Actions Attach the battery pack. drum. 9 The tape has run into any problem using the camcorder, use a new one. 17 The POWER switch is not on the cassette Use a new tape or slide the tab. Use a charged battery pack. 6 The AC power adaptor Connect the AC power adaptor to troubleshoot the problem. camcorder has been in Turn STANDBY down once and CAMERA mode, the turn...
... date or time indicator disappears. is . You pressed DATE (+) The camcorder is flashing.- Corrective Actions Attach the battery pack. drum. 9 The tape has run into any problem using the camcorder, use a new one. 17 The POWER switch is not on the cassette Use a new tape or slide the tab. Use a charged battery pack. 6 The AC power adaptor Connect the AC power adaptor to troubleshoot the problem. camcorder has been in Turn STANDBY down once and CAMERA mode, the turn...
Operating Instructions primary manual
Page 44
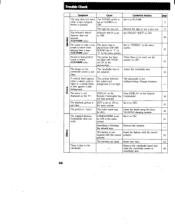
...." The playback picture is EDIT is set to "STEREO" in not clear. The video heads may be dirty. the infrared rays. Trouble Check Operation ' Symptom Cause The tape does not move The POWER switch is when a tape transport set to OFF. STEADY SHOT is set to CAMERA or button is played back with HiFi SOUND set ON in the menu system. No sound or only a low sound is heard when playing back a tape. (CCD-FX640...
...." The playback picture is EDIT is set to "STEREO" in not clear. The video heads may be dirty. the infrared rays. Trouble Check Operation ' Symptom Cause The tape does not move The POWER switch is when a tape transport set to OFF. STEADY SHOT is set to CAMERA or button is played back with HiFi SOUND set ON in the menu system. No sound or only a low sound is heard when playing back a tape. (CCD-FX640...
Operating Instructions primary manual
Page 46
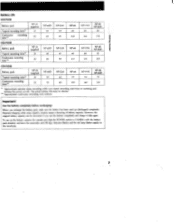
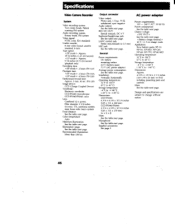
... system Audio recording system: Rotary heads, FM system Video signal: NTSC color, EIA standards Usable cassette: 8 mm video format cassette (standard 8 mm) Tape speed: Approx. 19/32 inches (1.43 or)/second, Approx. 5/16 inches (0.72 cm)/second (playback only) Recording time: 2 hours (P6-120) Playback time: 2 hours (P6-I20), 4 hours (P6-120) Fastforward/rewind time: Approx. 6 min. 30 sec. (P6-120) Image device: CCD (Charge Coupled Device) Viewfinder: Electronic viewfinder CCD-FX240: monochrome CCD-FX340/FX640: color Lens...
... system Audio recording system: Rotary heads, FM system Video signal: NTSC color, EIA standards Usable cassette: 8 mm video format cassette (standard 8 mm) Tape speed: Approx. 19/32 inches (1.43 or)/second, Approx. 5/16 inches (0.72 cm)/second (playback only) Recording time: 2 hours (P6-120) Playback time: 2 hours (P6-I20), 4 hours (P6-120) Fastforward/rewind time: Approx. 6 min. 30 sec. (P6-120) Image device: CCD (Charge Coupled Device) Viewfinder: Electronic viewfinder CCD-FX240: monochrome CCD-FX340/FX640: color Lens...
Operating Instructions primary manual
Page 49
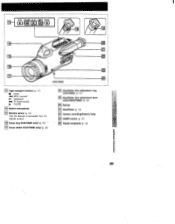
... 24 CCD-FX640 13 Tape transport buttons (p. 17) ▪ (stop) REW (rewind) 111. (playback) FF (fastforward) n PAUSE 14 Built-in microphone 15 Remote sensor (p. 53) Aim the Remote Commander here for remote control. 16 Focus ring (CCD-FX640 only) (p. 29) 17 Focus switch (CCD-FX640 only) (p. 29) 1181 Viewfinder lens adjustment ring (CCD-FX240) (p. 10) rill Viewfinder lens adjustment lever (CCD-FX340/FX640) (p. 10) ri20 Eyecup Viewfinder (p. 10) rill Camera recording/battery lamp l231 FADER button (p. 27...
... 24 CCD-FX640 13 Tape transport buttons (p. 17) ▪ (stop) REW (rewind) 111. (playback) FF (fastforward) n PAUSE 14 Built-in microphone 15 Remote sensor (p. 53) Aim the Remote Commander here for remote control. 16 Focus ring (CCD-FX640 only) (p. 29) 17 Focus switch (CCD-FX640 only) (p. 29) 1181 Viewfinder lens adjustment ring (CCD-FX240) (p. 10) rill Viewfinder lens adjustment lever (CCD-FX340/FX640) (p. 10) ri20 Eyecup Viewfinder (p. 10) rill Camera recording/battery lamp l231 FADER button (p. 27...


