Operating Instructions (primary manual)
Page 1
Refer to these numbers whenever you call upon your Sony dealer regarding this product. En ce qui concerne l'installation et les connexions, consulter le manuel d'installation/connexions fourni. XR-CA350X 2003 Sony Corporation 3-246-852-12 (1) FM/AM Cassette Car Stereo Operating Instructions US Mode d'emploi FR Owner's Record The model and serial numbers are located on the bottom of the unit. Record the serial number in the space provided below. XR-CA350X Serial No. Model No. For installation and connections, see the supplied installation/connections manual.
Refer to these numbers whenever you call upon your Sony dealer regarding this product. En ce qui concerne l'installation et les connexions, consulter le manuel d'installation/connexions fourni. XR-CA350X 2003 Sony Corporation 3-246-852-12 (1) FM/AM Cassette Car Stereo Operating Instructions US Mode d'emploi FR Owner's Record The model and serial numbers are located on the bottom of the unit. Record the serial number in the space provided below. XR-CA350X Serial No. Model No. For installation and connections, see the supplied installation/connections manual.
Operating Instructions (primary manual)
Page 2
... a particular installation. Connect the equipment into an outlet on XM tuner operation, please refer to radio communications. If this unit or a connected optional CD unit with the instructions, may cause harmful interference to the XM tuner module's included instruction manual. 2 When you play a CD TEXT disc*2. *1 You can connect a CD changer, an MD changer, a CD player, or an MD player. *2 A CD TEXT disc is encouraged to try to operate this Sony Cassette Player. Consult...
... a particular installation. Connect the equipment into an outlet on XM tuner operation, please refer to radio communications. If this unit or a connected optional CD unit with the instructions, may cause harmful interference to the XM tuner module's included instruction manual. 2 When you play a CD TEXT disc*2. *1 You can connect a CD changer, an MD changer, a CD player, or an MD player. *2 A CD TEXT disc is encouraged to try to operate this Sony Cassette Player. Consult...
Operating Instructions (primary manual)
Page 3
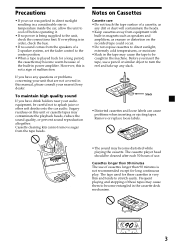
... or ejecting tapes. The cassette player head should be careful not to turn the reel and take up any questions or problems concerning your unit that are not covered in the cassette deck mechanism. 3 Cassettes longer than 90 minutes is being supplied to become distorted while playing the cassette. Remove or replace loose labels. • The sound may cause them to the unit, check the connections first...
... or ejecting tapes. The cassette player head should be careful not to turn the reel and take up any questions or problems concerning your unit that are not covered in the cassette deck mechanism. 3 Cassettes longer than 90 minutes is being supplied to become distorted while playing the cassette. Remove or replace loose labels. • The sound may cause them to the unit, check the connections first...
Operating Instructions (primary manual)
Page 4
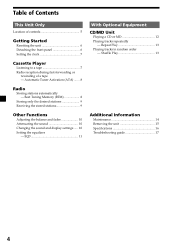
... Tuning Memory (BTM 8 Storing only the desired stations 9 Receiving the stored stations 9 Other Functions Adjusting the balance and fader 10 Attenuating the sound 10 Changing the sound and display settings ..... 10 Setting the equalizer - Repeat Play 13 Playing tracks in random order - EQ3 11 With Optional Equipment CD/MD Unit Playing a CD or MD 12 Playing tracks repeatedly - Table of Contents This Unit Only Location of controls 5 Getting Started Resetting the unit 6 Detaching the front panel 6 Setting...
... Tuning Memory (BTM 8 Storing only the desired stations 9 Receiving the stored stations 9 Other Functions Adjusting the balance and fader 10 Attenuating the sound 10 Changing the sound and display settings ..... 10 Setting the equalizer - Repeat Play 13 Playing tracks in random order - EQ3 11 With Optional Equipment CD/MD Unit Playing a CD or MD 12 Playing tracks repeatedly - Table of Contents This Unit Only Location of controls 5 Getting Started Resetting the unit 6 Detaching the front panel 6 Setting...
Operating Instructions (primary manual)
Page 5
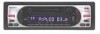
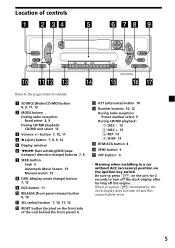
...)/DIR (tape transport direction change) buttons 7, 8 7 SEEK button Seek 9 Automatic Music Sensor 13 Manual search 13 8 DSPL (display mode change) button 7, 12 9 EQ3 button 11 q; When you press (OFF) momentarily, the clock display does not turn off the clock display after turning off and this causes battery wear. 5 Location of the unit behind the front panel) 6 qd ATT (attenuate) button 10 qf Number buttons 10, 12 During radio reception: Preset number select 9 During CD/MD playback: (1) DISC - 13 (2) DISC + 13 (3) REP...
...)/DIR (tape transport direction change) buttons 7, 8 7 SEEK button Seek 9 Automatic Music Sensor 13 Manual search 13 8 DSPL (display mode change) button 7, 12 9 EQ3 button 11 q; When you press (OFF) momentarily, the clock display does not turn off the clock display after turning off and this causes battery wear. 5 Location of the unit behind the front panel) 6 qd ATT (attenuate) button 10 qf Number buttons 10, 12 During radio reception: Preset number select 9 During CD/MD playback: (1) DISC - 13 (2) DISC + 13 (3) REP...
Operating Instructions (primary manual)
Page 6
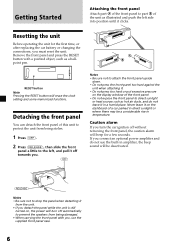
.... A B RESET button Note Pressing the RESET button will beep for the first time, or after replacing the car battery or changing the connections, you connect an optional power amplifier and do not leave it clicks. Resetting the unit Before operating the unit for a few seconds. Never leave it from the unit. • If you , use the built-in amplifier, the beep sound will be a considerable rise in a humid place. Remove the front panel...
.... A B RESET button Note Pressing the RESET button will beep for the first time, or after replacing the car battery or changing the connections, you connect an optional power amplifier and do not leave it clicks. Resetting the unit Before operating the unit for a few seconds. Never leave it from the unit. • If you , use the built-in amplifier, the beep sound will be a considerable rise in a humid place. Remove the front panel...
Operating Instructions (primary manual)
Page 7
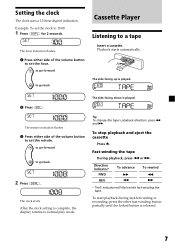
... the locked button is played. Setting the clock The clock uses a 12-hour digital indication. The side facing up is released. 7 The side facing down is complete, the display returns to set the clock to a tape Insert a cassette. To stop playback and eject the cassette Press Z. Example: To set the hour. The hour indication flashes. 1 Press either side of the volume button to normal play mode. After the clock setting is played. 2 Press...
... the locked button is played. Setting the clock The clock uses a 12-hour digital indication. The side facing up is released. 7 The side facing down is complete, the display returns to set the clock to a tape Insert a cassette. To stop playback and eject the cassette Press Z. Example: To set the hour. The hour indication flashes. 1 Press either side of the volume button to normal play mode. After the clock setting is played. 2 Press...
Operating Instructions (primary manual)
Page 8
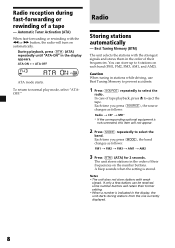
... When tuning in stations while driving, use Best Tuning Memory to prevent accidents. 1 Press (SOURCE) repeatedly to select the band. Each time you press (MODE), the band changes as follows: Radio t CD* t MD* * If the corresponding optional equipment is not connected, this item will not appear. 2 Press (MODE) repeatedly to select the radio. Automatic Tuner Activation (ATA) When fast-forwarding or rewinding with weak signals. To return to eject...
... When tuning in stations while driving, use Best Tuning Memory to prevent accidents. 1 Press (SOURCE) repeatedly to select the band. Each time you press (MODE), the band changes as follows: Radio t CD* t MD* * If the corresponding optional equipment is not connected, this item will not appear. 2 Press (MODE) repeatedly to select the radio. Automatic Tuner Activation (ATA) When fast-forwarding or rewinding with weak signals. To return to eject...
Operating Instructions (primary manual)
Page 9
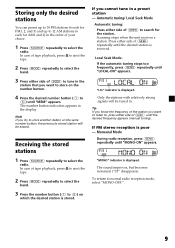
... frequency appears (manual tuning). The number button indication appears in a preset station - Local Seek Mode: If the automatic tuning stops too frequently, press (SENS) repeatedly until "MONO-ON" appears. If you want to listen to, press either side of (SEEK) to tune in the order of tape playback, press Z to eject the tape. 2 Press (MODE) repeatedly to select the band. 3 Press the number button ((1) to select...
... frequency appears (manual tuning). The number button indication appears in a preset station - Local Seek Mode: If the automatic tuning stops too frequently, press (SENS) repeatedly until "MONO-ON" appears. If you want to listen to, press either side of (SEEK) to tune in the order of tape playback, press Z to eject the tape. 2 Press (MODE) repeatedly to select the band. 3 Press the number button ((1) to select...
Operating Instructions (primary manual)
Page 10
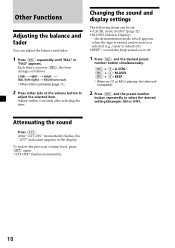
... ejected and no CD or MD is playing, this item will not appear. 2 Press (SEL) and the preset number button repeatedly to select the desired setting (Example: ON or OFF). To restore the previous volume level, press (ATT) again. Other Functions Adjusting the balance and fader You can be set: •A.SCRL (Auto Scroll)* (page 12). •M.DSPL (Motion Display) - Each time you press (SEL), the item changes...
... ejected and no CD or MD is playing, this item will not appear. 2 Press (SEL) and the preset number button repeatedly to select the desired setting (Example: ON or OFF). To restore the previous volume level, press (ATT) again. Other Functions Adjusting the balance and fader You can be set: •A.SCRL (Auto Scroll)* (page 12). •M.DSPL (Motion Display) - Each time you press (SEL), the item changes...
Operating Instructions (primary manual)
Page 11
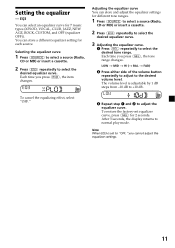
... adjust the equalizer settings for 7 music types (XPLOD, VOCAL, CLUB, JAZZ, NEW AGE, ROCK, CUSTOM, and OFF (equalizer OFF)). Selecting the equalizer curve 1 Press (SOURCE) to select a source (Radio, CD or MD) or insert a cassette. 2 Press (EQ3) repeatedly to adjust the equalizer curve. To cancel the equalizing effect, select "OFF." 3 Repeat step 1 and 2 to select the desired equalizer curve. Setting the equalizer - Each time you press (EQ3), the item changes. After 3 seconds, the display...
... adjust the equalizer settings for 7 music types (XPLOD, VOCAL, CLUB, JAZZ, NEW AGE, ROCK, CUSTOM, and OFF (equalizer OFF)). Selecting the equalizer curve 1 Press (SOURCE) to select a source (Radio, CD or MD) or insert a cassette. 2 Press (EQ3) repeatedly to adjust the equalizer curve. To cancel the equalizing effect, select "OFF." 3 Repeat step 1 and 2 to select the desired equalizer curve. Setting the equalizer - Each time you press (EQ3), the item changes. After 3 seconds, the display...
Operating Instructions (primary manual)
Page 12
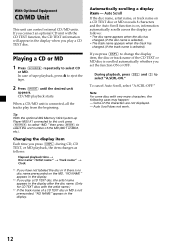
... (MD1 or MD2, etc.). Tip With the optional MG Memory Stick System-up Player MGS-X1 connected to this unit, press (SOURCE) to select "MD," then press (MODE) to select the unit number of tape playback, press Z to change the display item, the disc or track name of the characters are not displayed. - Changing the display item Each time you press (DSPL) during CD, CD TEXT, or...
... (MD1 or MD2, etc.). Tip With the optional MG Memory Stick System-up Player MGS-X1 connected to this unit, press (SOURCE) to select "MD," then press (MODE) to select the unit number of tape playback, press Z to change the display item, the disc or track name of the characters are not displayed. - Changing the display item Each time you press (DSPL) during CD, CD TEXT, or...
Operating Instructions (primary manual)
Page 13
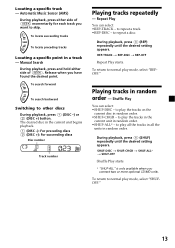
... units. The desired disc in a track - Manual Search During playback, press and hold either side of (SEEK). to other discs During playback, press (1) (DISC -) or (2) (DISC +) button. During playback, press (4) (SHUF) repeatedly until the desired setting appears. To locate succeeding tracks SEEK To locate preceding tracks Locating a specific point in the current unit begins playback. (1) (DISC -): For preceding discs (2) (DISC +): For succeeding discs Disc number Track number Playing tracks repeatedly - to play mode, select...
... units. The desired disc in a track - Manual Search During playback, press and hold either side of (SEEK). to other discs During playback, press (1) (DISC -) or (2) (DISC +) button. During playback, press (4) (SHUF) repeatedly until the desired setting appears. To locate succeeding tracks SEEK To locate preceding tracks Locating a specific point in the current unit begins playback. (1) (DISC -): For preceding discs (2) (DISC +): For succeeding discs Disc number Track number Playing tracks repeatedly - to play mode, select...
Operating Instructions (primary manual)
Page 14
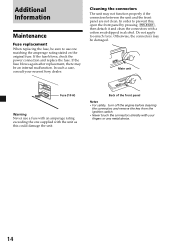
... and clean the connectors with your nearest Sony dealer. Back of the front panel Notes • For safety, turn off the engine before cleaning the connectors and remove the key from the ignition switch. • Never touch the connectors directly with a cotton swab dipped in alcohol. If the fuse blows, check the power connection and replace the fuse. In order to use a fuse with an amperage...
... and clean the connectors with your nearest Sony dealer. Back of the front panel Notes • For safety, turn off the engine before cleaning the connectors and remove the key from the ignition switch. • Never touch the connectors directly with a cotton swab dipped in alcohol. If the fuse blows, check the power connection and replace the fuse. In order to use a fuse with an amperage...
Operating Instructions (primary manual)
Page 15
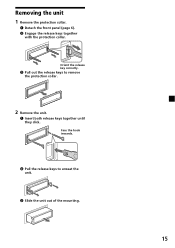
Face the hook inwards. 2 Pull the release keys to remove the protection collar. 2 Remove the unit. 1 Insert both release keys together until they click. Removing the unit 1 Remove the protection collar. 1 Detach the front panel (page 6). 2 Engage the release keys together with the protection collar. Orient the release key correctly. 3 Pull out the release keys to unseat the unit. 3 Slide the unit out of the mounting. 15
Face the hook inwards. 2 Pull the release keys to remove the protection collar. 2 Remove the unit. 1 Insert both release keys together until they click. Removing the unit 1 Remove the protection collar. 1 Detach the front panel (page 6). 2 Engage the release keys together with the protection collar. Orient the release key correctly. 3 Pull out the release keys to unseat the unit. 3 Slide the unit out of the mounting. 15
Operating Instructions (primary manual)
Page 16
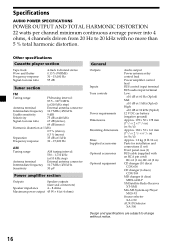
...;V Power amplifier section Outputs Speaker outputs (sure seal connectors) Speaker impedance 4 - 8 ohms Maximum power output 45 W × 4 (at 4 ohms) General Outputs Inputs Tone controls Power requirements Dimensions Mounting dimensions Mass Supplied accessories Optional accessories Optional equipment Audio output Power antenna relay control lead Power amplifier control lead BUS control input terminal BUS audio input terminal Low: ±10 dB at 60 Hz (Xplod) Mid: ±10 dB at 1 kHz (Xplod) High: ±10 dB at 10 kHz (Xplod) 12 V DC car battery (negative...
...;V Power amplifier section Outputs Speaker outputs (sure seal connectors) Speaker impedance 4 - 8 ohms Maximum power output 45 W × 4 (at 4 ohms) General Outputs Inputs Tone controls Power requirements Dimensions Mounting dimensions Mass Supplied accessories Optional accessories Optional equipment Audio output Power antenna relay control lead Power amplifier control lead BUS control input terminal BUS audio input terminal Low: ±10 dB at 60 Hz (Xplod) Mid: ±10 dB at 1 kHz (Xplod) High: ±10 dB at 10 kHz (Xplod) 12 V DC car battery (negative...
Operating Instructions (primary manual)
Page 17
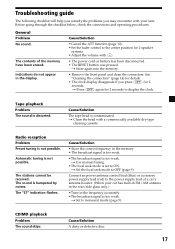
General Problem No sound. The contents of a car's antenna booster. (When your unit. Cause/Solution •Cancel the ATT function (page 10). •Set the fader control to ON. t Clean the head with (+). • The power cord or battery has been disconnected. • The RESET button was pressed. The stations cannot be received. t Use manual tuning. •The local seek mode is too weak. CD/MD playback Problem The sound skips. Troubleshooting guide The following checklist...
General Problem No sound. The contents of a car's antenna booster. (When your unit. Cause/Solution •Cancel the ATT function (page 10). •Set the fader control to ON. t Clean the head with (+). • The power cord or battery has been disconnected. • The RESET button was pressed. The stations cannot be received. t Use manual tuning. •The local seek mode is too weak. CD/MD playback Problem The sound skips. Troubleshooting guide The following checklist...

Operating Instructions (primary manual)
Page 18
.... problem.*2 A CD/MD cannot play because of some Insert another CD/MD. Insert discs in the CD/MD unit. RESET The CD/MD unit cannot be heard. properly. NO DISC No disc is not inserted in Insert the disc magazine in the display. MD unit. HI TEMP The ambient temperature is connected) The following indications will flash for about 5 seconds, and an alarm sound...
.... problem.*2 A CD/MD cannot play because of some Insert another CD/MD. Insert discs in the CD/MD unit. RESET The CD/MD unit cannot be heard. properly. NO DISC No disc is not inserted in Insert the disc magazine in the display. MD unit. HI TEMP The ambient temperature is connected) The following indications will flash for about 5 seconds, and an alarm sound...


