Operating Instructions
Page 10
... 7: Enjoying Surround Sound 32 Playback Playing a Disc 34 Playing from a USB Device 36 Enjoying music from a Bluetooth device 37 Connecting to a smartphone by One-touch listening function (NFC 39 Playing via a Network 40 Available Options 44 Sound Adjustment Selecting the Audio Format, Multilingual Tracks, or Channel 46 Enjoying Multiplex Broadcast Sound 47 Tuner Listening to the Radio 47 Other Operations Using the Control for HDMI Function for "BRAVIA" Sync 49 Calibrating the Appropriate Speaker Settings Automatically 50 Setting the Speakers 51 Using the...
... 7: Enjoying Surround Sound 32 Playback Playing a Disc 34 Playing from a USB Device 36 Enjoying music from a Bluetooth device 37 Connecting to a smartphone by One-touch listening function (NFC 39 Playing via a Network 40 Available Options 44 Sound Adjustment Selecting the Audio Format, Multilingual Tracks, or Channel 46 Enjoying Multiplex Broadcast Sound 47 Tuner Listening to the Radio 47 Other Operations Using the Control for HDMI Function for "BRAVIA" Sync 49 Calibrating the Appropriate Speaker Settings Automatically 50 Setting the Speakers 51 Using the...
Operating Instructions
Page 20
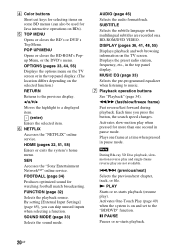
..., 56) Displays the options menu on the TV screen or in pause mode. Displays the preset radio station, frequency, etc., in pause mode. DISPLAY (pages 36, 41, 48, 55) Displays playback and web browsing information on the selected function.) RETURN Returns to the "BD/DVD" function. D Color buttons Short cut keys for selecting items on some BD menus (can skip unused inputs when selecting a function. SEN Accesses the "Sony Entertainment Network™" online service. Plays one...
..., 56) Displays the options menu on the TV screen or in pause mode. Displays the preset radio station, frequency, etc., in pause mode. DISPLAY (pages 36, 41, 48, 55) Displays playback and web browsing information on the selected function.) RETURN Returns to the "BD/DVD" function. D Color buttons Short cut keys for selecting items on some BD menus (can skip unused inputs when selecting a function. SEN Accesses the "Sony Entertainment Network™" online service. Plays one...
Operating Instructions
Page 31
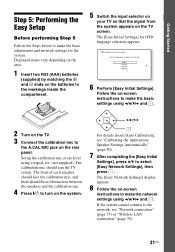
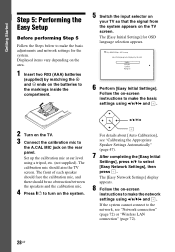
... speakers and the calibration mic. 4 Press [/1 to turn on -screen instructions to make the basic settings using a tripod, etc. (not supplied). The [Easy Network Settings] display appears. 8 Follow the on the system. B/V/v/b 2 Turn on the TV. 3 Connect the calibration mic to the A.CAL MIC jack on the TV screen. Getting Started Step 5: Performing the Easy Setup Before performing Step 5 Follow the Steps below to make the basic adjustments and network settings for OSD language selection...
... speakers and the calibration mic. 4 Press [/1 to turn on -screen instructions to make the basic settings using a tripod, etc. (not supplied). The [Easy Network Settings] display appears. 8 Follow the on the system. B/V/v/b 2 Turn on the TV. 3 Connect the calibration mic to the A.CAL MIC jack on the TV screen. Getting Started Step 5: Performing the Easy Setup Before performing Step 5 Follow the Steps below to make the basic adjustments and network settings for OSD language selection...

Operating Instructions
Page 49
Other Operations Other Operations Using the Control for HDMI Function for "BRAVIA" Sync This function is connected. Control for HDMI function via an HDMI cable, operation is output via the speakers of the system, you can adjust the volume and turn on, and the TV's input is switched to output from the TV speakers by pressing SPEAKERS TVyAUDIO. • When sound from TV or other equipment is simplified. For details about the Control for HDMI] function automatically by operating the TV...
Other Operations Other Operations Using the Control for HDMI Function for "BRAVIA" Sync This function is connected. Control for HDMI function via an HDMI cable, operation is output via the speakers of the system, you can adjust the volume and turn on, and the TV's input is switched to output from the TV speakers by pressing SPEAKERS TVyAUDIO. • When sound from TV or other equipment is simplified. For details about the Control for HDMI] function automatically by operating the TV...
Operating Instructions
Page 50
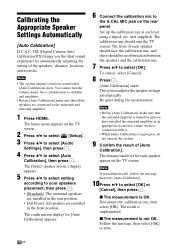
... select [Auto Calibration], then press . The home menu appears on the TV screen. Set up the calibration mic at ear level using a tripod, etc. (not supplied). Disconnect the calibration mic, then select [OK]. DX (Digital Cinema Auto Calibration DX) brings you have installed the surround amplifier in the front position. To cancel, select [Cancel]. 8 Press . [Auto Calibration] starts. x The measurement is implemented. The [Select speaker layout.] display appears. 5 Press V/v to select setting according to the main unit and surround amplifier. 1 Press HOME...
... select [Auto Calibration], then press . The home menu appears on the TV screen. Set up the calibration mic at ear level using a tripod, etc. (not supplied). Disconnect the calibration mic, then select [OK]. DX (Digital Cinema Auto Calibration DX) brings you have installed the surround amplifier in the front position. To cancel, select [Cancel]. 8 Press . [Auto Calibration] starts. x The measurement is implemented. The [Select speaker layout.] display appears. 5 Press V/v to select setting according to the main unit and surround amplifier. 1 Press HOME...
Operating Instructions
Page 58
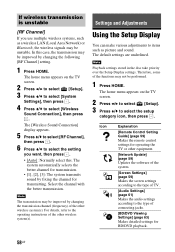
...) Makes the audio settings according to select [Wireless Sound Connection], then press . Settings and Adjustments Using the Setup Display You can make various adjustments to select the setup category icon, then press . The home menu appears on the TV screen. 2 Press B/b to select [Setup]. 3 Press V/v to items such as a wireless LAN (Local Area Network) or Bluetooth, the wireless signals may not be performed. 1 Press HOME. Icon Explanation [Remote Control Setting Guide] (page 59) Makes the remote control settings for transmitting. Note Playback settings stored in the disc...
...) Makes the audio settings according to select [Wireless Sound Connection], then press . Settings and Adjustments Using the Setup Display You can make various adjustments to select the setup category icon, then press . The home menu appears on the TV screen. 2 Press B/b to select [Setup]. 3 Press V/v to items such as a wireless LAN (Local Area Network) or Bluetooth, the wireless signals may not be performed. 1 Press HOME. Icon Explanation [Remote Control Setting Guide] (page 59) Makes the remote control settings for transmitting. Note Playback settings stored in the disc...
Operating Instructions
Page 62
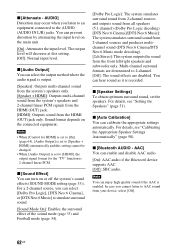
... HDMI (OUT) jack only. x [Auto Calibration] You can select [Dolby Pro Logic], [DTS Neo:6 Cinema], or [DTS Neo:6 Music] to AAC sound from the front left/right speakers and subwoofer only. Note You can hear sound as it is 2-channel linear PCM. Multi-channel surround formats are downmixed to the AUDIO (AUDIO IN L/R) jacks. x [Speaker Settings] To obtain optimum surround sound, set to [HDMI], the output signal format for the "TV" function is recorded. Sound format depends on or off the system's sound effects (SOUND MODE setting...
... HDMI (OUT) jack only. x [Auto Calibration] You can select [Dolby Pro Logic], [DTS Neo:6 Cinema], or [DTS Neo:6 Music] to AAC sound from the front left/right speakers and subwoofer only. Note You can hear sound as it is 2-channel linear PCM. Multi-channel surround formats are downmixed to the AUDIO (AUDIO IN L/R) jacks. x [Speaker Settings] To obtain optimum surround sound, set to [HDMI], the output signal format for the "TV" function is recorded. Sound format depends on or off the system's sound effects (SOUND MODE setting...
Operating Instructions
Page 63
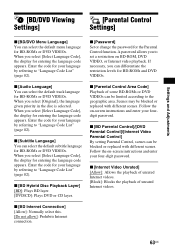
.... x [Password] Set or change the password for BD-ROMs or DVD VIDEOs. x [BD Hybrid Disc Playback Layer] [BD]: Plays BD layer. [DVD/CD]: Plays DVD or CD layer. A password allows you select [Select Language Code], the display for entering the language code appears. When you to "Language Code List" (page 82). x [BD Internet Connection] [Allow]: Normally select this. [Do not allow]: Prohibits Internet connection. 63US Settings and Adjustments [BD/DVD Viewing Settings] [Parental Control Settings] x [BD/DVD Menu Language] You can select the default menu...
.... x [Password] Set or change the password for BD-ROMs or DVD VIDEOs. x [BD Hybrid Disc Playback Layer] [BD]: Plays BD layer. [DVD/CD]: Plays DVD or CD layer. A password allows you select [Select Language Code], the display for entering the language code appears. When you to "Language Code List" (page 82). x [BD Internet Connection] [Allow]: Normally select this. [Do not allow]: Prohibits Internet connection. 63US Settings and Adjustments [BD/DVD Viewing Settings] [Parental Control Settings] x [BD/DVD Menu Language] You can select the default menu...

Operating Instructions
Page 64
.... [Auto]: The top panel display and softtouch buttons indicator are connected with the Audio Return Channel function and [Control for the Wireless System" (page 57). x [HDMI Settings] [Control for HDMI] [On]: Turns on the screen when changing the viewing titles, picture modes, audio signals, etc. [Off]: Displays information only when you want for HDMI] function. x [Quick Start Mode] [On]: Shortens the startup time from standby mode. x [Wireless Sound Connection] You can also check the wireless transmission status. For details, see "Further Settings for HDMI] is set...
.... [Auto]: The top panel display and softtouch buttons indicator are connected with the Audio Return Channel function and [Control for the Wireless System" (page 57). x [HDMI Settings] [Control for HDMI] [On]: Turns on the screen when changing the viewing titles, picture modes, audio signals, etc. [Off]: Displays information only when you want for HDMI] function. x [Quick Start Mode] [On]: Shortens the startup time from standby mode. x [Wireless Sound Connection] You can also check the wireless transmission status. For details, see "Further Settings for HDMI] is set...
Operating Instructions
Page 71
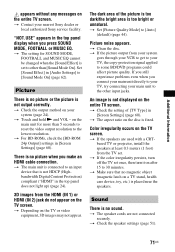
... you connect your main unit directly to the other than 5 seconds to reset the video output resolution to your nearest Sony dealer or local authorized Sony service facility. t Check the output method on the TV screen. t Set [Picture Quality Mode] to [Sound Mode On] (page 62). Sound There is not HDCP (Highbandwidth Digital Content Protection) compliant ("HDMI" in [Screen Settings] (page 60). t The main unit is connected to other input jacks. t Check the speaker settings (page...
... you connect your main unit directly to the other than 5 seconds to reset the video output resolution to your nearest Sony dealer or local authorized Sony service facility. t Check the output method on the TV screen. t Set [Picture Quality Mode] to [Sound Mode On] (page 62). Sound There is not HDCP (Highbandwidth Digital Content Protection) compliant ("HDMI" in [Screen Settings] (page 60). t The main unit is connected to other input jacks. t Check the speaker settings (page...
Operating Instructions
Page 75
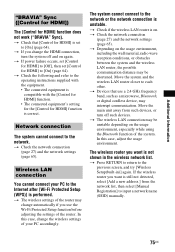
... connected equipment's setting for the [Control for HDMI] to input a network name (SSID) manually. 75US Move the system and the wireless LAN router closer to the network. In this case, adjust the usage environment. t If power failure occurs, set [Control for HDMI] to [Off], then set to the previous screen, and try [Wireless Setup(built-in the wireless network list. t Devices that [Control for HDMI] function does not work ("BRAVIA" Sync). In this case, change the HDMI connection, turn...
... connected equipment's setting for the [Control for HDMI] to input a network name (SSID) manually. 75US Move the system and the wireless LAN router closer to the network. In this case, adjust the usage environment. t If power failure occurs, set [Control for HDMI] to [Off], then set to the previous screen, and try [Wireless Setup(built-in the wireless network list. t Devices that [Control for HDMI] function does not work ("BRAVIA" Sync). In this case, change the HDMI connection, turn...
Operating Instructions 1
Page 7
... 7: Enjoying Surround Sound 29 Playback Playing a Disc 31 Playing from a USB Device 33 Enjoying music from a Bluetooth device 34 Connecting to a smartphone by One-touch listening function (NFC 36 Playing via a Network 37 Available Options 41 Sound Adjustment Selecting the Audio Format, Multilingual Tracks, or Channel 43 Enjoying Multiplex Broadcast Sound 44 Tuner Listening to the Radio 44 Other Operations Using the Control for HDMI Function for "BRAVIA" Sync 46 Calibrating the Appropriate Speaker Settings Automatically 47 Setting the Speakers 48 Using the...
... 7: Enjoying Surround Sound 29 Playback Playing a Disc 31 Playing from a USB Device 33 Enjoying music from a Bluetooth device 34 Connecting to a smartphone by One-touch listening function (NFC 36 Playing via a Network 37 Available Options 41 Sound Adjustment Selecting the Audio Format, Multilingual Tracks, or Channel 43 Enjoying Multiplex Broadcast Sound 44 Tuner Listening to the Radio 44 Other Operations Using the Control for HDMI Function for "BRAVIA" Sync 46 Calibrating the Appropriate Speaker Settings Automatically 47 Setting the Speakers 48 Using the...

Operating Instructions 1
Page 17
...-ROM/DVD VIDEO. By setting [External Input Settings] (page 62), you press the button, the search speed changes. AUDIO (page 43) Selects the audio format/track. Displays the preset radio station, frequency, etc., in the top panel display. (The location differs depending on the TV screen. Each time you can also be used for watching football match broadcasting. Note During Blu-ray 3D Disc playback, slowmotion reverse play and single-frame reverse play ). D Color buttons Short...
...-ROM/DVD VIDEO. By setting [External Input Settings] (page 62), you press the button, the search speed changes. AUDIO (page 43) Selects the audio format/track. Displays the preset radio station, frequency, etc., in the top panel display. (The location differs depending on the TV screen. Each time you can also be used for watching football match broadcasting. Note During Blu-ray 3D Disc playback, slowmotion reverse play and single-frame reverse play ). D Color buttons Short...
Operating Instructions 1
Page 28
... rear panel. B/V/v/b 2 Turn on the TV. 3 Connect the calibration mic to the A.CAL MIC jack on -screen instructions to make the basic settings using B/V/v/b and . The [Easy Network Settings] display appears. 8 Follow the on the system. The calibration mic should be no obstruction between the speakers and the calibration mic. 4 Press [/1 to turn on -screen instructions to make the basic adjustments and network settings for OSD language selection appears. 6 Perform [Easy Initial Settings]. If the system cannot connect to the network, see "Calibrating...
... rear panel. B/V/v/b 2 Turn on the TV. 3 Connect the calibration mic to the A.CAL MIC jack on -screen instructions to make the basic settings using B/V/v/b and . The [Easy Network Settings] display appears. 8 Follow the on the system. The calibration mic should be no obstruction between the speakers and the calibration mic. 4 Press [/1 to turn on -screen instructions to make the basic adjustments and network settings for OSD language selection appears. 6 Perform [Easy Initial Settings]. If the system cannot connect to the network, see "Calibrating...

Operating Instructions 1
Page 47
... (Digital Cinema Auto Calibration DX) brings you have installed the surround amplifier in an appropriate location to ensure wireless connection with it. • While [Auto Calibration] is implemented. Give consideration to select [Auto Calibration], then press . To cancel, select [Cancel]. 8 Press . [Auto Calibration] starts. Disconnect the calibration mic, then select [OK]. x The measurement is OK. Note • The system outputs a loud test sound when [Auto Calibration] starts. The home menu appears on the rear panel. The confirmation display for each speaker...
... (Digital Cinema Auto Calibration DX) brings you have installed the surround amplifier in an appropriate location to ensure wireless connection with it. • While [Auto Calibration] is implemented. Give consideration to select [Auto Calibration], then press . To cancel, select [Cancel]. 8 Press . [Auto Calibration] starts. Disconnect the calibration mic, then select [OK]. x The measurement is OK. Note • The system outputs a loud test sound when [Auto Calibration] starts. The home menu appears on the rear panel. The confirmation display for each speaker...

Operating Instructions 1
Page 55
.... 1 Press HOME. The default settings are underlined. Note Playback settings stored in the disc take priority over the Setup Display settings. The home menu appears on the TV screen. 2 Press B/b to select [Setup]. 3 Press V/v to select [System Settings], then press . 4 Press V/v to select the setup category icon, then press . The home menu appears on the TV screen. 2 Press B/b to select [Setup]. 3 Press V/v to select [Wireless Sound Connection], then press . Icon Explanation [Remote Control Setting Guide] (page 56) Makes the remote control settings for operating the...
.... 1 Press HOME. The default settings are underlined. Note Playback settings stored in the disc take priority over the Setup Display settings. The home menu appears on the TV screen. 2 Press B/b to select [Setup]. 3 Press V/v to select [System Settings], then press . 4 Press V/v to select the setup category icon, then press . The home menu appears on the TV screen. 2 Press B/b to select [Setup]. 3 Press V/v to select [Wireless Sound Connection], then press . Icon Explanation [Remote Control Setting Guide] (page 56) Makes the remote control settings for operating the...

Operating Instructions 1
Page 59
... an equipment connected to the AUDIO (AUDIO IN L/R) jacks. x [Sound Effect] You can prevent distortion by attenuating the input level on the main unit. [On]: Attenuates the input level. x [Bluetooth AUDIO - You can select [Dolby Pro Logic], [DTS Neo:6 Cinema], or [DTS Neo:6 Music] to [HDMI], the output signal format for HDMI] is set to [On] (page 61), [Audio Output] is 2-channel linear PCM. Note You can select the output method where the audio signal is set the speakers. Multi-channel surround formats are disabled...
... an equipment connected to the AUDIO (AUDIO IN L/R) jacks. x [Sound Effect] You can prevent distortion by attenuating the input level on the main unit. [On]: Attenuates the input level. x [Bluetooth AUDIO - You can select [Dolby Pro Logic], [DTS Neo:6 Cinema], or [DTS Neo:6 Music] to [HDMI], the output signal format for HDMI] is set to [On] (page 61), [Audio Output] is 2-channel linear PCM. Note You can select the output method where the audio signal is set the speakers. Multi-channel surround formats are disabled...

Operating Instructions 1
Page 61
..., picture modes, audio signals, etc. [Off]: Displays information only when you connect the system to [On]. [Auto]: The system can make further settings for the system on the [Control for the Wireless System" (page 54). x [HDMI Settings] [Control for HDMI] [On]: Turns on -screen display. When wireless transmission is low. [Off]: Normal status. x [Wireless Sound Connection] You can receive the digital audio signal of the TV automatically via an HDMI cable. [Off]: Off. x [Power Save Drive] [On]: Reduces power consumption when volume level...
..., picture modes, audio signals, etc. [Off]: Displays information only when you connect the system to [On]. [Auto]: The system can make further settings for the system on the [Control for the Wireless System" (page 54). x [HDMI Settings] [Control for HDMI] [On]: Turns on -screen display. When wireless transmission is low. [Off]: Normal status. x [Wireless Sound Connection] You can receive the digital audio signal of the TV automatically via an HDMI cable. [Off]: Off. x [Power Save Drive] [On]: Reduces power consumption when volume level...

Operating Instructions 1
Page 68
... the disc is connected to some BD/DVD programs could affect picture quality. An image is not output correctly. t Check the speaker settings (page 48). 68US appears without any messages on the entire TV screen. t Contact your TV, the copy-protection signal applied to an input device that no picture when you make an HDMI cable connection. t For BD-ROMs, check the [BD-ROM 24p Output] settings in [Audio Settings] to...
... the disc is connected to some BD/DVD programs could affect picture quality. An image is not output correctly. t Check the speaker settings (page 48). 68US appears without any messages on the entire TV screen. t Contact your TV, the copy-protection signal applied to an input device that no picture when you make an HDMI cable connection. t For BD-ROMs, check the [BD-ROM 24p Output] settings in [Audio Settings] to...

Operating Instructions 1
Page 72
... network list, then select [Manual Registration] to input a network name (SSID) manually. 72US The wireless router you use a 2.4 GHz frequency band, such as a microwave, Bluetooth, or digital cordless device, may change automatically if you want is on. t Check that use the Wi-Fi Protected Setup function before adjusting the settings of your PC to the Internet after [Wi-Fi Protected Setup (WPS)] is performed. t If power failure occurs, set [Control for HDMI] to [Off], then set...
... network list, then select [Manual Registration] to input a network name (SSID) manually. 72US The wireless router you use a 2.4 GHz frequency band, such as a microwave, Bluetooth, or digital cordless device, may change automatically if you want is on. t Check that use the Wi-Fi Protected Setup function before adjusting the settings of your PC to the Internet after [Wi-Fi Protected Setup (WPS)] is performed. t If power failure occurs, set [Control for HDMI] to [Off], then set...


