User Guide
Page 7
Contents AITi200-A/AITi100-A/AITi50-A/AITi390-ST/AITi200-ST/AITi100-ST Tape Drive ...8 Introduction ...9 Product Features 9 Precautions ...11 Installation ...12 Jumper Setting 12 Connectors ...13 Option Switches (DIP Switch 14 Mounting Holes 16 Reconfiguring from 5.25" Model to 3.5"... ...21 Attaching and Removing the Dust Cover 22 Attaching the Dust Cover 22 Removing the Dust Cover 24 Operation ...25 Location of 3 LEDs 25 Drive Operation 26 Interface Implementation 29 Supported ATA Commands 29 Supported ATAPI Packet Commands 29 Specifications ...30 Product Specifications 30...
Contents AITi200-A/AITi100-A/AITi50-A/AITi390-ST/AITi200-ST/AITi100-ST Tape Drive ...8 Introduction ...9 Product Features 9 Precautions ...11 Installation ...12 Jumper Setting 12 Connectors ...13 Option Switches (DIP Switch 14 Mounting Holes 16 Reconfiguring from 5.25" Model to 3.5"... ...21 Attaching and Removing the Dust Cover 22 Attaching the Dust Cover 22 Removing the Dust Cover 24 Operation ...25 Location of 3 LEDs 25 Drive Operation 26 Interface Implementation 29 Supported ATA Commands 29 Supported ATAPI Packet Commands 29 Specifications ...30 Product Specifications 30...

User Guide
Page 8
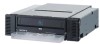
... Correction Code, and other features. AITi200-A/AITi100-A/AITi50-A/ AITi390-ST/AITi200-ST/AITi100-ST Tape Drive The Sony AITi200-A/AITi100-A/AITi50-A/AITi390-ST/AITi200-ST/ AITi100-ST drive is a high capacity data storage device using a standard format called AIT (Advanced Intelligent Tape) and ALDC formats. 8 The Sony AITi200-A/AITi100-A/AITi50-A/AITi390-ST/AITi200-ST/ AITi100-ST...
... Correction Code, and other features. AITi200-A/AITi100-A/AITi50-A/ AITi390-ST/AITi200-ST/AITi100-ST Tape Drive The Sony AITi200-A/AITi100-A/AITi50-A/AITi390-ST/AITi200-ST/ AITi100-ST drive is a high capacity data storage device using a standard format called AIT (Advanced Intelligent Tape) and ALDC formats. 8 The Sony AITi200-A/AITi100-A/AITi50-A/AITi390-ST/AITi200-ST/ AITi100-ST...
User Guide
Page 11
... will be lost, whenever power to the drive is confirmed to operate with an ISV. 11 Backup Application Make sure to collect inside the drive. direct sunlight Operation • Do not move the drive while it is writing to tape may cause water condensation to use a backup... application that is cycled. high temperature - If you attempt to operate the drive immediately after a sudden increase in ...
... will be lost, whenever power to the drive is confirmed to operate with an ISV. 11 Backup Application Make sure to collect inside the drive. direct sunlight Operation • Do not move the drive while it is writing to tape may cause water condensation to use a backup... application that is cycled. high temperature - If you attempt to operate the drive immediately after a sudden increase in ...
User Guide
Page 22
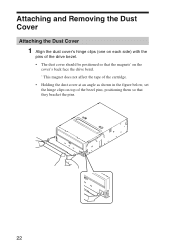
Attaching and Removing the Dust Cover Attaching the Dust Cover 1 Align the dust cover's hinge clips (one on each side) with the pins of the drive bezel. • The dust cover should be positioned so that the magnets* on the cover's back face the drive bezel. * This magnet does not affect the tape of the cartridge. • Holding the dust cover at an angle as shown in the figure below, set the hinge clips on top of the bezel pins, positioning them so that they bracket the pins. 22
Attaching and Removing the Dust Cover Attaching the Dust Cover 1 Align the dust cover's hinge clips (one on each side) with the pins of the drive bezel. • The dust cover should be positioned so that the magnets* on the cover's back face the drive bezel. * This magnet does not affect the tape of the cartridge. • Holding the dust cover at an angle as shown in the figure below, set the hinge clips on top of the bezel pins, positioning them so that they bracket the pins. 22
User Guide
Page 25
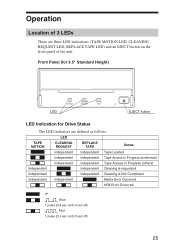
Front Panel (for 3.5" Standard Height) Advanced Intelligent Tape LED TAPE MOTION CLEANING REQUEST REPLACE TAPE EJECT button LED Indication for Drive Status The LED indicators are three LED indications (TAPE MOTION LED, CLEANING REQUEST LED, REPLACE TAPE LED) and an EJECT button on /0.3 sec off ) Fast 1 pulse (0.3 sec on the front panel of 3 LEDs There are defined...
Front Panel (for 3.5" Standard Height) Advanced Intelligent Tape LED TAPE MOTION CLEANING REQUEST REPLACE TAPE EJECT button LED Indication for Drive Status The LED indicators are three LED indications (TAPE MOTION LED, CLEANING REQUEST LED, REPLACE TAPE LED) and an EJECT button on /0.3 sec off ) Fast 1 pulse (0.3 sec on the front panel of 3 LEDs There are defined...
User Guide
Page 26
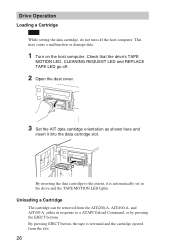
... automatically set in response to the extent, it into the data cartridge slot. Check that the drive's TAPE MOTION LED, CLEANING REQUEST LED and REPLACE TAPE LED go off the host computer. Drive Operation Loading a Cartridge Note While setting the data cartridge, do not turn off . 2 Open the dust cover... orientation as shown here and insert it is rewound and the cartridge ejected from the AITi200-A, AITi100-A, and AITi50-A either in the drive and the TAPE MOTION LED lights. Unloading a Cartridge The cartridge can be removed from the slot. 26 By inserting the data cartridge to a ATAPI...
... automatically set in response to the extent, it into the data cartridge slot. Check that the drive's TAPE MOTION LED, CLEANING REQUEST LED and REPLACE TAPE LED go off the host computer. Drive Operation Loading a Cartridge Note While setting the data cartridge, do not turn off . 2 Open the dust cover... orientation as shown here and insert it is rewound and the cartridge ejected from the AITi200-A, AITi100-A, and AITi50-A either in the drive and the TAPE MOTION LED lights. Unloading a Cartridge The cartridge can be removed from the slot. 26 By inserting the data cartridge to a ATAPI...
User Guide
Page 27
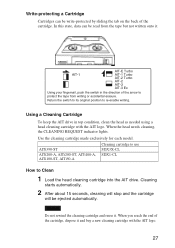
...with the AIT logo. Return the switch to its original position to Clean 1 Load the head cleaning cartridge into the AIT drive. Using a Cleaning Cartridge To keep the AIT drive in the direction of the cartridge. AITi390-ST AITi200-A, AITi200-ST, AITi100-A, AITi100-ST, AITi50-A Cleaning cartridge to use..., cleaning will stop and the cartridge will be write-protected by sliding the tab on the back of the arrow to protect the tape from the tape but not written onto it . Write-protecting a Cartridge Cartridges can be read from writing or accidental erasure. Caution Do not rewind ...
...with the AIT logo. Return the switch to its original position to Clean 1 Load the head cleaning cartridge into the AIT drive. Using a Cleaning Cartridge To keep the AIT drive in the direction of the cartridge. AITi390-ST AITi200-A, AITi200-ST, AITi100-A, AITi100-ST, AITi50-A Cleaning cartridge to use..., cleaning will stop and the cartridge will be write-protected by sliding the tab on the back of the arrow to protect the tape from the tape but not written onto it . Write-protecting a Cartridge Cartridges can be read from writing or accidental erasure. Caution Do not rewind ...