User Guide
Page 2
what and why 10 Applications 10 Getting started 11 Assembly 11 Turning the phone on and off 12 Setup guide 13 Screen lock 13 Accounts and services 14 Getting to know your phone 15 Phone overview 15 Using the keys 16 Battery 16 Using the touchscreen 18 Home screen 20 Accessing and using applications 22 Status and notifications 24 Phone settings menu 25 Typing text 26 Customizing your phone 30 Memory 32 Using a headset with your phone 33 Internet and messaging settings 34 Turning off data traffic 35 Data roaming 35 Mobile network settings 35 Calling 37 Emergency calls...
what and why 10 Applications 10 Getting started 11 Assembly 11 Turning the phone on and off 12 Setup guide 13 Screen lock 13 Accounts and services 14 Getting to know your phone 15 Phone overview 15 Using the keys 16 Battery 16 Using the touchscreen 18 Home screen 20 Accessing and using applications 22 Status and notifications 24 Phone settings menu 25 Typing text 26 Customizing your phone 30 Memory 32 Using a headset with your phone 33 Internet and messaging settings 34 Turning off data traffic 35 Data roaming 35 Mobile network settings 35 Calling 37 Emergency calls...

User Guide
Page 3
Communicating with your contacts 45 Sharing your contacts 45 Backing up contacts 45 Messaging 47 Using text and multimedia messaging 47 Text and multimedia message options 48 E-mail 50 Using e-mail 50 Using email accounts 53 Gmail™ and other Google™ services 53 Google Talk 55 Timescape 56 Timescape™ main view 56 Using Timescape 56 Timescape™ settings 58 Timescape™ Feed widget 58 Timescape™ Friends widget 59 Timescape™ Share widget 60 Getting started with Google Play 61 Downloading from Google Play 61 Clearing your application data ...
Communicating with your contacts 45 Sharing your contacts 45 Backing up contacts 45 Messaging 47 Using text and multimedia messaging 47 Text and multimedia message options 48 E-mail 50 Using e-mail 50 Using email accounts 53 Gmail™ and other Google™ services 53 Google Talk 55 Timescape 56 Timescape™ main view 56 Using Timescape 56 Timescape™ settings 58 Timescape™ Feed widget 58 Timescape™ Friends widget 59 Timescape™ Share widget 60 Getting started with Google Play 61 Downloading from Google Play 61 Clearing your application data ...
User Guide
Page 4
Synchronizing with Facebook 72 Synchronizing using SyncML 73 Connecting to wireless networks 75 Wi-Fi 75 Virtual private networks (VPNs 78 Web browser 80 Toolbar 80 Browsing the web 80 Navigating web pages 81 Managing bookmarks 81 Managing text and images 82 Multiple windows 82 Downloading from the web 83 Browser settings 83 Music 85 Protecting your hearing 85 Copying media files to your memory card 85 Using the music player 85 Identifying music using TrackID technology 90 Using TrackID™ technology results 90 Using the FM radio 92 FM radio overview 92 Using your ...
Synchronizing with Facebook 72 Synchronizing using SyncML 73 Connecting to wireless networks 75 Wi-Fi 75 Virtual private networks (VPNs 78 Web browser 80 Toolbar 80 Browsing the web 80 Navigating web pages 81 Managing bookmarks 81 Managing text and images 82 Multiple windows 82 Downloading from the web 83 Browser settings 83 Music 85 Protecting your hearing 85 Copying media files to your memory card 85 Using the music player 85 Identifying music using TrackID technology 90 Using TrackID™ technology results 90 Using the FM radio 92 FM radio overview 92 Using your ...
User Guide
Page 5
Sharing content with DLNA Certified™ devices 113 Playing files from DLNA Certified™ devices on your phone 113 Preparing to play phone content on DLNA Certified™ devices........113 Playing phone content on other DLNA Certified™ devices 114 Bluetooth™ wireless technology 115 Naming your phone 115 Pairing with another Bluetooth™ device 115 Sending and receiving items using Bluetooth™ technology 116 Connecting your phone to a computer 118 Transferring and handling content using a USB cable 118 Transferring files using Media transfer mode via Wi-Fi...
Sharing content with DLNA Certified™ devices 113 Playing files from DLNA Certified™ devices on your phone 113 Preparing to play phone content on DLNA Certified™ devices........113 Playing phone content on other DLNA Certified™ devices 114 Bluetooth™ wireless technology 115 Naming your phone 115 Pairing with another Bluetooth™ device 115 Sending and receiving items using Bluetooth™ technology 116 Connecting your phone to a computer 118 Transferring and handling content using a USB cable 118 Transferring files using Media transfer mode via Wi-Fi...
User Guide
Page 6
Legal information 137 Index 138 6 This is an Internet version of this publication. © Print only for private use.
Legal information 137 Index 138 6 This is an Internet version of this publication. © Print only for private use.

User Guide
Page 7
Without limitation, this publication. © Print only for private use your network operator or service provider to the GSM International Emergency Number 112. Important information Please read the Important information leaflet before you use . Please contact your mobile phone. Some of this applies to determine availability of any specific service or feature and whether additional access or usage fees apply. 7 This is an Internet version of the services and features described in this User guide are not supported in all countries/regions or by all networks and/or service ...
Without limitation, this publication. © Print only for private use your network operator or service provider to the GSM International Emergency Number 112. Important information Please read the Important information leaflet before you use . Please contact your mobile phone. Some of this applies to determine availability of any specific service or feature and whether additional access or usage fees apply. 7 This is an Internet version of the services and features described in this User guide are not supported in all countries/regions or by all networks and/or service ...
User Guide
Page 8
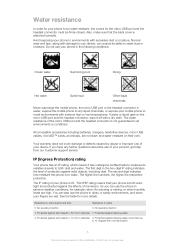
and water-resistant on the micro USB port and the headset connector, wipe it 's snowing or raining, or when humidity levels are high. This IP67 rating means that the back cover is not guaranteed in extreme weather conditions, for example, when it off with excessive dust or moisture. Protected against the effects of your product, get help from normal position 8 This is an Internet version of your phone is to both dusttight and protected against solid objects > 50 mm in dusty or sandy environments, and when your fingers are not dust- Also, make sure that your ...
and water-resistant on the micro USB port and the headset connector, wipe it 's snowing or raining, or when humidity levels are high. This IP67 rating means that the back cover is not guaranteed in extreme weather conditions, for example, when it off with excessive dust or moisture. Protected against the effects of your product, get help from normal position 8 This is an Internet version of your phone is to both dusttight and protected against solid objects > 50 mm in dusty or sandy environments, and when your fingers are not dust- Also, make sure that your ...

User Guide
Page 9
Dust-tight 3. Protected against solid objects > 2.5 mm in diameter 5. Protected against submersion 9 This is an Internet version of immersion 8. Protected against water jet spray 6. Protected against solid objects > 1 mm in diameter 4. Protected against splashing water 5. limited ingress (no harmful deposits) 6. 3. Protected against heavy jet spray 7. Protected against spraying water 4. Protected against dust; Protected against the effects of this publication. © Print only for private use.
Dust-tight 3. Protected against solid objects > 2.5 mm in diameter 5. Protected against submersion 9 This is an Internet version of immersion 8. Protected against water jet spray 6. Protected against solid objects > 1 mm in diameter 4. Protected against splashing water 5. limited ingress (no harmful deposits) 6. 3. Protected against heavy jet spray 7. Protected against spraying water 4. Protected against dust; Protected against the effects of this publication. © Print only for private use.

User Guide
Page 10
...photos and download more applications. 10 This is available and your phone supports this publication. © Print only for private use . Your Xperia smartphone from a constantly growing collection. For example, you can add and delete applications, or enhance existing applications to use many of the ... are applications to it when you perform a task. When a new software version is an Internet version of applications and games from Sony runs on your phone. New software releases may not be compatible with online services that helps you first start your Android™ phone...
...photos and download more applications. 10 This is available and your phone supports this publication. © Print only for private use . Your Xperia smartphone from a constantly growing collection. For example, you can add and delete applications, or enhance existing applications to use many of the ... are applications to it when you perform a task. When a new software version is an Internet version of applications and games from Sony runs on your phone. New software releases may not be compatible with online services that helps you first start your Android™ phone...

User Guide
Page 11
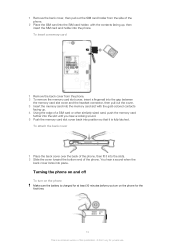
To insert the SIM card Do not insert an incompatible SIM card, for private use your phone. 11 This is an Internet version of this publication. © Print only for example, a micro SIM card, in the SIM card slot. Doing so could permanently damage your SIM card or your thumb to firmly lift up the cover. Getting started Assembly To remove the back cover • Insert a thumbnail into the strap hole opening on the back cover, then use .
To insert the SIM card Do not insert an incompatible SIM card, for private use your phone. 11 This is an Internet version of this publication. © Print only for example, a micro SIM card, in the SIM card slot. Doing so could permanently damage your SIM card or your thumb to firmly lift up the cover. Getting started Assembly To remove the back cover • Insert a thumbnail into the strap hole opening on the back cover, then use .
User Guide
Page 12
1 Remove the back cover, then pull out the SIM card holder from the phone. 2 To remove the memory card slot cover, insert a fingernail into the gap between the memory card slot cover and the headset connector, then pull out the cover. 3 Insert the memory card into the phone. Turning the phone on and off To turn on the phone for private use. To insert a memory card 1 Remove the back cover from the side of this publication. © Print only for the first time. 12 This is fully latched. To attach the back cover 1 Place the back cover over the back of the phone, then fit it into the ...
1 Remove the back cover, then pull out the SIM card holder from the phone. 2 To remove the memory card slot cover, insert a fingernail into the gap between the memory card slot cover and the headset connector, then pull out the cover. 3 Insert the memory card into the phone. Turning the phone on and off To turn on the phone for private use. To insert a memory card 1 Remove the back cover from the side of this publication. © Print only for the first time. 12 This is fully latched. To attach the back cover 1 Place the back cover over the back of the phone, then fit it into the ...
User Guide
Page 13
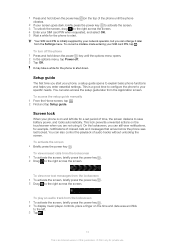
Your SIM card PIN is initially supplied by your phone is on the top of this publication. © Print only for a set period of time, the screen darkens to save battery power, and locks automatically. Setup guide The first time you start . On the lockscreen, you can also control the playback of missed calls and messages that arrived since the phone was last locked. To view missed calls from the Settings menu. 1 Press and hold down the power key until the phone vibrates. 2 If your screen goes dark, briefly press the power key to activate the screen. 3 To unlock the screen, drag to the...
Your SIM card PIN is initially supplied by your phone is on the top of this publication. © Print only for a set period of time, the screen darkens to save battery power, and locks automatically. Setup guide The first time you start . On the lockscreen, you can also control the playback of missed calls and messages that arrived since the phone was last locked. To view missed calls from the Settings menu. 1 Press and hold down the power key until the phone vibrates. 2 If your screen goes dark, briefly press the power key to activate the screen. 3 To unlock the screen, drag to the...
User Guide
Page 14
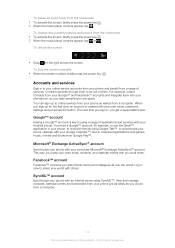
To unlock the screen • Drag to your online service accounts from Google Play™. To lock the screen manually • When the screen is key to using Google Talk™, to synchronize your phone calendar with your Android phone. You need a Google™ account, for private use the Gmail™ application in your phone, to chat with friends using a range of this publication. © Print only for example, to download applications and games, music, movies and books from your user name, password, settings and personal information. Microsoft® Exchange ...
To unlock the screen • Drag to your online service accounts from Google Play™. To lock the screen manually • When the screen is key to using Google Talk™, to synchronize your phone calendar with your Android phone. You need a Google™ account, for private use the Gmail™ application in your phone, to chat with friends using a range of this publication. © Print only for example, to download applications and games, music, movies and books from your user name, password, settings and personal information. Microsoft® Exchange ...

User Guide
Page 15
Power key 2 Ear speaker 3 Proximity sensor 1 4 Proximity sensor 2 5 Light sensor 6 Notification LED 7 Port for charger/USB cable 8 Volume/Zoom key 9 Menu key 10 Main microphone 11 Home key 12 Back key 13 Touchscreen 14 Headset connector 15 Camera LED light 16 Camera lens 17 Speaker 18 Strap hole 19 Second microphone 15 This is an Internet version of this publication. © Print only for private use. Getting to know your phone Phone overview 1.
Power key 2 Ear speaker 3 Proximity sensor 1 4 Proximity sensor 2 5 Light sensor 6 Notification LED 7 Port for charger/USB cable 8 Volume/Zoom key 9 Menu key 10 Main microphone 11 Home key 12 Back key 13 Touchscreen 14 Headset connector 15 Camera LED light 16 Camera lens 17 Speaker 18 Strap hole 19 Second microphone 15 This is an Internet version of this publication. © Print only for private use. Getting to know your phone Phone overview 1.

User Guide
Page 16
Charging the phone over a long period of time, for the first time. To charge the phone 16 This is an Internet version of options available in the charge status showing a level below 100 percent. This is to extend battery life and may take a few minutes before you connect the phone charger cable to a power source, such as a USB port or a phone charger, it may result in the current screen or application Battery Your phone has an embedded battery. You can still use . Charging the battery Charge your phone for private use your most recently used applications Menu • Open ...
Charging the phone over a long period of time, for the first time. To charge the phone 16 This is an Internet version of options available in the charge status showing a level below 100 percent. This is to extend battery life and may take a few minutes before you connect the phone charger cable to a power source, such as a USB port or a phone charger, it may result in the current screen or application Battery Your phone has an embedded battery. You can still use . Charging the battery Charge your phone for private use your most recently used applications Menu • Open ...

User Guide
Page 17
...; Downloading data from the Internet is power consuming. Be sure not to music. You can also customize the settings of this consumes power. • Use a Sony original handsfree device to listen to bend the connector when removing the cable from your phone in an area with the USB symbol facing down...
...; Downloading data from the Internet is power consuming. Be sure not to music. You can also customize the settings of this consumes power. • Use a Sony original handsfree device to listen to bend the connector when removing the cable from your phone in an area with the USB symbol facing down...

User Guide
Page 18
... Power Saver. 3 Press , then select Settings. 4 Mark the Notifications checkbox. Your phone screen is an Internet version of negligent care are not covered by the Sony warranty service. 18 This is made from glass. You can now turn off this publication. © Print only for a power saving mode 1 From your Home...
... Power Saver. 3 Press , then select Settings. 4 Mark the Notifications checkbox. Your phone screen is an Internet version of negligent care are not covered by the Sony warranty service. 18 This is made from glass. You can now turn off this publication. © Print only for a power saving mode 1 From your Home...
User Guide
Page 19
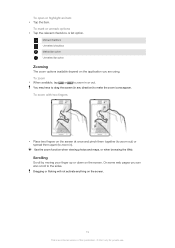
To zoom • When available, tap or to make the zoom icons appear. On some web pages you are using. Dragging or flicking will not activate anything on the screen. You may have to drag the screen (in any direction) to zoom in ). To zoom with two fingers • Place two fingers on the application you can also scroll to zoom in or out. Marked checkbox Unmarked checkbox Marked list option Unmarked list option Zooming The zoom options available depend on the screen at once and pinch them together (to zoom out) or spread them apart (to the sides. To open or highlight an ...
To zoom • When available, tap or to make the zoom icons appear. On some web pages you are using. Dragging or flicking will not activate anything on the screen. You may have to drag the screen (in any direction) to zoom in ). To zoom with two fingers • Place two fingers on the application you can also scroll to zoom in or out. Marked checkbox Unmarked checkbox Marked list option Unmarked list option Zooming The zoom options available depend on the screen at once and pinch them together (to zoom out) or spread them apart (to the sides. To open or highlight an ...

User Guide
Page 20
To scroll • Drag or flick your finger in the direction you want to scroll on the screen. Sensors Your phone has sensors that detect both light and proximity. This prevents you from unintentionally activating phone functions when you can stop by itself, or you are in. 20 This is the equivalent of this publication. © Print only for the scrolling movement to view content in one of the screen accordingly. To scroll more quickly, flick your finger in the direction you are engaged in the direction you want to go on the screen. It's the gateway to go on a ...
To scroll • Drag or flick your finger in the direction you want to scroll on the screen. Sensors Your phone has sensors that detect both light and proximity. This prevents you from unintentionally activating phone functions when you can stop by itself, or you are in. 20 This is the equivalent of this publication. © Print only for the scrolling movement to view content in one of the screen accordingly. To scroll more quickly, flick your finger in the direction you are engaged in the direction you want to go on the screen. It's the gateway to go on a ...

User Guide
Page 21
Widgets Widgets are small applications that widget. All widgets from different parts of this publication. © Print only for quick access. Rearranging your Home screen Customize the appearance of your Home screen You can use them. Change the screen background, move items around, create folders, and add shortcuts to the Home screen • Press . To browse the Home screen • Flick right or left. You can now share the applications and widgets you can open your Home screen and change the features you to start playing music directly. For example, the Music ...
Widgets Widgets are small applications that widget. All widgets from different parts of this publication. © Print only for quick access. Rearranging your Home screen Customize the appearance of your Home screen You can use them. Change the screen background, move items around, create folders, and add shortcuts to the Home screen • Press . To browse the Home screen • Flick right or left. You can now share the applications and widgets you can open your Home screen and change the features you to start playing music directly. For example, the Music ...
