User Guide
Page 6
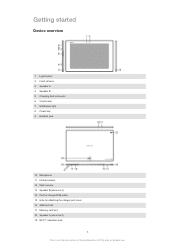
Getting started Device overview 1 Light sensor 2 Front camera 3 Speaker A 4 Speaker B 5 Charging dock connector 6 Volume key 7 Notification light 8 Power key 9 Headset jack 10 Microphone 11 Infrared sensor 12 Main camera 13 Speaker B (same as 4) 14 Port for charger/USB cable 15 Hole for attaching the charger port cover 16 SIM card slot 17 Memory card slot 18 Speaker A (same as 3) 19 NFC™ detection area 6 This is an Internet version of this publication. © Print only for private use.
Getting started Device overview 1 Light sensor 2 Front camera 3 Speaker A 4 Speaker B 5 Charging dock connector 6 Volume key 7 Notification light 8 Power key 9 Headset jack 10 Microphone 11 Infrared sensor 12 Main camera 13 Speaker B (same as 4) 14 Port for charger/USB cable 15 Hole for attaching the charger port cover 16 SIM card slot 17 Memory card slot 18 Speaker A (same as 3) 19 NFC™ detection area 6 This is an Internet version of this publication. © Print only for private use.

User Guide
Page 7
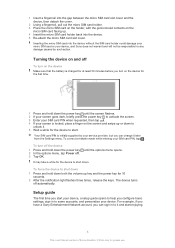
... To insert the memory card Do not insert a micro SIM card into the memory card slot. 1 Insert a fingernail into the gap between the memory card cover and the bottom side of this publication. © Print only for private use. To insert the micro SIM card Do not insert the micro SIM card into the slot until ...you hear a locking sound. 3 Reattach the memory card cover. The memory card may not be included at purchase in all the way into the memory card slot. 7 This is an Internet version of...
... To insert the memory card Do not insert a micro SIM card into the memory card slot. 1 Insert a fingernail into the gap between the memory card cover and the bottom side of this publication. © Print only for private use. To insert the micro SIM card Do not insert the micro SIM card into the slot until ...you hear a locking sound. 3 Reattach the memory card cover. The memory card may not be included at purchase in all the way into the memory card slot. 7 This is an Internet version of...
User Guide
Page 8
...entering your device, and Sony does not warrant and will not be responsible for the device to shut down 1 Press and hold down the power key 2 In the options menu, tap Power off automatically. Inserting the micro SIM card into the device. 5 Re-attach the micro SIM card slot cover. It ...3 Tap OK. To force the device to shut down both the volume up . 4 Insert the micro SIM card holder back into the device without the SIM card holder could damage your micro SIM card or your SIM card PIN, tap . To turn on the device for private use. Setup guide The first time you configure ...
...entering your device, and Sony does not warrant and will not be responsible for the device to shut down 1 Press and hold down the power key 2 In the options menu, tap Power off automatically. Inserting the micro SIM card into the device. 5 Re-attach the micro SIM card slot cover. It ...3 Tap OK. To force the device to shut down both the volume up . 4 Insert the micro SIM card holder back into the device without the SIM card holder could damage your micro SIM card or your SIM card PIN, tap . To turn on the device for private use. Setup guide The first time you configure ...

User Guide
Page 39
... groups You can mark contacts as favorites so that account appears in the list. 4 When you want to send all if you can use a memory card , a SIM card or an online synchronization tool such as a favorite 1 From the Home screen, tap , then tap . 2 Tap the contact you are finished, tap ... add to a group 1 In the Contacts application, tap the contact that appears, mark and unmark the desired options. Sending contact information To send your business card 1 From your Home screen, tap , then tap . 2 Press , then tap Mark several contacts at once 1 From your Home screen, tap , then tap . 2...
... groups You can mark contacts as favorites so that account appears in the list. 4 When you want to send all if you can use a memory card , a SIM card or an online synchronization tool such as a favorite 1 From the Home screen, tap , then tap . 2 Tap the contact you are finished, tap ... add to a group 1 In the Contacts application, tap the contact that appears, mark and unmark the desired options. Sending contact information To send your business card 1 From your Home screen, tap , then tap . 2 Press , then tap Mark several contacts at once 1 From your Home screen, tap , then tap . 2...
User Guide
Page 43
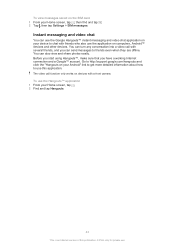
...Hangouts™ instant messaging and video chat application on your Home screen, tap , then find and tap . 2 Tap , then tap Settings > SIM messages. You can use the application on computers, Android™ devices and other devices. Go to http://support.google.com/hangouts and click the "Hangouts.... 43 This is an Internet version of this publication. © Print only for private use this application. To view messages saved on the SIM card 1 From your device to chat with a front camera. The video call with several friends, and you have a working Internet connection and a Google...
...Hangouts™ instant messaging and video chat application on your Home screen, tap , then find and tap . 2 Tap , then tap Settings > SIM messages. You can use the application on computers, Android™ devices and other devices. Go to http://support.google.com/hangouts and click the "Hangouts.... 43 This is an Internet version of this publication. © Print only for private use this application. To view messages saved on the SIM card 1 From your device to chat with a front camera. The video call with several friends, and you have a working Internet connection and a Google...
User Guide
Page 94
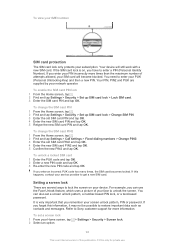
.... 5 Confirm the new PIN2 and tap OK. For example, you enter an incorrect PUK code too many times, the SIM card becomes locked. Setting a screen lock There are supplied by your face to Sony customer support for private use. If you can also set a screen lock 1 From your Home screen, tap 2 Select an...
.... 5 Confirm the new PIN2 and tap OK. For example, you enter an incorrect PUK code too many times, the SIM card becomes locked. Setting a screen lock There are supplied by your face to Sony customer support for private use. If you can also set a screen lock 1 From your Home screen, tap 2 Select an...
User Guide
Page 97
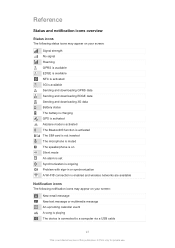
... Sending and downloading 3G data Battery status The battery is charging GPS is activated Airplane mode is activated The Bluetooth® function is activated The SIM card is not inserted The microphone is muted The speakerphone is on Silent mode An alarm is set Synchronization is ongoing Problem with sign-in or...
... Sending and downloading 3G data Battery status The battery is charging GPS is activated Airplane mode is activated The Bluetooth® function is activated The SIM card is not inserted The microphone is muted The speakerphone is on Silent mode An alarm is set Synchronization is ongoing Problem with sign-in or...

User Guide
Page 100
...device to the GSM International Emergency Number, 112. Limitations to the Internet. If water gets on the micro USB port, the microSD card, the micro SIM card and the headset connector, wipe it again. You may require access to services and features Some of this User guide are not ...: Ocean water Swimming pool Diving Hot water Sand/mud Other liquid chemicals Never submerge the device, the micro USB port, the microSD card, the micro SIM card or the headset connector in this applies to moist environments with excessive dust or moisture. To access the setup guide manually 1 From...
...device to the GSM International Emergency Number, 112. Limitations to the Internet. If water gets on the micro USB port, the microSD card, the micro SIM card and the headset connector, wipe it again. You may require access to services and features Some of this User guide are not ...: Ocean water Swimming pool Diving Hot water Sand/mud Other liquid chemicals Never submerge the device, the micro USB port, the microSD card, the micro SIM card or the headset connector in this applies to moist environments with excessive dust or moisture. To access the setup guide manually 1 From...


