User Guide
Page 1
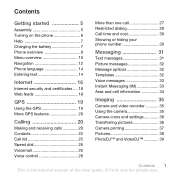
... Menu overview 10 Navigation 12 Phone language 14 Entering text 14 Internet 16 Internet security and certificates .... 18 Web feeds 18 GPS 19 Using the GPS 19 More GPS features 20 Calling 20 Making and receiving calls 20 Contacts 22 Call list 25 Speed dial 25 Voicemail 25 Voice...Message options 32 Templates 32 Voice messages 33 Instant Messaging (IM 33 Area and cell information 34 Imaging 35 Camera and video recorder 35 Using the camera 35 Camera icons and settings 36 Transferring pictures 36 Camera printing 37 Pictures 38 PhotoDJ™ and VideoDJ 39 Contents 1 ...
... Menu overview 10 Navigation 12 Phone language 14 Entering text 14 Internet 16 Internet security and certificates .... 18 Web feeds 18 GPS 19 Using the GPS 19 More GPS features 20 Calling 20 Making and receiving calls 20 Contacts 22 Call list 25 Speed dial 25 Voicemail 25 Voice...Message options 32 Templates 32 Voice messages 33 Instant Messaging (IM 33 Area and cell information 34 Imaging 35 Camera and video recorder 35 Using the camera 35 Camera icons and settings 36 Transferring pictures 36 Camera printing 37 Pictures 38 PhotoDJ™ and VideoDJ 39 Contents 1 ...
User Guide
Page 2
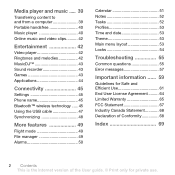
...MusicDJ 43 Sound recorder 43 Games 43 Applications 44 Connectivity 45 Settings 45 Phone name 45 Bluetooth™ wireless technology ..... 45 Using the USB cable 47 Synchronizing 48 More features 49 Flight mode 49 File manager 49 Alarms 50 Calendar 51 Notes 52 Tasks ... Main menu layout 53 Locks 54 Troubleshooting 55 Common questions 55 Error messages 57 Important information ...... 59 Guidelines for Safe and Efficient Use 61 End User License Agreement ......... 64 Limited Warranty 65 FCC Statement 67 Industry Canada Statement 68 Declaration of Conformity 68 Index 69 ...
...MusicDJ 43 Sound recorder 43 Games 43 Applications 44 Connectivity 45 Settings 45 Phone name 45 Bluetooth™ wireless technology ..... 45 Using the USB cable 47 Synchronizing 48 More features 49 Flight mode 49 File manager 49 Alarms 50 Calendar 51 Notes 52 Tasks ... Main menu layout 53 Locks 54 Troubleshooting 55 Common questions 55 Error messages 57 Important information ...... 59 Guidelines for Safe and Efficient Use 61 End User License Agreement ......... 64 Limited Warranty 65 FCC Statement 67 Industry Canada Statement 68 Declaration of Conformity 68 Index 69 ...

User Guide
Page 3
... Windows, Outlook, and Vista are trademarks or registered trademarks of Open Mobile Alliance LTD. This also applies to your improper use is properly licensed or is otherwise authorized. Your mobile phone has the capability to this User guide are trademarks or registered ...registered trademark of Microsoft Corporation in the United States and/or other countries. Pat. Sony Ericsson TM506 UMTS HSDPA 1700/2100 GSM EDGE 850/1800/1900 This User guide is published by Sony Ericsson Mobile Communications AB or its local affiliated company, without any time and without notice....
... Windows, Outlook, and Vista are trademarks or registered trademarks of Open Mobile Alliance LTD. This also applies to your improper use is properly licensed or is otherwise authorized. Your mobile phone has the capability to this User guide are trademarks or registered ...registered trademark of Microsoft Corporation in the United States and/or other countries. Pat. Sony Ericsson TM506 UMTS HSDPA 1700/2100 GSM EDGE 850/1800/1900 This User guide is published by Sony Ericsson Mobile Communications AB or its local affiliated company, without any time and without notice....
User Guide
Page 4
...of their respective owners. Treasury Department's list of Denial Orders. All illustrations are reserved. End-user license agreement for details. > Use a selection or navigation key to scroll and select. Customer shall not modify, decompile, disassemble, decrypt, extract, or otherwise reverse ...engineer Software. has embargoed goods; Restricted Rights: Use, duplication or disclosure by Sun and/or its associated regulations, and may be subject to export or import regulations in the ...
...of their respective owners. Treasury Department's list of Denial Orders. All illustrations are reserved. End-user license agreement for details. > Use a selection or navigation key to scroll and select. Customer shall not modify, decompile, disassemble, decrypt, extract, or otherwise reverse ...engineer Software. has embargoed goods; Restricted Rights: Use, duplication or disclosure by Sun and/or its associated regulations, and may be subject to export or import regulations in the ...
User Guide
Page 5
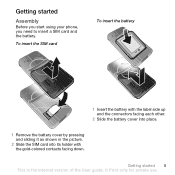
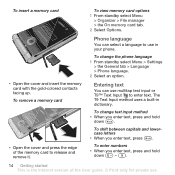
Getting started Assembly Before you start using your phone, you need to insert a SIM card and the battery. Getting started 5 This is the Internet version of the User guide. © Print only for private use. To insert the SIM card To insert the battery 1 Insert the battery with the label side up and the connectors facing each other. 2 Slide the battery cover into place. 1 Remove the battery cover by pressing and sliding it as shown in the picture. 2 Slide the SIM card into its holder with the gold-colored contacts facing down.
Getting started Assembly Before you start using your phone, you need to insert a SIM card and the battery. Getting started 5 This is the Internet version of the User guide. © Print only for private use. To insert the SIM card To insert the battery 1 Insert the battery with the label side up and the connectors facing each other. 2 Slide the battery cover into place. 1 Remove the battery cover by pressing and sliding it as shown in the picture. 2 Slide the SIM card into its holder with the gold-colored contacts facing down.
User Guide
Page 6
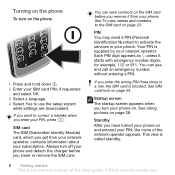
... you have turned your phone on and entered your PIN, the name of the User guide. © Print only for example, 112 or 911. See Using pictures on page 38. Turning on the phone To turn on the phone 1 Press and hold down . 2 Enter your SIM card PIN, if requested and... select OK. 3 Select a language. 4 Select Yes to use . SIM card The SIM (Subscriber Identity Module) card, which you insert or remove the SIM card. Always turn off your phone and detach the charger...
... you have turned your phone on and entered your PIN, the name of the User guide. © Print only for example, 112 or 911. See Using pictures on page 38. Turning on the phone To turn on the phone 1 Press and hold down . 2 Enter your SIM card PIN, if requested and... select OK. 3 Select a language. 4 Select Yes to use . SIM card The SIM (Subscriber Identity Module) card, which you insert or remove the SIM card. Always turn off your phone and detach the charger...
User Guide
Page 7
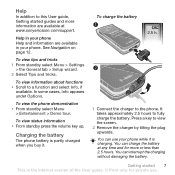
Help in your phone Help and information are available at any time and for private use your phone. Charging the battery The phone battery is the Internet version of the User guide. © Print only for more information are available in .... To charge the battery 2.5 h. 1 Connect the charger to this User guide, Getting started 7 This is partly charged when you buy it is charging. You can use . To view information about functions • Scroll to a function and select Info, if available. You can interrupt the charging without damaging the battery.
Help in your phone Help and information are available at any time and for private use your phone. Charging the battery The phone battery is the Internet version of the User guide. © Print only for more information are available in .... To charge the battery 2.5 h. 1 Connect the charger to this User guide, Getting started 7 This is partly charged when you buy it is charging. You can use . To view information about functions • Scroll to a function and select Info, if available. You can interrupt the charging without damaging the battery.
User Guide
Page 8
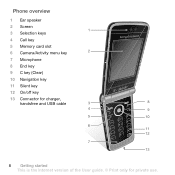
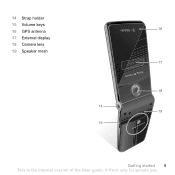
Phone overview 1 Ear speaker 2 Screen 1 3 Selection keys 4 Call key 5 Memory card slot 6 Camera/Activity menu key 2 7 Microphone 8 End key 9 C key (Clear) 10 Navigation key 11 Silent key 12 On/off key 13 Connector for charger, handsfree and USB cable 3 8 4 9 5 10 6 11 12 7 13 8 Getting started This is the Internet version of the User guide. © Print only for private use.
Phone overview 1 Ear speaker 2 Screen 1 3 Selection keys 4 Call key 5 Memory card slot 6 Camera/Activity menu key 2 7 Microphone 8 End key 9 C key (Clear) 10 Navigation key 11 Silent key 12 On/off key 13 Connector for charger, handsfree and USB cable 3 8 4 9 5 10 6 11 12 7 13 8 Getting started This is the Internet version of the User guide. © Print only for private use.
User Guide
Page 9
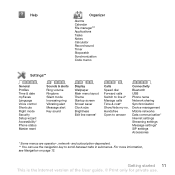
14 Strap holder 15 Volume keys 16 GPS antenna 16 17 External display 18 Camera lens 19 Speaker mesh 17 18 14 19 15 Getting started 9 This is the Internet version of the User guide. © Print only for private use.
14 Strap holder 15 Volume keys 16 GPS antenna 16 17 External display 18 Camera lens 19 Speaker mesh 17 18 14 19 15 Getting started 9 This is the Internet version of the User guide. © Print only for private use.

User Guide
Page 10
Menu overview Voice Notes IM & Email IM* Email Camera Call history** All Answered Dialed Missed Messaging Write new Inbox Drafts Outbox Saved messages Call voicemail Templates Manage messages Settings Contacts My Profile New contact t-zones Media Photo Music Video Games TV Web feeds Settings Entertainment Online services* Location services VideoDJ™ PhotoDJ™ MusicDJ™ Remote control Demo tour 10 Getting started This is the Internet version of the User guide. © Print only for private use.
Menu overview Voice Notes IM & Email IM* Email Camera Call history** All Answered Dialed Missed Messaging Write new Inbox Drafts Outbox Saved messages Call voicemail Templates Manage messages Settings Contacts My Profile New contact t-zones Media Photo Music Video Games TV Web feeds Settings Entertainment Online services* Location services VideoDJ™ PhotoDJ™ MusicDJ™ Remote control Demo tour 10 Getting started This is the Internet version of the User guide. © Print only for private use.
User Guide
Page 11
... started 11 This is the Internet version of the User guide. © Print only for private use the navigation key to scroll between tabs in submenus. Help Organizer Alarms Calendar File manager** Applications Tasks Notes Calculator Record sound Timer Stopwatch Synchronization Code ...
... started 11 This is the Internet version of the User guide. © Print only for private use the navigation key to scroll between tabs in submenus. Help Organizer Alarms Calendar File manager** Applications Tasks Notes Calculator Record sound Timer Stopwatch Synchronization Code ...
User Guide
Page 12
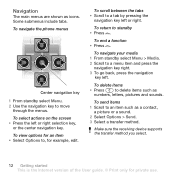
... Internet version of the User guide. © Print only for example, edit. To send items 1 Scroll to , for private use. To navigate the phone menus Center navigation key 1 From standby select Menu. 2 Use the navigation key to a menu item and press the navigation key right. 3 To go back, press the navigation key...
... Internet version of the User guide. © Print only for example, edit. To send items 1 Scroll to , for private use. To navigate the phone menus Center navigation key 1 From standby select Menu. 2 Use the navigation key to a menu item and press the navigation key right. 3 To go back, press the navigation key...
User Guide
Page 13
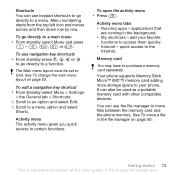
.... 2 Scroll to an option and select Edit. 3 Scroll to your favorite functions to certain functions. The Main menu layout must be used as a portable memory card with other compatible devices. quick access to purchase a memory card separately. Memory card You may have to the Internet. ...menu • From standby select Menu and press - , , or . Activity menu tabs • Running apps - add your phone. Shortcuts You can use the file manager to move a file in the background. • My shortcuts - Menu numbering starts from the top left icon and moves across and ...
.... 2 Scroll to an option and select Edit. 3 Scroll to your favorite functions to certain functions. The Main menu layout must be used as a portable memory card with other compatible devices. quick access to purchase a memory card separately. Memory card You may have to the Internet. ...menu • From standby select Menu and press - , , or . Activity menu tabs • Running apps - add your phone. Shortcuts You can use the file manager to move a file in the background. • My shortcuts - Menu numbering starts from the top left icon and moves across and ...
User Guide
Page 14
The T9 Text Input method uses a built-in your phone. To insert a memory card To view memory card options 1 From standby select Menu > Organizer > File ...a memory card • Open the cover and press the edge of the User guide. © Print only for private use multitap text input or T9™ Text Input to release and remove it. Entering text You can select a language to... use in dictionary. To enter numbers • When you enter text, press and hold down - . 14 Getting started ...
The T9 Text Input method uses a built-in your phone. To insert a memory card To view memory card options 1 From standby select Menu > Organizer > File ...a memory card • Open the cover and press the edge of the User guide. © Print only for private use multitap text input or T9™ Text Input to release and remove it. Entering text You can select a language to... use in dictionary. To enter numbers • When you enter text, press and hold down - . 14 Getting started ...

User Guide
Page 15
...and commas • When you enter text, select Options > Add symbol. 2 Scroll to a symbol and select Insert. To enter text using multitap input and select Insert. To enter text using multitap 1 From standby select, for example, Menu > Messaging > Write new > Text message. 2 If is not displayed, press and ... displayed, press and hold down to change to multitap text input. 3 Press - Write the whole word before looking at the suggestions. 4 Use or to view suggestions. 5 Press to write the word "Jane", press , , , . To enter a symbol 1 When you enter text, press .
...and commas • When you enter text, select Options > Add symbol. 2 Scroll to a symbol and select Insert. To enter text using multitap input and select Insert. To enter text using multitap 1 From standby select, for example, Menu > Messaging > Write new > Text message. 2 If is not displayed, press and ... displayed, press and hold down to change to multitap text input. 3 Press - Write the whole word before looking at the suggestions. 4 Use or to view suggestions. 5 Press to write the word "Jane", press , , , . To enter a symbol 1 When you enter text, press .
User Guide
Page 16
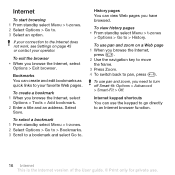
... To select a bookmark 1 From standby select Menu > t-zones. 2 Select Options > Go to > Bookmarks. 3 Scroll to a bookmark and select Go to > History. To use pan and zoom, you have browsed. Bookmarks You can create and edit bookmarks as quick links to turn off Smart-fit: Options > Advanced > Smart-Fit... page 45 or contact your favorite Web pages. Internet keypad shortcuts You can view Web pages you need to your operator. History pages You can use the keypad to go directly to . 3 Select an option. To view history pages • From standby select Menu > t-zones > Options > Go ...
... To select a bookmark 1 From standby select Menu > t-zones. 2 Select Options > Go to > Bookmarks. 3 Scroll to a bookmark and select Go to > History. To use pan and zoom, you have browsed. Bookmarks You can create and edit bookmarks as quick links to turn off Smart-fit: Options > Advanced > Smart-Fit... page 45 or contact your favorite Web pages. Internet keypad shortcuts You can view Web pages you need to your operator. History pages You can use the keypad to go directly to . 3 Select an option. To view history pages • From standby select Menu > t-zones > Options > Go ...
User Guide
Page 17
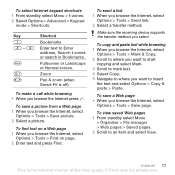
... and select Options > Copy & paste > Paste. Zoom Pan & zoom (when Smart-Fit is the Internet version of the User guide. © Print only for private use. Fullscreen or Landscape or Normal screen.
... and select Options > Copy & paste > Paste. Zoom Pan & zoom (when Smart-Fit is the Internet version of the User guide. © Print only for private use. Fullscreen or Landscape or Normal screen.
User Guide
Page 18
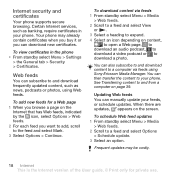
...select Menu > Settings > the General tab > Security > Certificates. Web feeds You can subscribe to your phone. To add new feeds for private use. See Transferring content to a feed and select Options > Schedule update. 3 Select an option. When there are updates, appears on page 39. Frequent... buy it or you want to add, scroll to download a photo. To download content via feeds using Web feeds. Certain Internet services, such as news, podcasts or photos, using Sony Ericsson Media Manager. To view certificates in your feeds, or schedule updates. To schedule Web feed updates 1...
...select Menu > Settings > the General tab > Security > Certificates. Web feeds You can subscribe to your phone. To add new feeds for private use. See Transferring content to a feed and select Options > Schedule update. 3 Select an option. When there are updates, appears on page 39. Frequent... buy it or you want to add, scroll to download a photo. To download content via feeds using Web feeds. Certain Internet services, such as news, podcasts or photos, using Sony Ericsson Media Manager. To view certificates in your feeds, or schedule updates. To schedule Web feed updates 1...
User Guide
Page 19
...Media > Photo > Photo feeds. GPS Your phone is equipped with a GPS receiver that require the GPS receiver to and download podcasts using Photo feeds, see Web feeds on page 18. Using the GPS Make sure you can subscribe to calculate your location is the Internet version of the sky when...If your location. Podcasts Podcasts are files, for example, video content, that you have a clear view of the User guide. © Print only for private use the Internet. To access video podcasts • From standby select Menu > Media > Video > Podcasts. GPS 19 This is not found after a few minutes...
...Media > Photo > Photo feeds. GPS Your phone is equipped with a GPS receiver that require the GPS receiver to and download podcasts using Photo feeds, see Web feeds on page 18. Using the GPS Make sure you can subscribe to calculate your location is the Internet version of the sky when...If your location. Podcasts Podcasts are files, for example, video content, that you have a clear view of the User guide. © Print only for private use the Internet. To access video podcasts • From standby select Menu > Media > Video > Podcasts. GPS 19 This is not found after a few minutes...
User Guide
Page 20
...standby enter a phone number (with international country code and area code, if applicable). 2 Press . See Voice control on page 25. You can also use . To make international calls 1 From standby press and hold down until a "+" sign appears. 2 Enter the country code, area code (without the ...first zero) and phone number. 3 Press . 20 Calling This is no longer used. Turn off the GPS The GPS receiver is automatically turned off manually 1 From standby select Menu > Entertainment > Location services > Settings. 2 Select an...
...standby enter a phone number (with international country code and area code, if applicable). 2 Press . See Voice control on page 25. You can also use . To make international calls 1 From standby press and hold down until a "+" sign appears. 2 Enter the country code, area code (without the ...first zero) and phone number. 3 Press . 20 Calling This is no longer used. Turn off the GPS The GPS receiver is automatically turned off manually 1 From standby select Menu > Entertainment > Location services > Settings. 2 Select an...


