

User Guide
Page 1
Contents Sony Ericsson K660i Getting started 5 Assembly 5 Turning on the phone 6 Help in your phone 7 Charging the battery 7 Phone overview 8 Menu overview 10 Navigation 12 File manager 13 ...
Contents Sony Ericsson K660i Getting started 5 Assembly 5 Turning on the phone 6 Help in your phone 7 Charging the battery 7 Phone overview 8 Menu overview 10 Navigation 12 File manager 13 ...

User Guide
Page 2
Entertainment 40 Stereo portable handsfree 40 Music player 40 Video player 40 Music and video controls 40 Transferring music from a computer 42 TrackID 43 Radio 43 PlayNow 44 Ringtones and melodies 44 MusicDJ 45 Sound recorder 45 Games 46 Applications 46 Connectivity 47 Settings 47 Phone name 48 Using the Internet 48 Web feeds 50 Bluetooth™ wireless technology 51 Using the USB cable 52 Synchronizing 54 Update service 56 More features 57 Flight mode 57 Location services 58 Alarms 58 Calendar 59 Notes 60 Tasks 61 Profiles 61 Time and date 62 Locks 62 ...
Entertainment 40 Stereo portable handsfree 40 Music player 40 Video player 40 Music and video controls 40 Transferring music from a computer 42 TrackID 43 Radio 43 PlayNow 44 Ringtones and melodies 44 MusicDJ 45 Sound recorder 45 Games 46 Applications 46 Connectivity 47 Settings 47 Phone name 48 Using the Internet 48 Web feeds 50 Bluetooth™ wireless technology 51 Using the USB cable 52 Synchronizing 54 Update service 56 More features 57 Flight mode 57 Location services 58 Alarms 58 Calendar 59 Notes 60 Tasks 61 Profiles 61 Time and date 62 Locks 62 ...

User Guide
Page 3
...Mobile Alliance LTD. No. 1,331,057, United Kingdom Pat. No. This also applies to download, store and forward additional content, e.g. Sony Ericsson does not guarantee the accuracy, integrity or quality of this User guide. Bluetooth is a trademark or a registered trademark of Singapore Pat. ...mobile phone. T9™ Text Input is a trademark or a registered trademark of Tegic Communications. T9™ Text Input is the Internet version of Sony Ericsson Mobile Communications AB. Nos. 5,818,437, 5,953,541, 5,187,480, 5,945,928, and 6,011,554; Canadian Pat. No. 2238414B;...
...Mobile Alliance LTD. No. 1,331,057, United Kingdom Pat. No. This also applies to download, store and forward additional content, e.g. Sony Ericsson does not guarantee the accuracy, integrity or quality of this User guide. Bluetooth is a trademark or a registered trademark of Singapore Pat. ...mobile phone. T9™ Text Input is a trademark or a registered trademark of Tegic Communications. T9™ Text Input is the Internet version of Sony Ericsson Mobile Communications AB. Nos. 5,818,437, 5,953,541, 5,187,480, 5,945,928, and 6,011,554; Canadian Pat. No. 2238414B;...

User Guide
Page 4
Restrictions: Software is confidential copyrighted information of Sun and title to export or import regulations in part. Export Administration Act and its licensors. Other product and company names mentioned herein may not be downloaded, or otherwise exported or re-exported (i) into, or to a national or resident of Sun Microsystems, Inc. Note Tip Warning A service or function is the Internet version of their respective owners. export control laws, including the U.S. Treasury Department's list of Denial Orders. Export Regulations: Software, including technical ...
Restrictions: Software is confidential copyrighted information of Sun and title to export or import regulations in part. Export Administration Act and its licensors. Other product and company names mentioned herein may not be downloaded, or otherwise exported or re-exported (i) into, or to a national or resident of Sun Microsystems, Inc. Note Tip Warning A service or function is the Internet version of their respective owners. export control laws, including the U.S. Treasury Department's list of Denial Orders. Export Regulations: Software, including technical ...

User Guide
Page 5
Getting started 5 This is the Internet version of the User's guide. © Print only for private use. Getting started Assembly Before you start using your phone, you need to insert a SIM card and the battery. To insert the SIM card To insert the battery 1 Remove the battery cover by pressing and sliding it as shown in the picture. 2 Slide the SIM card into its holder with the gold-coloured contacts facing down. 1 Insert the battery with the label side up and the connectors facing each other. 2 Slide the battery cover into place.
Getting started 5 This is the Internet version of the User's guide. © Print only for private use. Getting started Assembly Before you start using your phone, you need to insert a SIM card and the battery. To insert the SIM card To insert the battery 1 Remove the battery cover by pressing and sliding it as shown in the picture. 2 Slide the SIM card into its holder with the gold-coloured contacts facing down. 1 Insert the battery with the label side up and the connectors facing each other. 2 Slide the battery cover into place.

User Guide
Page 6
SIM card The SIM (Subscriber Identity Module) card, which you enter the wrong PIN three times in your network operator. PIN You may need a PIN (Personal Identification Number) to use . If you get from your phone. See SIM card lock on . Startup screen The startup screen appears when you turn your phone on page 62. Each PIN digit appears as *, unless it from your network operator, contains information about your subscription. Always turn off your phone and detach the charger before you remove it starts with emergency number digits, for private use the setup wizard while ...
SIM card The SIM (Subscriber Identity Module) card, which you enter the wrong PIN three times in your network operator. PIN You may need a PIN (Personal Identification Number) to use . If you get from your phone. See SIM card lock on . Startup screen The startup screen appears when you turn your phone on page 62. Each PIN digit appears as *, unless it from your network operator, contains information about your subscription. Always turn off your phone and detach the charger before you remove it starts with emergency number digits, for private use the setup wizard while ...

User Guide
Page 7
To view the phone demonstration • From standby select Menu > Entertainment > Demo tour. To charge the battery 2.5 h. 1 Connect the charger to a function and select Info, if available. You can interrupt the charging without damaging the battery. To view information about functions • Scroll to the phone. You can use your PIN, the name of the User's guide. © Print only for more or less than 2.5 hours. Standby After you buy it is charging. This view is the Internet version of the network operator appears. In some cases, Info appears under Options. To view status...
To view the phone demonstration • From standby select Menu > Entertainment > Demo tour. To charge the battery 2.5 h. 1 Connect the charger to a function and select Info, if available. You can interrupt the charging without damaging the battery. To view information about functions • Scroll to the phone. You can use your PIN, the name of the User's guide. © Print only for more or less than 2.5 hours. Standby After you buy it is charging. This view is the Internet version of the network operator appears. In some cases, Info appears under Options. To view status...

User Guide
Page 8
Phone overview 1 On/off key 1 2 Ear speaker 9 3 Screen 4 Selection keys 2 5 Memory card slot 6 Call key 3 7 Activity menu key 8 Keylock key 9 Video call camera 4 10 End key 11 C key (Clear) 10 12 Navigation key 11 13 Silent key 5 See Internet keypad shortcuts 6 12 on page 49 7 13 8 8 Getting started This is the Internet version of the User's guide. © Print only for private use.
Phone overview 1 On/off key 1 2 Ear speaker 9 3 Screen 4 Selection keys 2 5 Memory card slot 6 Call key 3 7 Activity menu key 8 Keylock key 9 Video call camera 4 10 End key 11 C key (Clear) 10 12 Navigation key 11 13 Silent key 5 See Internet keypad shortcuts 6 12 on page 49 7 13 8 8 Getting started This is the Internet version of the User's guide. © Print only for private use.

User Guide
Page 9
14 Volume, digital zoom keys 15 Main camera 16 Camera key 14 17 Connector for charger, handsfree and USB cable 15 16 17 Getting started 9 This is the Internet version of the User's guide. © Print only for private use.
14 Volume, digital zoom keys 15 Main camera 16 Camera key 14 17 Connector for charger, handsfree and USB cable 15 16 17 Getting started 9 This is the Internet version of the User's guide. © Print only for private use.

User Guide
Page 10
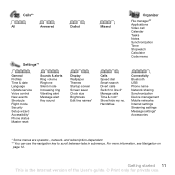
Menu overview PlayNow™* Internet* Camera Alarms Messaging Write new Inbox Email Web feeds Drafts Outbox Sent messages Saved messages My friends* Call voicemail Templates Manage messages Settings Contacts Myself New contact Entertainment Online services* Games TrackID™ Location services VideoDJ™ PhotoDJ™ MusicDJ™ Remote control Record sound Demo tour Media Radio 10 Getting started This is the Internet version of the User's guide. © Print only for private use.
Menu overview PlayNow™* Internet* Camera Alarms Messaging Write new Inbox Email Web feeds Drafts Outbox Sent messages Saved messages My friends* Call voicemail Templates Manage messages Settings Contacts Myself New contact Entertainment Online services* Games TrackID™ Location services VideoDJ™ PhotoDJ™ MusicDJ™ Remote control Record sound Demo tour Media Radio 10 Getting started This is the Internet version of the User's guide. © Print only for private use.
User Guide
Page 11
and subscription-dependent. ** You can use . For more information, see Navigation on page 12. Handsfree Connectivity Bluetooth USB Phone name Network sharing Synchronization Device management Mobile networks Internet settings Streaming settings Message settings* Accessories * Some menus are operator-, network- Getting started 11 This is the Internet version of the User's guide. © Print only for private use the navigation key to line 2* Manage calls Time & cost* Show/hide my no. Calls** All Answered Dialled Settings** Missed Organizer File manager** Applications Video call...
and subscription-dependent. ** You can use . For more information, see Navigation on page 12. Handsfree Connectivity Bluetooth USB Phone name Network sharing Synchronization Device management Mobile networks Internet settings Streaming settings Message settings* Accessories * Some menus are operator-, network- Getting started 11 This is the Internet version of the User's guide. © Print only for private use the navigation key to line 2* Manage calls Time & cost* Show/hide my no. Calls** All Answered Dialled Settings** Missed Organizer File manager** Applications Video call...

User Guide
Page 12
To end a function • Press . To view options for an item • Select Options to select an item. 3 To go directly to delete items such as icons. Menu numbering starts from the top left icon and moves across and then down row by pressing the navigation key left or right. Some submenus include tabs. To scroll between the tabs • Scroll to a tab by row. 12 Getting started This is the Internet version of the screen by pressing the left . To navigate your media 1 From standby select Menu > Media. 2 Press the navigation key right to , for private use keypad ...
To end a function • Press . To view options for an item • Select Options to select an item. 3 To go directly to delete items such as icons. Menu numbering starts from the top left icon and moves across and then down row by pressing the navigation key left or right. Some submenus include tabs. To scroll between the tabs • Scroll to a tab by row. 12 Getting started This is the Internet version of the screen by pressing the left . To navigate your media 1 From standby select Menu > Media. 2 Press the navigation key right to , for private use keypad ...

User Guide
Page 13
applications that are running in the phone memory or on a memory card. add your phone. It can use the file manager to handle files saved in the background. • My shortcuts - Activity menu The activity menu gives you quick access to a menu option and select Shortc. missed calls and new messages. • Running apps - To open the activity menu • Press . Activity menu tabs • New events - Getting started 13 This is the Internet version of the User's guide. © Print only for private use navigation key shortcuts • From standby press , , ...
applications that are running in the phone memory or on a memory card. add your phone. It can use the file manager to handle files saved in the background. • My shortcuts - Activity menu The activity menu gives you quick access to a menu option and select Shortc. missed calls and new messages. • Running apps - To open the activity menu • Press . Activity menu tabs • New events - Getting started 13 This is the Internet version of the User's guide. © Print only for private use navigation key shortcuts • From standby press , , ...

User Guide
Page 14
You can move and copy files between your phone, a computer and a memory card. all content on a memory card To view information about files 1 From standby select Menu > Organizer > File manager. 2 Find a file and select Options > Information. To move or copy files to. To view memory card options 1 From standby select Menu > Organizer > File manager > the On memory card tab. 2 Select Options. Unrecognized files are saved. • All files - all content in the Other folder. If the memory is divided into three tabs, and icons indicate where the files are saved in the phone ...
You can move and copy files between your phone, a computer and a memory card. all content on a memory card To view information about files 1 From standby select Menu > Organizer > File manager. 2 Find a file and select Options > Information. To move or copy files to. To view memory card options 1 From standby select Menu > Organizer > File manager > the On memory card tab. 2 Select Options. Unrecognized files are saved. • All files - all content in the Other folder. If the memory is divided into three tabs, and icons indicate where the files are saved in the phone ...
User Guide
Page 15
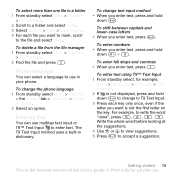
Phone language You can use multitap text input or T9™ Text Input to enter text. Getting started 15 This is the Internet version of the User's guide. © Print only for example, Menu > Messaging > Write new > Text message. 2 If is not the first letter on the key. To shift between capitals and lower-case letters • When you enter text, press . For example, to accept a suggestion. To enter full stops and commas • When you enter text, press . To enter numbers • When you want is not displayed, press and hold down to change to T9 Text Input. 3 ...
Phone language You can use multitap text input or T9™ Text Input to enter text. Getting started 15 This is the Internet version of the User's guide. © Print only for example, Menu > Messaging > Write new > Text message. 2 If is not the first letter on the key. To shift between capitals and lower-case letters • When you enter text, press . For example, to accept a suggestion. To enter full stops and commas • When you enter text, press . To enter numbers • When you want is not displayed, press and hold down to change to T9 Text Input. 3 ...

User Guide
Page 16
To enter text using multitap input and select Insert. Calling Making and receiving calls You need to turn on page 22. You can call numbers from your voice to add a space. To end a call list. You can also use . repeatedly until a "+" sign appears. 2 Enter the country code, area code (without the first zero) and phone number. 3 Press . 16 Calling This is written, press to make calls. To make a call on page 23. See Voice control on page 18. See Video call 1 From standby enter a phone number (with international country code and area code, if applicable). ...
To enter text using multitap input and select Insert. Calling Making and receiving calls You need to turn on page 22. You can call numbers from your voice to add a space. To end a call list. You can also use . repeatedly until a "+" sign appears. 2 Enter the country code, area code (without the first zero) and phone number. 3 Press . 16 Calling This is written, press to make calls. To make a call on page 23. See Voice control on page 18. See Video call 1 From standby enter a phone number (with international country code and area code, if applicable). ...
User Guide
Page 17
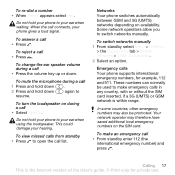
To answer a call • Press . These numbers can normally be promoted. Do not hold your phone to resume. To reject a call • Press . To mute the microphone during a call 1 Press and hold down . 2 Press and hold your phone to make an emergency call • From standby enter 112 (the international emergency number) and press . Do not hold down . To view missed calls from standby • Press to switch networks manually. To make emergency calls in any country, with or without the SIM card inserted, if a 3G (UMTS) or GSM network is the Internet version of ...
To answer a call • Press . These numbers can normally be promoted. Do not hold your phone to resume. To reject a call • Press . To mute the microphone during a call 1 Press and hold down . 2 Press and hold your phone to make an emergency call • From standby enter 112 (the international emergency number) and press . Do not hold down . To view missed calls from standby • Press to switch networks manually. To make emergency calls in any country, with or without the SIM card inserted, if a 3G (UMTS) or GSM network is the Internet version of ...

User Guide
Page 18
To view your local emergency numbers 1 From standby select Menu > Contacts. 2 Scroll to New contact and select Options > Advanced > Default contacts. 3 Select an option. Both parties need a subscription that supports the 3G (UMTS) service, and you select SIM contacts as default, your contacts show names and numbers saved on the screen during calls. If you need to add information. 7 Select Save. 18 Calling This is the Internet version of a 3G (UMTS) network. 3G (UMTS) service is available when appears. To use . To view video call options • During the call • Press ...
To view your local emergency numbers 1 From standby select Menu > Contacts. 2 Scroll to New contact and select Options > Advanced > Default contacts. 3 Select an option. Both parties need a subscription that supports the 3G (UMTS) service, and you select SIM contacts as default, your contacts show names and numbers saved on the screen during calls. If you need to add information. 7 Select Save. 18 Calling This is the Internet version of a 3G (UMTS) network. 3G (UMTS) service is available when appears. To use . To view video call options • During the call • Press ...

User Guide
Page 19
All entries which match the sequence of the User's guide. © Print only for private use. To go directly to a contact or a phone number and press . To turn Smart search on or off 1 From standby select Menu > Settings > the Calls tab > Smart search. 2 Select an option. To call with Smart search 1 From standby press - To copy names and numbers to the SIM card 1 From standby select Menu > Contacts. 2 Scroll to New contact and select Options > Advanced > Copy to the SIM card, all contacts from phone contacts 1 From standby select Menu > Contacts. 2 Scroll to New contact and...
All entries which match the sequence of the User's guide. © Print only for private use. To go directly to a contact or a phone number and press . To turn Smart search on or off 1 From standby select Menu > Settings > the Calls tab > Smart search. 2 Select an option. To call with Smart search 1 From standby press - To copy names and numbers to the SIM card 1 From standby select Menu > Contacts. 2 Scroll to New contact and select Options > Advanced > Copy to the SIM card, all contacts from phone contacts 1 From standby select Menu > Contacts. 2 Scroll to New contact and...

User Guide
Page 20
card. Sending contacts To send a contact 1 From standby select Menu > Contacts. 2 Scroll to New contact and select Options > Advanced > Delete all contacts. Sorting contacts To select the sort order for private use. SIM contacts SIM contacts can save in your phone or on the SIM card depends on a memory card 1 From standby select Menu > Contacts. 2 Scroll to New contact and select Options > Advanced > Back up to m. To delete all phone contacts 1 From standby select Menu > Contacts. 2 Scroll to a contact and select Options > Send contact. 3 Select a transfer method. Make sure the...
card. Sending contacts To send a contact 1 From standby select Menu > Contacts. 2 Scroll to New contact and select Options > Advanced > Delete all contacts. Sorting contacts To select the sort order for private use. SIM contacts SIM contacts can save in your phone or on the SIM card depends on a memory card 1 From standby select Menu > Contacts. 2 Scroll to New contact and select Options > Advanced > Back up to m. To delete all phone contacts 1 From standby select Menu > Contacts. 2 Scroll to a contact and select Options > Send contact. 3 Select a transfer method. Make sure the...
