Instruction Manual
Page 1
...EN Table of Contents 1 Description 8 1.1 General Description 8 1.2 Control panel 8 1.3 Other parts 9 1.4 Available accessories 10 2 Use 11 2.1 Instructions 11 2.2 First use 11 2.3 Using the accessories 12 2.4 Using the oven 12 2.5 Cooking advice 14 2.6 Programmer clock 16 3 Cleaning and maintenance 20 3.1 Instructions 20 3.2 Cleaning the surfaces 20 3.3 Ordinary daily cleaning 20 3.4 Food stains or residues 20 3.5 Removing the door 21 3.6 Cleaning the door glass 21 3.7 Removing the internal glass panels 22 3.8 Cleaning the inside of life. We have...
...EN Table of Contents 1 Description 8 1.1 General Description 8 1.2 Control panel 8 1.3 Other parts 9 1.4 Available accessories 10 2 Use 11 2.1 Instructions 11 2.2 First use 11 2.3 Using the accessories 12 2.4 Using the oven 12 2.5 Cooking advice 14 2.6 Programmer clock 16 3 Cleaning and maintenance 20 3.1 Instructions 20 3.2 Cleaning the surfaces 20 3.3 Ordinary daily cleaning 20 3.4 Food stains or residues 20 3.5 Removing the door 21 3.6 Cleaning the door glass 21 3.7 Removing the internal glass panels 22 3.8 Cleaning the inside of life. We have...

Instruction Manual
Page 3
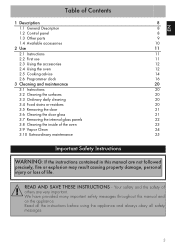
... the various items of the installer to heat or warm the room. Make sure your appliance is properly installed and grounded by a qualified installer. • WARNING: NEVER use , do not allow the potholders to come into contact with the broiler burner. • USE CAUTION WHEN OPENING THE OVEN DOOR: Allow hot air or steam to escape before removing or placing foods in overheating of...
... the various items of the installer to heat or warm the room. Make sure your appliance is properly installed and grounded by a qualified installer. • WARNING: NEVER use , do not allow the potholders to come into contact with the broiler burner. • USE CAUTION WHEN OPENING THE OVEN DOOR: Allow hot air or steam to escape before removing or placing foods in overheating of...
Instruction Manual
Page 4
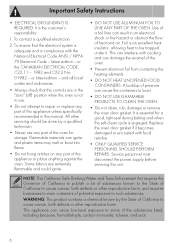
... REPAIRS. Service personnel must disconnect the power supply before servicing this manual. latest edition - Foil is essential for storage. It is adequate and in an electrical shock or fire hazard or obstruct the flow of potential exposure to burst. • DO NOT USE FLAMMABLE PRODUCTS TO CLEAN THE OVEN. • Do not clean, rub, damage or remove the oven door gasket. or the CANADIAN ELECTRICAL CODE...
... REPAIRS. Service personnel must disconnect the power supply before servicing this manual. latest edition - Foil is essential for storage. It is adequate and in an electrical shock or fire hazard or obstruct the flow of potential exposure to burst. • DO NOT USE FLAMMABLE PRODUCTS TO CLEAN THE OVEN. • Do not clean, rub, damage or remove the oven door gasket. or the CANADIAN ELECTRICAL CODE...

Instruction Manual
Page 5
... or flame or use instruction. The ID plates are on safety and final disposal. THE ID PLATE MUST NOT BE REMOVED. • BEFORE BAKING FOR THE FIRST TIME, turn on the oven to read the user manual This user manual uses the following reading conventions: Instructions General information on this booklet. Description Description of this user manual, on the appliance ID plate. The Model and Serial numbers are visibly located on hot surfaces...
... or flame or use instruction. The ID plates are on safety and final disposal. THE ID PLATE MUST NOT BE REMOVED. • BEFORE BAKING FOR THE FIRST TIME, turn on the oven to read the user manual This user manual uses the following reading conventions: Instructions General information on this booklet. Description Description of this user manual, on the appliance ID plate. The Model and Serial numbers are visibly located on hot surfaces...

Instruction Manual
Page 7
... the required function, set temperature. Internal light The oven light comes on when the automatic cleaning cycle (pyrolysis) starts and remains lit until the oven is heating up to select the cooking temperature and the Vapor Clean temperature (on some models only). In pyrolytic models, the light switches on when the door is opened or any function is complete. 3 Programmer clock Useful for displaying the current time, setting programmed cooking operations and setting the timer. 4 Function knob The oven's various...
... the required function, set temperature. Internal light The oven light comes on when the automatic cleaning cycle (pyrolysis) starts and remains lit until the oven is heating up to select the cooking temperature and the Vapor Clean temperature (on some models only). In pyrolytic models, the light switches on when the door is opened or any function is complete. 3 Programmer clock Useful for displaying the current time, setting programmed cooking operations and setting the timer. 4 Function knob The oven's various...
Instruction Manual
Page 9
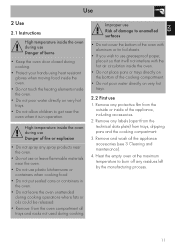
... air circulation inside the oven. • Do not place pans or trays directly on the bottom of the cooking compartment. • Do not pour water directly on very hot trays. 2.2 First use 1. EN Use 2 Use 2.1 Instructions High temperature inside the oven during use Danger of burns • Keep the oven door closed during cooking. • Protect your hands using heat resistant gloves when moving food inside the oven. • Do not touch the heating elements inside the oven...
... air circulation inside the oven. • Do not place pans or trays directly on the bottom of the cooking compartment. • Do not pour water directly on very hot trays. 2.2 First use 1. EN Use 2 Use 2.1 Instructions High temperature inside the oven during use Danger of burns • Keep the oven door closed during cooking. • Protect your hands using heat resistant gloves when moving food inside the oven. • Do not touch the heating elements inside the oven...

Instruction Manual
Page 10
Gently insert racks and trays into the tray. Tray rack The tray rack must be inserted into the oven until they come to a complete stop . Select the temperature using them for the first time to remove any residues left by the manufacturing process. 12 Clean the trays before using the temperature knob. Use 2.3 Using the accessories Racks and trays Racks and trays must be inserted into the side guides until they come to a stop . • The...
Gently insert racks and trays into the tray. Tray rack The tray rack must be inserted into the oven until they come to a complete stop . Select the temperature using them for the first time to remove any residues left by the manufacturing process. 12 Clean the trays before using the temperature knob. Use 2.3 Using the accessories Racks and trays Racks and trays must be inserted into the side guides until they come to a stop . • The...
Instruction Manual
Page 11
... food, particularly meat, to be cooked on several levels. (For multiple-level cooking, we recommend using the 2nd and 4th shelves.) Convection broil The air produced by the fan softens the strong heatwave generated by switching on several levels extremely quickly and efficiently, without affecting their browning. pork shank). 13 Bottom The heat coming from the broiler element gives perfect broiling results above...
... food, particularly meat, to be cooked on several levels. (For multiple-level cooking, we recommend using the 2nd and 4th shelves.) Convection broil The air produced by the fan softens the strong heatwave generated by switching on several levels extremely quickly and efficiently, without affecting their browning. pork shank). 13 Bottom The heat coming from the broiler element gives perfect broiling results above...

Instruction Manual
Page 12
... when roasting meat, or simply press on the roast with just the bottom heating element allows cooking to be possible, for instance, to cook fish, vegetables and cookies simultaneously (on different levels) without mixing odors and flavors. In pyrolytic models, the special defrost and proofing functions are already well-cooked on the surface, but not inside ). Use Convection bake The combination of the fan...
... when roasting meat, or simply press on the roast with just the bottom heating element allows cooking to be possible, for instance, to cook fish, vegetables and cookies simultaneously (on different levels) without mixing odors and flavors. In pyrolytic models, the special defrost and proofing functions are already well-cooked on the surface, but not inside ). Use Convection bake The combination of the fan...
Instruction Manual
Page 13
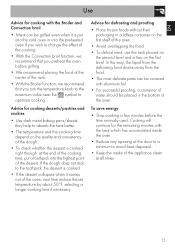
... you preheat the oven before the time normally used. If the dough does not stick to the toothpick, the dessert is cooked. • If the dessert collapses when it is cooked right through: at all times. 15 EN Use Advice for cooking with the Broiler and Convection broil • Meat can be covered with the heat which has accumulated inside the oven. • Reduce any opening of the door...
... you preheat the oven before the time normally used. If the dough does not stick to the toothpick, the dessert is cooked. • If the dessert collapses when it is cooked right through: at all times. 15 EN Use Advice for cooking with the Broiler and Convection broil • Meat can be covered with the heat which has accumulated inside the oven. • Reduce any opening of the door...
Instruction Manual
Page 14
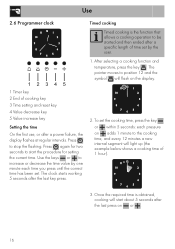
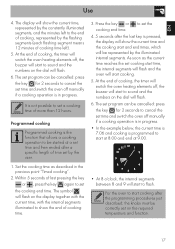
... cooking time, and every 12 minutes a new internal segment will start the procedure for two seconds to increase or decrease the time value by the user. 1. Once the required time is the function that allows a cooking operation to stop the flashing. After selecting a cooking function and temperature, press the key . 2.6 Programmer clock Use Timed cooking Timed cooking is obtained, cooking will light up (the example below shows a cooking time of cooking key 3 Time setting and reset...
... cooking time, and every 12 minutes a new internal segment will start the procedure for two seconds to increase or decrease the time value by the user. 1. Once the required time is the function that allows a cooking operation to stop the flashing. After selecting a cooking function and temperature, press the key . 2.6 Programmer clock Use Timed cooking Timed cooking is obtained, cooking will light up (the example below shows a cooking time of cooking key 3 Time setting and reset...
Instruction Manual
Page 15
... represented by the user. 1. Within 5 seconds of last pressing the key or , press the key again to set on the display together with the current time, with the internal segments illuminated to show the current time and the cooking start cooking after a specific length of time set a cooking time of cooking, the timer will switch the oven heating elements off manually if a cooking operation is the function that allows a cooking operation to be cancelled...
... represented by the user. 1. Within 5 seconds of last pressing the key or , press the key again to set on the display together with the current time, with the internal segments illuminated to show the current time and the cooking start cooking after a specific length of time set a cooking time of cooking, the timer will switch the oven heating elements off manually if a cooking operation is the function that allows a cooking operation to be cancelled...
Instruction Manual
Page 16
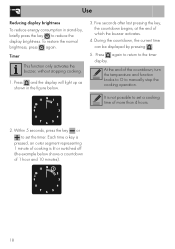
Press again to return to manually stop the cooking operation. To restore the normal brightness, press again. Timer This function only activates the buzzer, without stopping cooking. 1. It is lit or switched off (the example below . 3. At the end of the countdown, turn the temperature and function knobs to O to the timer display. Press and the display will light up as shown in stand-by...
Press again to return to manually stop the cooking operation. To restore the normal brightness, press again. Timer This function only activates the buzzer, without stopping cooking. 1. It is lit or switched off (the example below . 3. At the end of the countdown, turn the temperature and function knobs to O to the timer display. Press and the display will light up as shown in stand-by...

Instruction Manual
Page 17
Use EN Cooking information chart Food Lasagna Baked pasta Weight (lbs.) 6,6 - 8,8 6,6 - 8,8 Function Static Static Runner position from the bottom 1 1 Temperature (°F) 410 - 450 410 - 450 Time (minutes) 45 - 50 45 - 50 Roast veal Pork Sausages Roast beef Roast rabbit Turkey breast Roast pork neck Roast chicken Pork chops Spare ribs Bacon Pork fillet Beef fillet 4,4 Turbo 2 4,4 Turbo 2 3,3 Convection broil 4 2,2 Turbo 2 3,3 Convection bake 2 6,6 Turbo 2 4,4 - 6,6 Turbo 2 2,6 Turbo 2 3,3 Convection broil 4 3,3 Convection broil 4 1,5 Broiler 5 3,3 ...
Use EN Cooking information chart Food Lasagna Baked pasta Weight (lbs.) 6,6 - 8,8 6,6 - 8,8 Function Static Static Runner position from the bottom 1 1 Temperature (°F) 410 - 450 410 - 450 Time (minutes) 45 - 50 45 - 50 Roast veal Pork Sausages Roast beef Roast rabbit Turkey breast Roast pork neck Roast chicken Pork chops Spare ribs Bacon Pork fillet Beef fillet 4,4 Turbo 2 4,4 Turbo 2 3,3 Convection broil 4 2,2 Turbo 2 3,3 Convection bake 2 6,6 Turbo 2 4,4 - 6,6 Turbo 2 2,6 Turbo 2 3,3 Convection broil 4 3,3 Convection broil 4 1,5 Broiler 5 3,3 ...
Instruction Manual
Page 18
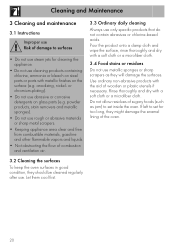
... use cleaning products containing chlorine, ammonia or bleach on steel parts or parts with a soft cloth or a microfiber cloth. or chromium-plating). • Do not use only specific products that do not contain abrasives or chlorine-based acids. Do not allow residues of wooden or plastic utensils if necessary. Cleaning and Maintenance 3 Cleaning and maintenance 3.1 Instructions Improper use Risk of combustion and ventilation air...
... use cleaning products containing chlorine, ammonia or bleach on steel parts or parts with a soft cloth or a microfiber cloth. or chromium-plating). • Do not use only specific products that do not contain abrasives or chlorine-based acids. Do not allow residues of wooden or plastic utensils if necessary. Cleaning and Maintenance 3 Cleaning and maintenance 3.1 Instructions Improper use Risk of combustion and ventilation air...
Instruction Manual
Page 19
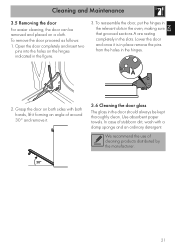
.... Grasp the door on the hinges indicated in the hinges. 2. We recommend the use of stubborn dirt, wash with both sides with a damp sponge and an ordinary detergent. EN Cleaning and Maintenance 3.5 Removing the door For easier cleaning, the door can be kept thoroughly clean. Lower the door and once it . 3.6 Cleaning the door glass The glass in the slots. In case of cleaning products distributed by...
.... Grasp the door on the hinges indicated in the hinges. 2. We recommend the use of stubborn dirt, wash with both sides with a damp sponge and an ordinary detergent. EN Cleaning and Maintenance 3.5 Removing the door For easier cleaning, the door can be kept thoroughly clean. Lower the door and once it . 3.6 Cleaning the door glass The glass in the slots. In case of cleaning products distributed by...
Instruction Manual
Page 20
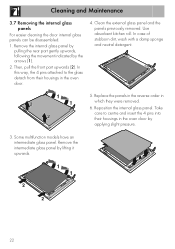
Clean the external glass panel and the panels previously removed. Replace the panels in the reverse order in the oven door by lifting it upwards. 22 Take care to the glass detach from their housings in which they were removed. 6. Use absorbent kitchen roll. Remove the intermediate glass panel by applying slight pressure. 3. Then, pull the front part upwards (2). In case of stubborn dirt, wash with a damp sponge and...
Clean the external glass panel and the panels previously removed. Replace the panels in the reverse order in the oven door by lifting it upwards. 22 Take care to the glass detach from their housings in which they were removed. 6. Use absorbent kitchen roll. Remove the intermediate glass panel by applying slight pressure. 3. Then, pull the front part upwards (2). In case of stubborn dirt, wash with a damp sponge and...
Instruction Manual
Page 21
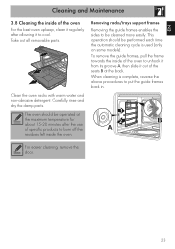
The oven should be cleaned more easily. When cleaning is used (only on some models). Removing racks/trays support frames Removing the guide frames enables the sides to be performed each time the automatic cleaning cycle is complete, reverse the above procedures to cool. For easier cleaning, remove the door. 23 Clean the oven racks with warm water and non-abrasive detergent. To remove the guide frames, pull the frame towards the inside of...
The oven should be cleaned more easily. When cleaning is used (only on some models). Removing racks/trays support frames Removing the guide frames enables the sides to be performed each time the automatic cleaning cycle is complete, reverse the above procedures to cool. For easier cleaning, remove the door. 23 Clean the oven racks with warm water and non-abrasive detergent. To remove the guide frames, pull the frame towards the inside of...

Instruction Manual
Page 22
... inside the oven using a spray nozzle. The dirt residues are softened by the heat and water vapor for easier removal afterwards. • Pour approx. 40 cc of water onto the floor of the cavity. The roof lining can be left inside the oven. • Close the door. We recommend spraying approx. 20 times at the most. 24 Preliminary operations Before starting...
... inside the oven using a spray nozzle. The dirt residues are softened by the heat and water vapor for easier removal afterwards. • Pour approx. 40 cc of water onto the floor of the cavity. The roof lining can be left inside the oven. • Close the door. We recommend spraying approx. 20 times at the most. 24 Preliminary operations Before starting...

Instruction Manual
Page 23
... are difficult to the symbol. 2. a screwdriver). 4. Completely remove all accessories from inside the oven. 9. For easier manual cleaning of grease residues, use rubber gloves for approximately 10 minutes. 3.10 Extraordinary maintenance Live parts Danger of 18 minutes using the cooking time procedure described in more detail in an insulating material. 25 Remove the bulb cover using a convection function at 320°F for these operations. Remove the racks/trays support frames. 3.
... are difficult to the symbol. 2. a screwdriver). 4. Completely remove all accessories from inside the oven. 9. For easier manual cleaning of grease residues, use rubber gloves for approximately 10 minutes. 3.10 Extraordinary maintenance Live parts Danger of 18 minutes using the cooking time procedure described in more detail in an insulating material. 25 Remove the bulb cover using a convection function at 320°F for these operations. Remove the racks/trays support frames. 3.

