User Manual
Page 2
... appliance to the nearest authorized dealer or service center for household use as described in the needle area, such as threading needle, changing needle, threading bobbin, or changing presser foot, and the like. 10. Special care is 75dB(A). 17. Switch the sewing machine off ("O") when making any other user servicing adjustments...
... appliance to the nearest authorized dealer or service center for household use as described in the needle area, such as threading needle, changing needle, threading bobbin, or changing presser foot, and the like. 10. Special care is 75dB(A). 17. Switch the sewing machine off ("O") when making any other user servicing adjustments...

User Manual
Page 6
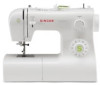
......2/4 Connecting Machine to Power Source ...6 Two Step Presser Foot Lifter...8 Accessories ...9 Threading the Machine Winding the Bobbin ...11 Inserting the Bobbin ...13 Thread Tension ...15 Threading the Upper Thread ...17 Automatic Needle Threader ...19 Raising the Bobbin Thread...21 Sewing How to Choose Your Pattern...23 Stitch Width Dial & Stitch Length Dial ...25...
......2/4 Connecting Machine to Power Source ...6 Two Step Presser Foot Lifter...8 Accessories ...9 Threading the Machine Winding the Bobbin ...11 Inserting the Bobbin ...13 Thread Tension ...15 Threading the Upper Thread ...17 Automatic Needle Threader ...19 Raising the Bobbin Thread...21 Sewing How to Choose Your Pattern...23 Stitch Width Dial & Stitch Length Dial ...25...

User Manual
Page 9
Thread cutter 4. Presser foot 5. Reverse sewing lever 8. Stitch length dial 11. Needle plate 6. One step buttonhole lever 13. Thread take-up lever 3. Automatic threader 1 7 8 9 2 10 3 PUSH 4 11 5 6 12 PUSH 13 2 Removable extension table/ accessory storage 7. Stitch width dial 10. Pattern selector dial 12. GB Principal Parts of the Machine 1. Bobbin stopper 9. Thread tension dial 2.
Thread cutter 4. Presser foot 5. Reverse sewing lever 8. Stitch length dial 11. Needle plate 6. One step buttonhole lever 13. Thread take-up lever 3. Automatic threader 1 7 8 9 2 10 3 PUSH 4 11 5 6 12 PUSH 13 2 Removable extension table/ accessory storage 7. Stitch width dial 10. Pattern selector dial 12. GB Principal Parts of the Machine 1. Bobbin stopper 9. Thread tension dial 2.

User Manual
Page 11
Hole for second spool pin 14 20 17. Power and light switch 21 19. Power cord 18 19 25 26 4 Bobbin winding spindle 16. Main plug socket 16 22 20. Bobbin thread guide 17 23 21. Presser foot lifter 25. Handwheel 15 18. Face plate 23. Foot speed control 26. Handle 24. Upper thread guide 24 22. Horizontal spool pin 15. GB Principal Parts of the Machine 14.
Hole for second spool pin 14 20 17. Power and light switch 21 19. Power cord 18 19 25 26 4 Bobbin winding spindle 16. Main plug socket 16 22 20. Bobbin thread guide 17 23 21. Presser foot lifter 25. Handwheel 15 18. Face plate 23. Foot speed control 26. Handle 24. Upper thread guide 24 22. Horizontal spool pin 15. GB Principal Parts of the Machine 14.

User Manual
Page 16
... foot e. L-screwdriver k. Overcasting foot o. Blind hem foot r. Gathering foot t. Edge/ quilting guide g. Pack of needles h. Satin stitch foot n. Cording foot q. Zipper foot c. Seam ripper/ brush f. Bobbin (3x) j. Quilting/ straight stitch foot u. GB Accessories Standard accessories (1) a. Darning/ embroidery foot s.
... foot e. L-screwdriver k. Overcasting foot o. Blind hem foot r. Gathering foot t. Edge/ quilting guide g. Pack of needles h. Satin stitch foot n. Cording foot q. Zipper foot c. Seam ripper/ brush f. Bobbin (3x) j. Quilting/ straight stitch foot u. GB Accessories Standard accessories (1) a. Darning/ embroidery foot s.

User Manual
Page 18
...10 Cut thread. (9) - Wind thread counterclockwise around bobbin winder tension discs. (4) - Push bobbin spindle to right. (6) 1 - Hold thread end. (7) 2 - Step on to the left (10) and remove. 4 Please Note: When the bobbin winder spindle is in "bobbin winding" position, the machine will not sew and the... hand wheel will not turn. To start sewing, push the bobbin winder spindle to spool pin. (1/2) - Thread bobbin as illustrated and place on spindle. (5)...
...10 Cut thread. (9) - Wind thread counterclockwise around bobbin winder tension discs. (4) - Push bobbin spindle to right. (6) 1 - Hold thread end. (7) 2 - Step on to the left (10) and remove. 4 Please Note: When the bobbin winder spindle is in "bobbin winding" position, the machine will not sew and the... hand wheel will not turn. To start sewing, push the bobbin winder spindle to spool pin. (1/2) - Thread bobbin as illustrated and place on spindle. (5)...

User Manual
Page 20
... tab (a) and remove the bobbin case. (2) - Insert the bobbin so that the thread runs in a clockwise direction (arrow). (3) 1 - Pull the thread through the slit and under the finger. (4) Leave a 6 inch tail of thread. - ...Remove the extension table, then open the hinged cover. (1) - Insert it into the shuttle. (6) Attention: 3 Turn power switch to off ("O") before inserting or removing the bobbin. 6 13 a 2 4 5 GB Inserting the Bobbin When inserting or removing the bobbin, the needle must be fully raised. - Hold the bobbin case by the hinged latch. (5) - Hold the...
... tab (a) and remove the bobbin case. (2) - Insert the bobbin so that the thread runs in a clockwise direction (arrow). (3) 1 - Pull the thread through the slit and under the finger. (4) Leave a 6 inch tail of thread. - ...Remove the extension table, then open the hinged cover. (1) - Insert it into the shuttle. (6) Attention: 3 Turn power switch to off ("O") before inserting or removing the bobbin. 6 13 a 2 4 5 GB Inserting the Bobbin When inserting or removing the bobbin, the needle must be fully raised. - Hold the bobbin case by the hinged latch. (5) - Hold the...

User Manual
Page 22
A. B. Lower thread tension To test the bobbin thread tension, remove the bobbin case and bobbin and hold it by suspending it does not unwind at all sewing will unwind 1 2 by the thread. Jerk it will always obtain a nicer stitch and ...less fabric puckering when the upper thread appears on the bottom side of the bobbin case. For zig zag and decorative sewing stitch functions, thread tension should generally be between "3" and "5". - If the tension is important to good sewing. - There...
A. B. Lower thread tension To test the bobbin thread tension, remove the bobbin case and bobbin and hold it by suspending it does not unwind at all sewing will unwind 1 2 by the thread. Jerk it will always obtain a nicer stitch and ...less fabric puckering when the upper thread appears on the bottom side of the bobbin case. For zig zag and decorative sewing stitch functions, thread tension should generally be between "3" and "5". - If the tension is important to good sewing. - There...

User Manual
Page 28
Turn the handwheel (1) towards you (counterclockwise) lowering, then raising needle. Note: If it is difficult to raise the bobbin thread, check to make sure the thread is not trapped by the hinged cover or the Removable Extension Table. 1 Gently pull on the upper thread to bring the bobbin thread up through the needle plate hole. (2) Lay both threads to the back under the presser foot. (3) 2 3 21 GB Raising the Bobbin Thread Hold the upper thread with the left hand.
Turn the handwheel (1) towards you (counterclockwise) lowering, then raising needle. Note: If it is difficult to raise the bobbin thread, check to make sure the thread is not trapped by the hinged cover or the Removable Extension Table. 1 Gently pull on the upper thread to bring the bobbin thread up through the needle plate hole. (2) Lay both threads to the back under the presser foot. (3) 2 3 21 GB Raising the Bobbin Thread Hold the upper thread with the left hand.

User Manual
Page 59
...The machine is damaged. 2. Needle/ fabric/ thread combination is noisy The machine jams Cause Correction 1. Select a finer needle. 2. Remove bobbin case, thread and insert correctly. 3. Poor quality oil has been used . 4. Replace the needle. GB Troubleshooting Guide Problem Upper thread ... damaged. 3. Insert the needle correctly. (flat side towards the back) 3. Choose a needle to suit the thread and fabric. 4. The bobbin case is incorrectly adjusted. 3. Correct the thread tension. 1. The stitch length is not correctly threaded. 3. Select a better quality thread. ...
...The machine is damaged. 2. Needle/ fabric/ thread combination is noisy The machine jams Cause Correction 1. Select a finer needle. 2. Remove bobbin case, thread and insert correctly. 3. Poor quality oil has been used . 4. Replace the needle. GB Troubleshooting Guide Problem Upper thread ... damaged. 3. Insert the needle correctly. (flat side towards the back) 3. Choose a needle to suit the thread and fabric. 4. The bobbin case is incorrectly adjusted. 3. Correct the thread tension. 1. The stitch length is not correctly threaded. 3. Select a better quality thread. ...

2277 Stitch Applications Guide
Page 4
... tension. For more . Cut a fabric strip wide enough to achieve various types of this same method, or try using a Gathering Foot (additional accessory). Pull the bobbin threads to create fullness. Use a Zipper Foot (additional accessory for some machine models). There is creating a series of small folds, used to gather the fabric...
... tension. For more . Cut a fabric strip wide enough to achieve various types of this same method, or try using a Gathering Foot (additional accessory). Pull the bobbin threads to create fullness. Use a Zipper Foot (additional accessory for some machine models). There is creating a series of small folds, used to gather the fabric...

2277 Stitch Applications Guide
Page 17
... look you are using, and stabilizer to help prevent skipped stitches on medium to heavy weight stretch fabrics. Learn more about needles on the SINGER website. Be sure to use a needle that is stronger than a regular straight stitch becuase it 's a good choice for seams on stretch...of stretch fabrics. Use this stitch to embellish your sewing projects with a single row, multiple rows, or even in the needle and bobbin, as regular allpurpose thread is too thick and will stretch with the fabric when the fabric is stronger than a regular straight stitch becuase...
... look you are using, and stabilizer to help prevent skipped stitches on medium to heavy weight stretch fabrics. Learn more about needles on the SINGER website. Be sure to use a needle that is stronger than a regular straight stitch becuase it 's a good choice for seams on stretch...of stretch fabrics. Use this stitch to embellish your sewing projects with a single row, multiple rows, or even in the needle and bobbin, as regular allpurpose thread is too thick and will stretch with the fabric when the fabric is stronger than a regular straight stitch becuase...


