Instruction Manual 4
Page 4
...16 Recommended settings (model 160) 17 Recommended settings (model 140) 18 Starting to sew 19 Finishing a seam 20 Straight stitching 21 Zigzag stitching 21 Overcasting 22 Reinforced straight stitching 22 Blind stitch hemming 23-24 Zipper insertion 25 Sewing on buttons 26 Bidging ...bobbin case 8 Inserting bobbin case 9 Threading upper thread, Threading for twin needle 10 Bringing up the bobbn thread 11 Changing sewing direction (turning corners) 12 Changing presser foot 12 Thread tension 13 Presser foot pressure 14 Stitch length, Stitch width 14 Drop...
...16 Recommended settings (model 160) 17 Recommended settings (model 140) 18 Starting to sew 19 Finishing a seam 20 Straight stitching 21 Zigzag stitching 21 Overcasting 22 Reinforced straight stitching 22 Blind stitch hemming 23-24 Zipper insertion 25 Sewing on buttons 26 Bidging ...bobbin case 8 Inserting bobbin case 9 Threading upper thread, Threading for twin needle 10 Bringing up the bobbn thread 11 Changing sewing direction (turning corners) 12 Changing presser foot 12 Thread tension 13 Presser foot pressure 14 Stitch length, Stitch width 14 Drop...
Instruction Manual 4
Page 17
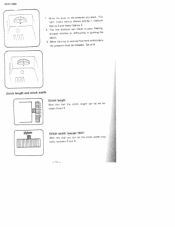
When darnrng or sewing freehand embroidery the pressure must be tween 0 and 4. Set at 0. 0 Stitch length and stitch width LI Stitch length With this dial you want. id - Too ow pressure can set be released. LI Stitch width (model 160) With this dial the stitch length can be set the stitch width step lessly between 0 and 4. - Move the lever to the pressure you can result in poor feeding, skipped stitches or difficulties in guiding the fabric. 3. For hght, elastic tabrcs choose setting 1, medium fabrics 2 and heavy fabrics 3. 2. I0 1. 02/01/2008 -h -
When darnrng or sewing freehand embroidery the pressure must be tween 0 and 4. Set at 0. 0 Stitch length and stitch width LI Stitch length With this dial you want. id - Too ow pressure can set be released. LI Stitch width (model 160) With this dial the stitch length can be set the stitch width step lessly between 0 and 4. - Move the lever to the pressure you can result in poor feeding, skipped stitches or difficulties in guiding the fabric. 3. For hght, elastic tabrcs choose setting 1, medium fabrics 2 and heavy fabrics 3. 2. I0 1. 02/01/2008 -h -
Instruction Manual 4
Page 30
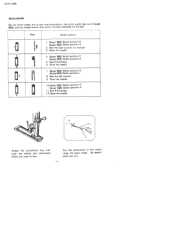
...the centre using the seam ripper. Sew the left column 9. Sew 5-6 stitches 6. Raise the needle 2 4. Be careful when you start to sew. 02/01/2008 Buttonholes Set the stitch length dial as per recommendation, the stitch width dial on 4 (rrdel 160> and the thread tension dial within ...the area indicated on the dial. Model 160 Select position C Model 140 Select position H 5. Raise...
...the centre using the seam ripper. Sew the left column 9. Sew 5-6 stitches 6. Raise the needle 2 4. Be careful when you start to sew. 02/01/2008 Buttonholes Set the stitch length dial as per recommendation, the stitch width dial on 4 (rrdel 160> and the thread tension dial within ...the area indicated on the dial. Model 160 Select position C Model 140 Select position H 5. Raise...


