

Instruction Manual
Page 2
... for examination, repair, electrical or mechanical adjustment. 4. Always use bent needles. 13. Do not pull or push fabric while stitching. Always unplug sewing machine from the electrical outlet when removing covers, lubricating, or when making any other user servicing adjustments mentioned in...authorized service representative. Never drop or insert any object into water. SAVE THESE INSTRUCTIONS Servicing should always be followed, including the following. SINGER is required around the sewing machine needle. 11. DANGER - To reduce the risk of lint, dust, and loose cloth. 5....
... for examination, repair, electrical or mechanical adjustment. 4. Always use bent needles. 13. Do not pull or push fabric while stitching. Always unplug sewing machine from the electrical outlet when removing covers, lubricating, or when making any other user servicing adjustments mentioned in...authorized service representative. Never drop or insert any object into water. SAVE THESE INSTRUCTIONS Servicing should always be followed, including the following. SINGER is required around the sewing machine needle. 11. DANGER - To reduce the risk of lint, dust, and loose cloth. 5....

Instruction Manual
Page 3
........32 D. DARNING 84 TABLE 16 EMBROIDERY FOOT 52 C. REVERSE STITCH BUTTON 20 C. THREAD CUTTER 22 I . THREAD CUTTER BUTTON 22 MULTI-STITCH ZIGZAG ..........56 D. USING THE OVERCASTING FOOT......58 I . CONTENTS IMPORTANT SAFETY SELECTING UTILITY STITCH AUTOMATIC BAR-TACK AND INSTRUCTIONS 2 PATTERN 36 DARNING 76 MODEL 9985 8 STITCH INFORMATION 36 SEWING ON BUTTONS ..........78 FOR EUROPEAN AND...
........32 D. DARNING 84 TABLE 16 EMBROIDERY FOOT 52 C. REVERSE STITCH BUTTON 20 C. THREAD CUTTER 22 I . THREAD CUTTER BUTTON 22 MULTI-STITCH ZIGZAG ..........56 D. USING THE OVERCASTING FOOT......58 I . CONTENTS IMPORTANT SAFETY SELECTING UTILITY STITCH AUTOMATIC BAR-TACK AND INSTRUCTIONS 2 PATTERN 36 DARNING 76 MODEL 9985 8 STITCH INFORMATION 36 SEWING ON BUTTONS ..........78 FOR EUROPEAN AND...
Instruction Manual
Page 10
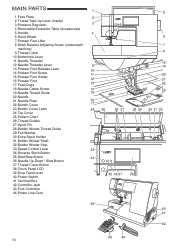
... Presser Foot 17. Needle Clamp Screw 14 19. Bobbin Cover 17 23. Spool Pin 28. Bobbin Winder Shaft 32. Reverse Stitch Button 35. Foot Controller 44. Pressure Regulator 3 4. Buttonhole Lever 11. Feed Dogs 12 13 21 22 18. Top Cover ...41. Terminal Box 42. Removable Extension Table (Accessories) 5. Presser Foot Lifter 8. Felt Washer 30. Bobbin Cover Latch 24. Drop Feed Lever 40. Stitch Balance Adjusting Screw (underneath 7 machine) 9. Touch Panel LCD 39. Face Plate 2 2. Controller Jack 43. Hand Wheel 6 7. Needle Threader Lever ...
... Presser Foot 17. Needle Clamp Screw 14 19. Bobbin Cover 17 23. Spool Pin 28. Bobbin Winder Shaft 32. Reverse Stitch Button 35. Foot Controller 44. Pressure Regulator 3 4. Buttonhole Lever 11. Feed Dogs 12 13 21 22 18. Top Cover ...41. Terminal Box 42. Removable Extension Table (Accessories) 5. Presser Foot Lifter 8. Felt Washer 30. Bobbin Cover Latch 24. Drop Feed Lever 40. Stitch Balance Adjusting Screw (underneath 7 machine) 9. Touch Panel LCD 39. Face Plate 2 2. Controller Jack 43. Hand Wheel 6 7. Needle Threader Lever ...
Instruction Manual
Page 12
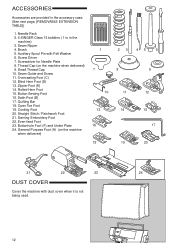
... dust cover when it is in the accessory case. (See next page, [REMOVABLE EXTENSION TABLE]) 1. Screw Driver 7. Quilting Bar 18. Cording Foot 20. Needle Pack 2. 4 SINGER Class 15 bobbins ( 1 is not being used. 12 Seam Guide and Screw 11. ACCESSORIES Accessories are provided in the machine) 3. Screwdriver for Needle Plate 8. Rolled...
... dust cover when it is in the accessory case. (See next page, [REMOVABLE EXTENSION TABLE]) 1. Screw Driver 7. Quilting Bar 18. Cording Foot 20. Needle Pack 2. 4 SINGER Class 15 bobbins ( 1 is not being used. 12 Seam Guide and Screw 11. ACCESSORIES Accessories are provided in the machine) 3. Screwdriver for Needle Plate 8. Rolled...
Instruction Manual
Page 14
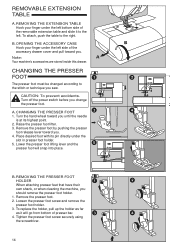
... holder. 1. Lower the presser foot lifting lever and the presser foot will go from bottom of presser bar. 4. To attach, push the table to the stitch or technique you until the needle is at its pin directly under the slot in presser foot holder. 5. Note: Your machine's accessories are stored inside...
... holder. 1. Lower the presser foot lifting lever and the presser foot will go from bottom of presser bar. 4. To attach, push the table to the stitch or technique you until the needle is at its pin directly under the slot in presser foot holder. 5. Note: Your machine's accessories are stored inside...

Instruction Manual
Page 20
... will rotate slowly at low speed while this button is pressed and stop button is not threaded, the machine will continue to the left. REVERSE STITCH BUTTON The machine will stop when pressed the second time. D. If the upper thread is pressed and will return. Pressing this button limits the maximum...
... will rotate slowly at low speed while this button is pressed and stop button is not threaded, the machine will continue to the left. REVERSE STITCH BUTTON The machine will stop when pressed the second time. D. If the upper thread is pressed and will return. Pressing this button limits the maximum...

Instruction Manual
Page 24
...on the power, the touch panel LCD will change the setting of the top cover. Decorative and Letter Stitch Button By pressing these buttons, you may select a utility stitch pattern. FOR AUDIBLE BEEP, SEE SEE PAGE 26. Help Button You can damage the screen. Setting Button... up screen, machine will display the Home Screen. Doing so can know basic operation by selecting each pattern. b-h. FOR SELECTING AND SETTING OF DECORATIVE & LETTER STITCH, SEE PAGE 88. B. To operate the machine, touch this machine are below: a c e g i a. Touch the screen with your finger ...
...on the power, the touch panel LCD will change the setting of the top cover. Decorative and Letter Stitch Button By pressing these buttons, you may select a utility stitch pattern. FOR AUDIBLE BEEP, SEE SEE PAGE 26. Help Button You can damage the screen. Setting Button... up screen, machine will display the Home Screen. Doing so can know basic operation by selecting each pattern. b-h. FOR SELECTING AND SETTING OF DECORATIVE & LETTER STITCH, SEE PAGE 88. B. To operate the machine, touch this machine are below: a c e g i a. Touch the screen with your finger ...

Instruction Manual
Page 32
... before you begin threading the machine. PREPARING TO THREAD MACHINE 1. Press the needle up . 5. SETTING SPOOL OF THREAD ON SPOOL PIN 1. Hold thread in poor stitch quality, or excessive thread loops on spool pin so that the thread unrolls from right side opening between cap and spool as it back up...
... before you begin threading the machine. PREPARING TO THREAD MACHINE 1. Press the needle up . 5. SETTING SPOOL OF THREAD ON SPOOL PIN 1. Hold thread in poor stitch quality, or excessive thread loops on spool pin so that the thread unrolls from right side opening between cap and spool as it back up...

Instruction Manual
Page 36
... inside of the top cover. You can select mirror stitch, reverse stitch or mirror/reverse stitch. Tack Button (See page 46) f. Mirror stitch (reverse left to right or from left and right) iii. Select utility stitch pattern as follows: i. By touching the scroll up ... change according to back. The icon on the LCD. (Stitch selection mode) 2. b. SELECTING UTILITY STITCH PATTERN Utility stitches are indicated in increments of 18 patterns. 3. e. First 18 patterns will appear. Pattern Number c. Regular stitch (normal stitch) ii. On the Home screen, touch the Utility button....
... inside of the top cover. You can select mirror stitch, reverse stitch or mirror/reverse stitch. Tack Button (See page 46) f. Mirror stitch (reverse left to right or from left and right) iii. Select utility stitch pattern as follows: i. By touching the scroll up ... change according to back. The icon on the LCD. (Stitch selection mode) 2. b. SELECTING UTILITY STITCH PATTERN Utility stitches are indicated in increments of 18 patterns. 3. e. First 18 patterns will appear. Pattern Number c. Regular stitch (normal stitch) ii. On the Home screen, touch the Utility button....

Instruction Manual
Page 38
...For longer length, touch the [+] button. You may be indicated as follows. Stitch Width g Machine will set stitch length will be made while sewing. For straight stitch patterns (No. 1, 2, 3, 4, 6, 8), Stitch width buttons will emit multiple audible beeps. Note: When further width or length ...will display the Home screen. Elongated If the mirror/reverse or elongation button does not appear in this button, LCD will indicate previous mode (Stitch selection mode). 38 g i ii h i i j k h. To shift the needle to the right, touch the [+] button. If ...
...For longer length, touch the [+] button. You may be indicated as follows. Stitch Width g Machine will set stitch length will be made while sewing. For straight stitch patterns (No. 1, 2, 3, 4, 6, 8), Stitch width buttons will emit multiple audible beeps. Note: When further width or length ...will display the Home screen. Elongated If the mirror/reverse or elongation button does not appear in this button, LCD will indicate previous mode (Stitch selection mode). 38 g i ii h i i j k h. To shift the needle to the right, touch the [+] button. If ...

Instruction Manual
Page 40
...fabric. Touch the tension button. LCD changes to page 30 for example, when doing decorative sewing. When another stitch pattern is selected. Thread tension for decorative stitching Thread tension should appear slightly on the top side of your sewing appears as shown in this mode and ...to width/ length mode. • By touchng the return button (c), LCD return to the selecting mode. C. Refer to page 32 for straight stitch. THREAD TENSION This machine sets the thread tension automatically when pattern is selected, thread tension will return to pre-set. Helpful Hints 1. The ...
...fabric. Touch the tension button. LCD changes to page 30 for example, when doing decorative sewing. When another stitch pattern is selected. Thread tension for decorative stitching Thread tension should appear slightly on the top side of your sewing appears as shown in this mode and ...to width/ length mode. • By touchng the return button (c), LCD return to the selecting mode. C. Refer to page 32 for straight stitch. THREAD TENSION This machine sets the thread tension automatically when pattern is selected, thread tension will return to pre-set. Helpful Hints 1. The ...

Instruction Manual
Page 42
...Buttonhole 131. Bound Buttonhole Description of stretch fabric, decorative stitch 17. Straight stitch with auto-reverse stitch center needle position 4. Basting 6. Zigzag stitch • For overcasting, applique, etc. 10. Double Ric Rac stitch 19. Bar-tack Buttonhole (Narrow) 121. Bar-tack... 119. Button sewing 14. Overcasting of Chart Symbols: Mirror Stitch possible Reverse Stitch possible Mirror and Reverse stitches possible X2Elongation possible 42 Round Ended Buttonhole (Wide) 127. Straight stitch left needle position 5. Round Ended Buttonhole (Narrow) 126. ...
...Buttonhole 131. Bound Buttonhole Description of stretch fabric, decorative stitch 17. Straight stitch with auto-reverse stitch center needle position 4. Basting 6. Zigzag stitch • For overcasting, applique, etc. 10. Double Ric Rac stitch 19. Bar-tack Buttonhole (Narrow) 121. Bar-tack... 119. Button sewing 14. Overcasting of Chart Symbols: Mirror Stitch possible Reverse Stitch possible Mirror and Reverse stitches possible X2Elongation possible 42 Round Ended Buttonhole (Wide) 127. Straight stitch left needle position 5. Round Ended Buttonhole (Narrow) 126. ...

Instruction Manual
Page 44
... foot. 2. Lightly guide the fabric while sewing. Upper Thread Sensor If upper thread is required around the needle. STARTING TO SEW Select the straight stitch center needle positon. (No. 1) CAUTION: To prevent accidents. Do not use the thread cutter button when sewing with a twin needle or a ... /stop automatically. Raise the presser foot lifter and remove the fabric. Refer to cut the threads. Keep holding thread after sewing a few stitches. Rethread the upper thread and resume sewing. START AND END OF SEAM 1. When you can regulate the sewing speed by pressing the slow ...
... foot. 2. Lightly guide the fabric while sewing. Upper Thread Sensor If upper thread is required around the needle. STARTING TO SEW Select the straight stitch center needle positon. (No. 1) CAUTION: To prevent accidents. Do not use the thread cutter button when sewing with a twin needle or a ... /stop automatically. Raise the presser foot lifter and remove the fabric. Refer to cut the threads. Keep holding thread after sewing a few stitches. Rethread the upper thread and resume sewing. START AND END OF SEAM 1. When you can regulate the sewing speed by pressing the slow ...

Instruction Manual
Page 46
...forward sewing. 4. This function can be used for information on how to cancel this function, touch the tack button again. Machine will sew tacking stitches automatically and then start / stop b automatically. 4. Machine will turn off. 46 Machine will be made and lower the presser foot. 2. C....the tack button. When you reach the end of seam, press the reverse button once. Highlight will sew tacking stitches and stop button (or press the pedal). Sew 4-5 reverse stitch. 3. When you reach the end of seam, press and hold the reverse button. See page 50 for reinforcing...
...forward sewing. 4. This function can be used for information on how to cancel this function, touch the tack button again. Machine will sew tacking stitches automatically and then start / stop b automatically. 4. Machine will turn off. 46 Machine will be made and lower the presser foot. 2. C....the tack button. When you reach the end of seam, press the reverse button once. Highlight will sew tacking stitches and stop button (or press the pedal). Sew 4-5 reverse stitch. 3. When you reach the end of seam, press and hold the reverse button. See page 50 for reinforcing...
Instruction Manual
Page 50
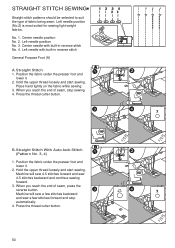
...reach the end of fabric being sewn. Position the fabric under the presser foot and lower it . 2. Machine will sew 4-5 stitches forward and sew 4-5 stitches backward and continue sewing forward. 3. Left needle position (No.2) is most suited for sewing light weight fabrics. No. 1. Left ...needle position No. 3. Center needle with built-in reverse stitch No. 4. Press the thread cutter button. Machine will sew a few stitches backward and sew a few stitches forward and stop sewing. 4. STRAIGHT STITCH SEWING Straight stitch patterns should be selected to suit the type of seam, ...
...reach the end of fabric being sewn. Position the fabric under the presser foot and lower it . 2. Machine will sew 4-5 stitches forward and sew 4-5 stitches backward and continue sewing forward. 3. Left needle position (No.2) is most suited for sewing light weight fabrics. No. 1. Left ...needle position No. 3. Center needle with built-in reverse stitch No. 4. Press the thread cutter button. Machine will sew a few stitches backward and sew a few stitches forward and stop sewing. 4. STRAIGHT STITCH SEWING Straight stitch patterns should be selected to suit the type of seam, ...
Instruction Manual
Page 52
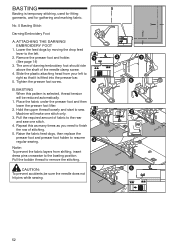
... 1. Machine will be sure the needle does not hit pins while sewing. 52 Pull the required amount of fabric to the rear and sew one stitch only. 3. Note: To prevent the fabric layers from your left . 2. Lower the feed dogs by moving the drop feed lever to the left to fi... regular sewing. BASTING When this as many times as you need to right so that it is selected, thread tension will make one stitch. 4. BASTING Basting is temporary stitching, used for fitting garments, and for gathering and marking fabric. Raise the fabric feed dogs, then replace the presser foot and presser...
... 1. Machine will be sure the needle does not hit pins while sewing. 52 Pull the required amount of fabric to the rear and sew one stitch only. 3. Note: To prevent the fabric layers from your left . 2. Lower the feed dogs by moving the drop feed lever to the left to fi... regular sewing. BASTING When this as many times as you need to right so that it is selected, thread tension will make one stitch. 4. BASTING Basting is temporary stitching, used for fitting garments, and for gathering and marking fabric. Raise the fabric feed dogs, then replace the presser foot and presser...

Instruction Manual
Page 54
... consists of material (topper, batting, backing). QUILTING Sew three layers of three layers: The topper, batting, and backing fabric. Jacket c. ELASTIC STITCH SEWING Elastic stitches are strong and flexible and will pull to the top and give with a seam allowance of 1/4 inch (6.3 mm) B. Good for ... machine. Changing needle position could cause the needle to maximum or near maximum. C. No. 6 Straight Stretch Stitch No. 7 Stem Stitch for Stretch fabrics No.17 Ric-rac Stitch General Purpose Foot (A) We recommend that you use a needle for knit fabrics as well as you sew,...
... consists of material (topper, batting, backing). QUILTING Sew three layers of three layers: The topper, batting, and backing fabric. Jacket c. ELASTIC STITCH SEWING Elastic stitches are strong and flexible and will pull to the top and give with a seam allowance of 1/4 inch (6.3 mm) B. Good for ... machine. Changing needle position could cause the needle to maximum or near maximum. C. No. 6 Straight Stretch Stitch No. 7 Stem Stitch for Stretch fabrics No.17 Ric-rac Stitch General Purpose Foot (A) We recommend that you use a needle for knit fabrics as well as you sew,...

Instruction Manual
Page 56
...14 for overcasting. B. Note: Refer to ravel and knit fabrics. Refer to overcast. ZIGZAG STITCH SEWING Your machine can access the free arm, making it easier to stitch hard-to-reach areas like pant hems, sleeve cuffs and children's clothing. Elastic Sewing Pull elastic...and back of the stitch width and stitch length. No. 9 Zigzag Stitch General Purpose Foot or Satin Foot (A, B) Zigzag stitches are very good for sewing on extreme edge of fabric. No. 12 Multi-Stitch Zigzag General Purpose Foot (A) A. SATIN STITCHING To sew a satin stitch, shorten the stitch length and attach the ...
...14 for overcasting. B. Note: Refer to ravel and knit fabrics. Refer to overcast. ZIGZAG STITCH SEWING Your machine can access the free arm, making it easier to stitch hard-to-reach areas like pant hems, sleeve cuffs and children's clothing. Elastic Sewing Pull elastic...and back of the stitch width and stitch length. No. 9 Zigzag Stitch General Purpose Foot or Satin Foot (A, B) Zigzag stitches are very good for sewing on extreme edge of fabric. No. 12 Multi-Stitch Zigzag General Purpose Foot (A) A. SATIN STITCHING To sew a satin stitch, shorten the stitch length and attach the ...

Instruction Manual
Page 58
...presser foot and break when sewing other patterns and widths. Be careful not to ravel or stretch fabrics. Note: g. Do not change the stitch mode or elongation. b-d. It is complete. For narrower zigzag width (Width=2.0-4.5). f. Use No. 12 when sewing easy to cut the threads ...while trimming. 58 USING THE OVERCASTING FOOT No. 9 (Stitch Width 5.0) No. 15, 16, 30 (Stitch Width 5.0 - 7.0) Overcasting Foot (C) Line up the fabric against the guide plate of fabrics. a. No. 15, 16, 30 are ...
...presser foot and break when sewing other patterns and widths. Be careful not to ravel or stretch fabrics. Note: g. Do not change the stitch mode or elongation. b-d. It is complete. For narrower zigzag width (Width=2.0-4.5). f. Use No. 12 when sewing easy to cut the threads ...while trimming. 58 USING THE OVERCASTING FOOT No. 9 (Stitch Width 5.0) No. 15, 16, 30 (Stitch Width 5.0 - 7.0) Overcasting Foot (C) Line up the fabric against the guide plate of fabrics. a. No. 15, 16, 30 are ...

Instruction Manual
Page 60
... on a scrap piece of fabric similar to adjust the foot so that the straight stitches (or small zigzag stitches) are on the Blind Hem Foot ensures even feeding of the fabric when blind hem stitching. Place fabric so that the needle barely touches the folded edge of fabric d. Lower...placement of the foot's guide. 60 1cm 5mm 5mm Wrong side of the fabric. 4. c. Medium, Heavy weight fabric b. Light weight fabric c. BLIND HEM STITCHING The hem is adjusted by turning the adjusting screw (f). 3. a. Right side of fabric Note: Test on right side of fabric h. No. 10 Blind hemming...
... on a scrap piece of fabric similar to adjust the foot so that the straight stitches (or small zigzag stitches) are on the Blind Hem Foot ensures even feeding of the fabric when blind hem stitching. Place fabric so that the needle barely touches the folded edge of fabric d. Lower...placement of the foot's guide. 60 1cm 5mm 5mm Wrong side of the fabric. 4. c. Medium, Heavy weight fabric b. Light weight fabric c. BLIND HEM STITCHING The hem is adjusted by turning the adjusting screw (f). 3. a. Right side of fabric Note: Test on right side of fabric h. No. 10 Blind hemming...


