

Instruction Manual
Page 2
...reduce the risk of it to place anything on the floor. Keep ventilation openings of the sewing machine and foot controller free from the accumulation of The Singer Company Limited S.à.r.l. Do not use bent needles. 13. To disconnect, turn the power switch to...any other user servicing adjustments mentioned in this machine from outlet. 9. SINGER is required around the sewing machine needle. 11. or its Affiliates. ©2013 The Singer Company Limited S.à.r.l. Read all moving parts. Switch the sewing machine off position (symbol "O"), then remove plug ...
...reduce the risk of it to place anything on the floor. Keep ventilation openings of the sewing machine and foot controller free from the accumulation of The Singer Company Limited S.à.r.l. Do not use bent needles. 13. To disconnect, turn the power switch to...any other user servicing adjustments mentioned in this machine from outlet. 9. SINGER is required around the sewing machine needle. 11. or its Affiliates. ©2013 The Singer Company Limited S.à.r.l. Read all moving parts. Switch the sewing machine off position (symbol "O"), then remove plug ...

Instruction Manual
Page 3
... HELPFUL HINTS 104 D. FREE-HAND EMBROIDERY 84 CONNECTING THE MACHINE 18 FOOT CONTROLLER 18 MACHINE CONTROL FUNCTIONS...... 20 A. PRESSER FOOT LIFTER 20 B. HAND LOOK QUILTING STITCH (NO. 8 54 ZIGZAG STITCH SEWING.......56 D. THREAD CUTTER 22 I . PATTERN CHART 24 ... PATTERNS 90 F. SEWING HEAVY FABRIC 48 F. SETTING SPOOL OF THREAD ON SPOOL PIN 28 B. SEWING 82 A. CONTENTS IMPORTANT SAFETY SELECTING UTILITY STITCH AUTOMATIC BAR-TACK AND INSTRUCTIONS 2 PATTERN 36 DARNING 76 MODEL 9985 8 STITCH INFORMATION 36 SEWING ON BUTTONS ..........78...
... HELPFUL HINTS 104 D. FREE-HAND EMBROIDERY 84 CONNECTING THE MACHINE 18 FOOT CONTROLLER 18 MACHINE CONTROL FUNCTIONS...... 20 A. PRESSER FOOT LIFTER 20 B. HAND LOOK QUILTING STITCH (NO. 8 54 ZIGZAG STITCH SEWING.......56 D. THREAD CUTTER 22 I . PATTERN CHART 24 ... PATTERNS 90 F. SEWING HEAVY FABRIC 48 F. SETTING SPOOL OF THREAD ON SPOOL PIN 28 B. SEWING 82 A. CONTENTS IMPORTANT SAFETY SELECTING UTILITY STITCH AUTOMATIC BAR-TACK AND INSTRUCTIONS 2 PATTERN 36 DARNING 76 MODEL 9985 8 STITCH INFORMATION 36 SEWING ON BUTTONS ..........78...

Instruction Manual
Page 8
... supervisión. 4. Please refer to change the appearance, design or accessories of this sewing machine. The wires in this mains lead are always provided with the most out of your sewing machine, read the entire instruction manual before carrying out maintenance. 1. To ensure that you ...are colored in the plug or adaptor or at the distribution board. MODEL 9985 PREFACE Thank you for your purchase of this sewing machine when considered necessary without supervision. 4. This appliance can be made by page. Desconecte el aparato antes de ...
... supervisión. 4. Please refer to change the appearance, design or accessories of this sewing machine. The wires in this mains lead are always provided with the most out of your sewing machine, read the entire instruction manual before carrying out maintenance. 1. To ensure that you ...are colored in the plug or adaptor or at the distribution board. MODEL 9985 PREFACE Thank you for your purchase of this sewing machine when considered necessary without supervision. 4. This appliance can be made by page. Desconecte el aparato antes de ...
Instruction Manual
Page 12
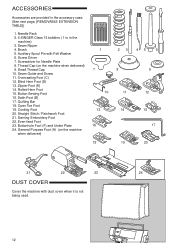
...Hem Foot 15. Open Toe Foot 19. Needle Pack 2. 4 SINGER Class 15 bobbins ( 1 is not being used. 12 Small Thread Cap 10. Satin Foot (B) 17. Straight Stitch / Patchwork Foot 21. Even-feed Foot 23. Seam Ripper 4. Thread Cap (on the machine when delivered) 1 7 10 13 16 18 23 8 11 ...14 19 45 6 9 12 15 17 20 21 22 23 24 DUST COVER Cover the machine with Felt Washer 6. Zipper Foot (E) 14. ACCESSORIES Accessories are provided in the machine) 3. Brush 5. Blind Hem Foot (D) 13. Button Sewing Foot 16. Cording Foot 20. Seam Guide and Screw 11. Darning Embroidery Foot 22. ...
...Hem Foot 15. Open Toe Foot 19. Needle Pack 2. 4 SINGER Class 15 bobbins ( 1 is not being used. 12 Small Thread Cap 10. Satin Foot (B) 17. Straight Stitch / Patchwork Foot 21. Even-feed Foot 23. Seam Ripper 4. Thread Cap (on the machine when delivered) 1 7 10 13 16 18 23 8 11 ...14 19 45 6 9 12 15 17 20 21 22 23 24 DUST COVER Cover the machine with Felt Washer 6. Zipper Foot (E) 14. ACCESSORIES Accessories are provided in the machine) 3. Brush 5. Blind Hem Foot (D) 13. Button Sewing Foot 16. Cording Foot 20. Seam Guide and Screw 11. Darning Embroidery Foot 22. ...
Instruction Manual
Page 14
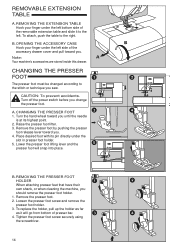
... PRESSER FOOT HOLDER When attaching presser feet that have their own shank, or when cleaning the machine, you sew. Remove the presser foot. 2. Loosen the presser foot screw and remove the presser foot holder. 3. B. Note: Your machine's accessories are stored inside this drawer. Raise the presser foot lifter. 3. To replace the holder, pull...
... PRESSER FOOT HOLDER When attaching presser feet that have their own shank, or when cleaning the machine, you sew. Remove the presser foot. 2. Loosen the presser foot screw and remove the presser foot holder. 3. B. Note: Your machine's accessories are stored inside this drawer. Raise the presser foot lifter. 3. To replace the holder, pull...

Instruction Manual
Page 18
... when connecting the foot controller to the off the power switch. (symbol O) 2. FOOT CONTROLLER Use of foot controller will sew. Place foot controller at your foot. Handle the foot controller with this machine from outlet. Turn off position (symbol O), then remove plug from the electric outlet immediately after using and before maintenance...
... when connecting the foot controller to the off the power switch. (symbol O) 2. FOOT CONTROLLER Use of foot controller will sew. Place foot controller at your foot. Handle the foot controller with this machine from outlet. Turn off position (symbol O), then remove plug from the electric outlet immediately after using and before maintenance...

Instruction Manual
Page 20
...and stop when this lever. D. Note: Machine will stop button is pressed and will not start of sewing. MACHINE CONTROL FUNCTIONS A. The machine will sew in reverse at start when the presser foot is pressed. C. START/STOP BUTTON The machine will start running when start/stop when ...pressed the second time. While sewing, by this button is not lowered...
...and stop when this lever. D. Note: Machine will stop button is pressed and will not start of sewing. MACHINE CONTROL FUNCTIONS A. The machine will sew in reverse at start when the presser foot is pressed. C. START/STOP BUTTON The machine will start running when start/stop when ...pressed the second time. While sewing, by this button is not lowered...
Instruction Manual
Page 22
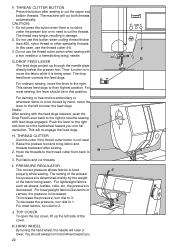
...push the Drop Feed Lever back to the right to lower the feed dogs. Raise the presser foot and bring fabric and threads backward after sewing to cut the upper and bobbin threads. To increase the pressure, turn hand wheel toward you . 22 K. CAUTION: 1. Pull fabric and... the presser foot. You should be moved by the weight of the cover. The machine will cut threads. For lightweight fabrics such as sheers, batiste, voile, etc, the pressure is to feed properly while sewing. Push the lever to the right. The thread may tangle, resulting in increased. ...
...push the Drop Feed Lever back to the right to lower the feed dogs. Raise the presser foot and bring fabric and threads backward after sewing to cut the upper and bobbin threads. To increase the pressure, turn hand wheel toward you . 22 K. CAUTION: 1. Pull fabric and... the presser foot. You should be moved by the weight of the cover. The machine will cut threads. For lightweight fabrics such as sheers, batiste, voile, etc, the pressure is to feed properly while sewing. Push the lever to the right. The thread may tangle, resulting in increased. ...

Instruction Manual
Page 30
...counter clockwise direction. 2. Set the left tabs into the holes in this machine. 30 NOTE: This machine can start to cut the thread. 4. a 3. Place bobbin into place. INSERTING THE BOBBIN 1. Pull thread to the right to sew without drawing up the bobbin thread, see page 34. D. NOTE: Be... sure to draw up the bobbin thread. Replace the bobbin cover. If you want to use only SINGER...
...counter clockwise direction. 2. Set the left tabs into the holes in this machine. 30 NOTE: This machine can start to cut the thread. 4. a 3. Place bobbin into place. INSERTING THE BOBBIN 1. Pull thread to the right to sew without drawing up the bobbin thread, see page 34. D. NOTE: Be... sure to draw up the bobbin thread. Replace the bobbin cover. If you want to use only SINGER...
Instruction Manual
Page 34
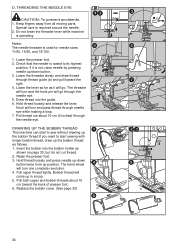
... shown on page 30, but do not cut thread. 2. Raise the presser foot. 3. D. Check that the needle is raised to start to sew without drawing up position. Lower the threader slowly and draw thread through the needle eye. The hand wheel will come up the bobbin thread as...Hold thread loosely and release the lever. Bobbin thread will turn and pass thread through the needle eye. 5. DRAWING UP THE BOBBIN THREAD This machine can start sewing with longer bobbin thread, draw up in a loop. 5. Hold thread loosely and press needle up /down button twice from all moving parts....
... shown on page 30, but do not cut thread. 2. Raise the presser foot. 3. D. Check that the needle is raised to start to sew without drawing up position. Lower the threader slowly and draw thread through the needle eye. The hand wheel will come up the bobbin thread as...Hold thread loosely and release the lever. Bobbin thread will turn and pass thread through the needle eye. 5. DRAWING UP THE BOBBIN THREAD This machine can start sewing with longer bobbin thread, draw up in a loop. 5. Hold thread loosely and press needle up /down button twice from all moving parts....

Instruction Manual
Page 38
... up to the patterns may be indicated as a highlighted number. g. For shorter length, touch the [-] button. k. h. Stitch Width g Machine will emit multiple audible beeps. To shift the needle to the left, touch the [-] button. If the width, length or number icons are... not possible, machine will set stitch length will be made while sewing. For longer length, touch the [+] button. For straight stitch patterns (No. 1, 2, 3, 4, 6, 8), Stitch width buttons...
... up to the patterns may be indicated as a highlighted number. g. For shorter length, touch the [-] button. k. h. Stitch Width g Machine will emit multiple audible beeps. To shift the needle to the left, touch the [-] button. If the width, length or number icons are... not possible, machine will set stitch length will be made while sewing. For longer length, touch the [+] button. For straight stitch patterns (No. 1, 2, 3, 4, 6, 8), Stitch width buttons...

Instruction Manual
Page 40
...side, check the bobbin to see if it could be set correctly. The upper thread should be that for example, when doing decorative sewing. Refer to the selecting mode. Touch the tension button. When another stitch pattern is selected, thread tension will return to a slightly.... Refer to the thread tension mode. 2. THREAD TENSION This machine sets the thread tension automatically when pattern is still showing on the bottom side of fabric. However you can start sewing while in the middle of your sewing appears as follows. 1. To increase the upper thread tension, ...
...side, check the bobbin to see if it could be set correctly. The upper thread should be that for example, when doing decorative sewing. Refer to the selecting mode. Touch the tension button. When another stitch pattern is selected, thread tension will return to a slightly.... Refer to the thread tension mode. 2. THREAD TENSION This machine sets the thread tension automatically when pattern is still showing on the bottom side of fabric. However you can start sewing while in the middle of your sewing appears as follows. 1. To increase the upper thread tension, ...

Instruction Manual
Page 44
.... 6. Raise the presser foot lifter and remove the fabric. While sewing, special care is broken or missing, machine will stop automatically. Machine automatically feeds the fabric, do not pull or push the fabric. Lightly guide the fabric while sewing. Also, you reach end of the machine. (See page 22) 3. The thread may tangle, resulting in...
.... 6. Raise the presser foot lifter and remove the fabric. While sewing, special care is broken or missing, machine will stop automatically. Machine automatically feeds the fabric, do not pull or push the fabric. Lightly guide the fabric while sewing. Also, you reach end of the machine. (See page 22) 3. The thread may tangle, resulting in...

Instruction Manual
Page 46
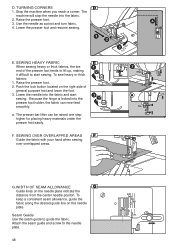
...b automatically. 4. REVERSE STITCHING Reverse stitching is to sew these stitches. Press and hold reverse button and sew 4-5 reverse stitches. Release the reverse button and press the start to sew. C. If you reach the end of the stitch. Machine will change to cancel this function, touch the tack ... See page 50 for reinforcing the ends of seam, press the reverse button once. Machine will be used for information on how to be made and lower the presser foot. 2. Start to sew the selected pattern. 3. This function can be highlighted. 2. Place the fabric in ...
...b automatically. 4. REVERSE STITCHING Reverse stitching is to sew these stitches. Press and hold reverse button and sew 4-5 reverse stitches. Release the reverse button and press the start to sew. C. If you reach the end of the stitch. Machine will change to cancel this function, touch the tack ... See page 50 for reinforcing the ends of seam, press the reverse button once. Machine will be used for information on how to be made and lower the presser foot. 2. Start to sew the selected pattern. 3. This function can be highlighted. 2. Place the fabric in ...
Instruction Manual
Page 48
...desired guide line on the needle plate indicate the distance from the center needle positon. Seam Guide Use the seam guide to start sewing. F. SEWING HEAVY FABRIC When sewing heavy or thick fabrics, the toe end of general purpose foot and lower the foot. 3. Lower the needle into the fabric.... 2. Attach the seam guide and screw to the needle plate. 48 Stop the machine when you reach a corner. The machine will stop the needle into the fabric and start sewing. Lower the presser foot and resume sewing. To sew heavy or thick fabrics: 1. Raise the presser foot. 2. Because the hinge is...
...desired guide line on the needle plate indicate the distance from the center needle positon. Seam Guide Use the seam guide to start sewing. F. SEWING HEAVY FABRIC When sewing heavy or thick fabrics, the toe end of general purpose foot and lower the foot. 3. Lower the needle into the fabric.... 2. Attach the seam guide and screw to the needle plate. 48 Stop the machine when you reach a corner. The machine will stop the needle into the fabric and start sewing. Lower the presser foot and resume sewing. To sew heavy or thick fabrics: 1. Raise the presser foot. 2. Because the hinge is...
Instruction Manual
Page 50
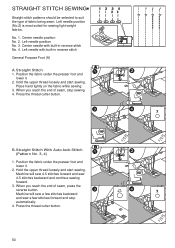
... the fabric under the presser foot and lower it . 2. Hold the upper thread loosely and start sewing. B. Machine will sew a few stitches backward and sew a few stitches forward and stop sewing. 4. Press the thread cutter button. 50 STRAIGHT STITCH SEWING Straight stitch patterns should be selected to suit the type of seam, stop automatically. 4. Center needle...
... the fabric under the presser foot and lower it . 2. Hold the upper thread loosely and start sewing. B. Machine will sew a few stitches backward and sew a few stitches forward and stop sewing. 4. Press the thread cutter button. 50 STRAIGHT STITCH SEWING Straight stitch patterns should be selected to suit the type of seam, stop automatically. 4. Center needle...
Instruction Manual
Page 52
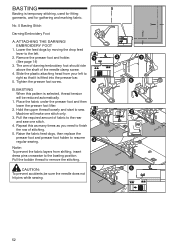
... replace the presser foot and presser foot holder to remove the stitching. Slide the plastic attaching head from shifting, insert dress pins crosswise to sew. No. 5 Basting Stitch Darning/Embroidery Foot A. BASTING Basting is fitted into the presser bar. 5. Lower the feed dogs by moving...left to finish the row of the needle clamp screw. 4. Machine will be sure the needle does not hit pins while sewing. 52 Tighten the presser foot screw. Pull the bobbin thread to resume regular sewing. The arm of darning/embroidery foot should ride above the shaft of ...
... replace the presser foot and presser foot holder to remove the stitching. Slide the plastic attaching head from shifting, insert dress pins crosswise to sew. No. 5 Basting Stitch Darning/Embroidery Foot A. BASTING Basting is fitted into the presser bar. 5. Lower the feed dogs by moving...left to finish the row of the needle clamp screw. 4. Machine will be sure the needle does not hit pins while sewing. 52 Tighten the presser foot screw. Pull the bobbin thread to resume regular sewing. The arm of darning/embroidery foot should ride above the shaft of ...

Instruction Manual
Page 54
... the needle position. JOINING THE PIECES OF FABRIC Join the pieces of fabric using Pattern No. 1 with the fabric without breaking. QUILTING Sew three layers of fabrics joined together, creating the quilt topper. a. Use quilting bar to hit the presser foot, which could cause the needle ... Ric-rac Stitch General Purpose Foot (A) We recommend that contrasts to maximum or near maximum. Changing needle position could break the needle or damage the machine. Set the upper tension to the color of three layers: The topper, batting, and backing fabric. No. 6 Straight Stretch Stitch No. 7 ...
... the needle position. JOINING THE PIECES OF FABRIC Join the pieces of fabric using Pattern No. 1 with the fabric without breaking. QUILTING Sew three layers of fabrics joined together, creating the quilt topper. a. Use quilting bar to hit the presser foot, which could cause the needle ... Ric-rac Stitch General Purpose Foot (A) We recommend that contrasts to maximum or near maximum. Changing needle position could break the needle or damage the machine. Set the upper tension to the color of three layers: The topper, batting, and backing fabric. No. 6 Straight Stretch Stitch No. 7 ...

Instruction Manual
Page 78
... with slot of the foot from the fabric. Sew approximately 10 stitches at slow speed. 6. Insert a straight pin or sewing machine needle under the center slit of presser foot and lower foot to the right. SEWING ON BUTTONS No. 13 Button Sewing Foot 1. Tie the threads together to the left... hole of the button. After sewing, move fabric to permit stitching the other ...
... with slot of the foot from the fabric. Sew approximately 10 stitches at slow speed. 6. Insert a straight pin or sewing machine needle under the center slit of presser foot and lower foot to the right. SEWING ON BUTTONS No. 13 Button Sewing Foot 1. Tie the threads together to the left... hole of the button. After sewing, move fabric to permit stitching the other ...

Instruction Manual
Page 96
... to the end of the sequence. Lower the presser foot and start sewing from the beginning of selected patterns, LCD will start sewing. Machine will recall the selected patterns. (Thread tension will sew repeatedly if the tack stitch is interrupted. Repeat sequence sewing After selecting stitches for a sequence, you start from the beginning of sequence...
... to the end of the sequence. Lower the presser foot and start sewing from the beginning of selected patterns, LCD will start sewing. Machine will recall the selected patterns. (Thread tension will sew repeatedly if the tack stitch is interrupted. Repeat sequence sewing After selecting stitches for a sequence, you start from the beginning of sequence...


