

Instruction Manual
Page 3
CONTENTS IMPORTANT SAFETY SELECTING UTILITY STITCH AUTOMATIC BAR-TACK AND INSTRUCTIONS 2 PATTERN 36 DARNING 76 MODEL 9985 8 STITCH INFORMATION 36 SEWING ON BUTTONS ..........78 FOR EUROPEAN AND SIMILAR THREAD TENSION 40 A. SINGLE CORDING 80 B. AUTO ... 100 CLEANING 100 MESSAGES ON LCD 102 C. THREADING THE UPPER THREAD.....32 D. TURNING CORNERS 48 A. INSERTING PATTERN 90 G. ATTACHING THE DARING/ EMBROIDERY FOOT 84 FABRIC, THREAD AND NEEDLE A. BASTING 52 ELASTIC STITCH SEWING .....54 QUILTING 54 A. DELETING PATTERNS 90 F. REVERSE STITCHING 46 A. WINDING...
CONTENTS IMPORTANT SAFETY SELECTING UTILITY STITCH AUTOMATIC BAR-TACK AND INSTRUCTIONS 2 PATTERN 36 DARNING 76 MODEL 9985 8 STITCH INFORMATION 36 SEWING ON BUTTONS ..........78 FOR EUROPEAN AND SIMILAR THREAD TENSION 40 A. SINGLE CORDING 80 B. AUTO ... 100 CLEANING 100 MESSAGES ON LCD 102 C. THREADING THE UPPER THREAD.....32 D. TURNING CORNERS 48 A. INSERTING PATTERN 90 G. ATTACHING THE DARING/ EMBROIDERY FOOT 84 FABRIC, THREAD AND NEEDLE A. BASTING 52 ELASTIC STITCH SEWING .....54 QUILTING 54 A. DELETING PATTERNS 90 F. REVERSE STITCHING 46 A. WINDING...
Instruction Manual
Page 12
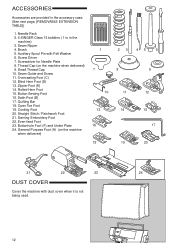
Seam Ripper 4. Screwdriver for Needle Plate 8. Zipper Foot (E) 14. Quilting Bar 18. Needle Pack 2. 4 SINGER Class 15 bobbins ( 1 is not being used. 12 Overcasting Foot (C) 12. Button Sewing Foot 16. Straight Stitch / Patchwork Foot 21. Auxiliary ... Hem Foot 15. Cording Foot 20. Even-feed Foot 23. Buttonhole Foot (F) and Under Plate 24. Satin Foot (B) 17. Open Toe Foot 19. Darning Embroidery Foot 22. General Purpose Foot (A) (on the machine when delivered) 9. ACCESSORIES Accessories are provided in the machine) 3. Seam Guide and Screw 11. Screw Driver...
Seam Ripper 4. Screwdriver for Needle Plate 8. Zipper Foot (E) 14. Quilting Bar 18. Needle Pack 2. 4 SINGER Class 15 bobbins ( 1 is not being used. 12 Overcasting Foot (C) 12. Button Sewing Foot 16. Straight Stitch / Patchwork Foot 21. Auxiliary ... Hem Foot 15. Cording Foot 20. Even-feed Foot 23. Buttonhole Foot (F) and Under Plate 24. Satin Foot (B) 17. Open Toe Foot 19. Darning Embroidery Foot 22. General Purpose Foot (A) (on the machine when delivered) 9. ACCESSORIES Accessories are provided in the machine) 3. Seam Guide and Screw 11. Screw Driver...
Instruction Manual
Page 22
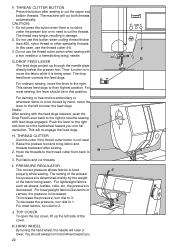
... to cut both threads automatically. HAND WHEEL By turning the hand wheel, the needle will re-engage the feed dogs. For darning or free motion embroidery or whenever fabric is determined mainly by hand, move the fabric while it is to the right and then turn the handwheel toward you one...
... to cut both threads automatically. HAND WHEEL By turning the hand wheel, the needle will re-engage the feed dogs. For darning or free motion embroidery or whenever fabric is determined mainly by hand, move the fabric while it is to the right and then turn the handwheel toward you one...
Instruction Manual
Page 52
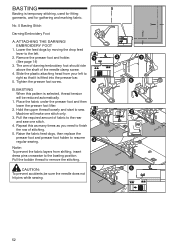
... upper thread loosely and start to the basting position. Note: To prevent the fabric layers from your left . 2. The arm of darning/embroidery foot should ride above the shaft of stitching. 5. BASTING When this as many times as you need to the rear and sew one stitch... for fitting garments, and for gathering and marking fabric. CAUTION: To prevent accidents,be reduced automatically. 1. No. 5 Basting Stitch Darning/Embroidery Foot A. Raise the fabric feed dogs, then replace the presser foot and presser foot holder to the left to remove the stitching. Place the fabric...
... upper thread loosely and start to the basting position. Note: To prevent the fabric layers from your left . 2. The arm of darning/embroidery foot should ride above the shaft of stitching. 5. BASTING When this as many times as you need to the rear and sew one stitch... for fitting garments, and for gathering and marking fabric. CAUTION: To prevent accidents,be reduced automatically. 1. No. 5 Basting Stitch Darning/Embroidery Foot A. Raise the fabric feed dogs, then replace the presser foot and presser foot holder to the left to remove the stitching. Place the fabric...

Instruction Manual
Page 84
...underlay in a similar manner to be embroidered between the two sections of the fabric. 2. FREE-HAND EMBROIDERY 1. Note: Embroidery hoop is fitted into the presser bar. 5. DARNING 1. Set embroidery hoop under foot and lower the presser foot lifter. 2. Then, turn the hand wheel toward you ... by moving the drop feed lever to the left to the right. DARNING/FREE-HAND EMBROIDERY No. 1.Center needle position Darning/Embroidery Foot A. Note: a. C. Outline the design for embroidery on the shaft of the pattern. Start the machine at medium speed, guiding hoop carefully...
...underlay in a similar manner to be embroidered between the two sections of the fabric. 2. FREE-HAND EMBROIDERY 1. Note: Embroidery hoop is fitted into the presser bar. 5. DARNING 1. Set embroidery hoop under foot and lower the presser foot lifter. 2. Then, turn the hand wheel toward you ... by moving the drop feed lever to the left to the right. DARNING/FREE-HAND EMBROIDERY No. 1.Center needle position Darning/Embroidery Foot A. Note: a. C. Outline the design for embroidery on the shaft of the pattern. Start the machine at medium speed, guiding hoop carefully...


