
Instruction Manual
Page 2
... needle to the off ("O") position, then remove plug from all controls to break. 7. Do not pull or push fabric while stitching. Always unplug sewing machine from accumulation of the sewing machine and foot controller free from the electrical outlet when removing covers, lubricating, or when making any opening. 12. To disconnect, turn off ("O") when...
... needle to the off ("O") position, then remove plug from all controls to break. 7. Do not pull or push fabric while stitching. Always unplug sewing machine from accumulation of the sewing machine and foot controller free from the electrical outlet when removing covers, lubricating, or when making any opening. 12. To disconnect, turn off ("O") when...

Instruction Manual
Page 6
... Two Step Presser Foot Lifter ...15 Accessories ...16 Threading the Machine Winding the Bobbin ...18 Inserting the Bobbin ...20 Threading the Upper Thread ...22 Raising the Bobbin Thread ...24 Thread Tension...26 Sewing How to Choose Your Pattern ...28 Sewing Straight Stitch ...30 Reverse Sewing/ Removing the Work/ Cutting the Thread 32 Blind Hem...
... Two Step Presser Foot Lifter ...15 Accessories ...16 Threading the Machine Winding the Bobbin ...18 Inserting the Bobbin ...20 Threading the Upper Thread ...22 Raising the Bobbin Thread ...24 Thread Tension...26 Sewing How to Choose Your Pattern ...28 Sewing Straight Stitch ...30 Reverse Sewing/ Removing the Work/ Cutting the Thread 32 Blind Hem...
Instruction Manual
Page 9
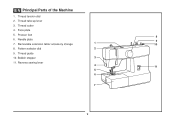
Thread cutter 4. Face plate 5. Presser foot 8 6. Needle plate 9 7. Reverse sewing lever 4 11 5 6 7 9 Bobbin stopper 3 11. Thread tension dial 2. Thread guide 10. Pattern selector dial 2 9. Thread take-up lever 3. Removable extension table/ accessory storage 1 10 8. EN Principal Parts of the Machine 1.
Thread cutter 4. Face plate 5. Presser foot 8 6. Needle plate 9 7. Reverse sewing lever 4 11 5 6 7 9 Bobbin stopper 3 11. Thread tension dial 2. Thread guide 10. Pattern selector dial 2 9. Thread take-up lever 3. Removable extension table/ accessory storage 1 10 8. EN Principal Parts of the Machine 1.

Instruction Manual
Page 13
...by FC-1902, KD-1902 (110-120V area)/ FC-2902A KD-2902 (220-240V area)/ 4C-316B (110-120V area)/ 4C-326G (230V area). Sewing light Press main switch (A) to " l " for power and light. 1 IMPORTANT NOTICE For appliance with a polarized plug (one way. Do not ...: Consult a qualified electrician if in doubt of electric shock, this plug is not in use . a. Polarized attachment plug b. EN Connecting Machine to Power Source Connect the machine to a power source as illustrated. (1) This appliance is equipped with a polarized plug which must be used with the appropriate polarized outlet. ...
...by FC-1902, KD-1902 (110-120V area)/ FC-2902A KD-2902 (220-240V area)/ 4C-316B (110-120V area)/ 4C-326G (230V area). Sewing light Press main switch (A) to " l " for power and light. 1 IMPORTANT NOTICE For appliance with a polarized plug (one way. Do not ...: Consult a qualified electrician if in doubt of electric shock, this plug is not in use . a. Polarized attachment plug b. EN Connecting Machine to Power Source Connect the machine to a power source as illustrated. (1) This appliance is equipped with a polarized plug which must be used with the appropriate polarized outlet. ...

Instruction Manual
Page 16
Seam ripper/ brush g. Bobbin (3x) k. L-screwdriver f. Edge/ quilting guide j. they are not supplied with this machine; All purpose foot b. Button sewing foot e. Pack of needles (3x) i. Blind hem foot p. Spool pin felt (2x) h. Overcasting foot n. Zipper foot c. Hemmer foot o. Darning plate Optional accessories (2) 2 (These 6 accessories are ...
Seam ripper/ brush g. Bobbin (3x) k. L-screwdriver f. Edge/ quilting guide j. they are not supplied with this machine; All purpose foot b. Button sewing foot e. Pack of needles (3x) i. Blind hem foot p. Spool pin felt (2x) h. Overcasting foot n. Zipper foot c. Hemmer foot o. Darning plate Optional accessories (2) 2 (These 6 accessories are ...
Instruction Manual
Page 18
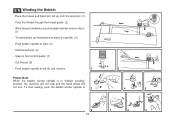
... clockwise around bobbin winder tension discs. (3) - Push bobbin spindle to right. (5) - Cut thread. (8) - Step on spindle. (4) - Push bobbin spindle to left (9) and remove. To start sewing, push the bobbin winder spindle to 18 EN Winding the Bobbin - Hold thread end. (6) - Please Note: When the bobbin winder spindle is in "bobbin winding...
... clockwise around bobbin winder tension discs. (3) - Push bobbin spindle to right. (5) - Cut thread. (8) - Step on spindle. (4) - Push bobbin spindle to left (9) and remove. To start sewing, push the bobbin winder spindle to 18 EN Winding the Bobbin - Hold thread end. (6) - Please Note: When the bobbin winder spindle is in "bobbin winding...
Instruction Manual
Page 30
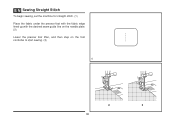
EN Sewing Straight Stitch To begin sewing, set the machine for straight stitch. (1) Place the fabric under the presser foot with the fabric edge lined up with the desired seam guide line on the needle plate. (2) Lower the presser foot lifter, and then step on the foot controller to start sewing. (3) 1 2 3 30
EN Sewing Straight Stitch To begin sewing, set the machine for straight stitch. (1) Place the fabric under the presser foot with the fabric edge lined up with the desired seam guide line on the needle plate. (2) Lower the presser foot lifter, and then step on the foot controller to start sewing. (3) 1 2 3 30

Instruction Manual
Page 32
... the needle and presser foot. (2) Cutting the Thread Pull the threads under and behind the presser foot. Pull threads down the reverse sewing lever (A). Release the lever and the machine will sew forward again. (1) A Removing the Work Turn the handwheel toward you (counterclockwise) to bring the thread take up lever to its highest...
... the needle and presser foot. (2) Cutting the Thread Pull the threads under and behind the presser foot. Pull threads down the reverse sewing lever (A). Release the lever and the machine will sew forward again. (1) A Removing the Work Turn the handwheel toward you (counterclockwise) to bring the thread take up lever to its highest...

Instruction Manual
Page 40
...to create small curving lines to right. EN Free Motion Darning, Stippling * The darning/ embroidery foot is accomplished without the sewing machine internal feed system. A darning hoop is recommended for straight stitch. Turn work from behind the needle clamp screw (b). The lever... (a) should be behind with your index finger and tighten the screw (c). (4) For darning, first sew around the edge of fabric. Stippling: Set the machine for easier sewing and better results. 1 2 Note: Free motion darning is an optional accessory not included with your...
...to create small curving lines to right. EN Free Motion Darning, Stippling * The darning/ embroidery foot is accomplished without the sewing machine internal feed system. A darning hoop is recommended for straight stitch. Turn work from behind the needle clamp screw (b). The lever... (a) should be behind with your index finger and tighten the screw (c). (4) For darning, first sew around the edge of fabric. Stippling: Set the machine for easier sewing and better results. 1 2 Note: Free motion darning is an optional accessory not included with your...

Instruction Manual
Page 55
... is too tight. 1. Thread is too tight. 3. Rethread the machine. 2. Reduce the thread tension. (lower number) 3. Insert a.... 1.The machine is not attached correctly. 1. The bobbin case is noisy The machine jams 1. Remove... for the fabric. 2. Fabric has been pulled. The machine is wrong threaded. 3. The thread should pull easily. ...case, turn the handwheel backwards and forwards by the machine. 1. The thread is not inserted correctly. 2. Replace...3. The needle is too thick for the needle. 4. The machine is not inserted correctly. 2. Lower thread breaks 1. The bobbin...
... is too tight. 1. Thread is too tight. 3. Rethread the machine. 2. Reduce the thread tension. (lower number) 3. Insert a.... 1.The machine is not attached correctly. 1. The bobbin case is noisy The machine jams 1. Remove... for the fabric. 2. Fabric has been pulled. The machine is wrong threaded. 3. The thread should pull easily. ...case, turn the handwheel backwards and forwards by the machine. 1. The thread is not inserted correctly. 2. Replace...3. The needle is too thick for the needle. 4. The machine is not inserted correctly. 2. Lower thread breaks 1. The bobbin...


