Instruction Manual
Page 4
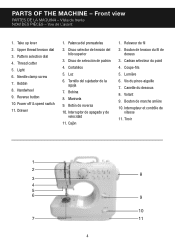
Take up lever 2. Light 6. Palanca del prensatelas 2. Cortahilos 5. Cadran sélecteur du point 4. Interrupteur et contrôle de vitesse 11. Upper thread tension dial 3. Reverse button 10. Bobina 8. Cajón 1. Vis du pince-aiguille 7. Canette du dessous 8. Vista de frente NOM DES PIÈCES - Thread cutter 5. Disco selector de tensión del hilo superior 3. Luz 6. Volant 9. Power off & speed switch 11. Drawer 1. Releveur de fil 2. Tiroir 1 2 8 3 4 5 6 9 10 7 11 4 Vue de L'avant 1. Handwheel 9. Interruptor de apagado y de ...
Take up lever 2. Light 6. Palanca del prensatelas 2. Cortahilos 5. Cadran sélecteur du point 4. Interrupteur et contrôle de vitesse 11. Upper thread tension dial 3. Reverse button 10. Bobina 8. Cajón 1. Vis du pince-aiguille 7. Canette du dessous 8. Vista de frente NOM DES PIÈCES - Thread cutter 5. Disco selector de tensión del hilo superior 3. Luz 6. Volant 9. Power off & speed switch 11. Drawer 1. Releveur de fil 2. Tiroir 1 2 8 3 4 5 6 9 10 7 11 4 Vue de L'avant 1. Handwheel 9. Interruptor de apagado y de ...
Instruction Manual
Page 17
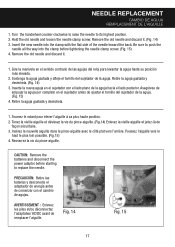
...en el sujetador antes de ajustar el tornillo del sujetador de la aguja. (Fig. 15) 4. Tournez le volant pour élever l'aiguille à sa plus loin possible. (Fig.15) 4. Hold the old needle and loosen the needle clamp screw. Gire la manivela en el sentido contrario de las agujas del... Insérez la nouvelle aiguille dans le pince-aiguille avec le côté plat vers l'arrière. Poussez l'aiguille vers le haut le plus haute position. 2. PRECAUCIÓN: Retire las baterías y desconecte el adaptador de energía antes de comenzar con el cambio de agujas. Insert...
...en el sujetador antes de ajustar el tornillo del sujetador de la aguja. (Fig. 15) 4. Tournez le volant pour élever l'aiguille à sa plus loin possible. (Fig.15) 4. Hold the old needle and loosen the needle clamp screw. Gire la manivela en el sentido contrario de las agujas del... Insérez la nouvelle aiguille dans le pince-aiguille avec le côté plat vers l'arrière. Poussez l'aiguille vers le haut le plus haute position. 2. PRECAUCIÓN: Retire las baterías y desconecte el adaptador de energía antes de comenzar con el cambio de agujas. Insert...
Instruction Manual
Page 20
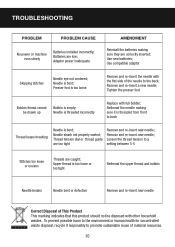
Use new batteries; Rethread the needle making sure they are caught; Thread tension dial or thread guide are low; Upper thread is bent; To prevent possible harm to the environment or human health for uncontrolled waste disposal, recycle it is threaded from front to back Thread keeps breaking Needle is too loose Remove and re-insert the needle with the flat side of the needle to the back; Batteries are too tight Remove and re-insert new needle; Adaptor power inadequate AMENDMENT Reinstall the batteries making sure it responsibly to a setting between 3-5 Stitches too ...
Use new batteries; Rethread the needle making sure they are caught; Thread tension dial or thread guide are low; Upper thread is bent; To prevent possible harm to the environment or human health for uncontrolled waste disposal, recycle it is threaded from front to back Thread keeps breaking Needle is too loose Remove and re-insert the needle with the flat side of the needle to the back; Batteries are too tight Remove and re-insert new needle; Adaptor power inadequate AMENDMENT Reinstall the batteries making sure it responsibly to a setting between 3-5 Stitches too ...
