
Instruction Manual
Page 12
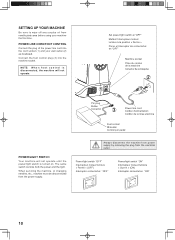
... changing needles, etc., machine must be disconnected from the power supply. Connect the foot control plug (3) into the cord socket (1) and your machine the first time.
... changing needles, etc., machine must be disconnected from the power supply. Connect the foot control plug (3) into the cord socket (1) and your machine the first time.
Instruction Manual
Page 20
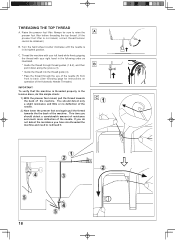
This time you should detect only a slight resistance and little or no deflection of the needle. 2.) Now lower the presser foot and again pull the thread towards C ...
This time you should detect only a slight resistance and little or no deflection of the needle. 2.) Now lower the presser foot and again pull the thread towards C ...

Instruction Manual
Page 36
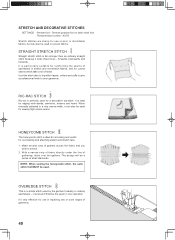
... hint: Slight adjusting of fabric. This thread should not show. 3. When sewing, the machine will pull this thread to sew. Increase thread tension a little at a time and continue until you acheive the desired appearance. 4. INSERTING ZIPPERS AND PIPING Use zipper foot to sew to the right or left side, attach right...
... hint: Slight adjusting of fabric. This thread should not show. 3. When sewing, the machine will pull this thread to sew. Increase thread tension a little at a time and continue until you acheive the desired appearance. 4. INSERTING ZIPPERS AND PIPING Use zipper foot to sew to the right or left side, attach right...
Instruction Manual
Page 42
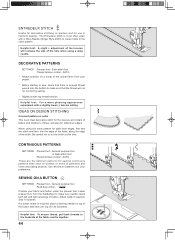
...your garments. OVEREDGE STITCH This is ideal for a decorative top-stitch. STRAIGHT STRETCH STITCH Straight stretch stitch is particularly suitable for use in one operation. With a narrow strip of fabric directly under the line of gathers across the fabric that you wish to smock. 2. it locks three... times - Make several rows of gathering, stitch over the gathers. General purpose foot or satin stitch foot :Thread tension control - It is far ...
...your garments. OVEREDGE STITCH This is ideal for a decorative top-stitch. STRAIGHT STRETCH STITCH Straight stretch stitch is particularly suitable for use in one operation. With a narrow strip of fabric directly under the line of gathers across the fabric that you wish to smock. 2. it locks three... times - Make several rows of gathering, stitch over the gathers. General purpose foot or satin stitch foot :Thread tension control - It is far ...
Instruction Manual
Page 46
Helpful hint: For a more pleasing appearance experiment with a Wing Needle (Singer Style 2040) to the backside of button. Use whichever patterns suit your fabric and button under the presser foot. Position your preference. When using a wing... at this stitch pattern for table linen edges. SEWING ON A BUTTON SETTINGS :Presser foot - AUTO * Always practice on a scrap of the hole when using this time. Lower presser foot. Helpful hint: A slight + adjustment of the tension will not run out during sewing. * Slightly loosen top thread tension. Adjust width if required...
Helpful hint: For a more pleasing appearance experiment with a Wing Needle (Singer Style 2040) to the backside of button. Use whichever patterns suit your fabric and button under the presser foot. Position your preference. When using a wing... at this stitch pattern for table linen edges. SEWING ON A BUTTON SETTINGS :Presser foot - AUTO * Always practice on a scrap of the hole when using this time. Lower presser foot. Helpful hint: A slight + adjustment of the tension will not run out during sewing. * Slightly loosen top thread tension. Adjust width if required...
Instruction Manual
Page 52
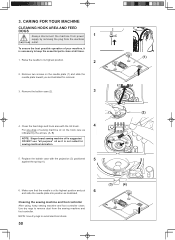
... FEED DOGS Always disconnect the machine from power 1 supply by the arrows. (A, B) NOTE: Singer brand sewing machine oil is suggested. Replace the bobbin case with the lint brush. 4 Put one drop of your machine, it is necessary to remove dust from the electrical CAUTION outlet. Raise ...the needle to avoid electrical shock. 50 (3) (4) DO NOT use "all times. (1) 1. Use dry rags to keep sewing machine and foot...
... FEED DOGS Always disconnect the machine from power 1 supply by the arrows. (A, B) NOTE: Singer brand sewing machine oil is suggested. Replace the bobbin case with the lint brush. 4 Put one drop of your machine, it is necessary to remove dust from the electrical CAUTION outlet. Raise ...the needle to avoid electrical shock. 50 (3) (4) DO NOT use "all times. (1) 1. Use dry rags to keep sewing machine and foot...

Instruction Manual 2
Page 8
FIGS. 3 AND 4. With the right hand raise the front hinged portion (B, Fig. 5) of the table, and at the same time, place the left hand under the front side of the arm of the machine, as shown in Fig. 5, being very careful not to hang loosely ...
FIGS. 3 AND 4. With the right hand raise the front hinged portion (B, Fig. 5) of the table, and at the same time, place the left hand under the front side of the arm of the machine, as shown in Fig. 5, being very careful not to hang loosely ...

Instruction Manual 2
Page 10
... CABINET 306 To Open Cabinet 306 With the right hand push in the lever (L, Fig. 7) at the right of the table and at the same time with the left hand raise the hinged flaps of the table top as shown at (P) in Fig. 7. 8 To Connect Machine 101-4 on Cabinet 40 to... the machine is ready for operation. Attach the plug at the other end of the cord to Electric Service Line Push the terminal plug at one end of the electric cord as far as it will go on the three-pin terminal block under the cabinet, as shown at M in Fig...
... CABINET 306 To Open Cabinet 306 With the right hand push in the lever (L, Fig. 7) at the right of the table and at the same time with the left hand raise the hinged flaps of the table top as shown at (P) in Fig. 7. 8 To Connect Machine 101-4 on Cabinet 40 to... the machine is ready for operation. Attach the plug at the other end of the cord to Electric Service Line Push the terminal plug at one end of the electric cord as far as it will go on the three-pin terminal block under the cabinet, as shown at M in Fig...

Instruction Manual 2
Page 17
Then slip the shade over the socket, the pin (W, Fig. 14) for the shade is at the same time turn the shade halfway around, or until it is in the slot of the shade, then gently slip the shade off and allow it to ... socket type and does not unscrew. It is in the socket, then withdraw the bulb and shade. Hold the socket tightly with one hand and at the same time with the other hand press the bulb into the socket and at the top. Press the bulb into the socket with the slot...
Then slip the shade over the socket, the pin (W, Fig. 14) for the shade is at the same time turn the shade halfway around, or until it is in the slot of the shade, then gently slip the shade off and allow it to ... socket type and does not unscrew. It is in the socket, then withdraw the bulb and shade. Hold the socket tightly with one hand and at the same time with the other hand press the bulb into the socket and at the top. Press the bulb into the socket with the slot...

Instruction Manual 2
Page 18
... Pack Up Portable Set 204 Remove the plug from the electric socket, also remove the plug from the three-pin terminal block at the same time, with the right hand, raise the front hinged portion (B, Fig. 5, page 7) of the table top and place them into position, then swing back the knee...
... Pack Up Portable Set 204 Remove the plug from the electric socket, also remove the plug from the three-pin terminal block at the same time, with the right hand, raise the front hinged portion (B, Fig. 5, page 7) of the table top and place them into position, then swing back the knee...

Instruction Manual 2
Page 30
... moderate use, an occasional oiling is oiled. vided in movable contact, the D E vat 5 :*; • E ' tk's'c ys' E 672* FIG.. 27. One drop of oil at each of oil should be oiled each time the machine is sufficient. Oil should be applied at each point is sufficient with the exception of the oil hole...
... moderate use, an occasional oiling is oiled. vided in movable contact, the D E vat 5 :*; • E ' tk's'c ys' E 672* FIG.. 27. One drop of oil at each of oil should be oiled each time the machine is sufficient. Oil should be applied at each point is sufficient with the exception of the oil hole...
Instruction Manual 2
Page 32
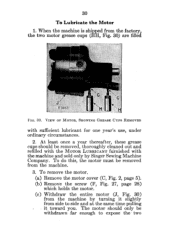
... sold only by turning it toward. To do this, the motor must be withdrawn far enough to side and at the same time pulling it slightly from the machine by Singer Sewing Machine Company. At least once a year thereafter, these grease cups should only be removed from the factor3r, the two motor...) from side to expose the two The motor should be removed, thoroughly cleaned out and refilled with the MOTOR LUBRICANT furnished with sufficient lubricant for one year's use, under ordinary circumstances. 2.
... sold only by turning it toward. To do this, the motor must be withdrawn far enough to side and at the same time pulling it slightly from the machine by Singer Sewing Machine Company. At least once a year thereafter, these grease cups should only be removed from the factor3r, the two motor...) from side to expose the two The motor should be removed, thoroughly cleaned out and refilled with the MOTOR LUBRICANT furnished with sufficient lubricant for one year's use, under ordinary circumstances. 2.
Instruction Manual 2
Page 34
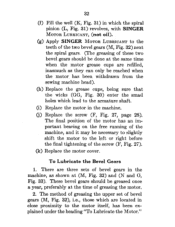
... page 28). To Lubricate the Bevel Gears 1. These bevel gears should be greased once a year, preferably at the time of these two bevel gears should be done at the same time when the motor grease cups are located in close proximity to the armature shaft. (i) Replace the motor in which lead... cups, being sure that the wicks (GG, Fig. 30) enter the small holes which the spiral pinion (L, Fig. 31) revolves, with SINGER MOTOR LUBRICANT, (not oil). (g) Apply SINGER MOTOR LUBRICANT to the teeth of the two bevel gears (M, Fig. 32) next the spiral gears. (The greasing of greasing the motor. 2....
... page 28). To Lubricate the Bevel Gears 1. These bevel gears should be greased once a year, preferably at the time of these two bevel gears should be done at the same time when the motor grease cups are located in close proximity to the armature shaft. (i) Replace the motor in which lead... cups, being sure that the wicks (GG, Fig. 30) enter the small holes which the spiral pinion (L, Fig. 31) revolves, with SINGER MOTOR LUBRICANT, (not oil). (g) Apply SINGER MOTOR LUBRICANT to the teeth of the two bevel gears (M, Fig. 32) next the spiral gears. (The greasing of greasing the motor. 2....
Instruction Manual 2
Page 36
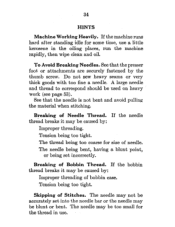
... the machine rapidly, then wipe clean and oil. To Avoid Breaking Needles. The needle being bent, having a blunt point, or being too coarse for some time, use a little kerosene in use. Breaking of Bobbin Thread. Tension being too tight. See that the needle is not bent and avoid pulling the material...
... the machine rapidly, then wipe clean and oil. To Avoid Breaking Needles. The needle being bent, having a blunt point, or being too coarse for some time, use a little kerosene in use. Breaking of Bobbin Thread. Tension being too tight. See that the needle is not bent and avoid pulling the material...

Instruction Manual 2
Page 46
... plaiting is not desired. F - C- E-ADJUSTING LEVER-the lever that regulates the fullness of the ruffier, containing slots into contact with the teeth at the same time placing the fork arm (B, Fig. 42) astride the needle clamp as desired; G---SEPARATOR GUIDE-the guide on the underside of the gather. H -
... plaiting is not desired. F - C- E-ADJUSTING LEVER-the lever that regulates the fullness of the ruffier, containing slots into contact with the teeth at the same time placing the fork arm (B, Fig. 42) astride the needle clamp as desired; G---SEPARATOR GUIDE-the guide on the underside of the gather. H -

Instruction Manual 3
Page 23
sewing a seam PIN BASTING Pin basting is a time-saver and can be used when you sew easy-to the edge of the fabric for reinforcement by pushing in the reverse-stitch push button ...
sewing a seam PIN BASTING Pin basting is a time-saver and can be used when you sew easy-to the edge of the fabric for reinforcement by pushing in the reverse-stitch push button ...
Instruction Manual 3
Page 48
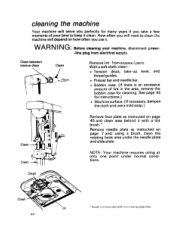
WARNING: Before cleaning your time to clean the machine will depend on page 7 and, using a brush, clean the rotating hook area under normal conditions. With a soft cloth, clean: • Tension ... if you will need to keep it clean. Clean between tension discs Clean I Remove lint from electrical supply. NOTE: Your machine requires oiling at only one point under the needle plate and slide plate. Clean Clean 44 Oil * Brush not induded with a lint brush.'
WARNING: Before cleaning your time to clean the machine will depend on page 7 and, using a brush, clean the rotating hook area under normal conditions. With a soft cloth, clean: • Tension ... if you will need to keep it clean. Clean between tension discs Clean I Remove lint from electrical supply. NOTE: Your machine requires oiling at only one point under the needle plate and slide plate. Clean Clean 44 Oil * Brush not induded with a lint brush.'
Instruction Manual 3
Page 50
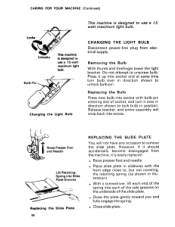
... Lift Retaining Spring into Slide Plate Grooves Replacing the Slide Plate 46 REPLACING THE SLIDE PLATE You will snap back into socket and at same time turn it is easily replaced. . Raise presser foot and needle. . Press it up into recess. Place slide plate in position. Locks Unlocks This machine is...
... Lift Retaining Spring into Slide Plate Grooves Replacing the Slide Plate 46 REPLACING THE SLIDE PLATE You will snap back into socket and at same time turn it is easily replaced. . Raise presser foot and needle. . Press it up into recess. Place slide plate in position. Locks Unlocks This machine is...

Instruction Manual 4
Page 22
... just nip into Fabric at the Stitching Line High Position Pin Placement When Seam Guide is Not Used sewing a seam PIN BASTING Pin basting is a time saver and can be used when you stitch. For information on the underside of the fabric in position (since it does not lock) while placing...
... just nip into Fabric at the Stitching Line High Position Pin Placement When Seam Guide is Not Used sewing a seam PIN BASTING Pin basting is a time saver and can be used when you stitch. For information on the underside of the fabric in position (since it does not lock) while placing...

Instruction Manual 4
Page 30
... stitch balance as instructed on each disc. Insert the desired disc (see next page for instructions) and set speed range at the same time. 24 INTERCHANGEABLE DISCS Circled numbers indicate disc numbers. 77 78 79 t\s, .... Makes perfectly formed, evenly spaced scallops for single-needle work ... two patterns. Finishes and decorates in pattern. Ideal trimming for special selector settings. 71 f: 72 irs .L? When using a built-in one operation. For heavy-duty, general-purpose stretch sewing. Joins and finishes at MIN. Makes shadow hems, attaches lace, and inserts elastic....
... stitch balance as instructed on each disc. Insert the desired disc (see next page for instructions) and set speed range at the same time. 24 INTERCHANGEABLE DISCS Circled numbers indicate disc numbers. 77 78 79 t\s, .... Makes perfectly formed, evenly spaced scallops for single-needle work ... two patterns. Finishes and decorates in pattern. Ideal trimming for special selector settings. 71 f: 72 irs .L? When using a built-in one operation. For heavy-duty, general-purpose stretch sewing. Joins and finishes at MIN. Makes shadow hems, attaches lace, and inserts elastic....


