User Manual
Page 4
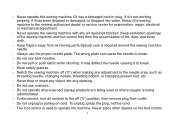
..., changing needle, threading bobbin, or changing presser foot, etc. -- Do not unplug by pulling on the foot control. Do not pull or push fabric while stitching. Switch the sewing machine off ("0") position, then remove plug from outlet. -- Do not use the proper needle plate. II Never operate the sewing machine with...
..., changing needle, threading bobbin, or changing presser foot, etc. -- Do not unplug by pulling on the foot control. Do not pull or push fabric while stitching. Switch the sewing machine off ("0") position, then remove plug from outlet. -- Do not use the proper needle plate. II Never operate the sewing machine with...
User Manual
Page 7
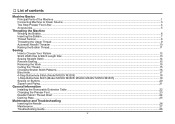
... Reverse Sewing...15 Removing the Work...15 Cutting the Thread...15 Choosing Stretch Stitch Patterns...16 Blind Hem...17 4-Step Buttonhole Stitch (Model M3200/ M3205)...18 1-Step Buttonhole Stitch (Model M3300/ M3305/ M3400/ M3405/ M3500/ M3505 19 Sewing on Buttons...20 Zippers and Piping...21 General Information Installing the Removable Extension Table...22 Changing...
... Reverse Sewing...15 Removing the Work...15 Cutting the Thread...15 Choosing Stretch Stitch Patterns...16 Blind Hem...17 4-Step Buttonhole Stitch (Model M3200/ M3205)...18 1-Step Buttonhole Stitch (Model M3300/ M3305/ M3400/ M3405/ M3500/ M3505 19 Sewing on Buttons...20 Zippers and Piping...21 General Information Installing the Removable Extension Table...22 Changing...
User Manual
Page 8
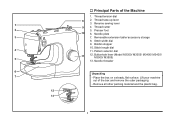
... stopper 10. Needle threader Unpacking - Reverse sewing lever 4. Lift your machine out of the Machine 1. Stitch width dial 9. Pattern selector dial 11 12. Thread tension dial 2. Presser foot 10 6. Buttonhole lever (Model M3300/ M3305/ M3400/ M3405/ M3500/ M3505) 13. Remove all other packing material and the plastic bag. 1 Thread cutter 5. Place the...
... stopper 10. Needle threader Unpacking - Reverse sewing lever 4. Lift your machine out of the Machine 1. Stitch width dial 9. Pattern selector dial 11 12. Thread tension dial 2. Presser foot 10 6. Buttonhole lever (Model M3300/ M3305/ M3400/ M3405/ M3500/ M3505) 13. Remove all other packing material and the plastic bag. 1 Thread cutter 5. Place the...

User Manual
Page 11
Extreme hot and cold temperatures can be raised to a higher position for easy positioning of the work. (A) Attention: Your SINGER® machine is adjusted to provide the best stitch result at normal room temperature. Two Step Presser Foot Lifter When sewing several layers or thick fabrics, the presser foot can affect the sewn result. 4
Extreme hot and cold temperatures can be raised to a higher position for easy positioning of the work. (A) Attention: Your SINGER® machine is adjusted to provide the best stitch result at normal room temperature. Two Step Presser Foot Lifter When sewing several layers or thick fabrics, the presser foot can affect the sewn result. 4
User Manual
Page 15
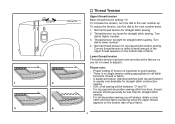
...correctly at the factory, so you will be between "3" and "5". -- For zig zag and decorative sewing stitch functions, thread tension should generally be less than for straight stitch construction sewing. -- 90% of fabric. Turn dial to higher number. 3. For all sewing will always...tension, turn the dial to good sewing. -- A balanced tension (identical stitches both top and bottom) is no single tension setting appropriate for straight stitch sewing. Thread tension too loose for straight stitch sewing. Correct thread tension is important to the next number down. 1. ...
...correctly at the factory, so you will be between "3" and "5". -- For zig zag and decorative sewing stitch functions, thread tension should generally be less than for straight stitch construction sewing. -- 90% of fabric. Turn dial to higher number. 3. For all sewing will always...tension, turn the dial to good sewing. -- A balanced tension (identical stitches both top and bottom) is no single tension setting appropriate for straight stitch sewing. Thread tension too loose for straight stitch sewing. Correct thread tension is important to the next number down. 1. ...

User Manual
Page 19
... To obtain the other patterns, turn the stitch length dial to Choose Your Pattern To select a stitch, simply turn the pattern selector dial. Reverse Sewing Lever b. " with the pattern For zigzag stitch, select pattern " selector dial. a. Sewing Model M3200/ M3205 Model M3300/ M3305 M3400/ M3405 Model M3500/ M3505 c d How to "S1"or "S2" and...
... To obtain the other patterns, turn the stitch length dial to Choose Your Pattern To select a stitch, simply turn the pattern selector dial. Reverse Sewing Lever b. " with the pattern For zigzag stitch, select pattern " selector dial. a. Sewing Model M3200/ M3205 Model M3300/ M3305 M3400/ M3405 Model M3500/ M3505 c d How to "S1"or "S2" and...

User Manual
Page 20
... - "5". Generally speaking, use a longer stitch length when sewing heavier weight fabrics or when using a finer needle or thread. 3 4 13 "0" is center needle position, "5" is full left needle position. (1) (Model M3300/ M3305 /M3400 /M3405 /M3500 /M3505) "0" is center needle position, ..."5" is also the control for the straight stitch infinite needle position. Use a shorter stitch length when sewing lighter weight fabrics or when using a thicker needle or thread.
... - "5". Generally speaking, use a longer stitch length when sewing heavier weight fabrics or when using a finer needle or thread. 3 4 13 "0" is center needle position, "5" is full left needle position. (1) (Model M3300/ M3305 /M3400 /M3405 /M3500 /M3505) "0" is center needle position, ..."5" is also the control for the straight stitch infinite needle position. Use a shorter stitch length when sewing lighter weight fabrics or when using a thicker needle or thread.
User Manual
Page 21
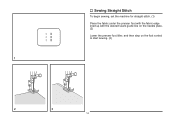
Sewing Straight Stitch To begin sewing, set the machine for straight stitch. (1) Place the fabric under the presser foot with the fabric edge lined up with the desired seam guide line on the needle plate. (2) Lower the presser foot lifter, and then step on the foot control to start sewing. (3) 14
Sewing Straight Stitch To begin sewing, set the machine for straight stitch. (1) Place the fabric under the presser foot with the fabric edge lined up with the desired seam guide line on the needle plate. (2) Lower the presser foot lifter, and then step on the foot control to start sewing. (3) 14
User Manual
Page 22
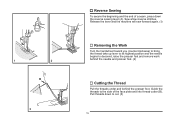
... needle begins to cut. (3) 15 Reverse Sewing To secure the beginning and the end of the face plate and into thread cutter (B). Sew a few reverse stitches.
... needle begins to cut. (3) 15 Reverse Sewing To secure the beginning and the end of the face plate and into thread cutter (B). Sew a few reverse stitches.
User Manual
Page 23
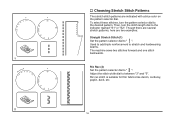
... with a blue color on the pattern selector dial. Choosing Stretch Stitch Patterns The stretch stitch patterns are two examples: Straight Stretch Stitch (1) Set the pattern selector dial to " ". Adjust the stitch width dial to stretch and hardwearing seams. The machine sews two stitches forward and one stitch backwards. Then, turn the pattern selector dial to " ". Used...
... with a blue color on the pattern selector dial. Choosing Stretch Stitch Patterns The stretch stitch patterns are two examples: Straight Stretch Stitch (1) Set the pattern selector dial to " ". Adjust the stitch width dial to stretch and hardwearing seams. The machine sews two stitches forward and one stitch backwards. Then, turn the pattern selector dial to " ". Used...
User Manual
Page 24
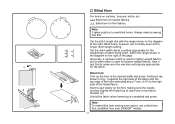
... needle touches slightly the folded top to catch one or two fabric threads. (2) Unfold the fabric when hemming is used for the fabric. Set the stitch width dial at the right. Blind Hem: Turn up the hem to sew blind hems. Always make blind hem sewing even easier, use a blind hem... foot, available from your SINGER® retailer. 17 Note: It takes practice to the desired width and press. Blind hems, however, are appropriate for heavier weight fabrics. Sew a test first...
... needle touches slightly the folded top to catch one or two fabric threads. (2) Unfold the fabric when hemming is used for the fabric. Set the stitch width dial at the right. Blind Hem: Turn up the hem to sew blind hems. Always make blind hem sewing even easier, use a blind hem... foot, available from your SINGER® retailer. 17 Note: It takes practice to the desired width and press. Blind hems, however, are appropriate for heavier weight fabrics. Sew a test first...

User Manual
Page 25
...results. -- When moving from both ends towards the middle. It is raised before turning the Pattern Selector Dial to sew the buttonhole. Adjust the stitch length dial in steps 2 and 4. Tips: -- The zig-zag should sew over the heavy thread or cord. (A) 18 Use a stabilizer for... fine or stretchy fabrics. -- 4-Step Buttonhole Stitch (Model M3200/ M3205) Prepare 1. Place fabric under the foot, so that marking on the fabric aligns with the center of button and add 0.3 cm (1/8")...
...results. -- When moving from both ends towards the middle. It is raised before turning the Pattern Selector Dial to sew the buttonhole. Adjust the stitch length dial in steps 2 and 4. Tips: -- The zig-zag should sew over the heavy thread or cord. (A) 18 Use a stabilizer for... fine or stretchy fabrics. -- 4-Step Buttonhole Stitch (Model M3200/ M3205) Prepare 1. Place fabric under the foot, so that marking on the fabric aligns with the center of button and add 0.3 cm (1/8")...

User Manual
Page 26
...with the mark on the fabric (A). (The front bar tack will overcast the cord. 1. While lightly holding the upper thread, start sewing. *Set the stitch width to " ". Attach the buttonhole foot and set the pattern selector dial to " ". 2. The width however may need to be sewn first.) (Align... them into the grooves and temporarily tie them there. 3. Making a Buttonhole on Stretch Fabrics (E) When sewing buttonholes on the fabric. 2. 1-Step Buttonhole Stitch (Model M3300/ M3305/ M3400/ M3405/ M3500/ M3505) Buttonhole sewing is a simple process that provides reliable results.
...with the mark on the fabric (A). (The front bar tack will overcast the cord. 1. While lightly holding the upper thread, start sewing. *Set the stitch width to " ". Attach the buttonhole foot and set the pattern selector dial to " ". 2. The width however may need to be sewn first.) (Align... them into the grooves and temporarily tie them there. 3. Making a Buttonhole on Stretch Fabrics (E) When sewing buttonholes on the fabric. 2. 1-Step Buttonhole Stitch (Model M3300/ M3305/ M3400/ M3405/ M3500/ M3505) Buttonhole sewing is a simple process that provides reliable results.
User Manual
Page 27
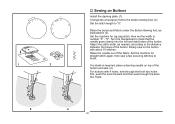
... the needle goes cleanly into the left and right holes of the button and sew. (4) For buttons with about 10 stitches. Set the machine for straight stitch again, then sew a few securing stitches to the distance between the holes of the fabric. "5". If a shank is required, place a darning needle on the ... through the front two holes first, push the work forward and then sew through the back two holes. 20 Set the machine for zig-zag stitch, then set the width to "0". Place the button and fabric under the Button Sewing foot, as needed, according to finish. Slowly sew on top...
... the needle goes cleanly into the left and right holes of the button and sew. (4) For buttons with about 10 stitches. Set the machine for straight stitch again, then sew a few securing stitches to the distance between the holes of the fabric. "5". If a shank is required, place a darning needle on the ... through the front two holes first, push the work forward and then sew through the back two holes. 20 Set the machine for zig-zag stitch, then set the width to "0". Place the button and fabric under the Button Sewing foot, as needed, according to finish. Slowly sew on top...

User Manual
Page 31
... knits, tricots, jerseys, crepes, woven polyester, shirt & blouse fabrics. Always use genuine SINGER® needles. 2. Replace needle often (approximately every other garment) and/ or at first thread breakage or skipped stitches. 24 Medium weight fabrics-cotton duck, woolen, heavier knits, terrycloth, denims. Heavyweight fabrics-...cotton on top and bottom. 18 (110) Heavy woolen, overcoat fabrics, upholstery fabrics, some leathers and vinyls. SINGER® 2045 Ball point needle, scarfed. 9 (70) to 18 (110). Leather, vinyl, upholstery. (Leaves smaller hole than standard large needle...
... knits, tricots, jerseys, crepes, woven polyester, shirt & blouse fabrics. Always use genuine SINGER® needles. 2. Replace needle often (approximately every other garment) and/ or at first thread breakage or skipped stitches. 24 Medium weight fabrics-cotton duck, woolen, heavier knits, terrycloth, denims. Heavyweight fabrics-...cotton on top and bottom. 18 (110) Heavy woolen, overcoat fabrics, upholstery fabrics, some leathers and vinyls. SINGER® 2045 Ball point needle, scarfed. 9 (70) to 18 (110). Leather, vinyl, upholstery. (Leaves smaller hole than standard large needle...
User Manual
Page 35
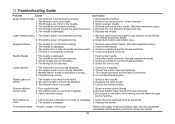
...a needle to suit the thread and fabric. 4. Select the correct foot. Check the threading. 2. Select a finer needle. 2. Readjust the stitch length. 3. Replace the needle. Troubleshooting Guide Problem Cause Correction Upper thread breaks 1. The machine is threaded wrong. 1. Remove and reinsert the ... needle. The bobbin case is not correctly inserted. 3. Check and attach correctly. The needle is not inserted correctly. 2. Loose stitches 1. The machine is attached. 1. Clean the hook and feed teeth as illustrated. 3. Choose a needle to suit the thread...
...a needle to suit the thread and fabric. 4. Select the correct foot. Check the threading. 2. Select a finer needle. 2. Readjust the stitch length. 3. Replace the needle. Troubleshooting Guide Problem Cause Correction Upper thread breaks 1. The machine is threaded wrong. 1. Remove and reinsert the ... needle. The bobbin case is not correctly inserted. 3. Check and attach correctly. The needle is not inserted correctly. 2. Loose stitches 1. The machine is attached. 1. Clean the hook and feed teeth as illustrated. 3. Choose a needle to suit the thread...
M3500 Stitch Applications Guide
Page 1
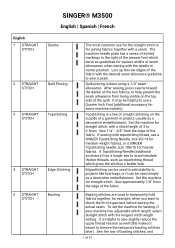
... used simply as a decorative embellishment. To set the machine for straight stitch. English 1 STRAIGHT STITCH 2 STRAIGHT STITCH 3 STRAIGHT STITCH 4 STRAIGHT STITCH 5 STRAIGHT STITCH SINGER® M3500 English | Spanish | French Seams Quilt Piecing Topstitching Edge Stitching Basting The most common use for the straight stitch is done using a 1/4" seam allowance. If sewing with topstitching thread, use a Quarter Inch Foot (additional accessory...
... used simply as a decorative embellishment. To set the machine for straight stitch. English 1 STRAIGHT STITCH 2 STRAIGHT STITCH 3 STRAIGHT STITCH 4 STRAIGHT STITCH 5 STRAIGHT STITCH SINGER® M3500 English | Spanish | French Seams Quilt Piecing Topstitching Edge Stitching Basting The most common use for the straight stitch is done using a 1/4" seam allowance. If sewing with topstitching thread, use a Quarter Inch Foot (additional accessory...

M3500 Stitch Applications Guide
Page 2
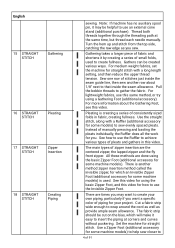
... to embellish fabrics. To set the machine for thread painting, first disengage or cover the machine's feed teeth (see this video. Select straight stitch. Place stabilizer or batting underneath the fabric. For best results, use a fabric marker that is a type of fabric being sewn. Echo quilting... be sure to put the upper thread tension back to use an Even Feed / Walking Foot (additional accessory for details). Select straight stitch. Move the layers together manually as the layers are quilted together. When satisfied with various thread types to sew decorative designs as you ...
... to embellish fabrics. To set the machine for thread painting, first disengage or cover the machine's feed teeth (see this video. Select straight stitch. Place stabilizer or batting underneath the fabric. For best results, use a fabric marker that is a type of fabric being sewn. Echo quilting... be sure to put the upper thread tension back to use an Even Feed / Walking Foot (additional accessory for details). Select straight stitch. Move the layers together manually as the layers are quilted together. When satisfied with various thread types to sew decorative designs as you ...
M3500 Stitch Applications Guide
Page 3
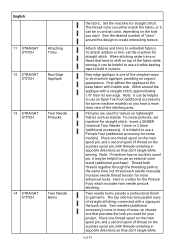
... texture. Raw edge applique is one that tend to use a Pintuck Foot (additional accessory for straight stitch. To create pintucks, set the machine for straight stitch. Insert a SINGER Universal Twin Needle 1.6mm or 2.0mm (additional accessory). It is a video for more clear view ...of the stitching area. Increase needle thread tension for the Pintuck Foot, which includes twin needle pintuck stitching. Here is helpful to use...
... texture. Raw edge applique is one that tend to use a Pintuck Foot (additional accessory for straight stitch. To create pintucks, set the machine for straight stitch. Insert a SINGER Universal Twin Needle 1.6mm or 2.0mm (additional accessory). It is a video for more clear view ...of the stitching area. Increase needle thread tension for the Pintuck Foot, which includes twin needle pintuck stitching. Here is helpful to use...
M3500 Stitch Applications Guide
Page 4
... models). Thread both threads together through the threading path at corners and curves without puckering. For medium weight fabrics, set the machine for straight stitch. For more information about 1/8" next to use this same method, or try using a Gathering Foot (additional accessory). See this video. The ... created various ways. Gathering takes a longer piece of consistently sized folds in this video for your project. Turn the hem up and stitch from the top side, catching the raw edge as provide ample seam allowance. Gathers can be cut on the bias, which an Invisible...
... models). Thread both threads together through the threading path at corners and curves without puckering. For medium weight fabrics, set the machine for straight stitch. For more information about 1/8" next to use this same method, or try using a Gathering Foot (additional accessory). See this video. The ... created various ways. Gathering takes a longer piece of consistently sized folds in this video for your project. Turn the hem up and stitch from the top side, catching the raw edge as provide ample seam allowance. Gathers can be cut on the bias, which an Invisible...


