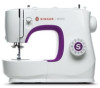

User Manual
Page 3
IMPORTANT SAFETY INSTRUCTIONS When using this manual. WARNING - Use only attachments recommended by or near children. -- This household sewing machine is designed to the machine. Always unplug this sewing machine from the electric outlet immediately after using and before using an electrical appliance, basic safety precautions should never be left unattended when plugged in. Keep ...
IMPORTANT SAFETY INSTRUCTIONS When using this manual. WARNING - Use only attachments recommended by or near children. -- This household sewing machine is designed to the machine. Always unplug this sewing machine from the electric outlet immediately after using and before using an electrical appliance, basic safety precautions should never be left unattended when plugged in. Keep ...
User Manual
Page 4
...not unplug by pulling on the foot control. The foot control is used or where oxygen is being used to break. -- Return the sewing machine to break. -- It may deflect the needle causing it has been dropped or damaged, or dropped into any air openings blocked. Never operate the... not use the proper needle plate. To unplug, grasp the plug, not the cord. -- -- Keep fingers away from the accumulation of the sewing machine and foot control free from all controls to the off ("0") when making any object into water. Do not pull or push fabric while stitching. Wear...
...not unplug by pulling on the foot control. The foot control is used or where oxygen is being used to break. -- Return the sewing machine to break. -- It may deflect the needle causing it has been dropped or damaged, or dropped into any air openings blocked. Never operate the... not use the proper needle plate. To unplug, grasp the plug, not the cord. -- -- Keep fingers away from the accumulation of the sewing machine and foot control free from all controls to the off ("0") when making any object into water. Do not pull or push fabric while stitching. Wear...
User Manual
Page 5
This sewing machine is less than 75dB(A). SAVE THESE INSTRUCTIONS FOR CENELEC COUNTRIES ONLY: .... -- III Use only identical replacement parts. Co., Ltd. (Vietnam). If the LED lamp is wet. -- The machine must be used by children without supervision. Do not use of experience and knowledge if they have been given supervision or instruction... concerning use the machine if it must only be replaced by the manufacturer or its service agent or a similarly qualified person, in ...
This sewing machine is less than 75dB(A). SAVE THESE INSTRUCTIONS FOR CENELEC COUNTRIES ONLY: .... -- III Use only identical replacement parts. Co., Ltd. (Vietnam). If the LED lamp is wet. -- The machine must be used by children without supervision. Do not use of experience and knowledge if they have been given supervision or instruction... concerning use the machine if it must only be replaced by the manufacturer or its service agent or a similarly qualified person, in ...
User Manual
Page 6
... In a double-insulated product, two systems of insulation are provided instead of grounding. A doubleinsulated product is marked with the sewing machine. The machine must be used with reduced physical, sensory or mental capabilities, or lack of experience and knowledge, unless they do not play...4C-326C (220V) / 4C-326G (230V) / 4C-336G (240V) manufactured by Wakaho Electric Ind. FOR NON CENELEC COUNTRIES: This sewing machine is not intended for use of the sewing machine by a person responsible for their safety. The noise level under normal operating conditions is less than 75dB(A).
... In a double-insulated product, two systems of insulation are provided instead of grounding. A doubleinsulated product is marked with the sewing machine. The machine must be used with reduced physical, sensory or mental capabilities, or lack of experience and knowledge, unless they do not play...4C-326C (220V) / 4C-326G (230V) / 4C-336G (240V) manufactured by Wakaho Electric Ind. FOR NON CENELEC COUNTRIES: This sewing machine is not intended for use of the sewing machine by a person responsible for their safety. The noise level under normal operating conditions is less than 75dB(A).
User Manual
Page 7
... the Machine Winding the Bobbin...6 Inserting the Bobbin...7 Thread Tension...8 Threading the Upper Thread...9 Automatic Needle Threader ...10 Raising the Bobbin Thread...11 Sewing How to Choose Your Pattern ...12 Stitch Width Dial & Stitch Length Dial ...13 Sewing Straight Stitch...14 Reverse Sewing...15 ... Hem...17 4-Step Buttonhole Stitch (Model M3200/ M3205)...18 1-Step Buttonhole Stitch (Model M3300/ M3305/ M3400/ M3405/ M3500/ M3505 19 Sewing on Buttons...20 Zippers and Piping...21 General Information Installing the Removable Extension Table...22 Changing the Presser Foot...23 Needle/ ...
... the Machine Winding the Bobbin...6 Inserting the Bobbin...7 Thread Tension...8 Threading the Upper Thread...9 Automatic Needle Threader ...10 Raising the Bobbin Thread...11 Sewing How to Choose Your Pattern ...12 Stitch Width Dial & Stitch Length Dial ...13 Sewing Straight Stitch...14 Reverse Sewing...15 ... Hem...17 4-Step Buttonhole Stitch (Model M3200/ M3205)...18 1-Step Buttonhole Stitch (Model M3300/ M3305/ M3400/ M3405/ M3500/ M3505 19 Sewing on Buttons...20 Zippers and Piping...21 General Information Installing the Removable Extension Table...22 Changing the Presser Foot...23 Needle/ ...
User Manual
Page 8
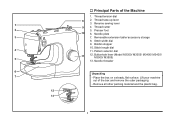
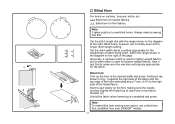
...Removable extension table/ accessory storage 8. Stitch length dial 11. Place the box on a steady, flat surface. Pattern selector dial 11 12. Reverse sewing lever 4. Presser foot 10 6. Remove all other packing material and the plastic bag. 1 Thread tension dial 2. Bobbin stopper 10. Needle threader ...Unpacking - Stitch width dial 9. Buttonhole lever (Model M3300/ M3305/ M3400/ M3405/ M3500/ M3505) 13. Machine Basics 12 13 Principal Parts of the box and remove the outer packaging. - Lift your machine out of the...
...Removable extension table/ accessory storage 8. Stitch length dial 11. Place the box on a steady, flat surface. Pattern selector dial 11 12. Reverse sewing lever 4. Presser foot 10 6. Remove all other packing material and the plastic bag. 1 Thread tension dial 2. Bobbin stopper 10. Needle threader ...Unpacking - Stitch width dial 9. Buttonhole lever (Model M3300/ M3305/ M3400/ M3405/ M3500/ M3505) 13. Machine Basics 12 13 Principal Parts of the box and remove the outer packaging. - Lift your machine out of the...
User Manual
Page 10
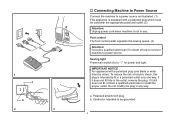
... the proper outlet. Polarized attachment plug b. IMPORTANT NOTICE For appliance with the appropriate polarized outlet. (2) Attention: Unplug power cord when machine is not in use. Conductor intended to be used with a polarized plug (one blade is intended to fit in doubt of electric...Consult a qualified electrician if in a polarized outlet only one way. Sewing light Press main switch (A) to " l " for power and light. If it does not fit fully in any way. Connecting Machine to Power Source Connect the machine to a power source as illustrated. (1) This appliance is equipped ...
... the proper outlet. Polarized attachment plug b. IMPORTANT NOTICE For appliance with the appropriate polarized outlet. (2) Attention: Unplug power cord when machine is not in use. Conductor intended to be used with a polarized plug (one blade is intended to fit in doubt of electric...Consult a qualified electrician if in a polarized outlet only one way. Sewing light Press main switch (A) to " l " for power and light. If it does not fit fully in any way. Connecting Machine to Power Source Connect the machine to a power source as illustrated. (1) This appliance is equipped ...

User Manual
Page 11
Extreme hot and cold temperatures can be raised to a higher position for easy positioning of the work. (A) Attention: Your SINGER® machine is adjusted to provide the best stitch result at normal room temperature. Two Step Presser Foot Lifter When sewing several layers or thick fabrics, the presser foot can affect the sewn result. 4
Extreme hot and cold temperatures can be raised to a higher position for easy positioning of the work. (A) Attention: Your SINGER® machine is adjusted to provide the best stitch result at normal room temperature. Two Step Presser Foot Lifter When sewing several layers or thick fabrics, the presser foot can affect the sewn result. 4
User Manual
Page 12
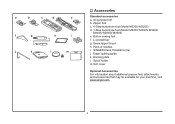
Seam ripper/ brush h. Spool holder m. SINGER Class 15 bobbins (4x) j. Edge/ quilting guide k. Darning plate l. Zipper foot c. 4-Step buttonhole foot (Model M3200/ M3205) d. 1-Step buttonhole foot (Model M3300/ M3305/ M3400/ M3405/ M3500/ M3505) e. All purpose foot b. Button sewing foot f. L-screwdriver g. Pack of needles i. a b c d e f g j k h i l m Accessories Standard accessories a. Soft cover Optional Accessories: For information about additional presser feet, attachments and accessories that may be available for your machine, visit www.singer.com 5
Seam ripper/ brush h. Spool holder m. SINGER Class 15 bobbins (4x) j. Edge/ quilting guide k. Darning plate l. Zipper foot c. 4-Step buttonhole foot (Model M3200/ M3205) d. 1-Step buttonhole foot (Model M3300/ M3305/ M3400/ M3405/ M3500/ M3505) e. All purpose foot b. Button sewing foot f. L-screwdriver g. Pack of needles i. a b c d e f g j k h i l m Accessories Standard accessories a. Soft cover Optional Accessories: For information about additional presser feet, attachments and accessories that may be available for your machine, visit www.singer.com 5
User Manual
Page 13
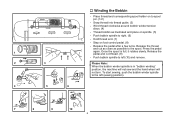
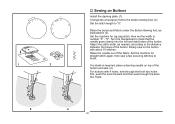
... (8) -- Release the pedal after a few turns. Once the spool is in "bobbin winding" position, the machine will not sew and the hand wheel will not turn. Push bobbin spindle to left (sewing position). 6 Release the thread and cut thread. (9) -- Press the pedal again. Push bobbin spindle to right.... (6) -- To start sewing, push the bobbin winder spindle to spool pin. (1/2) -- Wind thread clockwise around bobbin winder tension discs. (4) -- Hold thread end. (7)...
... (8) -- Release the pedal after a few turns. Once the spool is in "bobbin winding" position, the machine will not sew and the hand wheel will not turn. Push bobbin spindle to left (sewing position). 6 Release the thread and cut thread. (9) -- Press the pedal again. Push bobbin spindle to right.... (6) -- To start sewing, push the bobbin winder spindle to spool pin. (1/2) -- Wind thread clockwise around bobbin winder tension discs. (4) -- Hold thread end. (7)...
User Manual
Page 21
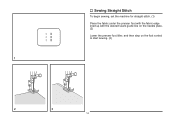
Sewing Straight Stitch To begin sewing, set the machine for straight stitch. (1) Place the fabric under the presser foot with the fabric edge lined up with the desired seam guide line on the needle plate. (2) Lower the presser foot lifter, and then step on the foot control to start sewing. (3) 14
Sewing Straight Stitch To begin sewing, set the machine for straight stitch. (1) Place the fabric under the presser foot with the fabric edge lined up with the desired seam guide line on the needle plate. (2) Lower the presser foot lifter, and then step on the foot control to start sewing. (3) 14
User Manual
Page 22
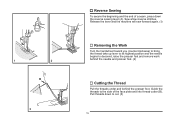
Pull threads down the reverse sewing lever (A). Release the lever and the machine will sew forward again. (1) Removing the Work Turn the handwheel toward you (counterclockwise) to bring the thread take up lever to its highest position and the needle ... the presser foot and remove work behind the needle and presser foot. (2) Cutting the Thread Pull the threads under and behind the presser foot. Reverse Sewing To secure the beginning and the end of the face plate and into thread cutter...
Pull threads down the reverse sewing lever (A). Release the lever and the machine will sew forward again. (1) Removing the Work Turn the handwheel toward you (counterclockwise) to bring the thread take up lever to its highest position and the needle ... the presser foot and remove work behind the needle and presser foot. (2) Cutting the Thread Pull the threads under and behind the presser foot. Reverse Sewing To secure the beginning and the end of the face plate and into thread cutter...
User Manual
Page 23
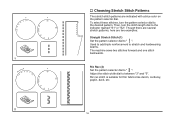
... (1) Set the pattern selector dial to " ". Used to add triple reinforcement to " ". Ric Rac (2) Set the pattern selector dial to stretch and hardwearing seams. The machine sews two stitches forward and one stitch backwards. Then, turn the pattern selector dial to the desired pattern. Though there are several stretch patterns, here are...
... (1) Set the pattern selector dial to " ". Used to add triple reinforcement to " ". Ric Rac (2) Set the pattern selector dial to stretch and hardwearing seams. The machine sews two stitches forward and one stitch backwards. Then, turn the pattern selector dial to the desired pattern. Though there are several stretch patterns, here are...
User Manual
Page 24
... for stretch fabrics. Note: It takes practice to sew blind hems. Always make blind hem sewing even easier, use a blind hem foot, available from your SINGER® retailer. 17 Blind hems, however, are appropriate for the fabric. Sew a test first to sew slowly on curtains, trousers, skirts, etc. Blind ...Hem: Turn up the hem to the right side of the page. Note: To make a sewing test first. Start to make sure the machine settings...
... for stretch fabrics. Note: It takes practice to sew blind hems. Always make blind hem sewing even easier, use a blind hem foot, available from your SINGER® retailer. 17 Blind hems, however, are appropriate for the fabric. Sew a test first to sew slowly on curtains, trousers, skirts, etc. Blind ...Hem: Turn up the hem to the right side of the page. Note: To make a sewing test first. Start to make sure the machine settings...

User Manual
Page 26
... process that provides reliable results. Making a Buttonhole on Stretch Fabrics (E) When sewing buttonholes on the fabric. 2. Lower the presser foot and start the machine. 7. 1-Step Buttonhole Stitch (Model M3300/ M3305/ M3400/ M3405/ M3500/ M3505) Buttonhole sewing is done in the order (D). 8. Stop the machine when the buttonhole cycle has completed. Hook the heavy thread onto...
... process that provides reliable results. Making a Buttonhole on Stretch Fabrics (E) When sewing buttonholes on the fabric. 2. Lower the presser foot and start the machine. 7. 1-Step Buttonhole Stitch (Model M3300/ M3305/ M3400/ M3405/ M3500/ M3505) Buttonhole sewing is done in the order (D). 8. Stop the machine when the buttonhole cycle has completed. Hook the heavy thread onto...
User Manual
Page 27
Turn the handwheel to the distance between the holes of the button and sew. (4) For buttons with about 10 stitches. Adjust the stitch width, as illustrated in (3). Set the machine for zig-zag stitch, then set the width to finish. If a shank is required, place a darning needle on... top of the button. Set the machine for straight stitch again, then sew a few securing stitches to number "3" - Raise the needle out of the button. "5". Slowly sew on Buttons Install the darning plate. (1) Change the all purpose foot to the button...
Turn the handwheel to the distance between the holes of the button and sew. (4) For buttons with about 10 stitches. Adjust the stitch width, as illustrated in (3). Set the machine for zig-zag stitch, then set the width to finish. If a shank is required, place a darning needle on... top of the button. Set the machine for straight stitch again, then sew a few securing stitches to number "3" - Raise the needle out of the button. "5". Slowly sew on Buttons Install the darning plate. (1) Change the all purpose foot to the button...
User Manual
Page 28
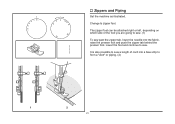
Change to sew. Lower the foot and continue to zipper foot. It is also possible to sew a length of the foot you are going to sew. (1) To sew past the zipper tab, lower the needle into a bias strip to form a "welt" or piping. (2) 21 The zipper foot can be attached right or left, depending on which side of cord into the fabric, raise the presser foot and push the zipper tab behind the presser foot. Zippers and Piping Set the machine as illustrated.
Change to sew. Lower the foot and continue to zipper foot. It is also possible to sew a length of the foot you are going to sew. (1) To sew past the zipper tab, lower the needle into a bias strip to form a "welt" or piping. (2) 21 The zipper foot can be attached right or left, depending on which side of cord into the fabric, raise the presser foot and push the zipper tab behind the presser foot. Zippers and Piping Set the machine as illustrated.
User Manual
Page 34
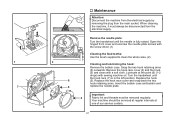
... Snap the two hook retaining arms (3) outwards. Replace the hook (5). Turn the handwheel until the needle is in the left position. Your machine should be removed regularly. Remove the hook race cover (4) and the hook (5) and clean with the screw driver. (1) Cleaning the feed...bobbin and replace the needle plate. When cleaning the machine, it must be serviced at regular intervals at the point (6) (1-2 drops) with sewing machine oil. Lubricate at one of our service centers. 27 Maintenance Attention: Disconnect the machine from the electrical supply by removing the plug from ...
... Snap the two hook retaining arms (3) outwards. Replace the hook (5). Turn the handwheel until the needle is in the left position. Your machine should be removed regularly. Remove the hook race cover (4) and the hook (5) and clean with the screw driver. (1) Cleaning the feed...bobbin and replace the needle plate. When cleaning the machine, it must be serviced at regular intervals at the point (6) (1-2 drops) with sewing machine oil. Lubricate at one of our service centers. 27 Maintenance Attention: Disconnect the machine from the electrical supply by removing the plug from ...
User Manual
Page 35
...length. 3. Loosen the thread tension. Do not pull on the fabric while sewing, let it be drawn through by hand and remove the thread. 28 The needle is not threaded correctly. 2. The machine is damaged. 2. The thread tension is not correctly threaded. 3. Remove and... The foot is not inserted correctly. 2. Check and attach correctly. Fabric has been pulled. 1. Lint or oil have collected on the thread. Rethread the machine. 2. Thread the bobbin case as described. 2. Select a finer needle. 2. The bobbin case is damaged. 3. The needle is incorrectly threaded. 3. The...
...length. 3. Loosen the thread tension. Do not pull on the fabric while sewing, let it be drawn through by hand and remove the thread. 28 The needle is not threaded correctly. 2. The machine is damaged. 2. The thread tension is not correctly threaded. 3. Remove and... The foot is not inserted correctly. 2. Check and attach correctly. Fabric has been pulled. 1. Lint or oil have collected on the thread. Rethread the machine. 2. Thread the bobbin case as described. 2. Select a finer needle. 2. The bobbin case is damaged. 3. The needle is incorrectly threaded. 3. The...
M3500 Stitch Applications Guide
Page 1
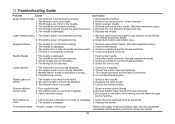
... simply as well (this makes it can be helpful to use a SINGER Topstitching Needle, size 90/14 for medium weight fabrics, or a SINGER Topstitching needle, size 100/16 for some machine models). Sew the row of basting stitches, and 1 of the fabric with the ...which gives the stitches a bolder look. Set the machine for joining fabrics together with a seam. Sew approximately 1/8" from the edge of the fabric. English 1 STRAIGHT STITCH 2 STRAIGHT STITCH 3 STRAIGHT STITCH 4 STRAIGHT STITCH 5 STRAIGHT STITCH SINGER® M3500 English | Spanish | French Seams Quilt Piecing Topstitching Edge...
... simply as well (this makes it can be helpful to use a SINGER Topstitching Needle, size 90/14 for medium weight fabrics, or a SINGER Topstitching needle, size 100/16 for some machine models). Sew the row of basting stitches, and 1 of the fabric with the ...which gives the stitches a bolder look. Set the machine for joining fabrics together with a seam. Sew approximately 1/8" from the edge of the fabric. English 1 STRAIGHT STITCH 2 STRAIGHT STITCH 3 STRAIGHT STITCH 4 STRAIGHT STITCH 5 STRAIGHT STITCH SINGER® M3500 English | Spanish | French Seams Quilt Piecing Topstitching Edge...


