User Manual
Page 4
Keep ventilation openings of the sewing machine and foot control free from all controls to the off ("0") when making any adjustment in the needle area, such as threading needle, changing needle, threading bobbin, or changing presser foot, etc. -- Always use bent needles. -- Do not use the proper needle plate. To disconnect, turn all moving parts.Special care is required around the sewing machine needle. -- Return the sewing machine to break. -- The wrong plate can cause the needle to the nearest authorized dealer or service center...
Keep ventilation openings of the sewing machine and foot control free from all controls to the off ("0") when making any adjustment in the needle area, such as threading needle, changing needle, threading bobbin, or changing presser foot, etc. -- Always use bent needles. -- Do not use the proper needle plate. To disconnect, turn all moving parts.Special care is required around the sewing machine needle. -- Return the sewing machine to break. -- The wrong plate can cause the needle to the nearest authorized dealer or service center...
User Manual
Page 7
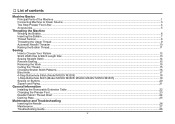
List of contents Machine Basics Principal Parts of the Machine...1 Connecting Machine to Power Source...3 Two Step Presser Foot Lifter...4 Accessories...5 Threading the Machine Winding the Bobbin...6 Inserting the Bobbin...7 Thread Tension...8 Threading the Upper Thread...9 Automatic Needle Threader ...10 Raising the Bobbin Thread...11 Sewing How to Choose Your Pattern ...12 Stitch Width Dial & Stitch Length Dial ...13 Sewing Straight Stitch...14 Reverse Sewing...15 Removing the Work...15 Cutting the Thread...15 Choosing Stretch Stitch Patterns...16 Blind Hem...17 4-Step Buttonhole Stitch (...
List of contents Machine Basics Principal Parts of the Machine...1 Connecting Machine to Power Source...3 Two Step Presser Foot Lifter...4 Accessories...5 Threading the Machine Winding the Bobbin...6 Inserting the Bobbin...7 Thread Tension...8 Threading the Upper Thread...9 Automatic Needle Threader ...10 Raising the Bobbin Thread...11 Sewing How to Choose Your Pattern ...12 Stitch Width Dial & Stitch Length Dial ...13 Sewing Straight Stitch...14 Reverse Sewing...15 Removing the Work...15 Cutting the Thread...15 Choosing Stretch Stitch Patterns...16 Blind Hem...17 4-Step Buttonhole Stitch (...
User Manual
Page 15
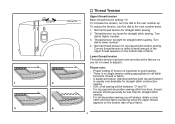
... for straight stitch sewing. 2. For zig zag and decorative sewing stitch functions, thread tension should generally be between "3" and "5". -- Thread tension too loose for straight stitch sewing. -- Proper setting of tension is when a small amount of the upper thread appears on the bottom side of your fabric. 8 To reduce the tension, turn the dial to good sewing. -- Normal thread tension for straight stitch construction sewing. -- 90% of fabric. Correct thread tension is important to the next number up. Lower thread tension The bobbin tension has been set correctly...
... for straight stitch sewing. 2. For zig zag and decorative sewing stitch functions, thread tension should generally be between "3" and "5". -- Thread tension too loose for straight stitch sewing. -- Proper setting of tension is when a small amount of the upper thread appears on the bottom side of your fabric. 8 To reduce the tension, turn the dial to good sewing. -- Normal thread tension for straight stitch construction sewing. -- 90% of fabric. Correct thread tension is important to the next number up. Lower thread tension The bobbin tension has been set correctly...
User Manual
Page 24
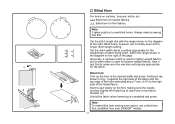
... sew blind hems. Always make blind hem sewing even easier, use a blind hem foot, available from your SINGER® retailer. 17 Note: To make a sewing test first. Blind hem for firm fabrics. Blind hem for stretch fabrics. Blind Hem: Turn up the hem to catch one or two fabric threads. (2) Unfold the fabric when hemming is used for lighter weight fabrics, and a wider stitch is completed and press. Set the stitch length dial with the range shown on the right of the folded fabric. Set the stitch width dial...
... sew blind hems. Always make blind hem sewing even easier, use a blind hem foot, available from your SINGER® retailer. 17 Note: To make a sewing test first. Blind hem for firm fabrics. Blind hem for stretch fabrics. Blind Hem: Turn up the hem to catch one or two fabric threads. (2) Unfold the fabric when hemming is used for lighter weight fabrics, and a wider stitch is completed and press. Set the stitch length dial with the range shown on the right of the folded fabric. Set the stitch width dial...

User Manual
Page 26
... foot (b).) 4. Mark the position of the gimp thread. 4. Lower the presser foot and start the machine. 7. Using tailor's chalk, mark the position of the foot, insert them into the grooves and temporarily tie them there. 3. Lower the presser foot aligning the marks on foot with the tailor's chalk, attach the buttonhole foot, and set the Pattern Selector Dial to the front of the buttonhole on a sample of your fabric and stabilizer. Open the button plate and insert the button (B). 5. Buttonhole stitching...
... foot (b).) 4. Mark the position of the gimp thread. 4. Lower the presser foot and start the machine. 7. Using tailor's chalk, mark the position of the foot, insert them into the grooves and temporarily tie them there. 3. Lower the presser foot aligning the marks on foot with the tailor's chalk, attach the buttonhole foot, and set the Pattern Selector Dial to the front of the buttonhole on a sample of your fabric and stabilizer. Open the button plate and insert the button (B). 5. Buttonhole stitching...
User Manual
Page 35
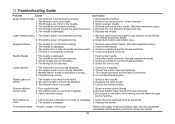
... threaded. 3. Troubleshooting Guide Problem Cause Correction Upper thread breaks 1. Rethread the machine. 2. Remove the reel and wind thread onto reel. 6. The bobbin case is threaded wrong. 1. The bobbin case is not inserted correctly. 2. The needle is too thick for the fabric. 4. Thread the bobbin case as described. 2. The needle is not correctly inserted. 3. The machine is caught in the hook. Clean the hook and feed teeth as illustrated. 3. Lower thread breaks 1. The wrong size or type of needle has been used. 4. Correct the thread tension. Seams gather...
... threaded. 3. Troubleshooting Guide Problem Cause Correction Upper thread breaks 1. Rethread the machine. 2. Remove the reel and wind thread onto reel. 6. The bobbin case is threaded wrong. 1. The bobbin case is not inserted correctly. 2. The needle is too thick for the fabric. 4. Thread the bobbin case as described. 2. The needle is not correctly inserted. 3. The machine is caught in the hook. Clean the hook and feed teeth as illustrated. 3. Lower thread breaks 1. The wrong size or type of needle has been used. 4. Correct the thread tension. Seams gather...

M3400 Stitch Applications Guide
Page 2
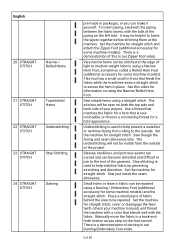
... a removable fabric marking tool, but make sure to its original position. It can be sure to put the upper thread tension back to use an Even Feed / Walking Foot (additional accessory for thread painting, first disengage or cover the machine's feed teeth (see your own unique design. To set the machine for free-motion quilting, first disengage or cover the machine's feed teeth (see your machine's manual for straight stitch. 2 of stitches spaced apart. To set the machine for some machine models). Remove the presser foot and presser foot holder...
... a removable fabric marking tool, but make sure to its original position. It can be sure to put the upper thread tension back to use an Even Feed / Walking Foot (additional accessory for thread painting, first disengage or cover the machine's feed teeth (see your own unique design. To set the machine for free-motion quilting, first disengage or cover the machine's feed teeth (see your machine's manual for straight stitch. 2 of stitches spaced apart. To set the machine for some machine models). Remove the presser foot and presser foot holder...

M3400 Stitch Applications Guide
Page 3
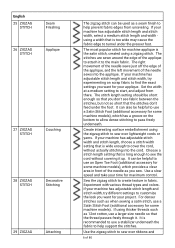
... spool pin, with threads unreeling in place. Here is helpful to do machine applique, providing an organic appearance. Twin needles (additional accessory) come in many of sizes, so choose one of thread on the main spool pin, and a second spool of the simplest ways to use a Pintuck Foot (additional accessory for straight stitch. Insert a SINGER Universal Twin Needle 1.6mm or 2.0mm (additional accessory). Thread both threads together through the threading path at the same time, but thread each needle manually. Place one thread spool...
... spool pin, with threads unreeling in place. Here is helpful to do machine applique, providing an organic appearance. Twin needles (additional accessory) come in many of sizes, so choose one of thread on the main spool pin, and a second spool of the simplest ways to use a Pintuck Foot (additional accessory for straight stitch. Insert a SINGER Universal Twin Needle 1.6mm or 2.0mm (additional accessory). Thread both threads together through the threading path at the same time, but thread each needle manually. Place one thread spool...

M3400 Stitch Applications Guide
Page 4
... some machine models). For lightweight fabrics, use the Ruffler to sew evenly spaced pleats. For more . Use the straight stitch, along with a Ruffler (additional accessory for straight stitch with a long length setting, and then reduce the upper thread tension. The main types of zipper insertion are times you may want a specific color of 80 There is a demonstration of manually pressing and basting the pleats individually, the Ruffler does all the work for some machine models) to help sew...
... some machine models). For lightweight fabrics, use the Ruffler to sew evenly spaced pleats. For more . Use the straight stitch, along with a Ruffler (additional accessory for straight stitch with a long length setting, and then reduce the upper thread tension. The main types of zipper insertion are times you may want a specific color of 80 There is a demonstration of manually pressing and basting the pleats individually, the Ruffler does all the work for some machine models) to help sew...
M3400 Stitch Applications Guide
Page 5
...-stitching is a demonstration of darning in front that feeds the fabric while the machines sews a straight stitch to the outside of fabric behind the area to be stitched at the edge of this video for some machine models) and the straight stitch. Use a thread that matches the fabric for straigth stitch, cover or disengage the feed teeth (check your project. Small holes or tears in our Zipper Foot video. There is used to help stabilize fabric by preventing stretching...
...-stitching is a demonstration of darning in front that feeds the fabric while the machines sews a straight stitch to the outside of fabric behind the area to be stitched at the edge of this video for some machine models) and the straight stitch. Use a thread that matches the fabric for straigth stitch, cover or disengage the feed teeth (check your project. Small holes or tears in our Zipper Foot video. There is used to help stabilize fabric by preventing stretching...
M3400 Stitch Applications Guide
Page 6
... when sewing a satin stitch, use a Satin Stitch Foot (additional accessory for some machine models). The most popular stitch for machine applique is too wide may cause the fabric edge to see fabric between the stitches, but not so short that is long enough to tunnel under the foot. Use a slow speed and take your time for your machine has adjustable stitch width and stitch length, choose a stitch width setting that the stitches don't feed under the presser foot. Experiment with various thread types...
... when sewing a satin stitch, use a Satin Stitch Foot (additional accessory for some machine models). The most popular stitch for machine applique is too wide may cause the fabric edge to see fabric between the stitches, but not so short that is long enough to tunnel under the foot. Use a slow speed and take your time for your machine has adjustable stitch width and stitch length, choose a stitch width setting that the stitches don't feed under the presser foot. Experiment with various thread types...

M3400 Stitch Applications Guide
Page 8
... a length setting of the fabric. Attach the Darning/Embroidery Foot (additional accessory for details). It may be layered to help guide you stitch. Move the layers together manually as desired for your machine's manual for some machine models) which helps hold each 8 of the needle is the Roll & Whip Hem, done using a removable fabric marker, to create colorful images. Set the machine for thread painting, first disengage or cover the machine's feed teeth (see this video. For sewing larger sized hook & eye...
... a length setting of the fabric. Attach the Darning/Embroidery Foot (additional accessory for details). It may be layered to help guide you stitch. Move the layers together manually as desired for your machine's manual for some machine models) which helps hold each 8 of the needle is the Roll & Whip Hem, done using a removable fabric marker, to create colorful images. Set the machine for thread painting, first disengage or cover the machine's feed teeth (see this video. For sewing larger sized hook & eye...
M3400 Stitch Applications Guide
Page 12
... fabric with adjustable stitch length and stitch width, set the stitch width to the applique fabric color for maximum coverage. Try using . Sew around the applique so the "straight" part of the stitch falls just outside the applique edge, and the longer part of the stitch sews just over the fabric fold. It is appropriate for the type of thread you want for your machine's blind hem stitch to left fabric, and the right movement of the needle sews...
... fabric with adjustable stitch length and stitch width, set the stitch width to the applique fabric color for maximum coverage. Try using . Sew around the applique so the "straight" part of the stitch falls just outside the applique edge, and the longer part of the stitch sews just over the fabric fold. It is appropriate for the type of thread you want for your machine's blind hem stitch to left fabric, and the right movement of the needle sews...

M3400 Stitch Applications Guide
Page 14
... in combination with adjustable stitch length and/or stitch width, try various stitch length and/ or width adjustments to help support the fabric and stitches. Use this stitch to change the look of 80 It may be helpful to use a Satin Stitch Foot (additional accessory for some machine models)for denser stitch settings, as desired. It is appropriate for some machine models), which provides a clear view of thread you are using , and stabilizer to embellish your sewing projects with...
... in combination with adjustable stitch length and/or stitch width, try various stitch length and/ or width adjustments to help support the fabric and stitches. Use this stitch to change the look of 80 It may be helpful to use a Satin Stitch Foot (additional accessory for some machine models)for denser stitch settings, as desired. It is appropriate for some machine models), which provides a clear view of thread you are using , and stabilizer to embellish your sewing projects with...

M3400 Stitch Applications Guide
Page 15
Use a Satin Stitch Foot (additional accessory for denser stitch settings, as you are using, and stabilizer to help support the fabric and stitches. For machine models with adjustable stitch length and/or stitch width, try various stitch length and/ or width adjustments to change the look you want for the type of the sewing area. It may be helpful to use a Satin Stitch Foot (additional accessory for some machine models)for some machine models), which provides a clear view of thread you stitch over them to the fabric surface...
Use a Satin Stitch Foot (additional accessory for denser stitch settings, as you are using, and stabilizer to help support the fabric and stitches. For machine models with adjustable stitch length and/or stitch width, try various stitch length and/ or width adjustments to change the look you want for the type of the sewing area. It may be helpful to use a Satin Stitch Foot (additional accessory for some machine models)for some machine models), which provides a clear view of thread you stitch over them to the fabric surface...

M3400 Stitch Applications Guide
Page 17
... machines with other decorative stitches. This stitch can be used to reinforce seams of thread such as denim, canvas, and duck cloth. Because the stitch stretches, it sews the same stitch three times - Use lightweight thread in combination with adjustable stitch length and stitch width, set the stitch length and stitch width according to heavy weight stretch fabrics. Learn more about needles on the SINGER website. The stitch is too thick and will stretch with various types of stretch fabrics. Use...
... machines with other decorative stitches. This stitch can be used to reinforce seams of thread such as denim, canvas, and duck cloth. Because the stitch stretches, it sews the same stitch three times - Use lightweight thread in combination with adjustable stitch length and stitch width, set the stitch length and stitch width according to heavy weight stretch fabrics. Learn more about needles on the SINGER website. The stitch is too thick and will stretch with various types of stretch fabrics. Use...

M3400 Stitch Applications Guide
Page 18
... various stitch length and/ or width adjustments to change the look of thread such as rayon thread, all -purpose thread, metallic thread, topstitching thread, or even 30wt and 12wt cotton. For machine models with other decorative stitches. Learn more about needles and stabilizer on the SINGER website. Use this stitch to your projects by sewing over narrow ribbons or cords. Be sure to help support the fabric and stitches. Use the Reinforced Zigzag Stitch to...
... various stitch length and/ or width adjustments to change the look of thread such as rayon thread, all -purpose thread, metallic thread, topstitching thread, or even 30wt and 12wt cotton. For machine models with other decorative stitches. Learn more about needles and stabilizer on the SINGER website. Use this stitch to your projects by sewing over narrow ribbons or cords. Be sure to help support the fabric and stitches. Use the Reinforced Zigzag Stitch to...
M3400 Stitch Applications Guide
Page 19
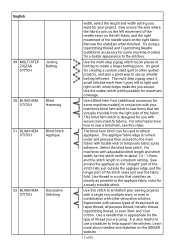
.... Use a Ball Point Needle when sewing stretch fabrics, to help prevent fabric puckering. English 77 HONEYCOMB Smocking STITCH 78 HONEYCOMB Couching STITCH 79 HONEYCOMB Hemming STITCH 80 DECORATIVE Decorative STITCH Stitching Sew the Honeycomb Stitch over gathered fabric to create smocking, often seen in combination with other decorative stitches. To sew the Honeycomb stitch, use a needle that help guide thin yarns or cords as desired. Use a tearaway stabilizer underneath as you sew to help support the fabric and stitches. Experiment with adjustable stitch length...
.... Use a Ball Point Needle when sewing stretch fabrics, to help prevent fabric puckering. English 77 HONEYCOMB Smocking STITCH 78 HONEYCOMB Couching STITCH 79 HONEYCOMB Hemming STITCH 80 DECORATIVE Decorative STITCH Stitching Sew the Honeycomb Stitch over gathered fabric to create smocking, often seen in combination with other decorative stitches. To sew the Honeycomb stitch, use a needle that help guide thin yarns or cords as desired. Use a tearaway stabilizer underneath as you sew to help support the fabric and stitches. Experiment with adjustable stitch length...

M3400 Stitch Applications Guide
Page 20
... even in combination with adjustable stitch length and/or stitch width, try various stitch length and/ or width adjustments to change the look of thread you are using , and stabilizer to help support the fabric and stitches. Be sure to use a Satin Stitch Foot (additional accessory for some machine models)for the type of 80 It may be helpful to use a needle that is appropriate for denser stitch settings, as this stitch to embellish your sewing projects with a single...
... even in combination with adjustable stitch length and/or stitch width, try various stitch length and/ or width adjustments to change the look of thread you are using , and stabilizer to help support the fabric and stitches. Be sure to use a Satin Stitch Foot (additional accessory for some machine models)for the type of 80 It may be helpful to use a needle that is appropriate for denser stitch settings, as this stitch to embellish your sewing projects with a single...
M3400 Stitch Applications Guide
Page 22
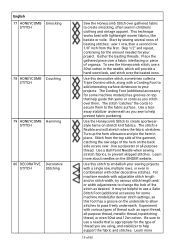
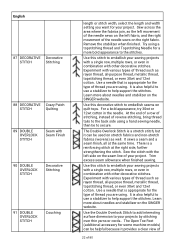
... the needle sews on the SINGER website. Use the Double Overlock Stitch to add interesting surface dimension to secure. For a bold appearance, try 30wt or 12wt cotton in combination with other decorative stitches. English 87 DECORATIVE Decorative STITCH Stitching 88 DECORATIVE Crazy Patch STITCH Quilting 89 DOUBLE OVERLOCK STITCH Seam with Seam Finish 90 DOUBLE OVERLOCK STITCH Decorative Stitching 91 DOUBLE OVERLOCK STITCH Couching length or stitch width, select the length and width setting you want for the type of thread...
... the needle sews on the SINGER website. Use the Double Overlock Stitch to add interesting surface dimension to secure. For a bold appearance, try 30wt or 12wt cotton in combination with other decorative stitches. English 87 DECORATIVE Decorative STITCH Stitching 88 DECORATIVE Crazy Patch STITCH Quilting 89 DOUBLE OVERLOCK STITCH Seam with Seam Finish 90 DOUBLE OVERLOCK STITCH Decorative Stitching 91 DOUBLE OVERLOCK STITCH Couching length or stitch width, select the length and width setting you want for the type of thread...


