
User Manual
Page 3
... all instructions before using and before cleaning, removing covers, lubricating or when making any other user servicing adjustments mentioned in the instruction manual. Use this sewing machine is used as described in . DANGER - To reduce the risk of electric shock: -- The electrical socket, to person: -- WARNING - Use only attachments recommended by or...
... all instructions before using and before cleaning, removing covers, lubricating or when making any other user servicing adjustments mentioned in the instruction manual. Use this sewing machine is used as described in . DANGER - To reduce the risk of electric shock: -- The electrical socket, to person: -- WARNING - Use only attachments recommended by or...
User Manual
Page 4
.... Do not unplug by pulling on the foot control. To unplug, grasp the plug, not the cord. -- II Keep ventilation openings of the sewing machine and foot control free from outlet. -- Always use outdoors. -- Do not use bent needles. -- Do not pull or push fabric while stitching.... Never operate the sewing machine with any adjustment in the needle area, such as threading needle, changing needle, threading bobbin, or changing presser foot, etc. -- Keep fingers away...
.... Do not unplug by pulling on the foot control. To unplug, grasp the plug, not the cord. -- II Keep ventilation openings of the sewing machine and foot control free from outlet. -- Always use outdoors. -- Do not use bent needles. -- Do not pull or push fabric while stitching.... Never operate the sewing machine with any adjustment in the needle area, such as threading needle, changing needle, threading bobbin, or changing presser foot, etc. -- Keep fingers away...
User Manual
Page 5
... from 8 years and above and persons with reduced physical, sensory or mental capabilities or lack of Double-Insulated Appliances. III This sewing machine is damaged or broken, it must be used by children without supervision. The noise level under normal operating conditions is wet. -- The...it is less than 75dB(A). See instructions for Servicing of experience and knowledge if they have been given supervision or instruction concerning use the machine if it must only be replaced by the manufacturer or its service agent or a similarly qualified person, in a safe way and understand ...
... from 8 years and above and persons with reduced physical, sensory or mental capabilities or lack of Double-Insulated Appliances. III This sewing machine is damaged or broken, it must be used by children without supervision. The noise level under normal operating conditions is wet. -- The...it is less than 75dB(A). See instructions for Servicing of experience and knowledge if they have been given supervision or instruction concerning use the machine if it must only be replaced by the manufacturer or its service agent or a similarly qualified person, in a safe way and understand ...
User Manual
Page 6
FOR NON CENELEC COUNTRIES: This sewing machine is not intended for use of type KD-1902, FC-1902 (110-120V) / KD2902, FC-2902A, FC-2902C...of insulation are provided instead of the system and should be added to the product. A doubleinsulated product is marked with the sewing machine. The noise level under normal operating conditions is provided on a double-insulated product, nor should be identical to ensure that they...than 75dB(A). Children should a means for a double-insulated product must only be used with foot control of the sewing machine by qualified service personnel.
FOR NON CENELEC COUNTRIES: This sewing machine is not intended for use of type KD-1902, FC-1902 (110-120V) / KD2902, FC-2902A, FC-2902C...of insulation are provided instead of the system and should be added to the product. A doubleinsulated product is marked with the sewing machine. The noise level under normal operating conditions is provided on a double-insulated product, nor should be identical to ensure that they...than 75dB(A). Children should a means for a double-insulated product must only be used with foot control of the sewing machine by qualified service personnel.
User Manual
Page 7
... Presser Foot Lifter...4 Accessories...5 Threading the Machine Winding the Bobbin...6 Inserting the Bobbin...7 Thread Tension...8 Threading the Upper Thread...9 Automatic Needle Threader ...10 Raising the Bobbin Thread...11 Sewing How to Choose Your Pattern ...12 Stitch Width Dial & Stitch Length Dial ...13 Sewing Straight Stitch...14 Reverse Sewing...15 Removing the Work...15 Cutting...
... Presser Foot Lifter...4 Accessories...5 Threading the Machine Winding the Bobbin...6 Inserting the Bobbin...7 Thread Tension...8 Threading the Upper Thread...9 Automatic Needle Threader ...10 Raising the Bobbin Thread...11 Sewing How to Choose Your Pattern ...12 Stitch Width Dial & Stitch Length Dial ...13 Sewing Straight Stitch...14 Reverse Sewing...15 Removing the Work...15 Cutting...
User Manual
Page 8
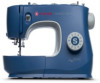
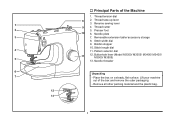
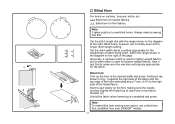
... plastic bag. 1 Thread tension dial 2. Presser foot 10 6. Removable extension table/ accessory storage 8. Bobbin stopper 10. Machine Basics 12 13 Principal Parts of the box and remove the outer packaging. - Needle threader Unpacking - Reverse sewing lever 4. Pattern selector dial 11 12. Stitch length dial 11. Buttonhole lever (Model M3300/ M3305/ M3400/ M3405...
... plastic bag. 1 Thread tension dial 2. Presser foot 10 6. Removable extension table/ accessory storage 8. Bobbin stopper 10. Machine Basics 12 13 Principal Parts of the box and remove the outer packaging. - Needle threader Unpacking - Reverse sewing lever 4. Pattern selector dial 11 12. Stitch length dial 11. Buttonhole lever (Model M3300/ M3305/ M3400/ M3405...
User Manual
Page 10
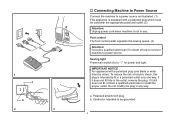
... the outlet, reverse the plug. a. Conductor intended to be used with the appropriate polarized outlet. (2) Attention: Unplug power cord when machine is not in a polarized outlet only one way. IMPORTANT NOTICE For appliance with a polarized plug (one blade is intended to fit in...does not fit, contact a qualified electrician to install the proper outlet. Connecting Machine to Power Source Connect the machine to a power source as illustrated. (1) This appliance is equipped with a polarized plug which must be grounded 3 Sewing light Press main switch (A) to " l " for power and light. ...
... the outlet, reverse the plug. a. Conductor intended to be used with the appropriate polarized outlet. (2) Attention: Unplug power cord when machine is not in a polarized outlet only one way. IMPORTANT NOTICE For appliance with a polarized plug (one blade is intended to fit in...does not fit, contact a qualified electrician to install the proper outlet. Connecting Machine to Power Source Connect the machine to a power source as illustrated. (1) This appliance is equipped with a polarized plug which must be grounded 3 Sewing light Press main switch (A) to " l " for power and light. ...

User Manual
Page 11
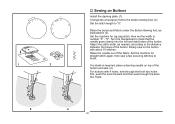
Extreme hot and cold temperatures can be raised to a higher position for easy positioning of the work. (A) Attention: Your SINGER® machine is adjusted to provide the best stitch result at normal room temperature. Two Step Presser Foot Lifter When sewing several layers or thick fabrics, the presser foot can affect the sewn result. 4
Extreme hot and cold temperatures can be raised to a higher position for easy positioning of the work. (A) Attention: Your SINGER® machine is adjusted to provide the best stitch result at normal room temperature. Two Step Presser Foot Lifter When sewing several layers or thick fabrics, the presser foot can affect the sewn result. 4
User Manual
Page 12
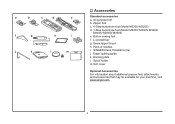
Darning plate l. Edge/ quilting guide k. Seam ripper/ brush h. Button sewing foot f. Spool holder m. Zipper foot c. 4-Step buttonhole foot (Model M3200/ M3205) d. 1-Step buttonhole foot (Model M3300/ M3305/ M3400/ M3405/ M3500/ M3505) e. SINGER Class 15 bobbins (4x) j. Soft cover Optional Accessories: For information about additional presser feet, attachments and accessories that may be available for your machine, visit www.singer.com 5 L-screwdriver g. a b c d e f g j k h i l m Accessories Standard accessories a. Pack of needles i. All purpose foot b.
Darning plate l. Edge/ quilting guide k. Seam ripper/ brush h. Button sewing foot f. Spool holder m. Zipper foot c. 4-Step buttonhole foot (Model M3200/ M3205) d. 1-Step buttonhole foot (Model M3300/ M3305/ M3400/ M3405/ M3500/ M3505) e. SINGER Class 15 bobbins (4x) j. Soft cover Optional Accessories: For information about additional presser feet, attachments and accessories that may be available for your machine, visit www.singer.com 5 L-screwdriver g. a b c d e f g j k h i l m Accessories Standard accessories a. Pack of needles i. All purpose foot b.
User Manual
Page 13
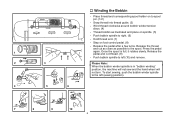
Winding the Bobbin -- Step on spindle. (5) -- Once the spool is in "bobbin winding" position, the machine will not sew and the hand wheel will not turn. Push bobbin spindle to spool pin. (1/2) -- Release the pedal and cut as close as ... left (10) and remove. Press the pedal again. Please Note: When the bobbin winder spindle is full, it rotates slowly. Push bobbin spindle to left (sewing position). 6 Place thread and corresponding spool holder on to right. (6) -- Snap thread into thread guide. (3) -- Wind thread clockwise around bobbin winder tension discs....
Winding the Bobbin -- Step on spindle. (5) -- Once the spool is in "bobbin winding" position, the machine will not sew and the hand wheel will not turn. Push bobbin spindle to spool pin. (1/2) -- Release the pedal and cut as close as ... left (10) and remove. Press the pedal again. Please Note: When the bobbin winder spindle is full, it rotates slowly. Push bobbin spindle to left (sewing position). 6 Place thread and corresponding spool holder on to right. (6) -- Snap thread into thread guide. (3) -- Wind thread clockwise around bobbin winder tension discs....
User Manual
Page 21
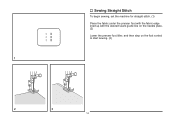
Sewing Straight Stitch To begin sewing, set the machine for straight stitch. (1) Place the fabric under the presser foot with the fabric edge lined up with the desired seam guide line on the needle plate. (2) Lower the presser foot lifter, and then step on the foot control to start sewing. (3) 14
Sewing Straight Stitch To begin sewing, set the machine for straight stitch. (1) Place the fabric under the presser foot with the fabric edge lined up with the desired seam guide line on the needle plate. (2) Lower the presser foot lifter, and then step on the foot control to start sewing. (3) 14
User Manual
Page 22
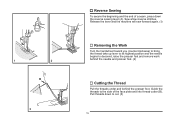
Pull threads down the reverse sewing lever (A). Release the lever and the machine will sew forward again. (1) Removing the Work Turn the handwheel toward you (counterclockwise) to bring the thread take up lever to its highest position and the needle ..., raise the presser foot and remove work behind the needle and presser foot. (2) Cutting the Thread Pull the threads under and behind the presser foot. Sew a few reverse stitches. Reverse Sewing To secure the beginning and the end of the face plate and into thread cutter (B).
Pull threads down the reverse sewing lever (A). Release the lever and the machine will sew forward again. (1) Removing the Work Turn the handwheel toward you (counterclockwise) to bring the thread take up lever to its highest position and the needle ..., raise the presser foot and remove work behind the needle and presser foot. (2) Cutting the Thread Pull the threads under and behind the presser foot. Sew a few reverse stitches. Reverse Sewing To secure the beginning and the end of the face plate and into thread cutter (B).
User Manual
Page 23
... stitch patterns are two examples: Straight Stretch Stitch (1) Set the pattern selector dial to " ". Used to add triple reinforcement to stretch and hardwearing seams. The machine sews two stitches forward and one stitch backwards.
... stitch patterns are two examples: Straight Stretch Stitch (1) Set the pattern selector dial to " ". Used to add triple reinforcement to stretch and hardwearing seams. The machine sews two stitches forward and one stitch backwards.
User Manual
Page 24
...fabric. Generally, a narrower stitch is used for lighter weight fabrics, and a wider stitch is completed and press. Note: To make sure the machine settings are normally sewn with the range shown on curtains, trousers, skirts, etc. Blind hem for heavier weight fabrics. Set the stitch width ... the right. Blind Hem For hems on the diagram at a setting appropriate for the fabric. Sew a test first to make blind hem sewing even easier, use a blind hem foot, available from your SINGER® retailer. 17 Blind hem for stretch fabrics. Blind hems, however, are appropriate for the...
...fabric. Generally, a narrower stitch is used for lighter weight fabrics, and a wider stitch is completed and press. Note: To make sure the machine settings are normally sewn with the range shown on curtains, trousers, skirts, etc. Blind hem for heavier weight fabrics. Set the stitch width ... the right. Blind Hem For hems on the diagram at a setting appropriate for the fabric. Sew a test first to make blind hem sewing even easier, use a blind hem foot, available from your SINGER® retailer. 17 Blind hem for stretch fabrics. Blind hems, however, are appropriate for the...

User Manual
Page 26
... end of the buttonhole foot, then bring the two heavy thread ends to the project. Once sewing is done in the order (D). 8. Set the stitch width at "5". Stop the machine when the buttonhole cycle has completed. Mark the position of the buttonhole on the fabric with the... the stitch width to remove any slack, then trim off the excess. 19 However, it back (C). 6. Sew a test first to " ". 2. Lower the presser foot and start the machine. 7. Buttonhole stitching is completed, gently pull the heavy thread to match the diameter of the gimp thread. 4. 1-Step Buttonhole Stitch...
... end of the buttonhole foot, then bring the two heavy thread ends to the project. Once sewing is done in the order (D). 8. Set the stitch width at "5". Stop the machine when the buttonhole cycle has completed. Mark the position of the buttonhole on the fabric with the... the stitch width to remove any slack, then trim off the excess. 19 However, it back (C). 6. Sew a test first to " ". 2. Lower the presser foot and start the machine. 7. Buttonhole stitching is completed, gently pull the heavy thread to match the diameter of the gimp thread. 4. 1-Step Buttonhole Stitch...
User Manual
Page 27
...is required, place a darning needle on top of the button. Place the button and fabric under the Button Sewing foot, as needed, according to finish. Set the machine for straight stitch again, then sew a few securing stitches to the distance between the holes of the fabric. "5". Adjust the stitch width, ...as illustrated in (3). Raise the needle out of the button. Set the machine for zig-zag stitch, then set the width to "0". Sewing on Buttons Install the darning plate. (1) Change the all purpose foot to the button...
...is required, place a darning needle on top of the button. Place the button and fabric under the Button Sewing foot, as needed, according to finish. Set the machine for straight stitch again, then sew a few securing stitches to the distance between the holes of the fabric. "5". Adjust the stitch width, ...as illustrated in (3). Raise the needle out of the button. Set the machine for zig-zag stitch, then set the width to "0". Sewing on Buttons Install the darning plate. (1) Change the all purpose foot to the button...
User Manual
Page 28
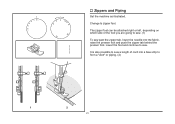
Lower the foot and continue to form a "welt" or piping. (2) 21 It is also possible to sew a length of the foot you are going to zipper foot. Change to sew. (1) To sew past the zipper tab, lower the needle into a bias strip to sew. Zippers and Piping Set the machine as illustrated. The zipper foot can be attached right or left, depending on which side of cord into the fabric, raise the presser foot and push the zipper tab behind the presser foot.
Lower the foot and continue to form a "welt" or piping. (2) 21 It is also possible to sew a length of the foot you are going to zipper foot. Change to sew. (1) To sew past the zipper tab, lower the needle into a bias strip to sew. Zippers and Piping Set the machine as illustrated. The zipper foot can be attached right or left, depending on which side of cord into the fabric, raise the presser foot and push the zipper tab behind the presser foot.
User Manual
Page 34
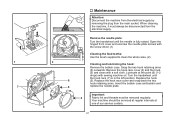
... unscrew the needle plate screws with a soft cloth. Snap the two hook retaining arms (3) outwards. Replace the hook (5). Your machine should be serviced at regular intervals at the point (6) (1-2 drops) with sewing machine oil. Important: Fabric lint and threads must always be removed regularly. Lubricate at one of our service centers. 27 Replace... whole area. (2) Cleaning and lubricating the hook: Remove the bobbin case. Turn the handwheel until the needle is in the left position. When cleaning the machine, it must be disconnected from the main socket.
... unscrew the needle plate screws with a soft cloth. Snap the two hook retaining arms (3) outwards. Replace the hook (5). Your machine should be serviced at regular intervals at the point (6) (1-2 drops) with sewing machine oil. Important: Fabric lint and threads must always be removed regularly. Lubricate at one of our service centers. 27 Replace... whole area. (2) Cleaning and lubricating the hook: Remove the bobbin case. Turn the handwheel until the needle is in the left position. When cleaning the machine, it must be disconnected from the main socket.
User Manual
Page 35
... correctly. 2. Replace the needle. The needle is damaged. 2. Check both bobbin and bobbin case. Do not pull on the fabric while sewing, let it be drawn through by hand and remove the thread. 28 Remove and reinsert the needle. (flat side towards the back) 3..... 1. The thread is not correctly threaded. 2. Replace the needle. Lower thread breaks 1. Insert a new needle. 2. Select a better quality thread. 2. The machine is too thick for the needle. 4. The thread tension is damaged. 3. The needle is too tight. 3. Thread tension wrong. 1. The thread tension is caught...
... correctly. 2. Replace the needle. The needle is damaged. 2. Check both bobbin and bobbin case. Do not pull on the fabric while sewing, let it be drawn through by hand and remove the thread. 28 Remove and reinsert the needle. (flat side towards the back) 3..... 1. The thread is not correctly threaded. 2. Replace the needle. Lower thread breaks 1. Insert a new needle. 2. Select a better quality thread. 2. The machine is too thick for the needle. 4. The thread tension is damaged. 3. The needle is too tight. 3. Thread tension wrong. 1. The thread tension is caught...


