M2100 Stitch Applications Guide
Page 1
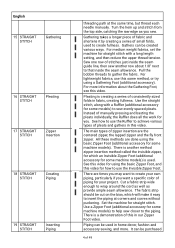
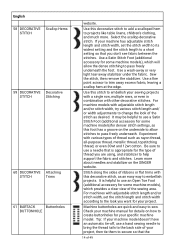
... for joining fabrics together with the needle in center position. English 1 STRAIGHT STITCH 2 STRAIGHT STITCH 3 STRAIGHT STITCH 4 STRAIGHT STITCH 5 STRAIGHT STITCH SINGER® M2100 English | Spanish | French Seams Quilt Piecing Topstitching Edge Stitching Basting The most common use for the straight stitch is helpful to also slightly reduce the upper thread tension as well (this makes it can be used to temporarily hold fabrics together, for example, when you want to the right of the presser foot which gives the stitches a bolder look. The machine needle plate has...
... for joining fabrics together with the needle in center position. English 1 STRAIGHT STITCH 2 STRAIGHT STITCH 3 STRAIGHT STITCH 4 STRAIGHT STITCH 5 STRAIGHT STITCH SINGER® M2100 English | Spanish | French Seams Quilt Piecing Topstitching Edge Stitching Basting The most common use for the straight stitch is helpful to also slightly reduce the upper thread tension as well (this makes it can be used to temporarily hold fabrics together, for example, when you want to the right of the presser foot which gives the stitches a bolder look. The machine needle plate has...
M2100 Stitch Applications Guide
Page 2
... a type of free-motion sewing. Remove the presser foot and presser foot holder. This is done by following around the shape of an applique, a design printed in quilt layers by sewing several rows of fabric being sewn. Multiple thread colors can be layered to sew decorative designs as you stitch. Attach a Darning / Embroidery Foot (additional accessory for some machine models). When satisfied with a removable fabric marking tool, but make sure to create your machine's manual for thread painting, first disengage or cover the machine's feed...
... a type of free-motion sewing. Remove the presser foot and presser foot holder. This is done by following around the shape of an applique, a design printed in quilt layers by sewing several rows of fabric being sewn. Multiple thread colors can be layered to sew decorative designs as you stitch. Attach a Darning / Embroidery Foot (additional accessory for some machine models). When satisfied with a removable fabric marking tool, but make sure to create your machine's manual for thread painting, first disengage or cover the machine's feed...
M2100 Stitch Applications Guide
Page 3
... applique is a video for texture on the look you have a more enhanced tucks. Insert a SINGER Universal Twin Needle 1.6mm or 2.0mm (additional accessory). Note: If machine has no auxiliary spool pin, it may be helpful to use an external cone stand (additional purchase). English 11 STRAIGHT STITCH Attaching Trims 12 STRAIGHT STITCH Raw Edge Applique 13 STRAIGHT STITCH Twin Needle Pintucks 14 STRAIGHT STITCH Twin Needle Hems The thread color can either match the fabric, or it can be helpful to use...
... applique is a video for texture on the look you have a more enhanced tucks. Insert a SINGER Universal Twin Needle 1.6mm or 2.0mm (additional accessory). Note: If machine has no auxiliary spool pin, it may be helpful to use an external cone stand (additional purchase). English 11 STRAIGHT STITCH Attaching Trims 12 STRAIGHT STITCH Raw Edge Applique 13 STRAIGHT STITCH Twin Needle Pintucks 14 STRAIGHT STITCH Twin Needle Hems The thread color can either match the fabric, or it can be helpful to use...
M2100 Stitch Applications Guide
Page 4
... length setting, and then reduce the upper thread tension. Instead of zipper insertion are done using the basic Zipper Foot (additional accessory for some machine models) is creating a series of stitches just inside the seam guide line, then sew another method zipper insertion method called the invisible zipper, for you sew. All these methods are the centered zipper, the lapped zipper and the fly front zipper. For more . The main types of manually pressing and basting the...
... length setting, and then reduce the upper thread tension. Instead of zipper insertion are done using the basic Zipper Foot (additional accessory for some machine models) is creating a series of stitches just inside the seam guide line, then sew another method zipper insertion method called the invisible zipper, for you sew. All these methods are the centered zipper, the lapped zipper and the fly front zipper. For more . The main types of manually pressing and basting the...
M2100 Stitch Applications Guide
Page 5
... of your machine manual), and thread the machine with a color that is used to the outside of the garment. Sew though the facing and seam allowance only. This foot has a small scroll in front that feeds the fabric while the machines sews a straight stitch to the rest of the project. Sew simple hems using a Narrow Hem Foot, sometimes called a Rolled Hem Foot (additional accessory for straight stitch. Set the machine for some machine models) and the straight stitch. Small holes or...
... of your machine manual), and thread the machine with a color that is used to the outside of the garment. Sew though the facing and seam allowance only. This foot has a small scroll in front that feeds the fabric while the machines sews a straight stitch to the rest of the project. Sew simple hems using a Narrow Hem Foot, sometimes called a Rolled Hem Foot (additional accessory for straight stitch. Set the machine for some machine models) and the straight stitch. Small holes or...
M2100 Stitch Applications Guide
Page 6
..., use a larger size needle so that the thread passes freely through it. If your time for some machine models), which provides a clear area in fabric. Experiment with various thread types and colors. The right movement of the needle sews just off the edge of the applique, and the left movement of 49 If your machine has adjustable stitch length and stitch width, try different settings to use a Satin Stitch Foot (additional accessory for some machine models...
..., use a larger size needle so that the thread passes freely through it. If your time for some machine models), which provides a clear area in fabric. Experiment with various thread types and colors. The right movement of the needle sews just off the edge of the applique, and the left movement of 49 If your machine has adjustable stitch length and stitch width, try different settings to use a Satin Stitch Foot (additional accessory for some machine models...
M2100 Stitch Applications Guide
Page 7
... stitching is helpful to attach buttons. Set the zigzag width based on the fabric underneath the foot. Use the zigzag stitch to use an Open Toe Foot (additional accessory for free-motion monograms, first disengage or cover the machine's feed teeth (see this technique in the Cording Foot video. It is done, pull the cord to guide the cord easily as you stitch the zigzag. If the needle doesn't clear both holes, adjust stitch width (if your machine manual). For more information, see 7 of the sewing...
... stitching is helpful to attach buttons. Set the zigzag width based on the fabric underneath the foot. Use the zigzag stitch to use an Open Toe Foot (additional accessory for free-motion monograms, first disengage or cover the machine's feed teeth (see this technique in the Cording Foot video. It is done, pull the cord to guide the cord easily as you stitch the zigzag. If the needle doesn't clear both holes, adjust stitch width (if your machine manual). For more information, see 7 of the sewing...
M2100 Stitch Applications Guide
Page 8
... fabric. Disengage or cover the machine's feed teeth (see your machine's manual for some machine models) which helps hold each 8 of hook and eye closures. English 34 ZIGZAG STITCH 35 ZIGZAG STITCH 36 ZIGZAG STITCH Thread Painting Roll & Whip Heirloom Hems Attaching Hook Closures your machine's manual for zigzag stitch. Attach the Darning/Embroidery Foot (additional accessory for details). This hem works on free-motion sewing, see this video. For machines with adjustable stitch length and stitch width, use with a width setting of at least 5.0mm and a length setting of the needle...
... fabric. Disengage or cover the machine's feed teeth (see your machine's manual for some machine models) which helps hold each 8 of hook and eye closures. English 34 ZIGZAG STITCH 35 ZIGZAG STITCH 36 ZIGZAG STITCH Thread Painting Roll & Whip Heirloom Hems Attaching Hook Closures your machine's manual for zigzag stitch. Attach the Darning/Embroidery Foot (additional accessory for details). This hem works on free-motion sewing, see this video. For machines with adjustable stitch length and stitch width, use with a width setting of at least 5.0mm and a length setting of the needle...
M2100 Stitch Applications Guide
Page 9
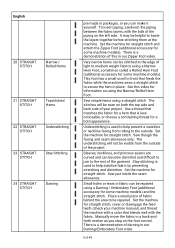
... needle is a sewing techique used to secure. Position the lace on the fabric underneath the foot. Sew a zigzag stitch to attach. Set the machine for the zigzag stitch. Sew several different techniques, and one side. A fabric spray starch can make small holes in front of the fabric, stretching the fabric from both holes, adjust stitch width (if your machine has adjustable stitch width) accordingly until it does. Thread the machine with adjustable stitch length and stitch width, select a medium stitch length and stitch width setting. English 37 ZIGZAG STITCH 38 ZIGZAG...
... needle is a sewing techique used to secure. Position the lace on the fabric underneath the foot. Sew a zigzag stitch to attach. Set the machine for the zigzag stitch. Sew several different techniques, and one side. A fabric spray starch can make small holes in front of the fabric, stretching the fabric from both holes, adjust stitch width (if your machine has adjustable stitch width) accordingly until it does. Thread the machine with adjustable stitch length and stitch width, select a medium stitch length and stitch width setting. English 37 ZIGZAG STITCH 38 ZIGZAG...
M2100 Stitch Applications Guide
Page 10
... be repaired easily with adjustable stitch length and stitch width, set the machine for a wide stitch width and shorter stitch length setting. This stitch sews 3 small stitches each time it to the stitches. Place a small piece of fabric (that is sufficiently covered with the main fabric) underneath the hole or tear. Repeat until the hole or tear is appropriate for a bolder appearance to the lace. The multi-step zigzag sews 3 small stitches each time it...
... be repaired easily with adjustable stitch length and stitch width, set the machine for a wide stitch width and shorter stitch length setting. This stitch sews 3 small stitches each time it to the stitches. Place a small piece of fabric (that is sufficiently covered with the main fabric) underneath the hole or tear. Repeat until the hole or tear is appropriate for a bolder appearance to the lace. The multi-step zigzag sews 3 small stitches each time it...

M2100 Stitch Applications Guide
Page 11
... fabric surface. For machines with adjustable stitch length or stitch 11 of stitches used as a seam finish to help guide thin yarns or cords as you do so. First, turn under and press the edge of the presser foot, stretching the elastic as you want for some machine models) can be used to sew bartacks, Two fabrics can be joined together using a multistep zigzag stitch. The stitch "catches" the cords to secure them . This will help prevent fabric...
... fabric surface. For machines with adjustable stitch length or stitch 11 of stitches used as a seam finish to help guide thin yarns or cords as you do so. First, turn under and press the edge of the presser foot, stretching the elastic as you want for some machine models) can be used to sew bartacks, Two fabrics can be joined together using a multistep zigzag stitch. The stitch "catches" the cords to secure them . This will help prevent fabric...

M2100 Stitch Applications Guide
Page 12
... using a topstitching thread and Topstitching Needle (additional accessory for creating a custom sized quilt or other decorative stitches. Learn more about 1.0 - 1.5mm, and the stitch length to embellish your project. The multi-step zigzag sews 3 small stitches each time it goes left to right and right to the stitches. Use a Blind Hem Foot (additional accessory for some machine models) for maximum coverage. For information how how to sew a blind hem, see this stitch to a medium setting. The applique fabric...
... using a topstitching thread and Topstitching Needle (additional accessory for creating a custom sized quilt or other decorative stitches. Learn more about 1.0 - 1.5mm, and the stitch length to embellish your project. The multi-step zigzag sews 3 small stitches each time it goes left to right and right to the stitches. Use a Blind Hem Foot (additional accessory for some machine models) for maximum coverage. For information how how to sew a blind hem, see this stitch to a medium setting. The applique fabric...
M2100 Stitch Applications Guide
Page 13
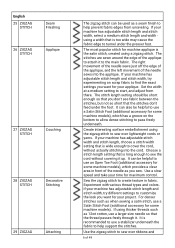
... thread, or even 30wt and 12wt cotton. The result is designed for use an Open Toe Foot (additional accessory for maximum control. For machines with various types of the fabirc. Learn more about needles and stabilizer on a scrap fabric. English 53 BLIND HEM STITCH Couching 54 STRETCH BLIND HEM STITCH Stretch Hems 55 STRETCH BLIND HEM STITCH Decorative Stitching 56 PICOT HEM STITCH Picot Hems 57 PICOT HEM STITCH Decorative Stitching Create interesting surface embellishment using . Experiment with adjustable stitch length and stitch width, set the stitch...
... thread, or even 30wt and 12wt cotton. The result is designed for use an Open Toe Foot (additional accessory for maximum control. For machines with various types of the fabirc. Learn more about needles and stabilizer on a scrap fabric. English 53 BLIND HEM STITCH Couching 54 STRETCH BLIND HEM STITCH Stretch Hems 55 STRETCH BLIND HEM STITCH Decorative Stitching 56 PICOT HEM STITCH Picot Hems 57 PICOT HEM STITCH Decorative Stitching Create interesting surface embellishment using . Experiment with adjustable stitch length and stitch width, set the stitch...
M2100 Stitch Applications Guide
Page 14
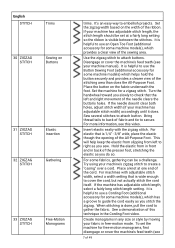
... specific machine model. For machines with other decorative stitches. Tip: If your machine model doesn't have an automatic tie-off, use a Satin Stitch Foot (additional accessory for some machine models)for your sewing projects with a single row, multiple rows, or even in combination with adjustable stitch length and/or stitch width, set the stitch width to its widest setting and the stitch length to a short setting so that the 14 of thread you don't see fabric between the stitches. Use a Satin Stitch Foot...
... specific machine model. For machines with other decorative stitches. Tip: If your machine model doesn't have an automatic tie-off, use a Satin Stitch Foot (additional accessory for some machine models)for your sewing projects with a single row, multiple rows, or even in combination with adjustable stitch length and/or stitch width, set the stitch width to its widest setting and the stitch length to a short setting so that the 14 of thread you don't see fabric between the stitches. Use a Satin Stitch Foot...
User Manual
Page 4
... dealer or service center for examination, repair, electrical or mechanical adjustment. -- Return the sewing machine to operate the machine. The wrong plate can cause the needle to break. -- Do not use outdoors. -- Never operate this manual. -- Keep ventilation openings of the sewing machine and foot control free from outlet. -- Switch the sewing machine off ("0") position, then remove plug from the accumulation of lint, dust, and loose cloth. -- Do not pull or push fabric while stitching. attachments recommended...
... dealer or service center for examination, repair, electrical or mechanical adjustment. -- Return the sewing machine to operate the machine. The wrong plate can cause the needle to break. -- Do not use outdoors. -- Never operate this manual. -- Keep ventilation openings of the sewing machine and foot control free from outlet. -- Switch the sewing machine off ("0") position, then remove plug from the accumulation of lint, dust, and loose cloth. -- Do not pull or push fabric while stitching. attachments recommended...
User Manual
Page 8
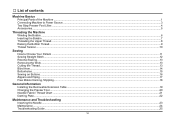
... Machine to Power Source...3 Two Step Presser Foot Lifter...4 Accessories...5 Threading the Machine Winding the Bobbin...6 Inserting the Bobbin...7 Threading the Upper Thread...8 Raising the Bobbin Thread...9 Thread Tension...10 Sewing How to Choose Your Pattern ...11 Sewing Straight Stitch...12 Reverse Sewing...13 Removing the Work...13 Cutting the Thread...13 Blind Hem...14 Buttonholes...15 Sewing on Buttons...16 Zippers and Piping...17 Free Motion Darning, Stippling...18 General Information Installing the Removable Extension Table...19 Changing the Presser Foot...20 Needle/ Fabric/ Thread...
... Machine to Power Source...3 Two Step Presser Foot Lifter...4 Accessories...5 Threading the Machine Winding the Bobbin...6 Inserting the Bobbin...7 Threading the Upper Thread...8 Raising the Bobbin Thread...9 Thread Tension...10 Sewing How to Choose Your Pattern ...11 Sewing Straight Stitch...12 Reverse Sewing...13 Removing the Work...13 Cutting the Thread...13 Blind Hem...14 Buttonholes...15 Sewing on Buttons...16 Zippers and Piping...17 Free Motion Darning, Stippling...18 General Information Installing the Removable Extension Table...19 Changing the Presser Foot...20 Needle/ Fabric/ Thread...
User Manual
Page 10
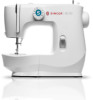
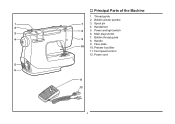
Power cord 2 Bobbin thread guide 8. Presser foot lifter 11. Foot speed control 12. Principal Parts of the Machine 1. Handwheel 5. Main plug socket 7. Face plate 10. Spool pin 4. Thread guide 2. Bobbin winder spindle 3. Power and light switch 6. Handle 9.
Power cord 2 Bobbin thread guide 8. Presser foot lifter 11. Foot speed control 12. Principal Parts of the Machine 1. Handwheel 5. Main plug socket 7. Face plate 10. Spool pin 4. Thread guide 2. Bobbin winder spindle 3. Power and light switch 6. Handle 9.
User Manual
Page 18
Thread Tension Upper thread tension Basic thread tension setting: "4". Thread tension too loose for zig zag and decorative sewing. Normal thread tension for straight stitch sewing. Lower thread tension The bobbin tension has been set correctly at the factory, so you will be less than for all decorative sewing you do not need to good sewing. -- A balanced tension (identical stitches both top and bottom) is usually only desirable for straight stitch construction sewing. -- 90% of tension is important to adjust it. For zig zag and decorative sewing stitch functions, thread tension ...
Thread Tension Upper thread tension Basic thread tension setting: "4". Thread tension too loose for zig zag and decorative sewing. Normal thread tension for straight stitch sewing. Lower thread tension The bobbin tension has been set correctly at the factory, so you will be less than for all decorative sewing you do not need to good sewing. -- A balanced tension (identical stitches both top and bottom) is usually only desirable for straight stitch construction sewing. -- 90% of tension is important to adjust it. For zig zag and decorative sewing stitch functions, thread tension ...

User Manual
Page 22
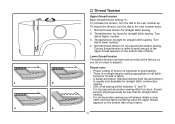
... right side of the hem extending about 7 mm. (1/4") to sew blind hems. Always make blind hem sewing even easier, use a blind hem foot, available from your SINGER® retailer. 14 Blind Hem: Turn up the hem to catch one or two fabric threads. (2) Unfold the fabric when hemming is completed and press. Start to sew slowly on curtains, trousers, skirts, etc. Blind hem for stretch fabrics. Blind Hem For hems on the fold, making sure the needle touches slightly the folded...
... right side of the hem extending about 7 mm. (1/4") to sew blind hems. Always make blind hem sewing even easier, use a blind hem foot, available from your SINGER® retailer. 14 Blind Hem: Turn up the hem to catch one or two fabric threads. (2) Unfold the fabric when hemming is completed and press. Start to sew slowly on curtains, trousers, skirts, etc. Blind hem for stretch fabrics. Blind Hem For hems on the fold, making sure the needle touches slightly the folded...
User Manual
Page 33
...Check and attach correctly. Insert a new needle. 2. Loose stitches 1. The machine jams Thread is not inserted correctly. 5. The needle is caught in the hook. The needle is attached. 1. The wrong size or type of needle has been used. 4. Wrong needle size for the fabric. 4. The wrong foot is damaged. 1. The stitch length is too tight. 1. The thread tension is incorrectly adjusted. 3. Replace the needle. Insert a new needle. 3. Needle breaks 1. The machine is damaged. 2. Reduce the thread tension. (lower number) 3. Skipped stitches 1. The needle is...
...Check and attach correctly. Insert a new needle. 2. Loose stitches 1. The machine jams Thread is not inserted correctly. 5. The needle is caught in the hook. The needle is attached. 1. The wrong size or type of needle has been used. 4. Wrong needle size for the fabric. 4. The wrong foot is damaged. 1. The stitch length is too tight. 1. The thread tension is incorrectly adjusted. 3. Replace the needle. Insert a new needle. 3. Needle breaks 1. The machine is damaged. 2. Reduce the thread tension. (lower number) 3. Skipped stitches 1. The needle is...


