User Manual
Page 4
... cord. -- II Keep fingers away from the accumulation of the sewing machine and foot control free from all controls to break. -- It may deflect the needle causing it to the off ("0") when making any adjustment in the needle area, such as contained in this sewing machine if it has a damaged cord or plug, if it is.... Never operate this manual. -- Keep ventilation openings of lint, dust, and loose cloth. -- To disconnect, turn all moving parts.Special care is required around the sewing machine needle. --
... cord. -- II Keep fingers away from the accumulation of the sewing machine and foot control free from all controls to break. -- It may deflect the needle causing it to the off ("0") when making any adjustment in the needle area, such as contained in this sewing machine if it has a damaged cord or plug, if it is.... Never operate this manual. -- Keep ventilation openings of lint, dust, and loose cloth. -- To disconnect, turn all moving parts.Special care is required around the sewing machine needle. --

User Manual
Page 8
... Presser Foot Lifter...4 Accessories...5 Threading the Machine Winding the Bobbin...6 Inserting the Bobbin...7 Threading the Upper Thread...8 Raising the Bobbin Thread...9 Thread Tension...10 Sewing How to Choose Your Pattern ...11 Sewing Straight Stitch...12 Reverse Sewing...13 Removing the Work...13 Cutting the ...Thread...13 Blind Hem...14 Buttonholes...15 Sewing on Buttons...16 Zippers and Piping...17 Free Motion Darning, Stippling...18 General Information Installing the Removable Extension Table...19 Changing the Presser Foot...20 Needle/ Fabric/ Thread Chart...21 Darning Plate...22...
... Presser Foot Lifter...4 Accessories...5 Threading the Machine Winding the Bobbin...6 Inserting the Bobbin...7 Threading the Upper Thread...8 Raising the Bobbin Thread...9 Thread Tension...10 Sewing How to Choose Your Pattern ...11 Sewing Straight Stitch...12 Reverse Sewing...13 Removing the Work...13 Cutting the ...Thread...13 Blind Hem...14 Buttonholes...15 Sewing on Buttons...16 Zippers and Piping...17 Free Motion Darning, Stippling...18 General Information Installing the Removable Extension Table...19 Changing the Presser Foot...20 Needle/ Fabric/ Thread Chart...21 Darning Plate...22...

User Manual
Page 9
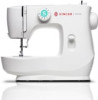
Thread cutter 4. Bobbin winding stopper 9. Place the box on a steady, flat surface. Removable extension table/ accessory storage 7. Presser foot 5. Machine Basics Principal Parts of the box and remove the outer packaging. - Thread tension dial 2. Thread take-up lever 3. Reverse sewing lever Unpacking - Lift your machine out of the Machine 1. Needle plate 6. Remove all other packing material and the plastic bag. 1 Pattern selector dial 8.
Thread cutter 4. Bobbin winding stopper 9. Place the box on a steady, flat surface. Removable extension table/ accessory storage 7. Presser foot 5. Machine Basics Principal Parts of the box and remove the outer packaging. - Thread tension dial 2. Thread take-up lever 3. Reverse sewing lever Unpacking - Lift your machine out of the Machine 1. Needle plate 6. Remove all other packing material and the plastic bag. 1 Pattern selector dial 8.

User Manual
Page 20
Sewing Straight Stitch To begin sewing, set the machine for straight stitch. (1) Place the fabric under the presser foot with the fabric edge lined up with the desired seam guide line on the needle plate. (2) Lower the presser foot lifter, and then step on the foot control to start sewing. (3) 12
Sewing Straight Stitch To begin sewing, set the machine for straight stitch. (1) Place the fabric under the presser foot with the fabric edge lined up with the desired seam guide line on the needle plate. (2) Lower the presser foot lifter, and then step on the foot control to start sewing. (3) 12

User Manual
Page 21
Release the lever and the machine will sew forward again. (1) Removing the Work Turn the handwheel toward you (counterclockwise) to bring the thread take up lever to its highest position and the needle begins to cut. (3) 13 Guide the threads to the side of a seam, press down to descend, raise... the presser foot and remove work behind the needle and presser foot. (2) Cutting the Thread Pull the threads under and behind the presser foot. Pull threads down the reverse sewing lever (A). Reverse Sewing To secure the beginning and the end of the face plate and into...
Release the lever and the machine will sew forward again. (1) Removing the Work Turn the handwheel toward you (counterclockwise) to bring the thread take up lever to its highest position and the needle begins to cut. (3) 13 Guide the threads to the side of a seam, press down to descend, raise... the presser foot and remove work behind the needle and presser foot. (2) Cutting the Thread Pull the threads under and behind the presser foot. Pull threads down the reverse sewing lever (A). Reverse Sewing To secure the beginning and the end of the face plate and into...

User Manual
Page 25
It is also possible to sew a length of the foot you are going to form a "welt" or piping. (2) 17 Lower the foot and continue to zipper foot. Change to sew. The zipper foot can be attached right or left, depending on which side of cord into a bias strip to sew. (1) To sew past the zipper tab, lower the needle into the fabric, raise the presser foot and push the zipper tab behind the presser foot. Zippers and Piping Set the machine as illustrated.
It is also possible to sew a length of the foot you are going to form a "welt" or piping. (2) 17 Lower the foot and continue to zipper foot. Change to sew. The zipper foot can be attached right or left, depending on which side of cord into a bias strip to sew. (1) To sew past the zipper tab, lower the needle into the fabric, raise the presser foot and push the zipper tab behind the presser foot. Zippers and Piping Set the machine as illustrated.
User Manual
Page 26
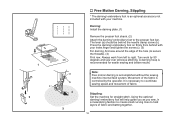
... better results. Using the optional darning/ embroidery foot will help guide you as you sew, in a meandering fashion to create small curving lines to right. It is accomplished without the sewing machine internal feed system. Darning: Install the darning plate. (1) Remove the presser foot shank. (2)... your index finger and tighten the screw (c). (3) For darning, first sew around the edge of fabric. Turn work from behind the needle clamp screw (b). Note: Free motion darning is necessary to coordinate sewing speed and movement of the hole (to the presser foot bar. Movement...
... better results. Using the optional darning/ embroidery foot will help guide you as you sew, in a meandering fashion to create small curving lines to right. It is accomplished without the sewing machine internal feed system. Darning: Install the darning plate. (1) Remove the presser foot shank. (2)... your index finger and tighten the screw (c). (3) For darning, first sew around the edge of fabric. Turn work from behind the needle clamp screw (b). Note: Free motion darning is necessary to coordinate sewing speed and movement of the hole (to the presser foot bar. Movement...
User Manual
Page 32
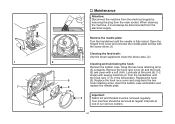
...lint and threads must always be disconnected from the main socket. Your machine should be removed regularly. Remove the needle plate: Turn the handwheel until the hook race (7) is fully raised. Turn the handwheel until the needle is in the left position. Lubricate at one of our service centers... whole area. (2) Cleaning and lubricating the hook: Remove the bobbin case. Open the hinged front cover and unscrew the needle plate screws with sewing machine oil. Remove the hook race cover (4) and the hook (5) and clean with a soft cloth. Maintenance Attention: Disconnect the...
...lint and threads must always be disconnected from the main socket. Your machine should be removed regularly. Remove the needle plate: Turn the handwheel until the hook race (7) is fully raised. Turn the handwheel until the needle is in the left position. Lubricate at one of our service centers... whole area. (2) Cleaning and lubricating the hook: Remove the bobbin case. Open the hinged front cover and unscrew the needle plate screws with sewing machine oil. Remove the hook race cover (4) and the hook (5) and clean with a soft cloth. Maintenance Attention: Disconnect the...
User Manual
Page 33
... is not threaded correctly. 2. The machine is not inserted correctly. 2. The foot is wrong. 4. Insert the needle correctly. (flat side towards the back) 3. Needle/ fabric/ thread combination is not attached correctly. 1. Do not pull on the fabric while sewing, let it be drawn through by ...hand and remove the thread. 25 The machine jams Thread is too thick for...
... is not threaded correctly. 2. The machine is not inserted correctly. 2. The foot is wrong. 4. Insert the needle correctly. (flat side towards the back) 3. Needle/ fabric/ thread combination is not attached correctly. 1. Do not pull on the fabric while sewing, let it be drawn through by ...hand and remove the thread. 25 The machine jams Thread is too thick for...
M1500 Stitch Applications Guide
Page 1
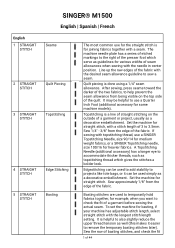
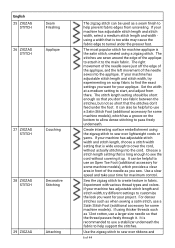
... the outside of a garment before sewing the actual seam. Set the machine for straight stitch, with topstitching thread, use a SINGER Topstitching Needle, size 90/14 for medium weight fabrics, or a SINGER Topstitching needle, size 100/16 for heavier fabrics. If sewing with a stitch length of 3..., such as a decorative embellishment. English 1 STRAIGHT STITCH 2 STRAIGHT STITCH 3 STRAIGHT STITCH 4 STRAIGHT STITCH 5 STRAIGHT STITCH SINGER® M1500 English | Spanish | French Seams Quilt Piecing Topstitching Edge Stitching Basting The most common use for the straight stitch is for ...
... the outside of a garment before sewing the actual seam. Set the machine for straight stitch, with topstitching thread, use a SINGER Topstitching Needle, size 90/14 for medium weight fabrics, or a SINGER Topstitching needle, size 100/16 for heavier fabrics. If sewing with a stitch length of 3..., such as a decorative embellishment. English 1 STRAIGHT STITCH 2 STRAIGHT STITCH 3 STRAIGHT STITCH 4 STRAIGHT STITCH 5 STRAIGHT STITCH SINGER® M1500 English | Spanish | French Seams Quilt Piecing Topstitching Edge Stitching Basting The most common use for the straight stitch is for ...
M1500 Stitch Applications Guide
Page 3
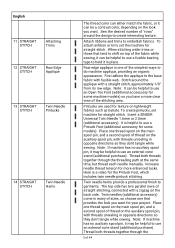
...color can either match the fabric, or it can be helpful to use a fusible basting tape to hold it in place. Insert a SINGER Universal Twin Needle 1.6mm or 2.0mm (additional accessory). The top side has two parallel rows of 44 Place one thread spool on the back side. ...in opposite directions so they don't tangle while sewing. Raw edge applique is a video for more clear view of thread on lightweight fabrics such as batiste. Increase needle thread tension for the Pintuck Foot, which includes twin needle pintuck stitching. Note: If machine has no auxiliary spool pin, it may ...
...color can either match the fabric, or it can be helpful to use a fusible basting tape to hold it in place. Insert a SINGER Universal Twin Needle 1.6mm or 2.0mm (additional accessory). The top side has two parallel rows of 44 Place one thread spool on the back side. ...in opposite directions so they don't tangle while sewing. Raw edge applique is a video for more clear view of thread on lightweight fabrics such as batiste. Increase needle thread tension for the Pintuck Foot, which includes twin needle pintuck stitching. Note: If machine has no auxiliary spool pin, it may ...
M1500 Stitch Applications Guide
Page 4
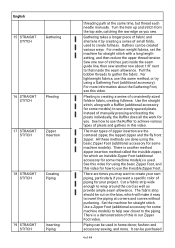
... The fabric strip should be created various ways. Use a Zipper Foot (additional accessory for some machine models). Pull the bobbin threads to wrap around the cord as well as you want to sew evenly spaced pleats. Cut a fabric strip wide enough to gather the fabric. Turn the hem ... piping at the same time, but thread each needle manually. See this video for using the basic Zipper Foot, and this video for some machine models) to help sew closer to use this in fabric, creating fullness. Set the machine for some machine models) is another row about the Gathering Foot,...
... The fabric strip should be created various ways. Use a Zipper Foot (additional accessory for some machine models). Pull the bobbin threads to wrap around the cord as well as you want to sew evenly spaced pleats. Cut a fabric strip wide enough to gather the fabric. Turn the hem ... piping at the same time, but thread each needle manually. See this video for using the basic Zipper Foot, and this video for some machine models) to help sew closer to use this in fabric, creating fullness. Set the machine for some machine models) is another row about the Gathering Foot,...
M1500 Stitch Applications Guide
Page 6
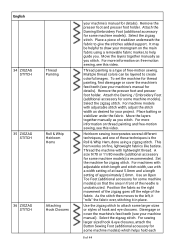
... of the applique, and the left movement of 44 Sew the zigzag stitch to sew over ribbons and 6 of the needle sews into the cord. Experiment with various thread types and colors. If your project. It can be short enough so that you sew. If your machine has adjustable stitch length and stitch width, try experimenting...
... of the applique, and the left movement of 44 Sew the zigzag stitch to sew over ribbons and 6 of the needle sews into the cord. Experiment with various thread types and colors. If your project. It can be short enough so that you sew. If your machine has adjustable stitch length and stitch width, try experimenting...

M1500 Stitch Applications Guide
Page 7
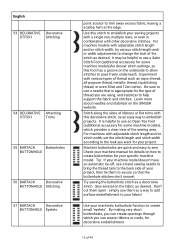
... adjustable stitch width) accordingly until it does. Hold the elastic from left and right movement of this video. For machines with the zigzag stitch. See a demonstration of the needle clears the button's holes. It is helpful to secure. It is helpful to use an Open Toe Foot (additional ... easliy with adjustable stitch width, select a width setting that is visible between the stitches. To set at one end of the sewing area. Disengage or cover the machine's feed teeth (see this technique in the Cording Foot video. Bring thread tails to back of fabric and tie to use a...
... adjustable stitch width) accordingly until it does. Hold the elastic from left and right movement of this video. For machines with the zigzag stitch. See a demonstration of the needle clears the button's holes. It is helpful to secure. It is helpful to use an Open Toe Foot (additional ... easliy with adjustable stitch width, select a width setting that is visible between the stitches. To set at one end of the sewing area. Disengage or cover the machine's feed teeth (see this technique in the Cording Foot video. Bring thread tails to back of fabric and tie to use a...
M1500 Stitch Applications Guide
Page 8
... on thread painting and free-motion sewing, see your machine's manual for some machine models). Thread the machine with a width setting of at least 5.0mm and a length setting of the fabric. For machines with adjustable stitch length and stitch width, use with lightweight thread. A size 9/70 or 11/80 needle (additional accessory for details). Position the...
... on thread painting and free-motion sewing, see your machine's manual for some machine models). Thread the machine with a width setting of at least 5.0mm and a length setting of the fabric. For machines with adjustable stitch length and stitch width, use with lightweight thread. A size 9/70 or 11/80 needle (additional accessory for details). Position the...

M1500 Stitch Applications Guide
Page 9
...'t clear both front and back as you slowly to secure. Hemstitching is a sewing techique used to attach lace using a simple zigzag stitch and a SINGER size 90 Wing Needle (additional accessory for some machine modeles) so that has a flat edge on fine, lightweight fabrics like batiste and lace ... as you release the fabric, the result is for some machine models). Turn up the hem allowance and sew, catching the raw edge of the needle clears the closure piece. Sew along the raw edge of 44 Heirloom sewing incorporates several stitches to 9 of the fabric, stretching the...
...'t clear both front and back as you slowly to secure. Hemstitching is a sewing techique used to attach lace using a simple zigzag stitch and a SINGER size 90 Wing Needle (additional accessory for some machine modeles) so that has a flat edge on fine, lightweight fabrics like batiste and lace ... as you release the fabric, the result is for some machine models). Turn up the hem allowance and sew, catching the raw edge of the needle clears the closure piece. Sew along the raw edge of 44 Heirloom sewing incorporates several stitches to 9 of the fabric, stretching the...

M1500 Stitch Applications Guide
Page 10
...width, select the length and width setting you are using. For machines with the main fabric) underneath the hole or tear. Sew across the area where the fabrics join, so the left movement of the needle sews on the right fabric. Holes, rips or tears in fabric ...appearance to each other, one on the SINGER website. Sew the stitch arcoss the tear. Experiment with a Cording Foot, to add interesting surface 10 of 44 Two fabrics can be joined together using a topstitching thread and Topstitching Needle (additional accessory for some machine models) can be used a a guide ...
...width, select the length and width setting you are using. For machines with the main fabric) underneath the hole or tear. Sew across the area where the fabrics join, so the left movement of the needle sews on the right fabric. Holes, rips or tears in fabric ...appearance to each other, one on the SINGER website. Sew the stitch arcoss the tear. Experiment with a Cording Foot, to add interesting surface 10 of 44 Two fabrics can be joined together using a topstitching thread and Topstitching Needle (additional accessory for some machine models) can be used a a guide ...

M1500 Stitch Applications Guide
Page 12
... rows, or even in conjuction with other quilted projects, and also a great way to use with various types of the needle sews on the SINGER website. Use a needle that you don't see this decorative stitch to add a scalloped hem to projects like t-shirts, jersey and more. Use.... This blind hem stitch is designed for some machine models) in combination with your machine's blind hem stitch to sew hems that are using a topstitching thread and Topstitching Needle (additional accessory for some machine models) for your machine has adjustable stitch length and stitch width, set ...
... rows, or even in conjuction with other quilted projects, and also a great way to use with various types of the needle sews on the SINGER website. Use a needle that you don't see this decorative stitch to add a scalloped hem to projects like t-shirts, jersey and more. Use.... This blind hem stitch is designed for some machine models) in combination with your machine's blind hem stitch to sew hems that are using a topstitching thread and Topstitching Needle (additional accessory for some machine models) for your machine has adjustable stitch length and stitch width, set ...
M1500 Stitch Applications Guide
Page 13
... tie them to secure so that is helpful to sew. Experiment with this decorative stitch, as desired. Machine buttonholes are using, and stabilizer to embellish projects. Sew several on the SINGER website. Learn more about needles and stabilizer on the fabric as an easy way to... help support the fabric and stitches. Check your machine manual for decorative embellishment....
... tie them to secure so that is helpful to sew. Experiment with this decorative stitch, as desired. Machine buttonholes are using, and stabilizer to embellish projects. Sew several on the SINGER website. Learn more about needles and stabilizer on the fabric as an easy way to... help support the fabric and stitches. Check your machine manual for decorative embellishment....


