
Instruction Manual
Page 4
... understand that machine and operator are adequate to specifications and technical standards in its instructions manual, and indications of use should only be followed. Singer will not be held responsible for any electric device is not running the machine. • In case of lubricant oil contact... as indicated in your safety, goggles must be made by qualified personnel. Safety Instructions 1.1 Important Safety Instructions Important When using the machine. In case of cold water. If any damage caused by the needle or replacing the bobbin or looper. •...
... understand that machine and operator are adequate to specifications and technical standards in its instructions manual, and indications of use should only be followed. Singer will not be held responsible for any electric device is not running the machine. • In case of lubricant oil contact... as indicated in your safety, goggles must be made by qualified personnel. Safety Instructions 1.1 Important Safety Instructions Important When using the machine. In case of cold water. If any damage caused by the needle or replacing the bobbin or looper. •...
Instruction Manual
Page 12
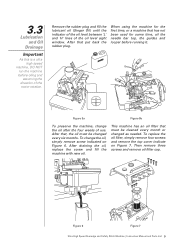
...plug and fill the lubricant oil (Singer Oil) until the indicator of the oil level between 'L' and 'H' lines of the motor rotation. To replace the oil filter, simply remove four screws and remove the top cover indicate on Figure 6. When using the machine for some time, oil the ...simply remove screw indicated on Figure 7. Then remove three screws and remove oil filter cap. To change the oil after the four weeks of use. 3.3 Lubrication and Oil Drainage Important As this is a ultra high speed machine, DO NOT run the machine before running it. After that has ...
...plug and fill the lubricant oil (Singer Oil) until the indicator of the oil level between 'L' and 'H' lines of the motor rotation. To replace the oil filter, simply remove four screws and remove the top cover indicate on Figure 6. When using the machine for some time, oil the ...simply remove screw indicated on Figure 7. Then remove three screws and remove oil filter cap. To change the oil after the four weeks of use. 3.3 Lubrication and Oil Drainage Important As this is a ultra high speed machine, DO NOT run the machine before running it. After that has ...

Instruction Manual
Page 13
... the bar end.. Figure 9 (b) Figure 10 Ultra High Speed Overedge and Safety Stitch Machine | Instruction Manual and Parts List 10 Figure 8 3.5 Needle Attachment (or Replacement) Use only Singer's Cat. 6120 needles Loosen screw '1' as indicated on Figure 8.
... the bar end.. Figure 9 (b) Figure 10 Ultra High Speed Overedge and Safety Stitch Machine | Instruction Manual and Parts List 10 Figure 8 3.5 Needle Attachment (or Replacement) Use only Singer's Cat. 6120 needles Loosen screw '1' as indicated on Figure 8.
Instruction Manual
Page 15
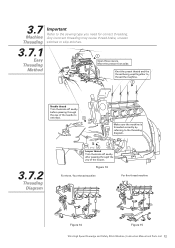
... 14 Figure 15 Ultra High Speed Overedge and Safety Stitch Machine | Instruction Manual and Parts List 12 Knot the preset thread and the thread being used together to thread the machine. 2 Needle thread Trim the knots off neatly before passing through the eye of the needle to rethread. 3 Make sure the...
... 14 Figure 15 Ultra High Speed Overedge and Safety Stitch Machine | Instruction Manual and Parts List 12 Knot the preset thread and the thread being used together to thread the machine. 2 Needle thread Trim the knots off neatly before passing through the eye of the needle to rethread. 3 Make sure the...

Instruction Manual
Page 20
... be sprayed into the oil window. 4 Maintenance 4.1 Machine Head Cleaning Clean the machine periodically with a soft and dry cloth to wipe the surface. Do not use any kind of topic 3.3. To replace the oil, follow the instructions of dust on the machine head.
... be sprayed into the oil window. 4 Maintenance 4.1 Machine Head Cleaning Clean the machine periodically with a soft and dry cloth to wipe the surface. Do not use any kind of topic 3.3. To replace the oil, follow the instructions of dust on the machine head.

Instruction Manual
Page 21
...of needle and looper. 10. Wrong thread tension. 3. Needle thread is not centralized with looper. 2. Use needle adequate for cloth and thread. Needle is not lubricated. 4. Use adequate needle to cloth and thread. 3. Tension disk or guides with looper. 5. Replace the parts....Wrong relation with burrs . 8. Low quality thread. 1. Adjust the thread tension unit. Fill in stitches 3. Adjust thread tension button. 5. Use proper needle hole for cloth and thread. Needle installed the wrong way. 1. Wrong kind of needle with the hole at the needle 6. ...
...of needle and looper. 10. Wrong thread tension. 3. Needle thread is not centralized with looper. 2. Use needle adequate for cloth and thread. Needle is not lubricated. 4. Use adequate needle to cloth and thread. 3. Tension disk or guides with looper. 5. Replace the parts....Wrong relation with burrs . 8. Low quality thread. 1. Adjust the thread tension unit. Fill in stitches 3. Adjust thread tension button. 5. Use proper needle hole for cloth and thread. Needle installed the wrong way. 1. Wrong kind of needle with the hole at the needle 6. ...

Instruction Manual
Page 22
.... 2. Chain stitch looper installed wrongly. 4. Thread tension inadequate. 6. Needle plate or presser foot with burrs. 6. Adjust lower knife correctly. 4. Adjust the height of feed dog. 8. Use proper needle to cloth and thread. 1. Adjust looper cam. 3. Adjust thread tension. 6. Ultra High Speed Overedge and Safety Stitch Machine | Instruction Manual and Parts List...
.... 2. Chain stitch looper installed wrongly. 4. Thread tension inadequate. 6. Needle plate or presser foot with burrs. 6. Adjust lower knife correctly. 4. Adjust the height of feed dog. 8. Use proper needle to cloth and thread. 1. Adjust looper cam. 3. Adjust thread tension. 6. Ultra High Speed Overedge and Safety Stitch Machine | Instruction Manual and Parts List...


