
Instruction Manual
Page 4
... safety instructions are not limited to sew materials as indicated in the product. Singer will not be followed. When using it, understand that machine and operator are adequate to specifications and technical standards in your safety, goggles must be used to the following situations arise: • Passing the thread by the needle...
... safety instructions are not limited to sew materials as indicated in the product. Singer will not be followed. When using it, understand that machine and operator are adequate to specifications and technical standards in your safety, goggles must be used to the following situations arise: • Passing the thread by the needle...
Instruction Manual
Page 12
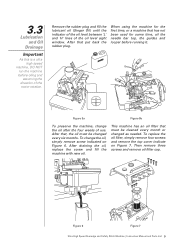
... and Safety Stitch Machine | Instruction Manual and Parts List 9 After that must be cleaned every month or changed every six months. To replace the oil filter, simply remove four screws and remove the top cover indicate on Figure 6. After that has not been used for some time,... the motor rotation. Remove the rubber plug and fill the lubricant oil (Singer Oil) until the indicator of the oil level between 'L' and 'H' lines of use. When using the machine for the first time, or a machine that put back the rubber plug. After draining the oil, replace the screw and...
... and Safety Stitch Machine | Instruction Manual and Parts List 9 After that must be cleaned every month or changed every six months. To replace the oil filter, simply remove four screws and remove the top cover indicate on Figure 6. After that has not been used for some time,... the motor rotation. Remove the rubber plug and fill the lubricant oil (Singer Oil) until the indicator of the oil level between 'L' and 'H' lines of use. When using the machine for the first time, or a machine that put back the rubber plug. After draining the oil, replace the screw and...

Instruction Manual
Page 13
Figure 8 3.5 Needle Attachment (or Replacement) Use only Singer's Cat. 6120 needles Loosen screw '1' as indicated on Figure 8. Figure 9 (b) Figure 10 Ultra High Speed Overedge and Safety Stitch Machine | Instruction Manual and Parts List 10 Figure 9 (a) OK! Insert the needle to prevent needle thread breakage and fabric damage. As show on Figure 9 & 10 with ...
Figure 8 3.5 Needle Attachment (or Replacement) Use only Singer's Cat. 6120 needles Loosen screw '1' as indicated on Figure 8. Figure 9 (b) Figure 10 Ultra High Speed Overedge and Safety Stitch Machine | Instruction Manual and Parts List 10 Figure 9 (a) OK! Insert the needle to prevent needle thread breakage and fabric damage. As show on Figure 9 & 10 with ...
Instruction Manual
Page 15
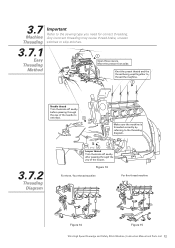
...13 For three / four thread machine For five thread machine Figure 14 Figure 15 Ultra High Speed Overedge and Safety Stitch Machine | Instruction Manual and Parts List 12 Knot the preset thread and the thread being used together to thread the machine. 2 Needle thread Trim the knots... off neatly before passing through the eye of the looper. 3.7 Machine Threading Important Refer to the threading diagram. 3.7.2 Threading Diagram 4 Looper ...
...13 For three / four thread machine For five thread machine Figure 14 Figure 15 Ultra High Speed Overedge and Safety Stitch Machine | Instruction Manual and Parts List 12 Knot the preset thread and the thread being used together to thread the machine. 2 Needle thread Trim the knots... off neatly before passing through the eye of the looper. 3.7 Machine Threading Important Refer to the threading diagram. 3.7.2 Threading Diagram 4 Looper ...

Instruction Manual
Page 20
... be sure that it has the proper tension (Except 321K) Check and be sure there is not excessively worn out and see topic 3.3) If the machine was idle for a long time, oil the top of the needle holder, guides and looper guides before resuming the operation. To clean or replace the... oil filter, follow the instructions of topic 3.3. Do not use any kind of dust on the machine head. The oil should be sprayed into the oil window. OK! (Operating) Figure 29 Frequently check if all screws that fix and...
... be sure that it has the proper tension (Except 321K) Check and be sure there is not excessively worn out and see topic 3.3) If the machine was idle for a long time, oil the top of the needle holder, guides and looper guides before resuming the operation. To clean or replace the... oil filter, follow the instructions of topic 3.3. Do not use any kind of dust on the machine head. The oil should be sprayed into the oil window. OK! (Operating) Figure 29 Frequently check if all screws that fix and...

Instruction Manual
Page 21
.... 4. Broken thread 5. Wrong passage of thread. 3. Pass thread correctly. 3. Needle damaged. 6. Wrong thread tension. 3. Use good quality thread. 2. Needle installed the wrong way. 3. Install needle correctly. Adjust the needle and looper. Ultra High Speed Overedge and Safety... Stitch Machine | Instruction Manual and Parts List 18 Use needle adequate for a new one. 4. Broken needle 3. Low quality thread. 1. Wrong passage of thread. 2. Thread...
.... 4. Broken thread 5. Wrong passage of thread. 3. Pass thread correctly. 3. Needle damaged. 6. Wrong thread tension. 3. Use good quality thread. 2. Needle installed the wrong way. 3. Install needle correctly. Adjust the needle and looper. Ultra High Speed Overedge and Safety... Stitch Machine | Instruction Manual and Parts List 18 Use needle adequate for a new one. 4. Broken needle 3. Low quality thread. 1. Wrong passage of thread. 2. Thread...

Instruction Manual
Page 22
...thread tension. 6. Wrong setting of needle with looper. 7. Inadequate thread tension. 1. Needle is too thick. 1. Adjust lower knife correctly. 4. Use proper needle to cloth and thread. 1. Adjust looper correctly. 4. Pass thread correctly. 5. Adjust relation of lower knfe. 4. Polish thread tension...the height of feed dog. 4. Adjust differential feed ratio. 6. Adjust presser foot correctly. 2. Ultra High Speed Overedge and Safety Stitch Machine | Instruction Manual and Parts List 19 Knives does not cut perfectly. 5. Knives does not cut perfectly. 5. Incorrect presser foot. 2....
...thread tension. 6. Wrong setting of needle with looper. 7. Inadequate thread tension. 1. Needle is too thick. 1. Adjust lower knife correctly. 4. Use proper needle to cloth and thread. 1. Adjust looper correctly. 4. Pass thread correctly. 5. Adjust relation of lower knfe. 4. Polish thread tension...the height of feed dog. 4. Adjust differential feed ratio. 6. Adjust presser foot correctly. 2. Ultra High Speed Overedge and Safety Stitch Machine | Instruction Manual and Parts List 19 Knives does not cut perfectly. 5. Knives does not cut perfectly. 5. Incorrect presser foot. 2....


