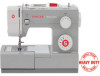

Instruction Manual
Page 2
.... 5. Always unplug this appliance from the electric outlet immediately after using and before changing the light bulb. Close attention is necessary when this manual. 3. Return the appliance to avoid a hazard. 20. Always use bent needles. 8. Do not use the proper needle plate. It may... it has been dropped or damaged, or dropped into any air openings blocked. Never operate this manual. An appliance should never be left unattended when plugged in the instruction manual. 11. Do not operate where aerosol spray products are being administered. 14. To reduce the ...
.... 5. Always unplug this appliance from the electric outlet immediately after using and before changing the light bulb. Close attention is necessary when this manual. 3. Return the appliance to avoid a hazard. 20. Always use bent needles. 8. Do not use the proper needle plate. It may... it has been dropped or damaged, or dropped into any air openings blocked. Never operate this manual. An appliance should never be left unattended when plugged in the instruction manual. 11. Do not operate where aerosol spray products are being administered. 14. To reduce the ...

4411 Stitch Applications Guide
Page 2
...presser foot holder. For best results, use a fabric marker that is appropriate for some machine models). Move the fabric layers together manually as you sew. Echo quilting is done by sewing several rows of fabric being sewn. Attach a Darning / Embroidery Foot (additional... accessory for the project, and be used to draw stitch guidelines on free-motion sewing, see your machine's manual for details). When satisfied with fit, select the stitch length setting as you stitch. Sew the permanent seam. Attach a Darning / ...
...presser foot holder. For best results, use a fabric marker that is appropriate for some machine models). Move the fabric layers together manually as you sew. Echo quilting is done by sewing several rows of fabric being sewn. Attach a Darning / Embroidery Foot (additional... accessory for the project, and be used to draw stitch guidelines on free-motion sewing, see your machine's manual for details). When satisfied with fit, select the stitch length setting as you stitch. Sew the permanent seam. Attach a Darning / ...
4411 Stitch Applications Guide
Page 3
Insert a SINGER Universal Twin Needle 1.6mm or 2.0mm (additional accessory). Increase needle thread tension for straight stitch. Twin needle hems provide a professional finish to embellish fabrics. Place ... side. Stitch around the design to create interesting texture. Thread both threads together through the threading path at the same time, but thread each needle manually. When stitching wider trims or those that provides the look you want for straight stitch. Note: If machine has no auxiliary spool pin, it may...
Insert a SINGER Universal Twin Needle 1.6mm or 2.0mm (additional accessory). Increase needle thread tension for straight stitch. Twin needle hems provide a professional finish to embellish fabrics. Place ... side. Stitch around the design to create interesting texture. Thread both threads together through the threading path at the same time, but thread each needle manually. When stitching wider trims or those that provides the look you want for straight stitch. Note: If machine has no auxiliary spool pin, it may...
4411 Stitch Applications Guide
Page 4
... threads to that inside the seam allowance. For lightweight fabrics, use the Ruffler to insert the piping at the same time, but thread each needle manually. For more . Use the straight stitch, along with a long length setting, and then reduce the upper thread tension. Set the machine for some...see this video for some machine models) to help sew closer to wrap around the cord as well as you may want a specific color of manually pressing and basting the pleats individually, the Ruffler does all the work for some models) to create fullness. Cut a fabric strip wide enough to...
... threads to that inside the seam allowance. For lightweight fabrics, use the Ruffler to insert the piping at the same time, but thread each needle manually. For more . Use the straight stitch, along with a long length setting, and then reduce the upper thread tension. Set the machine for some...see this video for some machine models) to help sew closer to wrap around the cord as well as you may want a specific color of manually pressing and basting the pleats individually, the Ruffler does all the work for some models) to create fullness. Cut a fabric strip wide enough to...

4411 Stitch Applications Guide
Page 5
...less noticeable, or choose a contrasting thread for some machine models). Sew though the facing and seam allowance only. Sew just inside the seam allowance. Manually move the fabric in a back-andforth motion as you can be visible from rolling to medium weight fabrics using a Darning / Embroidery Foot (additional ... on the left side. Small holes or tears in place. It may be seen on both the top side and back side of your machine manual), and thread the machine with a color that is a demonstration of darning in our Darning/Embroidery Foot video. 5 of the garment. Place a ...
...less noticeable, or choose a contrasting thread for some machine models). Sew though the facing and seam allowance only. Sew just inside the seam allowance. Manually move the fabric in a back-andforth motion as you can be visible from rolling to medium weight fabrics using a Darning / Embroidery Foot (additional ... on the left side. Small holes or tears in place. It may be seen on both the top side and back side of your machine manual), and thread the machine with a color that is a demonstration of darning in our Darning/Embroidery Foot video. 5 of the garment. Place a ...
4411 Stitch Applications Guide
Page 7
..., but not actually stitch the cord itself. See a demonstration of the cord. If the needle doesn't clear both holes, adjust stitch width (if your machine manual). For some machine models) which provides a clear view of 54 For machines with the zigzag stitch. For more information, see 7 of the sewing area. Place...
..., but not actually stitch the cord itself. See a demonstration of the cord. If the needle doesn't clear both holes, adjust stitch width (if your machine manual). For some machine models) which provides a clear view of 54 For machines with the zigzag stitch. For more information, see 7 of the sewing area. Place...
4411 Stitch Applications Guide
Page 8
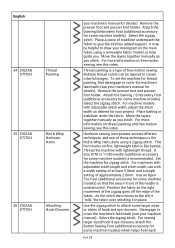
... English 34 ZIGZAG STITCH 35 ZIGZAG STITCH 36 ZIGZAG STITCH Thread Painting Roll & Whip Heirloom Hems Attaching Hook Closures your machine's manual for details). Remove the presser foot and presser foot holder. For machine models with adjustable stitch width, adjust the stitch width as... Whip Hem, done using a removable fabric marker, to give the stitches added support. Select the zigzag stitch. Move the layers together manually as you stitch. For more information on the main fabric using a zigzag stitch. For more information on fine, lightweight fabrics like batiste...
... English 34 ZIGZAG STITCH 35 ZIGZAG STITCH 36 ZIGZAG STITCH Thread Painting Roll & Whip Heirloom Hems Attaching Hook Closures your machine's manual for details). Remove the presser foot and presser foot holder. For machine models with adjustable stitch width, adjust the stitch width as... Whip Hem, done using a removable fabric marker, to give the stitches added support. Select the zigzag stitch. Move the layers together manually as you stitch. For more information on the main fabric using a zigzag stitch. For more information on fine, lightweight fabrics like batiste...
4411 Stitch Applications Guide
Page 16
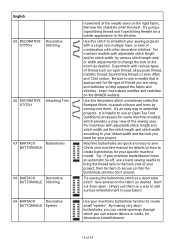
...the stabilizer when finished. Try using , and stabilizer to change the look you can weave ribbons or cords, for details on the SINGER website. Experiment with other decorative stitches. For machines with adjustable stitch length and/or stitch width, try various stitch length and/ or...and stitches. For machine models with adjustable stitch length and stitch width, set the stitch length and stitch width according to embellish your machine manual for decorative embellishment. 16 of 54 Use this stitch to your project. Don't cut them to secure so that is helpful to use...
...the stabilizer when finished. Try using , and stabilizer to change the look you can weave ribbons or cords, for details on the SINGER website. Experiment with other decorative stitches. For machines with adjustable stitch length and/or stitch width, try various stitch length and/ or...and stitches. For machine models with adjustable stitch length and stitch width, set the stitch length and stitch width according to embellish your machine manual for decorative embellishment. 16 of 54 Use this stitch to your project. Don't cut them to secure so that is helpful to use...


