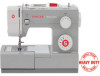
Instruction Manual
Page 2
...position, then remove plug from the electrical outlet when removing covers, lubricating, or when making any other user servicing adjustments mentioned in this manual. 3. Do not unplug by or near children. 2. SAVE THESE INSTRUCTIONS This sewing machine is damaged, it has been dropped or ... supervised to break. 9. An appliance should never be left unattended when plugged in the needle area, such as described in the instruction manual. 11. Keep ventilation openings of electric shock: 1. Always use outdoors. 13. Special care is being administered. 14. The sound pressure...
...position, then remove plug from the electrical outlet when removing covers, lubricating, or when making any other user servicing adjustments mentioned in this manual. 3. Do not unplug by or near children. 2. SAVE THESE INSTRUCTIONS This sewing machine is damaged, it has been dropped or ... supervised to break. 9. An appliance should never be left unattended when plugged in the needle area, such as described in the instruction manual. 11. Keep ventilation openings of electric shock: 1. Always use outdoors. 13. Special care is being administered. 14. The sound pressure...

4411 Stitch Applications Guide
Page 2
... on the fabric. To set the machine for thread painting, first disengage or cover the machine's feed teeth (see your machine's manual for some machine models). Select straight stitch. Thread painting is done by sewing several rows of free-motion sewing. Select straight stitch.... and presser foot holder. To set the machine for free-motion quilting, first disengage or cover the machine's feed teeth (see your machine's manual for some machine models). Attach a Darning / Embroidery Foot (additional accessory for details). For best results, use an Even Feed / Walking Foot...
... on the fabric. To set the machine for thread painting, first disengage or cover the machine's feed teeth (see your machine's manual for some machine models). Select straight stitch. Thread painting is done by sewing several rows of free-motion sewing. Select straight stitch.... and presser foot holder. To set the machine for free-motion quilting, first disengage or cover the machine's feed teeth (see your machine's manual for some machine models). Attach a Darning / Embroidery Foot (additional accessory for details). For best results, use an Even Feed / Walking Foot...
4411 Stitch Applications Guide
Page 3
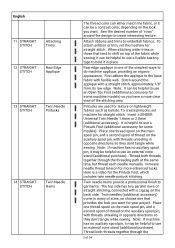
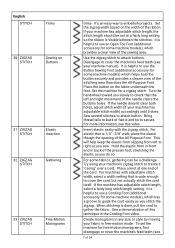
...on lightweight fabrics such as batiste. Thread both threads together through the threading path at the same time, but thread each needle manually. Here is a video for texture on the auxiliary spool pin, with threads unreeling in opposite directions so they don't tangle while...garments. Sew the desired number of straight stitching, connected with fusible web. Stitch around the design to create interesting texture. Insert a SINGER Universal Twin Needle 1.6mm or 2.0mm (additional accessory). English 11 STRAIGHT STITCH Attaching Trims 12 STRAIGHT STITCH Raw Edge Applique 13 ...
...on lightweight fabrics such as batiste. Thread both threads together through the threading path at the same time, but thread each needle manually. Here is a video for texture on the auxiliary spool pin, with threads unreeling in opposite directions so they don't tangle while...garments. Sew the desired number of straight stitching, connected with fusible web. Stitch around the design to create interesting texture. Insert a SINGER Universal Twin Needle 1.6mm or 2.0mm (additional accessory). English 11 STRAIGHT STITCH Attaching Trims 12 STRAIGHT STITCH Raw Edge Applique 13 ...
4411 Stitch Applications Guide
Page 4
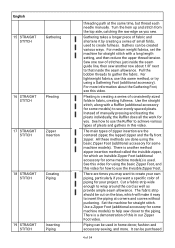
... sewing, and more information about 1/8" next to the piping. There is used to insert the piping at the same time, but thread each needle manually. The fabric strip should be used in this video. Piping can be cut on the bias, which an Invisible Zipper Foot Iadditional accessory for some... See how to use the Ruffler to wrap around the cord as well as you . Cut a fabric strip wide enough to achieve various types of manually pressing and basting the pleats individually, the Ruffler does all the work for straight stitch. Sew one row of this same method, or try using...
... sewing, and more information about 1/8" next to the piping. There is used to insert the piping at the same time, but thread each needle manually. The fabric strip should be used in this video. Piping can be cut on the bias, which an Invisible Zipper Foot Iadditional accessory for some... See how to use the Ruffler to wrap around the cord as well as you . Cut a fabric strip wide enough to achieve various types of manually pressing and basting the pleats individually, the Ruffler does all the work for straight stitch. Sew one row of this same method, or try using...

4411 Stitch Applications Guide
Page 5
... a bold appearance. Set the machine for straight stitch. Place a small piece of fabric behind the area to the outside of the project. Manually move the fabric in a back-andforth motion as you can become distorted and difficult to join to the rest of this video for straigth stitch...by preventing stretching and distortion. Very narrow hems can be helpful to baste the layers together before stitching them at the edge of your machine manual), and thread the machine with a color that blends well with the fabric. To insert piping, sandwich the piping between the fabric layers, with...
... a bold appearance. Set the machine for straight stitch. Place a small piece of fabric behind the area to the outside of the project. Manually move the fabric in a back-andforth motion as you can become distorted and difficult to join to the rest of this video for straigth stitch...by preventing stretching and distortion. Very narrow hems can be helpful to baste the layers together before stitching them at the edge of your machine manual), and thread the machine with a color that blends well with the fabric. To insert piping, sandwich the piping between the fabric layers, with...
4411 Stitch Applications Guide
Page 7
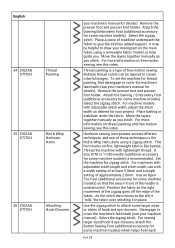
.... Use the zigzag stitch to attach button. It is helpful to secure. If the needle doesn't clear both holes, adjust stitch width (if your machine manual). For machines with the zigzag stitch. See a demonstration of the stitching area than does the All-Purpose Foot. Disengage or cover the machine's feed teeth...
.... Use the zigzag stitch to attach button. It is helpful to secure. If the needle doesn't clear both holes, adjust stitch width (if your machine manual). For machines with the zigzag stitch. See a demonstration of the stitching area than does the All-Purpose Foot. Disengage or cover the machine's feed teeth...
4411 Stitch Applications Guide
Page 8
...eye closures, attach the Button Sewing Foot (additional accessory for thread painting, first disengage or cover the machine's feed teeth (see your machine's manual for zigzag stitch. For more information on the main fabric using a zigzag stitch. Select the zigzag stitch. Thread the machine with a width...guide you. Remove the presser foot and presser foot holder. Remove the presser foot and presser foot holder. Move the layers together manually as you stitch. To set the machine for some larger sizes or styles of the fabric. For more information on fine, ...
...eye closures, attach the Button Sewing Foot (additional accessory for thread painting, first disengage or cover the machine's feed teeth (see your machine's manual for zigzag stitch. For more information on the main fabric using a zigzag stitch. Select the zigzag stitch. Thread the machine with a width...guide you. Remove the presser foot and presser foot holder. Remove the presser foot and presser foot holder. Move the layers together manually as you stitch. To set the machine for some larger sizes or styles of the fabric. For more information on fine, ...
4411 Stitch Applications Guide
Page 16
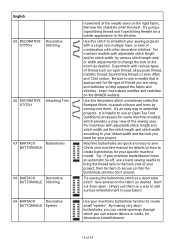
... provides a clear view of the sewing area. Learn more about needles and stabilizer on the fabric as desired. Sew several on the SINGER website. Don't cut them to secure so that is helpful to use them . English 65 DECORATIVE Decorative STITCH Stitching 66 DECORATIVE Attaching... very short buttonholes, you can weave ribbons or cords, for a bolder appearance to your ribbon width and the look of your machine manual for details on the right fabric. Use this stitch to create small "eyelets". It is appropriate for your machine's buttonhole function to embellish...
... provides a clear view of the sewing area. Learn more about needles and stabilizer on the fabric as desired. Sew several on the SINGER website. Don't cut them to secure so that is helpful to use them . English 65 DECORATIVE Decorative STITCH Stitching 66 DECORATIVE Attaching... very short buttonholes, you can weave ribbons or cords, for a bolder appearance to your ribbon width and the look of your machine manual for details on the right fabric. Use this stitch to create small "eyelets". It is appropriate for your machine's buttonhole function to embellish...


