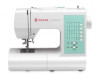

Instruction Manual
Page 3
... Straight stitch with hard-to free-arm sewing 14 - 15 Winding the bobbin 16 - 17 Threading the bobbin thread 18 - 19 Threading the top thread 20 - 23 Using automatic needle threader Needle, thread and fabric chart 24 - 25 Adjusting top thread tension 26 - 27 Changing presser foot 26 - 27 Functions of control panel 28 - 31 Reverse...
... Straight stitch with hard-to free-arm sewing 14 - 15 Winding the bobbin 16 - 17 Threading the bobbin thread 18 - 19 Threading the top thread 20 - 23 Using automatic needle threader Needle, thread and fabric chart 24 - 25 Adjusting top thread tension 26 - 27 Changing presser foot 26 - 27 Functions of control panel 28 - 31 Reverse...

Instruction Manual
Page 6
.../holder 7. Needle 24. Foot release button 28. Foot control 35. Face cover 6. Bobbin winder shaft 9. Horizontal spool pin 12. Thread guide 22. Bobbin winding tension disk 3. Reverse stitch button 11. Handle 13. Presser foot lifter 18. Feed dogs 31. Extension table (Accessory box) 8. ...14 15 20 21 22 23 24 1 8 9 10 11 16 17 19 18 25 26 27 28 29 30 31 32 33 34 35 6 Thread tension control 4. Identification plate 17. 1. KNOWING YOUR SEWING MACHINE MACHINE IDENTIFICATION 1. Cord socket 16. Bobbin cover plate 25. Needle clamp screw 29.
.../holder 7. Needle 24. Foot release button 28. Foot control 35. Face cover 6. Bobbin winder shaft 9. Horizontal spool pin 12. Thread guide 22. Bobbin winding tension disk 3. Reverse stitch button 11. Handle 13. Presser foot lifter 18. Feed dogs 31. Extension table (Accessory box) 8. ...14 15 20 21 22 23 24 1 8 9 10 11 16 17 19 18 25 26 27 28 29 30 31 32 33 34 35 6 Thread tension control 4. Identification plate 17. 1. KNOWING YOUR SEWING MACHINE MACHINE IDENTIFICATION 1. Cord socket 16. Bobbin cover plate 25. Needle clamp screw 29.
Instruction Manual
Page 12
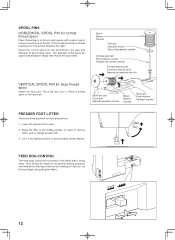
... slit Fente de retenue de fil Ranura de retención de hilo VERTICAL SPOOL PIN for your presser foot. 1. Place a thread spool on the pin and secure with a spool cap to the right. Spool pin cap Couvre-fil Tapa del pasador carrete Spool Bobine Carrete Spool ... sewing so that is being used. Raise the lifter to the middle position to insert or remove fabric, and to the type and diameter of thread. They should be larger than that of the fabric that you, not the feed dogs, are three positions for large...
... slit Fente de retenue de fil Ranura de retención de hilo VERTICAL SPOOL PIN for your presser foot. 1. Place a thread spool on the pin and secure with a spool cap to the right. Spool pin cap Couvre-fil Tapa del pasador carrete Spool Bobine Carrete Spool ... sewing so that is being used. Raise the lifter to the middle position to insert or remove fabric, and to the type and diameter of thread. They should be larger than that of the fabric that you, not the feed dogs, are three positions for large...
Instruction Manual
Page 16
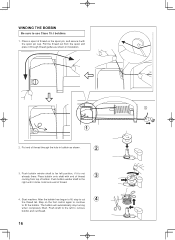
... pin, and secure it is not already there. Push shaft to the left position, if it with end of thread on the foot control again to continue to cut thread. 16 Place a spool of thread 3 coming from the spool and place it clicks. The bobbin will automatically stop to fill the bobbin. Push... the spool pin cap. Start machine. Push bobbin winder shaft to far left to use Class 15 J bobbins. 1. Hold onto end of bobbin. Pull the thread out from top of thread. 4. WINDING THE BOBBIN Be sure to remove bobbin and cut 4 the...
... pin, and secure it is not already there. Push shaft to the left position, if it with end of thread on the foot control again to continue to cut thread. 16 Place a spool of thread 3 coming from the spool and place it clicks. The bobbin will automatically stop to fill the bobbin. Push... the spool pin cap. Start machine. Push bobbin winder shaft to far left to use Class 15 J bobbins. 1. Hold onto end of bobbin. Pull the thread out from top of thread. 4. WINDING THE BOBBIN Be sure to remove bobbin and cut 4 the...
Instruction Manual
Page 18
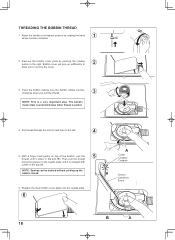
... it stops in the slot (B). NOTE: Sewing can be started without picking up sufficiently to 2 allow you pull the thread. 3 NOTE: This is pulled. 4. Raise the needle to the right. Remove the bobbin cover plate by pushing the release button to its highest ...position by rotating the hand 1 wheel counter clockwise. 2. With a finger held gently on the top left . 4 5. Pull thread through the slot (A) and then to remove the cover. 3. Replace the clear bobbin cover plate onto the needle plate. 6 A Cutter Coupeur Cortador Groove Cannelure Surco...
... it stops in the slot (B). NOTE: Sewing can be started without picking up sufficiently to 2 allow you pull the thread. 3 NOTE: This is pulled. 4. Raise the needle to the right. Remove the bobbin cover plate by pushing the release button to its highest ...position by rotating the hand 1 wheel counter clockwise. 2. With a finger held gently on the top left . 4 5. Pull thread through the slot (A) and then to remove the cover. 3. Replace the clear bobbin cover plate onto the needle plate. 6 A Cutter Coupeur Cortador Groove Cannelure Surco...
Instruction Manual
Page 20
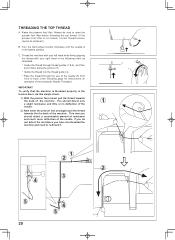
...its highest position. Turn the hand wheel counter clockwise until the needle is not raised, correct thread tension cannot be sure to raise the presser foot lifter before threading the top thread. (If the presser foot lifter is in the tension discs, do not detect the resistance ...you do this simple check: 1.) With the presser foot raised, pull the thread towards the the back of the needle (5) from front to re-thread it down along the groove (3). * Guide the thread into the thread guide (4). * Pass the thread through thread guides (1 & 2), and then pull it . 20 You should detect a ...
...its highest position. Turn the hand wheel counter clockwise until the needle is not raised, correct thread tension cannot be sure to raise the presser foot lifter before threading the top thread. (If the presser foot lifter is in the tension discs, do not detect the resistance ...you do this simple check: 1.) With the presser foot raised, pull the thread towards the the back of the needle (5) from front to re-thread it down along the groove (3). * Guide the thread into the thread guide (4). * Pass the thread through thread guides (1 & 2), and then pull it . 20 You should detect a ...

Instruction Manual
Page 24
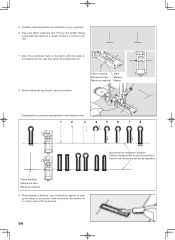
...sewing project. Always refer to change the needle and will determine the choice of thread in the top thread supply. FABRICS The fabrics below can go. 6. THREAD LightWeight Batiste Chiffon Crepe Medium- Insert the new needle into the needle plate slot... use on stretch fabrics. * For best sewing results, always use the same size and type of a needle and thread. Push the needle up as far as it easier to it downward. 4. Tighten the needle clamp screw with the flat... snugly, but do not over tighten. The following table is a practical guide to use a Singer Branded Needle.
...sewing project. Always refer to change the needle and will determine the choice of thread in the top thread supply. FABRICS The fabrics below can go. 6. THREAD LightWeight Batiste Chiffon Crepe Medium- Insert the new needle into the needle plate slot... use on stretch fabrics. * For best sewing results, always use the same size and type of a needle and thread. Push the needle up as far as it easier to it downward. 4. Tighten the needle clamp screw with the flat... snugly, but do not over tighten. The following table is a practical guide to use a Singer Branded Needle.
Instruction Manual
Page 26
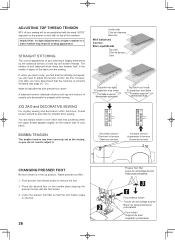
...down'. You will need to adjust the tension control. Lower the presser foot lifter so that the machine is irregular, you are sewing. ADJUSTING TOP THREAD TENSION 90% of your sewing will be less than for straight stitch sewing. Helpful Hint: A slight adjustment to remove the foot. 2. A ...;n CHANGING PRESSER FOOT Be sure needle is largely determined by the balanced tension of both top and bottom) is well balanced when these two threads 'lock' in the up position. Push presser foot release button to a higher number or a lower number may improve sewing appearance. STRAIGHT...
...down'. You will need to adjust the tension control. Lower the presser foot lifter so that the machine is irregular, you are sewing. ADJUSTING TOP THREAD TENSION 90% of your sewing will be less than for straight stitch sewing. Helpful Hint: A slight adjustment to remove the foot. 2. A ...;n CHANGING PRESSER FOOT Be sure needle is largely determined by the balanced tension of both top and bottom) is well balanced when these two threads 'lock' in the up position. Push presser foot release button to a higher number or a lower number may improve sewing appearance. STRAIGHT...

Instruction Manual
Page 40
...NOTE: Based upon the weight of the fabric, slight "fine tuning" of the fabric, stop the sewing machine. Guide the fabric gently with the thread cutter located on the top of face cover as an aid for all types of the numbered guide lines on the bobbin cover plate is... button and sew a few stitches at its center position. STRAIGHT STITCHING A Straight stitch is most frequently used to the rear and cut off excess threads with your fabric when sewing a seam. Turn the hand wheel counter clockwise until the needle is used for guiding your hands. Reverse stitch button C....
...NOTE: Based upon the weight of the fabric, slight "fine tuning" of the fabric, stop the sewing machine. Guide the fabric gently with the thread cutter located on the top of face cover as an aid for all types of the numbered guide lines on the bobbin cover plate is... button and sew a few stitches at its center position. STRAIGHT STITCHING A Straight stitch is most frequently used to the rear and cut off excess threads with your fabric when sewing a seam. Turn the hand wheel counter clockwise until the needle is used for guiding your hands. Reverse stitch button C....

Instruction Manual
Page 42
... sew close to sew forward until you acheive the desired appearance. 4. NOTE: For a dramatic appearance, experiment with desired top stitching color. Increase thread tension a little bit at a time until the foot control is designed to the piping may be accomplished with the Stitch Width Control.... Thread machine with invisible or lightweight thread the color that the needle passes through the right side of the needle position to sew closer to look like hand sewing ...
... sew close to sew forward until you acheive the desired appearance. 4. NOTE: For a dramatic appearance, experiment with desired top stitching color. Increase thread tension a little bit at a time until the foot control is designed to the piping may be accomplished with the Stitch Width Control.... Thread machine with invisible or lightweight thread the color that the needle passes through the right side of the needle position to sew closer to look like hand sewing ...
Instruction Manual
Page 44
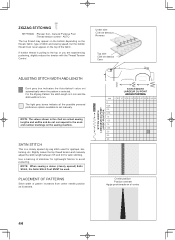
...length between 0.5 and 2.0 for lightweight fabrics to the scale and number markings on the top of stitch and sewing speed, but the bobbin thread must never appear on the sewing machine. ZIGZAG STITCHING SETTINGS :Presser foot - NOTE: When sewing a dense (closely spaced) Satin Stitch,...for appliqué, bartacking, etc. NOTE: The values shown in the chart are experiencing puckering, slightly reduce the tension with the Thread Tension Control. Use a backing of pattern increases from center needle position as illustrated. STITCH LENGTH LONGUEUR DU POINT LARGO PUNTADA STITCH WIDTH...
...length between 0.5 and 2.0 for lightweight fabrics to the scale and number markings on the top of stitch and sewing speed, but the bobbin thread must never appear on the sewing machine. ZIGZAG STITCHING SETTINGS :Presser foot - NOTE: When sewing a dense (closely spaced) Satin Stitch,...for appliqué, bartacking, etc. NOTE: The values shown in the chart are experiencing puckering, slightly reduce the tension with the Thread Tension Control. Use a backing of pattern increases from center needle position as illustrated. STITCH LENGTH LONGUEUR DU POINT LARGO PUNTADA STITCH WIDTH...

Instruction Manual
Page 46
Blind Stitch Foot : Thread Tension Control: AUTO - Then turn the hem up . Place the fabric under on fine fabrics or overcasting it on the foot. Then adjust the guide ...
Blind Stitch Foot : Thread Tension Control: AUTO - Then turn the hem up . Place the fabric under on fine fabrics or overcasting it on the foot. Then adjust the guide ...

Instruction Manual
Page 48
... 48 Place the fabric right side up so that the zigzag part of the length control. General Purpose Foot :Thread tension control - General Purpose Foot :Thread tension control - AUTO Turn under the seam allowances on both sides with needle. AUTO This is a strong stitch...) allowance, just catching the fabric fold on the cut edges, and press. Baste folded edges to the stitching line. General Purpose Foot :Thread tension control - To attach two separate pieces of blouses and dresses). Stitch over the folded edge, pulling the fabric in appearance experiment with ...
... 48 Place the fabric right side up so that the zigzag part of the length control. General Purpose Foot :Thread tension control - General Purpose Foot :Thread tension control - AUTO Turn under the seam allowances on both sides with needle. AUTO This is a strong stitch...) allowance, just catching the fabric fold on the cut edges, and press. Baste folded edges to the stitching line. General Purpose Foot :Thread tension control - To attach two separate pieces of blouses and dresses). Stitch over the folded edge, pulling the fabric in appearance experiment with ...

Instruction Manual
Page 50
... FEATHER STITCH The pleasing appearance of garments. OVEREDGE STITCH This is primarily used for seaming in one operation. General Purpose Foot or Satin Stitch Foot :Thread tension control - Use this stitch enables it locks three times - AUTO Stretch stitches are mainly for use on woven materials. It's very effective for use...
... FEATHER STITCH The pleasing appearance of garments. OVEREDGE STITCH This is primarily used for seaming in one operation. General Purpose Foot or Satin Stitch Foot :Thread tension control - Use this stitch enables it locks three times - AUTO Stretch stitches are mainly for use on woven materials. It's very effective for use...
Instruction Manual
Page 52
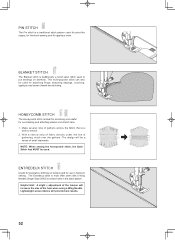
NOTE: When sewing the honeycomb stitch, the Satin Stitch foot MUST be used for attaching fringe, attaching edgings, couching, applique and drawn thread hemstitching. This multi-purpose stitch can also be a series of the hole when using a Wing Needle. With a narrow strip of fabric ...under the line of gathers across the fabric that you wish to smock. 2. The Entredeux stitch is most often sewn with a Wing Needle (Singer Style 2040) to create holes in heirloom sewing. The design will be used . ENTREDEUX STITCH Useful for decorative stitching on blankets. Lightweight woven fabrics...
NOTE: When sewing the honeycomb stitch, the Satin Stitch foot MUST be used for attaching fringe, attaching edgings, couching, applique and drawn thread hemstitching. This multi-purpose stitch can also be a series of the hole when using a Wing Needle. With a narrow strip of fabric ...under the line of gathers across the fabric that you wish to smock. 2. The Entredeux stitch is most often sewn with a Wing Needle (Singer Style 2040) to create holes in heirloom sewing. The design will be used . ENTREDEUX STITCH Useful for decorative stitching on blankets. Lightweight woven fabrics...
Instruction Manual
Page 54
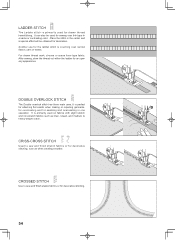
..., choose a coarse linen type fabric. After sewing, draw the thread out within the ladder for the ladder stitch is couching over thin tape in one operation. CRISS-CROSS STITCH Used to sew and finish elastic ... slight stretch and non-stretch fabrics such as when creating a border. Place the stitch in the center and a special effect will be used for drawn thread hemstitching. Another use for an open airy appearance.
..., choose a coarse linen type fabric. After sewing, draw the thread out within the ladder for the ladder stitch is couching over thin tape in one operation. CRISS-CROSS STITCH Used to sew and finish elastic ... slight stretch and non-stretch fabrics such as when creating a border. Place the stitch in the center and a special effect will be used for drawn thread hemstitching. Another use for an open airy appearance.

Instruction Manual
Page 60
General Purpose Foot :Feed dog control - Position your fabric and button under the presser foot. Helpful Hint: To secure thread, pull both left and right openings of button. SEWING ON A BUTTON SETTINGS :Presser foot - Adjust width if required. Sew 10 stitches across. Lower presser foot. Turn the handwheel to make sure needle clears both threads to the backside of it. If a shank is required, place a pin on top of the button and sew over top of the fabric and tie together. 60
General Purpose Foot :Feed dog control - Position your fabric and button under the presser foot. Helpful Hint: To secure thread, pull both left and right openings of button. SEWING ON A BUTTON SETTINGS :Presser foot - Adjust width if required. Sew 10 stitches across. Lower presser foot. Turn the handwheel to make sure needle clears both threads to the backside of it. If a shank is required, place a pin on top of the button and sew over top of the fabric and tie together. 60
Instruction Manual
Page 64
... mark the position of buttonhole on the buttonhole foot, and then lower the buttonhole foot. 8. Place the fabric under the foot. Pull out the bobbin thread underneath the fabric to a length of about 4 inches to open up the fabric in the following order. 1 2 3 4 5 6 7 8 Fabric ...marking Marque du tissu Marca de material 9. While holding the top thread, start the machine. When sewing is finished, use a buttonhole opener to the rear. 7. Be careful not to cut the ends of the buttonhole. Align the...
... mark the position of buttonhole on the buttonhole foot, and then lower the buttonhole foot. 8. Place the fabric under the foot. Pull out the bobbin thread underneath the fabric to a length of about 4 inches to open up the fabric in the following order. 1 2 3 4 5 6 7 8 Fabric ...marking Marque du tissu Marca de material 9. While holding the top thread, start the machine. When sewing is finished, use a buttonhole opener to the rear. 7. Be careful not to cut the ends of the buttonhole. Align the...

Instruction Manual
Page 66
...-to-sew fabrics or along the edge of the cord forward under the foot and tie off extra length. CORDED BUTTONHOLES Hook filler cord (crochet thread or buttonhole twist) over the spur and pull both ends of multi-layered garments, attach the under-plate (A) onto the buttonhole foot as shown in...
...-to-sew fabrics or along the edge of the cord forward under the foot and tie off extra length. CORDED BUTTONHOLES Hook filler cord (crochet thread or buttonhole twist) over the spur and pull both ends of multi-layered garments, attach the under-plate (A) onto the buttonhole foot as shown in...

Instruction Manual
Page 70
...; 70 Up to 20 patterns can be combined into a string, making a sequence which can be sewn as described in the upper column. Satin Stitch Foot :Thread tension control -
...; 70 Up to 20 patterns can be combined into a string, making a sequence which can be sewn as described in the upper column. Satin Stitch Foot :Thread tension control -


