
Instruction Manual
Page 1
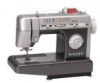
MODEL CG-590 COMMERCIAL GRADE SEWING MACHINE WORKBOOK
MODEL CG-590 COMMERCIAL GRADE SEWING MACHINE WORKBOOK

Instruction Manual
Page 2
.... Your machine is a registered trademark of the Singer Company Ltd. © 2004 Singer Sewing Company All Rights Reserved. Congratulations on the purchase of your creativity will have many hours of sewing enjoyment with this easy-to your own projects. This commercial grade sewing machine is ideal for learning various sewing techniques, which you will be inspired, and that...
.... Your machine is a registered trademark of the Singer Company Ltd. © 2004 Singer Sewing Company All Rights Reserved. Congratulations on the purchase of your creativity will have many hours of sewing enjoyment with this easy-to your own projects. This commercial grade sewing machine is ideal for learning various sewing techniques, which you will be inspired, and that...

Instruction Manual
Page 3
... Topstitching 2 Create Quilted Fabric 3 Speed Basting 4 Making Piping 5 Attaching Purchased Piping 6 Centered Zippers 7 Satin Stitch Applique 9 Lace Insertion 11 Button Sewing 13 Four-Step Buttonholes 15 Free-Motion Monogramming 17 Free-Motion Embroidery 19 Blindstitch Hem 21 Attaching Beaded Trims 23 Mending with Multi-Stitch Zigzag ... Fabrics 27 Ribbing Application 28 Overedge Stitching 29 Seam Allowence with Stretch Overedge Seam Stitch 30 Attaching Elastic 31 Sewing with a Wing Needle 32 Twin Needle Sewing 33 Applying Ribbon with a Twin Needle 34...
... Topstitching 2 Create Quilted Fabric 3 Speed Basting 4 Making Piping 5 Attaching Purchased Piping 6 Centered Zippers 7 Satin Stitch Applique 9 Lace Insertion 11 Button Sewing 13 Four-Step Buttonholes 15 Free-Motion Monogramming 17 Free-Motion Embroidery 19 Blindstitch Hem 21 Attaching Beaded Trims 23 Mending with Multi-Stitch Zigzag ... Fabrics 27 Ribbing Application 28 Overedge Stitching 29 Seam Allowence with Stretch Overedge Seam Stitch 30 Attaching Elastic 31 Sewing with a Wing Needle 32 Twin Needle Sewing 33 Applying Ribbon with a Twin Needle 34...
Instruction Manual
Page 4
Decorative Stitching 36 Joining Fabric with Herringbone Stitch 37 Decorative Stippling 38 Scallop Edges 39 Narrow Hem 40 Gathering with the Cording Foot 41 Applying Trims, Cords & Braids 42 Shirring with the Gathering Foot 43 Using the Even Feed Foot to Sew Multiple Fabric Layers 45 Using the Even Feed Foot to Sew Plaid Fabrics 46 Using the Even Feed Foot to Sew Pile Fabrics 47 Sewing with the Side Cutter 48 Sewing with the Ruffler 50 \
Decorative Stitching 36 Joining Fabric with Herringbone Stitch 37 Decorative Stippling 38 Scallop Edges 39 Narrow Hem 40 Gathering with the Cording Foot 41 Applying Trims, Cords & Braids 42 Shirring with the Gathering Foot 43 Using the Even Feed Foot to Sew Multiple Fabric Layers 45 Using the Even Feed Foot to Sew Plaid Fabrics 46 Using the Even Feed Foot to Sew Pile Fabrics 47 Sewing with the Side Cutter 48 Sewing with the Ruffler 50 \
Instruction Manual
Page 5
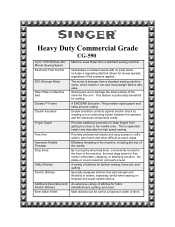
...Commercial Grade CG-590 Up to 1100 Stitches-PerMinute Sewing Speed Electronic Foot Control 60% Stronger Motor Steel Plate on knitwear and super-stretch fabrics. Sewing pins won't damage the steel surface of the machine, the feed dogs lower for free motion embroidery, stippling, or attaching a button. This is stronger than a standard sewing... components inside. No plates or covers required, just push a lever. Most stitches can sew heavyweight fabrics with no jump starts. A SINGER® Exclusive. This feature is particularly beneficial for fabric embellishment, quilting, and more. ...
...Commercial Grade CG-590 Up to 1100 Stitches-PerMinute Sewing Speed Electronic Foot Control 60% Stronger Motor Steel Plate on knitwear and super-stretch fabrics. Sewing pins won't damage the steel surface of the machine, the feed dogs lower for free motion embroidery, stippling, or attaching a button. This is stronger than a standard sewing... components inside. No plates or covers required, just push a lever. Most stitches can sew heavyweight fabrics with no jump starts. A SINGER® Exclusive. This feature is particularly beneficial for fabric embellishment, quilting, and more. ...
Instruction Manual
Page 6
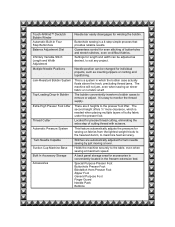
...Bobbin This is needed when placing multiple layers of bulky fabric under the presser foot. It is easy to the table, even when sewing at all! Touch-N-Wind™ Declutch Bobbin Winder Automatic Built-In Four Step Buttonhole Balance Adjustment Dial Infinitely Variable Stitch Length and ...188;" more clearance, which the bobbin case actually floats above the hook, precluding thread jams. The machine will not jam, even when sewing on sheer fabric or no bobbin cases to suit any project. Located for winding the bobbin. Special Purpose Presser Foot Buttonhole Presser Foot Blindstitch...
...Bobbin This is needed when placing multiple layers of bulky fabric under the presser foot. It is easy to the table, even when sewing at all! Touch-N-Wind™ Declutch Bobbin Winder Automatic Built-In Four Step Buttonhole Balance Adjustment Dial Infinitely Variable Stitch Length and ...188;" more clearance, which the bobbin case actually floats above the hook, precluding thread jams. The machine will not jam, even when sewing on sheer fabric or no bobbin cases to suit any project. Located for winding the bobbin. Special Purpose Presser Foot Buttonhole Presser Foot Blindstitch...
Instruction Manual
Page 7
All Rights Reserved. Self-Lubricating Because the machine is permanently lubricated, there is a registered trademark of mind knowing the machine has a 25 year School and Home Warranty limited warranty. Machine can be mounted into a cabinet. \ SINGER® is no need to transport the machine. Portable Cabinet Mountable Machine has a built-in carry handle, making it easy to oil the machine, and no oil gets on fabric. 25 Year Limited Commercial, Peace of the Singer Company Ltd. © 2004 Singer Sewing Company.
All Rights Reserved. Self-Lubricating Because the machine is permanently lubricated, there is a registered trademark of mind knowing the machine has a 25 year School and Home Warranty limited warranty. Machine can be mounted into a cabinet. \ SINGER® is no need to transport the machine. Portable Cabinet Mountable Machine has a built-in carry handle, making it easy to oil the machine, and no oil gets on fabric. 25 Year Limited Commercial, Peace of the Singer Company Ltd. © 2004 Singer Sewing Company.
Instruction Manual
Page 8
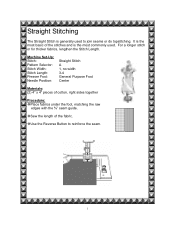
...-Up: Stitch: Pattern Selector: Stitch Width: Stitch Length: Presser Foot: Needle Position: Straight Stitch A 1, no width 3-4 General Purpose Foot Center Materials: (2) 4" x 4" pieces of the fabric. Sew the length of cotton, right sides together Procedure: Place fabrics under the foot, matching the raw edges with the ⅝" seam guide. Straight Stitching The...
...-Up: Stitch: Pattern Selector: Stitch Width: Stitch Length: Presser Foot: Needle Position: Straight Stitch A 1, no width 3-4 General Purpose Foot Center Materials: (2) 4" x 4" pieces of the fabric. Sew the length of cotton, right sides together Procedure: Place fabrics under the foot, matching the raw edges with the ⅝" seam guide. Straight Stitching The...
Instruction Manual
Page 9
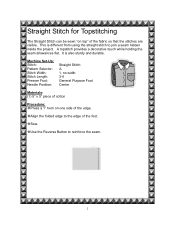
..." of the fabric so that the stitches are visible. This is also sturdy and durable. A topstitch provides a decorative touch while holding the seam allowances flat. Sew. It is different from using the straight stitch to join a seam hidden inside the project. Use the Reverse Button to the edge of the edge...
..." of the fabric so that the stitches are visible. This is also sturdy and durable. A topstitch provides a decorative touch while holding the seam allowances flat. Sew. It is different from using the straight stitch to join a seam hidden inside the project. Use the Reverse Button to the edge of the edge...
Instruction Manual
Page 10
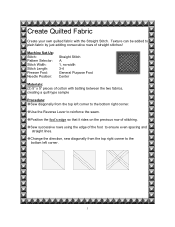
...top left corner. 3 Create Quilted Fabric Create your own quilted fabric with batting between the two fabrics, creating a quilt-type sample Procedure: Sew diagonally from the top right corner to the bottom left corner to plain fabric by just adding consecutive rows of straight stitches! Use the Reverse ...Lever to ensure even spacing and straight lines. Sew successive rows using the edge of the foot to reinforce the seam. Position the foot's edge so that it rides on the previous row...
...top left corner. 3 Create Quilted Fabric Create your own quilted fabric with batting between the two fabrics, creating a quilt-type sample Procedure: Sew diagonally from the top right corner to the bottom left corner to plain fabric by just adding consecutive rows of straight stitches! Use the Reverse ...Lever to ensure even spacing and straight lines. Sew successive rows using the edge of the foot to reinforce the seam. Position the foot's edge so that it rides on the previous row...
Instruction Manual
Page 11
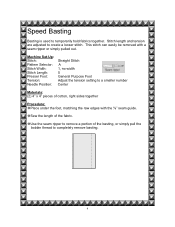
... together Procedure: Place under the foot, matching the raw edges with a seam ripper or simply pulled out. Use the seam ripper to completely remove basting. 4 Sew the length of the fabric. Stitch length and tension are adjusted to temporarily hold fabrics together. Speed Basting Basting is used to create a looser stitch.
... together Procedure: Place under the foot, matching the raw edges with a seam ripper or simply pulled out. Use the seam ripper to completely remove basting. 4 Sew the length of the fabric. Stitch length and tension are adjusted to temporarily hold fabrics together. Speed Basting Basting is used to create a looser stitch.
Instruction Manual
Page 12
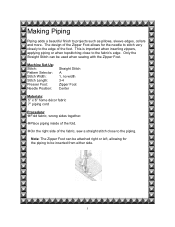
... close to the piping. On the right side of the Zipper Foot allows for the piping to the fabric's edge. The design of the fabric, sew a straight stitch close to be inserted from either side. 5 Note: The Zipper Foot can be attached right or left, allowing for the needle to stitch...
... close to the piping. On the right side of the Zipper Foot allows for the piping to the fabric's edge. The design of the fabric, sew a straight stitch close to be inserted from either side. 5 Note: The Zipper Foot can be attached right or left, allowing for the needle to stitch...
Instruction Manual
Page 13
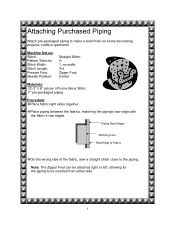
... Set-up: Stitch: Pattern Selector: Stitch Width: Stitch Length: Presser Foot: Needle Position: Straight Stitch A 1, no width 3-4 Zipper Foot Center Materials: (2) 3" x 6" pieces of the fabric, sew a straight stitch close to the piping.
... Set-up: Stitch: Pattern Selector: Stitch Width: Stitch Length: Presser Foot: Needle Position: Straight Stitch A 1, no width 3-4 Zipper Foot Center Materials: (2) 3" x 6" pieces of the fabric, sew a straight stitch close to the piping.

Instruction Manual
Page 16
... fabric. (Fusing the appliqué into place will form on the applique and half on the base fabric. Try a rayon thread for a smoother looking finish. Sew around the applique. Satin Stitch Appliqué Satin Stitching is a series of the stitch will keep the appliqué from shifting while stitching.) Place a tear...
... fabric. (Fusing the appliqué into place will form on the applique and half on the base fabric. Try a rayon thread for a smoother looking finish. Sew around the applique. Satin Stitch Appliqué Satin Stitching is a series of the stitch will keep the appliqué from shifting while stitching.) Place a tear...

Instruction Manual
Page 17
Sewing over an applique twice is not always necessary, however, it does give a beautiful full-covered effect. 10 Sewing around the applique again, covering the previous stitching. .
Sewing over an applique twice is not always necessary, however, it does give a beautiful full-covered effect. 10 Sewing around the applique again, covering the previous stitching. .
Instruction Manual
Page 18
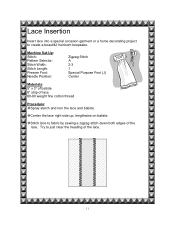
... Width: Stitch Length: Presser Foot: Needle Position: Zigzag Stitch A 2-3 1 Special Purpose Foot (J) Center Materials: 5" x 3" of batiste 6" strip of the lace. Stitch lace to fabric by sewing a zigzag stitch down both edges of lace 60-80 weight fine cotton thread Procedure: Spray starch and iron the lace and batiste. Try to create...
... Width: Stitch Length: Presser Foot: Needle Position: Zigzag Stitch A 2-3 1 Special Purpose Foot (J) Center Materials: 5" x 3" of batiste 6" strip of the lace. Stitch lace to fabric by sewing a zigzag stitch down both edges of lace 60-80 weight fine cotton thread Procedure: Spray starch and iron the lace and batiste. Try to create...

Instruction Manual
Page 19
Finish fabric's edges by stitching a row of decorative stitches down the center. Turn fabric over and trim excess fabric seam allowances away. Back side of the lace. 12 Note: A nice touch can be added by sewing a small zigzag through all layers, being careful not to catch too much lace. Carefully cut under the lace down each side of fabric Lace Turn these raw edges back away from the lace, then finger press.
Finish fabric's edges by stitching a row of decorative stitches down the center. Turn fabric over and trim excess fabric seam allowances away. Back side of the lace. 12 Note: A nice touch can be added by sewing a small zigzag through all layers, being careful not to catch too much lace. Carefully cut under the lace down each side of fabric Lace Turn these raw edges back away from the lace, then finger press.

Instruction Manual
Page 20
... Feed Dogs: Presser Foot: Needle Position: Zigzag Stitch A Determined by button (width between the holes is usually 3mm) N/A Lowered Feed Dogs Button Sewing Foot* Center Materials: Home décor fabric or shirting One 2-hole button Liquid fray preventer Procedure: Lower the Feed Dogs Fold fabric in the ...button are between the toes of the foot. *The Button Sewing Foot is especially helpful when making a large project where several buttons need to sew on the fabric so that has button tabs. Check with your sewing machine to be attached, such as a shower curtain that the ...
... Feed Dogs: Presser Foot: Needle Position: Zigzag Stitch A Determined by button (width between the holes is usually 3mm) N/A Lowered Feed Dogs Button Sewing Foot* Center Materials: Home décor fabric or shirting One 2-hole button Liquid fray preventer Procedure: Lower the Feed Dogs Fold fabric in the ...button are between the toes of the foot. *The Button Sewing Foot is especially helpful when making a large project where several buttons need to sew on the fabric so that has button tabs. Check with your sewing machine to be attached, such as a shower curtain that the ...

Instruction Manual
Page 21
... stitch in place. Turn the hand wheel forward, adjust so that the needle goes into the opposite hole and then use the foot control to sew 5-6 stitches. Apply a liquid fray preventer on the backside of the needle into the opposite hole. This forms a tie-off on the knots. Adjust the stitch...
... stitch in place. Turn the hand wheel forward, adjust so that the needle goes into the opposite hole and then use the foot control to sew 5-6 stitches. Apply a liquid fray preventer on the backside of the needle into the opposite hole. This forms a tie-off on the knots. Adjust the stitch...

Instruction Manual
Page 23
...of the Four-Step buttonhole. Turn Pattern Selection knob to Step One of the Four-Step buttonhole. Sew, and the machine will stitch in reverse, making the left side of the buttonhole. Sew 5 to Step Four of the Four-Step buttonhole. Turn Pattern Selection knob to 6 stitches, ...bartacking the top of the Four-Step buttonhole. Sew, and the machine will stitch the right side of the buttonhole. ...
...of the Four-Step buttonhole. Turn Pattern Selection knob to Step One of the Four-Step buttonhole. Sew, and the machine will stitch in reverse, making the left side of the buttonhole. Sew 5 to Step Four of the Four-Step buttonhole. Turn Pattern Selection knob to 6 stitches, ...bartacking the top of the Four-Step buttonhole. Sew, and the machine will stitch the right side of the buttonhole. ...


