
Instruction Manual
Page 1
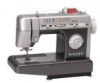
MODEL CG-590 COMMERCIAL GRADE SEWING MACHINE WORKBOOK
MODEL CG-590 COMMERCIAL GRADE SEWING MACHINE WORKBOOK

Instruction Manual
Page 2
..., and that you can apply to -use machine, feature-packed machine! We are certain that your new SINGER® Sewing Machine! This commercial grade sewing machine is a registered trademark of sewing, including fashion sewing, home decorating, quilting and crafts. This workbook has been created as a tool for all types of the Singer Company Ltd. © 2004 Singer Sewing Company All Rights Reserved. Enjoy! Congratulations...
..., and that you can apply to -use machine, feature-packed machine! We are certain that your new SINGER® Sewing Machine! This commercial grade sewing machine is a registered trademark of sewing, including fashion sewing, home decorating, quilting and crafts. This workbook has been created as a tool for all types of the Singer Company Ltd. © 2004 Singer Sewing Company All Rights Reserved. Enjoy! Congratulations...
Instruction Manual
Page 5
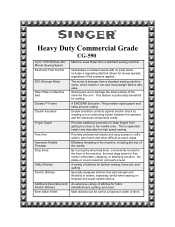
...-to the needle area. A SINGER® Exclusive. Double insulation protects against electric shock by creating a non-conducting barrier between the operator and the electrical components inside. A variety of stitches for slower speeds, regardless of the machine, the feed dogs lower for... knitwear and super-stretch fabrics. Specially designed stitches that allows for fashion sewing, home dec and quilting. Heavy Duty Commercial Grade CG-590 Up to seams, especially useful when sewing on Machine Bed Duratec™ Frame Double Insulated Finger Guard Free Arm Automatic Needle ...
...-to the needle area. A SINGER® Exclusive. Double insulation protects against electric shock by creating a non-conducting barrier between the operator and the electrical components inside. A variety of stitches for slower speeds, regardless of the machine, the feed dogs lower for... knitwear and super-stretch fabrics. Specially designed stitches that allows for fashion sewing, home dec and quilting. Heavy Duty Commercial Grade CG-590 Up to seams, especially useful when sewing on Machine Bed Duratec™ Frame Double Insulated Finger Guard Free Arm Automatic Needle ...
Instruction Manual
Page 6
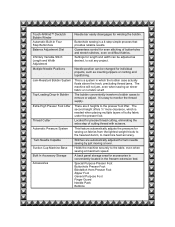
... all! Located for sewing on difficult fabrics. Automatic Pressure System This feature automatically adjusts the pressure for precise thread cutting, eliminating the extra step of bulky fabric under the presser foot. Holds the machine securely to maximize feed accuracy. A back panel storage area for length and width.... The second height offers ¼" more clearance, which the bobbin case actually floats above the hook, precluding thread jams. The machine will not jam, even when sewing on sheer fabric or no bobbin cases to the presser foot lifter. Twin Needle Capable Suction Cup...
... all! Located for sewing on difficult fabrics. Automatic Pressure System This feature automatically adjusts the pressure for precise thread cutting, eliminating the extra step of bulky fabric under the presser foot. Holds the machine securely to maximize feed accuracy. A back panel storage area for length and width.... The second height offers ¼" more clearance, which the bobbin case actually floats above the hook, precluding thread jams. The machine will not jam, even when sewing on sheer fabric or no bobbin cases to the presser foot lifter. Twin Needle Capable Suction Cup...
Instruction Manual
Page 7
Portable Cabinet Mountable Machine has a built-in carry handle, making it easy to oil the machine, and no oil gets on fabric. 25 Year Limited Commercial, Peace of the Singer Company Ltd. © 2004 Singer Sewing Company. Machine can be mounted into a cabinet. \ SINGER® is no need to transport the machine. Self-Lubricating Because the machine is permanently lubricated, there is a registered trademark of mind knowing the machine has a 25 year School and Home Warranty limited warranty. All Rights Reserved.
Portable Cabinet Mountable Machine has a built-in carry handle, making it easy to oil the machine, and no oil gets on fabric. 25 Year Limited Commercial, Peace of the Singer Company Ltd. © 2004 Singer Sewing Company. Machine can be mounted into a cabinet. \ SINGER® is no need to transport the machine. Self-Lubricating Because the machine is permanently lubricated, there is a registered trademark of mind knowing the machine has a 25 year School and Home Warranty limited warranty. All Rights Reserved.
Instruction Manual
Page 8
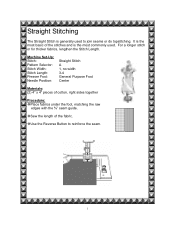
...stitch or for thicker fabrics, lengthen the Stitch Length. Straight Stitching The Straight Stitch is the most basic of the stitches and is generally used . Machine Set-Up: Stitch: Pattern Selector: Stitch Width: Stitch Length: Presser Foot: Needle Position: Straight Stitch A 1, no width 3-4 General Purpose Foot Center.... Use the Reverse Button to join seams or do topstitching. It is the most commonly used to reinforce the seam. 1 Sew the length of cotton, right sides together Procedure: Place fabrics under the foot, matching the raw edges with the ⅝" seam guide.
...stitch or for thicker fabrics, lengthen the Stitch Length. Straight Stitching The Straight Stitch is the most basic of the stitches and is generally used . Machine Set-Up: Stitch: Pattern Selector: Stitch Width: Stitch Length: Presser Foot: Needle Position: Straight Stitch A 1, no width 3-4 General Purpose Foot Center.... Use the Reverse Button to join seams or do topstitching. It is the most commonly used to reinforce the seam. 1 Sew the length of cotton, right sides together Procedure: Place fabrics under the foot, matching the raw edges with the ⅝" seam guide.
Instruction Manual
Page 9
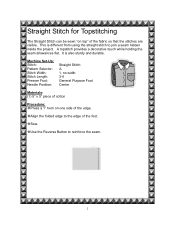
Machine Set-Up: Stitch: Pattern Selector: Stitch Width: Stitch Length: Presser Foot: Needle Position: Straight Stitch A 1, no width 3-4 General Purpose Foot Center Materials: (1) 5" x 5" piece of cotton Procedure: Press a 1" hem on top" of the fabric so that the stitches are visible. Use the Reverse Button to the edge of the foot. Sew. A topstitch provides...
Machine Set-Up: Stitch: Pattern Selector: Stitch Width: Stitch Length: Presser Foot: Needle Position: Straight Stitch A 1, no width 3-4 General Purpose Foot Center Materials: (1) 5" x 5" piece of cotton Procedure: Press a 1" hem on top" of the fabric so that the stitches are visible. Use the Reverse Button to the edge of the foot. Sew. A topstitch provides...
Instruction Manual
Page 10
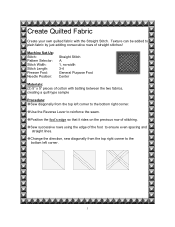
...seam. Change the direction, sew diagonally from the top left corner. 3 Texture can be added to plain fabric by just adding consecutive rows of stitching. Position the foot's edge so that it rides on the previous row of straight stitches! Machine Set-Up: Stitch: Pattern... Selector: Stitch Width: Stitch Length: Presser Foot: Needle Position: Straight Stitch A 1, no width 3-4 General Purpose Foot Center Materials: (2) 5" x 5" pieces of the foot to ensure even spacing and straight lines. Sew successive rows using the edge...
...seam. Change the direction, sew diagonally from the top left corner. 3 Texture can be added to plain fabric by just adding consecutive rows of stitching. Position the foot's edge so that it rides on the previous row of straight stitches! Machine Set-Up: Stitch: Pattern... Selector: Stitch Width: Stitch Length: Presser Foot: Needle Position: Straight Stitch A 1, no width 3-4 General Purpose Foot Center Materials: (2) 5" x 5" pieces of the foot to ensure even spacing and straight lines. Sew successive rows using the edge...
Instruction Manual
Page 11
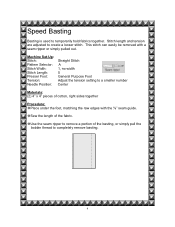
Machine Set-Up: Stitch: Pattern Selector: Stitch Width: Stitch Length: Presser Foot: Tension: Needle Position: Straight Stitch A 1, no width 5 General Purpose Foot Adjust the tension setting ... Materials: (2) 4" x 4" pieces of the fabric. This stitch can easily be removed with the ⅝" seam guide. Speed Basting Basting is used to create a looser stitch. Sew the length of cotton, right sides together Procedure: Place under the foot, matching the raw edges with a seam ripper or simply pulled out. Stitch length...
Machine Set-Up: Stitch: Pattern Selector: Stitch Width: Stitch Length: Presser Foot: Tension: Needle Position: Straight Stitch A 1, no width 5 General Purpose Foot Adjust the tension setting ... Materials: (2) 4" x 4" pieces of the fabric. This stitch can easily be removed with the ⅝" seam guide. Speed Basting Basting is used to create a looser stitch. Sew the length of cotton, right sides together Procedure: Place under the foot, matching the raw edges with a seam ripper or simply pulled out. Stitch length...
Instruction Manual
Page 12
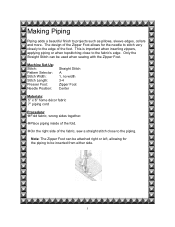
... the Zipper Foot allows for the piping to be inserted from either side. 5 Making Piping Piping adds a beautiful finish to the edge of the foot. Machine Set-Up: Stitch: Pattern Selector: Stitch Width: Stitch Length: Presser Foot: Needle Position: Straight Stitch A 1, no width 3-4 Zipper Foot Center Materials: ...5" x 6" home décor fabric 7" piping cord Procedure: Fold fabric, wrong sides together. Only the Straight Stitch can be used when sewing with the Zipper Foot. The design of the fold. Note: The Zipper Foot can be attached right or left, allowing for the needle to ...
... the Zipper Foot allows for the piping to be inserted from either side. 5 Making Piping Piping adds a beautiful finish to the edge of the foot. Machine Set-Up: Stitch: Pattern Selector: Stitch Width: Stitch Length: Presser Foot: Needle Position: Straight Stitch A 1, no width 3-4 Zipper Foot Center Materials: ...5" x 6" home décor fabric 7" piping cord Procedure: Fold fabric, wrong sides together. Only the Straight Stitch can be used when sewing with the Zipper Foot. The design of the fold. Note: The Zipper Foot can be attached right or left, allowing for the needle to ...
Instruction Manual
Page 13
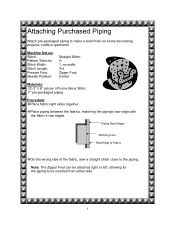
Machine Set-up: Stitch: Pattern Selector: Stitch Width: Stitch Length: Presser Foot: Needle Position: Straight Stitch A 1, no width 3-4 Zipper Foot Center Materials: (2) 3" x 6" pieces of the fabric, sew a straight stitch close to the piping. Note: The Zipper Foot can be inserted from either side. 6 Attaching Purchased Piping Attach pre-packaged piping to be ...
Machine Set-up: Stitch: Pattern Selector: Stitch Width: Stitch Length: Presser Foot: Needle Position: Straight Stitch A 1, no width 3-4 Zipper Foot Center Materials: (2) 3" x 6" pieces of the fabric, sew a straight stitch close to the piping. Note: The Zipper Foot can be inserted from either side. 6 Attaching Purchased Piping Attach pre-packaged piping to be ...

Instruction Manual
Page 16
...the cotton foundation fabric. (Fusing the appliqué into place will form on the applique and half on the base fabric. Sew around the applique. Try a rayon thread for monograms, embroidery and appliqué work to produce a smooth satin-like appearance.... Satin Stitching can be used to below 1. . 9 Machine Set-Up: Stitch: Pattern Selector: Stitch Width: Stitch Length: Presser Foot: Needle Position: Zigzag Stitch A 2-3 0.5-1 Special Purpose Foot (J) Center Materials: ...
...the cotton foundation fabric. (Fusing the appliqué into place will form on the applique and half on the base fabric. Sew around the applique. Try a rayon thread for monograms, embroidery and appliqué work to produce a smooth satin-like appearance.... Satin Stitching can be used to below 1. . 9 Machine Set-Up: Stitch: Pattern Selector: Stitch Width: Stitch Length: Presser Foot: Needle Position: Zigzag Stitch A 2-3 0.5-1 Special Purpose Foot (J) Center Materials: ...
Instruction Manual
Page 18
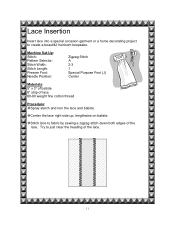
Try to just clear the heading of lace 60-80 weight fine cotton thread Procedure: Spray starch and iron the lace and batiste. Machine Set-Up: Stitch: Pattern Selector: Stitch Width: Stitch Length: Presser Foot: Needle Position: Zigzag Stitch A 2-3 1 Special Purpose Foot (J) Center Materials: 5" x 3" of batiste 6" strip...11 Stitch lace to create a beautiful heirloom keepsake. Lace Insertion Insert lace into a special occasion garment or a home decorating project to fabric by sewing a zigzag stitch down both edges of the lace. Center the lace right side up, lengthwise on batiste.
Try to just clear the heading of lace 60-80 weight fine cotton thread Procedure: Spray starch and iron the lace and batiste. Machine Set-Up: Stitch: Pattern Selector: Stitch Width: Stitch Length: Presser Foot: Needle Position: Zigzag Stitch A 2-3 1 Special Purpose Foot (J) Center Materials: 5" x 3" of batiste 6" strip...11 Stitch lace to create a beautiful heirloom keepsake. Lace Insertion Insert lace into a special occasion garment or a home decorating project to fabric by sewing a zigzag stitch down both edges of the lace. Center the lace right side up, lengthwise on batiste.

Instruction Manual
Page 20
... holes is especially helpful when making a large project where several buttons need to sew on the fabric so that has button tabs. Button Sewing Use your SINGER® Retailer. 13 Position the button on buttons, snaps or hooks with your sewing machine to be attached, such as a shower curtain that the holes in half and...
... holes is especially helpful when making a large project where several buttons need to sew on the fabric so that has button tabs. Button Sewing Use your SINGER® Retailer. 13 Position the button on buttons, snaps or hooks with your sewing machine to be attached, such as a shower curtain that the holes in half and...

Instruction Manual
Page 21
... place. Adjust the stitch width dial to fine tune the swing of the needle into the opposite hole and then use the foot control to sew 5-6 stitches. Apply a liquid fray preventer on the backside of the needle into the opposite hole. Trim threads after they dry, being careful not to straight... stitch. Before removing the button and fabric from the machine, set machine to cut thread knots. 14 Recheck the swing of fabric on the back side to secure the button. This forms a tie-off on the...
... place. Adjust the stitch width dial to fine tune the swing of the needle into the opposite hole and then use the foot control to sew 5-6 stitches. Apply a liquid fray preventer on the backside of the needle into the opposite hole. Trim threads after they dry, being careful not to straight... stitch. Before removing the button and fabric from the machine, set machine to cut thread knots. 14 Recheck the swing of fabric on the back side to secure the button. This forms a tie-off on the...

Instruction Manual
Page 23
... open buttonhole and use a liquid fray preventer to Step Three of the buttonhole. Turn Pattern Selection knob to Step Two of the Four-Step buttonhole. Sew, and the machine will stitch the right side of the buttonhole. Turn Pattern Selection knob to Step One of the Four-Step buttonhole...
... open buttonhole and use a liquid fray preventer to Step Three of the buttonhole. Turn Pattern Selection knob to Step Two of the Four-Step buttonhole. Sew, and the machine will stitch the right side of the buttonhole. Turn Pattern Selection knob to Step One of the Four-Step buttonhole...

Instruction Manual
Page 24
... touch to garments, home decorating items and craft projects. Lower the presser foot. 17 When monogramming, the feed dogs are covered, allowing for free-motion sewing. Machine Set-Up: Stitch: Pattern Selector: Stitch Width: Stitch Length: Feet Dogs: Presser Foot: Needle Position: Zigzag Stitch A 2 N/A Lowered Embroidery/Darning Foot* (or remove the foot...
... touch to garments, home decorating items and craft projects. Lower the presser foot. 17 When monogramming, the feed dogs are covered, allowing for free-motion sewing. Machine Set-Up: Stitch: Pattern Selector: Stitch Width: Stitch Length: Feet Dogs: Presser Foot: Needle Position: Zigzag Stitch A 2 N/A Lowered Embroidery/Darning Foot* (or remove the foot...
Instruction Manual
Page 26
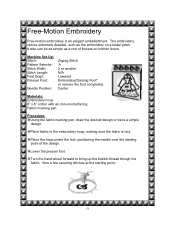
... wheel forward to bring up the bobbin thread though the fabric. Place fabric in the embroidery hoop, making sure the fabric is an elegant embellishment. Machine Set-Up: Stitch: Pattern Selector: Stitch Width: Stitch Length: Feet Dogs: Presser Foot: Needle Position: Zigzag Stitch A 2 or smaller N/A Lowered Embroidery/Darning Foot* or ...trace a simple design. Free-Motion Embroidery Free-motion embroidery is taut. Place the hoop under the foot, positioning the needle over the starting point. 19 Sew a few securing stitches at the starting point of flowers on a bridal gown.
... wheel forward to bring up the bobbin thread though the fabric. Place fabric in the embroidery hoop, making sure the fabric is an elegant embellishment. Machine Set-Up: Stitch: Pattern Selector: Stitch Width: Stitch Length: Feet Dogs: Presser Foot: Needle Position: Zigzag Stitch A 2 or smaller N/A Lowered Embroidery/Darning Foot* or ...trace a simple design. Free-Motion Embroidery Free-motion embroidery is taut. Place the hoop under the foot, positioning the needle over the starting point. 19 Sew a few securing stitches at the starting point of flowers on a bridal gown.
Instruction Manual
Page 28
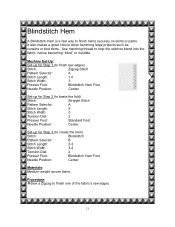
Use matching thread to finish one of the fabric's raw edges. 21 Machine Set-Up: Set-up for Step 1 (to finish raw edges) Stitch: Zigzag Stitch Pattern Selector: A Stitch Length: 1.0 Stitch Width: 3 Presser Foot: ...Blindstitch Pattern Selector: B Stitch Length: 2-3 Stitch Width 3-4 Tension Dial: 2 Presser Foot: Blindstitch Hem Foot Needle Position: Center Materials: Medium weight woven fabric Procedure: Sew a Zigzag to help the stitches blend into the fabric, hence becoming "blind" or invisible. It also makes a great choice when hemming large projects such as...
Use matching thread to finish one of the fabric's raw edges. 21 Machine Set-Up: Set-up for Step 1 (to finish raw edges) Stitch: Zigzag Stitch Pattern Selector: A Stitch Length: 1.0 Stitch Width: 3 Presser Foot: ...Blindstitch Pattern Selector: B Stitch Length: 2-3 Stitch Width 3-4 Tension Dial: 2 Presser Foot: Blindstitch Hem Foot Needle Position: Center Materials: Medium weight woven fabric Procedure: Sew a Zigzag to help the stitches blend into the fabric, hence becoming "blind" or invisible. It also makes a great choice when hemming large projects such as...
Instruction Manual
Page 38
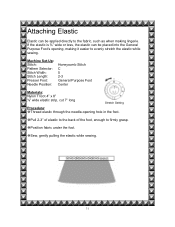
If the elastic is ⅜" wide or less, the elastic can be placed into the General Purpose Foot's opening hole in the foot. Machine Set-Up: Stitch: Pattern Selector: Stitch Width: Stitch Length: Presser Foot: Needle Position: Honeycomb Stitch C 5 2-3 General Purpose Foot Center Materials: Nylon ..., such as when making lingerie. Attaching Elastic Elastic can be applied directly to evenly stretch the elastic while sewing. Position fabric under the foot. Sew, gently pulling the elastic while sewing. 31 Pull 2-3" of elastic to the back of the foot, enough to firmly grasp.
If the elastic is ⅜" wide or less, the elastic can be placed into the General Purpose Foot's opening hole in the foot. Machine Set-Up: Stitch: Pattern Selector: Stitch Width: Stitch Length: Presser Foot: Needle Position: Honeycomb Stitch C 5 2-3 General Purpose Foot Center Materials: Nylon ..., such as when making lingerie. Attaching Elastic Elastic can be applied directly to evenly stretch the elastic while sewing. Position fabric under the foot. Sew, gently pulling the elastic while sewing. 31 Pull 2-3" of elastic to the back of the foot, enough to firmly grasp.


