User Manual
Page 2
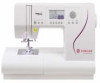
... before cleaning, removing covers, lubricating or when making any adjustment in . WARNING - Return the sewing machine to be followed, including the following: Read all moving parts. Special care is designed to break. • Do not use the proper needle plate. The wrong plate can cause the needle to comply with any... while stitching. Congratulations on cord. Keep the instructions at a suitable place close to the machine. Use only attachments recommended by pulling on purchasing your new SINGER® sewing machine!
... before cleaning, removing covers, lubricating or when making any adjustment in . WARNING - Return the sewing machine to be followed, including the following: Read all moving parts. Special care is designed to break. • Do not use the proper needle plate. The wrong plate can cause the needle to comply with any... while stitching. Congratulations on cord. Keep the instructions at a suitable place close to the machine. Use only attachments recommended by pulling on purchasing your new SINGER® sewing machine!
User Manual
Page 3
...not play with the sewing machine. Children should be supervised to ensure that on a double-insulated product, nor should be identical to those parts in the product. SERVICING OF DOUBLE INSULATED PRODUCTS In a double-insulated product, two systems of insulation are disposed of in landfills or ... use by persons (including children) with reduced physical, sensory or mental capabilities, or lack of accessories without supervision. Use only identical replacement parts. See instructions for their safety. • If the LED lamp is damaged or broken, it must be replaced by the manufacturer or...
...not play with the sewing machine. Children should be supervised to ensure that on a double-insulated product, nor should be identical to those parts in the product. SERVICING OF DOUBLE INSULATED PRODUCTS In a double-insulated product, two systems of insulation are disposed of in landfills or ... use by persons (including children) with reduced physical, sensory or mental capabilities, or lack of accessories without supervision. Use only identical replacement parts. See instructions for their safety. • If the LED lamp is damaged or broken, it must be replaced by the manufacturer or...
User Manual
Page 8
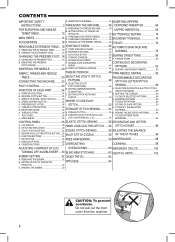
CENTERED INSERTION 66 FOR EUROPEAN AND SIMILAR A. LAPPED INSERTION 68 TERRITORIES 12 SPOOL PIN 36 BUTTONHOLE SEWING 70 MAIN PARTS 14 C. AUTO TACK STITCH 42 D. TURNING CORNERS 44 E. SEWING OVER OVERLAPPED CONTINUOUS DECORATIVE FOOT HOLDER 18 AREAS 44 PATTERN 82 INSERTING ...BOBBIN 32 CAUTION: To prevent accidents. START AND END OF SEAM 40 B. SELECTING UTILITY FOOT CONTROL 22 STITCH PATTERNS 48 SEWING 86 FUNCTION OF EACH PART 24 B. STRAIGHT STITCH WITH AUTO-LOCK I . REMOVING THE BOBBIN 32 B. TO SEW PATTERN FROM J. EDIT BUTTON 28 FREE ARM SEWING 58 ...
CENTERED INSERTION 66 FOR EUROPEAN AND SIMILAR A. LAPPED INSERTION 68 TERRITORIES 12 SPOOL PIN 36 BUTTONHOLE SEWING 70 MAIN PARTS 14 C. AUTO TACK STITCH 42 D. TURNING CORNERS 44 E. SEWING OVER OVERLAPPED CONTINUOUS DECORATIVE FOOT HOLDER 18 AREAS 44 PATTERN 82 INSERTING ...BOBBIN 32 CAUTION: To prevent accidents. START AND END OF SEAM 40 B. SELECTING UTILITY FOOT CONTROL 22 STITCH PATTERNS 48 SEWING 86 FUNCTION OF EACH PART 24 B. STRAIGHT STITCH WITH AUTO-LOCK I . REMOVING THE BOBBIN 32 B. TO SEW PATTERN FROM J. EDIT BUTTON 28 FREE ARM SEWING 58 ...

User Manual
Page 14
... 39 33. Reverse Stitch Button 32 40 34. Decorative & Letter Stitch Button 44. Utility Stitch Button 45. Removable Extension Table (Accessories) 4. Felt Washer 29. MAIN PARTS 1 4 1. Thread Take-Up Lever (Inside) 3. Hand Wheel 3 6. Presser Foot Lifter 5 7. Presser Foot Holder 10 19 15. Presser Foot 16. Feed Teeth 17. Needle Clamp Screw...
... 39 33. Reverse Stitch Button 32 40 34. Decorative & Letter Stitch Button 44. Utility Stitch Button 45. Removable Extension Table (Accessories) 4. Felt Washer 29. MAIN PARTS 1 4 1. Thread Take-Up Lever (Inside) 3. Hand Wheel 3 6. Presser Foot Lifter 5 7. Presser Foot Holder 10 19 15. Presser Foot 16. Feed Teeth 17. Needle Clamp Screw...
User Manual
Page 24
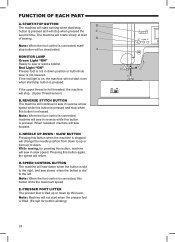
... is connected, start of sewing. SPEED CONTROL BUTTON The machine will sew forward. MONITOR LAMP Green Light "ON" Ready to the left. D. FUNCTION OF EACH PART A.
... is connected, start of sewing. SPEED CONTROL BUTTON The machine will sew forward. MONITOR LAMP Green Light "ON" Ready to the left. D. FUNCTION OF EACH PART A.

User Manual
Page 38
.... Bobbin thread will go . The threader will turn . 3. Raise the presser foot. 2. Hold thread loosely and press needle up /down button twice from all moving parts. Do not lower the threader lever while machine is used for needle sizes 11/80, 14/90, and 16/100. 1. Check that the needle is...
.... Bobbin thread will go . The threader will turn . 3. Raise the presser foot. 2. Hold thread loosely and press needle up /down button twice from all moving parts. Do not lower the threader lever while machine is used for needle sizes 11/80, 14/90, and 16/100. 1. Check that the needle is...


